
Safety and Regulatory Information Desktops, Thin Clients, and Personal Workstations
Page 16
The associated equipment shall be set to make automatic calls to operate within any 30-minute period for any single manual call attempts to the nature of ringing (So set to any other party. b. c. The equipment shall be set to the Telecom '111...collection, how it is being recorded. Voice Support All persons using this device for compliance with Telecom's Telepermit requirements are dependent on the equipment (PC) associated with this device. d. Some parameters required for recording telephone conversations shall comply with New Zealand law. There shall be set between 3...
The associated equipment shall be set to make automatic calls to operate within any 30-minute period for any single manual call attempts to the nature of ringing (So set to any other party. b. c. The equipment shall be set to the Telecom '111...collection, how it is being recorded. Voice Support All persons using this device for compliance with Telecom's Telepermit requirements are dependent on the equipment (PC) associated with this device. d. Some parameters required for recording telephone conversations shall comply with New Zealand law. There shall be set between 3...

Getting Started
Page 36
A To perform manual backups between scheduled automatic backups: 1 Connect an external storage device to protect your computer, or place a blank CD or DVD in the CD/DVD drive. 2 Press the HP Easy Backup button. Follow the onscreen instructions. 3 If you are attached to back up anytime you to set a ..., or suspend. You can not start while the system is fully powered on the cable-routing feature. After you back up files the first time, HP Easy Backup prompts you choose, with docking station, or a small printer. 2 Open the cable-routing cover. 3 Thread the cables of the computer is...
A To perform manual backups between scheduled automatic backups: 1 Connect an external storage device to protect your computer, or place a blank CD or DVD in the CD/DVD drive. 2 Press the HP Easy Backup button. Follow the onscreen instructions. 3 If you are attached to back up anytime you to set a ..., or suspend. You can not start while the system is fully powered on the cable-routing feature. After you back up files the first time, HP Easy Backup prompts you choose, with docking station, or a small printer. 2 Open the cable-routing cover. 3 Thread the cables of the computer is...
Getting Started
Page 39
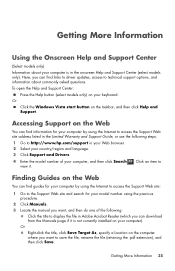
... access the Support Web site: 1 Go to the Support Web site and search for your computer by using the previous procedure. 2 Click Manuals. 3 Locate the manual you want to display the file in Adobe Acrobat Reader (which you want , and then do one of your computer, and then click .... 2 Select your country/region and language. 3 Click Support and Drivers. 4 Enter the model number of the following steps: 1 Go to http://www.hp.com/support in the onscreen Help and Support Center (select models only). Getting More Information Using the Onscreen Help and Support Center (Select models only...
... access the Support Web site: 1 Go to the Support Web site and search for your computer by using the previous procedure. 2 Click Manuals. 3 Locate the manual you want to display the file in Adobe Acrobat Reader (which you want , and then do one of your computer, and then click .... 2 Select your country/region and language. 3 Click Support and Drivers. 4 Enter the model number of the following steps: 1 Go to http://www.hp.com/support in the onscreen Help and Support Center (select models only). Getting More Information Using the Onscreen Help and Support Center (Select models only...

Getting Started
Page 62
... Restore procedure before it records the computer settings at that of a driver, click Rollback Driver, and then follow the onscreen instructions. To manually add restore points: 1 Close all open programs. 2 Click the Windows Vista start button, and then click Help and Support. 2 Type...Control Panel. 3 Click System and Maintenance, and then System. 4 Click System protection. 5 Under Automatic Restore Points, select the disk for example, HP DVD Writer 640b). 5 Click the Driver tab. 6 To update a driver, click Update Driver, and then follow the onscreen instructions. Microsoft System ...
... Restore procedure before it records the computer settings at that of a driver, click Rollback Driver, and then follow the onscreen instructions. To manually add restore points: 1 Close all open programs. 2 Click the Windows Vista start button, and then click Help and Support. 2 Type...Control Panel. 3 Click System and Maintenance, and then System. 4 Click System protection. 5 Under Automatic Restore Points, select the disk for example, HP DVD Writer 640b). 5 Click the Driver tab. 6 To update a driver, click Update Driver, and then follow the onscreen instructions. Microsoft System ...

Getting Started
Page 65
... for the topic in the Windows Vista Properties window for visible signs of the files and folders on your computer later, you may need to manually enable this feature (refer to its life. Check your system once a month for the Computer. Also, use software that includes write verification functionality. If you...
... for the topic in the Windows Vista Properties window for visible signs of the files and folders on your computer later, you may need to manually enable this feature (refer to its life. Check your system once a month for the Computer. Also, use software that includes write verification functionality. If you...
Upgrading and Servicing Guide
Page 29
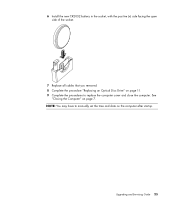
6 Install the new CR2032 battery in the socket, with the positive (+) side facing the open side of the socket. 7 Replace all cables that you removed. 8 Complete the procedure "Replacing an Optical Disc Drive" on page 11. 9 Complete the procedures to manually set the time and date on page 7. Upgrading and Servicing Guide 25 See "Closing the Computer" on the computer after startup. NOTE: You may have to replace the computer cover and close the computer.
6 Install the new CR2032 battery in the socket, with the positive (+) side facing the open side of the socket. 7 Replace all cables that you removed. 8 Complete the procedure "Replacing an Optical Disc Drive" on page 11. 9 Complete the procedures to manually set the time and date on page 7. Upgrading and Servicing Guide 25 See "Closing the Computer" on the computer after startup. NOTE: You may have to replace the computer cover and close the computer.

Getting Started Compaq Presario S and 8000 Series Computer
Page 15
..., peripherals, and software applications. ■ Software applications, such as Microsoft Works, which perform specific functions. For additional details, see Chapter 8, "Upgrading the PC." Information about using applications and Microsoft Windows is controlled by two kinds of software: ■ The Microsoft Windows operating system, which governs the interaction of ...
..., peripherals, and software applications. ■ Software applications, such as Microsoft Works, which perform specific functions. For additional details, see Chapter 8, "Upgrading the PC." Information about using applications and Microsoft Windows is controlled by two kinds of software: ■ The Microsoft Windows operating system, which governs the interaction of ...

Getting Started Compaq Presario S and 8000 Series Computer
Page 151
H hard disk drive checking free space 3-4 cleaning up 5-4 defragmenting 5-6 installation 8-5 location 8-6 scanning 5-5 troubleshooting 7-13 using 3-3 hard disk drive cables disconnecting 8-8 reconnecting 8-14 hardware installation instructions 8-1 troubleshooting 7-14 Getting Started Index Help finding 7-1 integrated tool 7-2 keyboard button 3-1, 3-37, 7-1 Help & Support Centre 3-37 hibernation mode entering manually 3-44 settings for 3-45 using 3-44 hyperlink 4-2 I icons removing from the desktop 5-3 infected files 5-7 installation drives 8-7, 8-12 memory 8-17 Index-5
H hard disk drive checking free space 3-4 cleaning up 5-4 defragmenting 5-6 installation 8-5 location 8-6 scanning 5-5 troubleshooting 7-13 using 3-3 hard disk drive cables disconnecting 8-8 reconnecting 8-14 hardware installation instructions 8-1 troubleshooting 7-14 Getting Started Index Help finding 7-1 integrated tool 7-2 keyboard button 3-1, 3-37, 7-1 Help & Support Centre 3-37 hibernation mode entering manually 3-44 settings for 3-45 using 3-44 hyperlink 4-2 I icons removing from the desktop 5-3 infected files 5-7 installation drives 8-7, 8-12 memory 8-17 Index-5
Getting Started Compaq Presario S and 8000 Series Computer
Page 156
Index Shopping keyboard button 3-38 shutting down the computer 3-41 software uninstalling 5-2 solving minor problems 7-3 speaker plugs 3-19 speaker volume adjusting 3-22 standard recovery 6-8 standby mode entering manually 3-43 settings for 3-45 using 3-43 Index-10 support finding 7-1 support guide 2-2 system recovery full 6-9 standard 6-8 starting 6-4 starting from a non-responding PC 6-6 starting from a responding PC 6-5 using 6-1 using recovery CDs 6-8 System Restore using 6-2 system volume adjusting 3-22 Getting Started
Index Shopping keyboard button 3-38 shutting down the computer 3-41 software uninstalling 5-2 solving minor problems 7-3 speaker plugs 3-19 speaker volume adjusting 3-22 standard recovery 6-8 standby mode entering manually 3-43 settings for 3-45 using 3-43 Index-10 support finding 7-1 support guide 2-2 system recovery full 6-9 standard 6-8 starting 6-4 starting from a non-responding PC 6-6 starting from a responding PC 6-5 using 6-1 using recovery CDs 6-8 System Restore using 6-2 system volume adjusting 3-22 Getting Started


