
Limited Warranty and Technical Support
Page 1
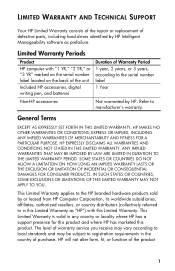
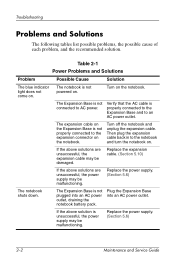
...in this Limited Warranty as prefailure. Limited Warranty Periods Product HP computer with "1 YR," "2 YR," or "3 YR" marked on the serial number label located on the back of the unit Included HP accessories, digital writing pen, and batteries Duration of Warranty Period 1 year, 2 years, or ...3 years, according to the serial number label 1 Year Non-HP accessories Not warranted by or leased from HP Computer Corporation, its worldwide subsidiaries, affiliates,...
...in this Limited Warranty as prefailure. Limited Warranty Periods Product HP computer with "1 YR," "2 YR," or "3 YR" marked on the serial number label located on the back of the unit Included HP accessories, digital writing pen, and batteries Duration of Warranty Period 1 year, 2 years, or ...3 years, according to the serial number label 1 Year Non-HP accessories Not warranted by or leased from HP Computer Corporation, its worldwide subsidiaries, affiliates,...

Expansion Base Reference Guide
Page 8
Reference Guide 1-5 Getting Started Identifying the Wireless Accessories Component Description 1 Wireless Keyboard Connects to the Expansion Base without a cable. 2 Batteries Batteries that are inserted in the wireless keyboard and mouse. 3 Receiver Allows connection between the Expansion Base and the wireless keyboard or mouse. 4 Wireless Mouse Connects to the Expansion Base without a cable. ✎ The wireless accessories may be included with the Expansion Base.
Reference Guide 1-5 Getting Started Identifying the Wireless Accessories Component Description 1 Wireless Keyboard Connects to the Expansion Base without a cable. 2 Batteries Batteries that are inserted in the wireless keyboard and mouse. 3 Receiver Allows connection between the Expansion Base and the wireless keyboard or mouse. 4 Wireless Mouse Connects to the Expansion Base without a cable. ✎ The wireless accessories may be included with the Expansion Base.
Expansion Base Reference Guide
Page 21
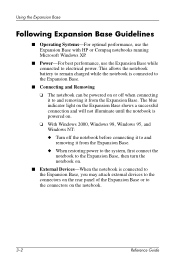
...power. Using the Expansion Base Following Expansion Base Guidelines ■ Operating Systems-For optimal performance, use the Expansion Base with HP or Compaq notebooks running Microsoft Windows XP. ■ Power-For best performance, use the Expansion Base while connected to and removing it from ...the Expansion Base. This allows the notebook battery to remain charged while the notebook is connected to the Expansion Base. ■ Connecting and Removing ❏ The notebook can be powered on or off the notebook before connecting it to and removing it from the Expansion...
...power. Using the Expansion Base Following Expansion Base Guidelines ■ Operating Systems-For optimal performance, use the Expansion Base with HP or Compaq notebooks running Microsoft Windows XP. ■ Power-For best performance, use the Expansion Base while connected to and removing it from ...the Expansion Base. This allows the notebook battery to remain charged while the notebook is connected to the Expansion Base. ■ Connecting and Removing ❏ The notebook can be powered on or off the notebook before connecting it to and removing it from the Expansion...
Expansion Base Reference Guide
Page 22
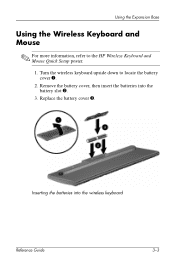
Turn the wireless keyboard upside down to the HP Wireless Keyboard and Mouse Quick Setup poster. 1. Inserting the batteries into the battery slot 2. 3. Replace the battery cover 3. Using the Expansion Base Using the Wireless Keyboard and Mouse ✎ For more information, refer to locate the battery cover 1. 2. Remove the battery cover, then insert the batteries into the wireless keyboard Reference Guide 3-3
Turn the wireless keyboard upside down to the HP Wireless Keyboard and Mouse Quick Setup poster. 1. Inserting the batteries into the battery slot 2. 3. Replace the battery cover 3. Using the Expansion Base Using the Wireless Keyboard and Mouse ✎ For more information, refer to locate the battery cover 1. 2. Remove the battery cover, then insert the batteries into the wireless keyboard Reference Guide 3-3
Expansion Base Reference Guide
Page 23
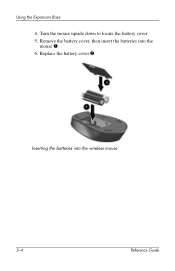
Using the Expansion Base 4. Inserting the batteries into the mouse 1. 6. Remove the battery cover, then insert the batteries into the wireless mouse 3-4 Reference Guide Replace the battery cover 2. Turn the mouse upside down to locate the battery cover. 5.
Using the Expansion Base 4. Inserting the batteries into the mouse 1. 6. Remove the battery cover, then insert the batteries into the wireless mouse 3-4 Reference Guide Replace the battery cover 2. Turn the mouse upside down to locate the battery cover. 5.

Expansion Base Reference Guide
Page 33
... Keyboard and Mouse" section for more information. suspend or hibernate mode. The notebook is in the keyboard or mouse and that batteries are inserted correctly in Remove the notebook from suspend/hibernate mode. The notebook shuts down. Refer to the expansion connector. The keyboard or mouse has no... volume. The wireless The receiver is not connected to the expansion connector on the notebook. The Expansion Base is set too low. Make sure that the batteries are muted or the volume is not Plug the Expansion Base plugged into an available does not...
... Keyboard and Mouse" section for more information. suspend or hibernate mode. The notebook is in the keyboard or mouse and that batteries are inserted correctly in Remove the notebook from suspend/hibernate mode. The notebook shuts down. Refer to the expansion connector. The keyboard or mouse has no... volume. The wireless The receiver is not connected to the expansion connector on the notebook. The Expansion Base is set too low. Make sure that the batteries are muted or the volume is not Plug the Expansion Base plugged into an available does not...

Expansion Base - Maintenance and Service Guide
Page 14
... steps. The fans are designed to turn on the left and right sides of the HP Notebook Expansion Base. These conditions are affected by a temperature sensor and are controlled by high external temperatures, system power consumption, power management/battery conservation configurations, and software applications. Exhaust air is displaced through the ventilation grill located...
... steps. The fans are designed to turn on the left and right sides of the HP Notebook Expansion Base. These conditions are affected by a temperature sensor and are controlled by high external temperatures, system power consumption, power management/battery conservation configurations, and software applications. Exhaust air is displaced through the ventilation grill located...
Expansion Base - Maintenance and Service Guide
Page 16
... The expansion cable on the notebook. Replace the power supply. (Section 5.6) The notebook shuts down. The Expansion Base is not properly connected to the notebook and turn the notebook on the notebook. Plug the Expansion Base into an AC power outlet, draining the notebook battery pack. The Expansion Base is... properly connected to the Expansion Base and to AC power. Verify that the AC cable is not connected to an AC power outlet. The notebook is unsuccessful, the power supply may be...
... The expansion cable on the notebook. Replace the power supply. (Section 5.6) The notebook shuts down. The Expansion Base is not properly connected to the notebook and turn the notebook on the notebook. Plug the Expansion Base into an AC power outlet, draining the notebook battery pack. The Expansion Base is... properly connected to the Expansion Base and to AC power. Verify that the AC cable is not connected to an AC power outlet. The notebook is unsuccessful, the power supply may be...
Compaq Notebook Series - Maintenance, Shipping and Travel Guide
Page 7
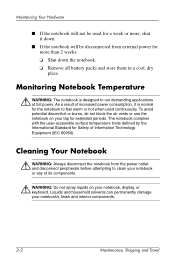
...demanding applications at full power. Cleaning Your Notebook Å WARNING: Always disconnect the notebook from external power for the notebook to feel warm or hot when used for a week or more than 2 weeks: ❏ Shut down the notebook. ❏ Remove all battery packs and store them in a cool,... dry place. The notebook complies with the user-...
...demanding applications at full power. Cleaning Your Notebook Å WARNING: Always disconnect the notebook from external power for the notebook to feel warm or hot when used for a week or more than 2 weeks: ❏ Shut down the notebook. ❏ Remove all battery packs and store them in a cool,... dry place. The notebook complies with the user-...
Compaq Notebook Series - Maintenance, Shipping and Travel Guide
Page 13
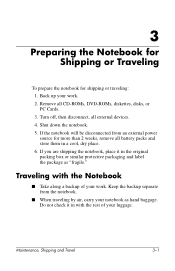
... with the rest of your work . Turn off, then disconnect, all battery packs and store them in a cool, dry place. 6. Maintenance, Shipping and Travel 3-1 Remove all CD-ROMs, DVD-ROMs, diskettes, disks, or PC Cards. 3. If you are shipping the notebook, place it in the original packing box or similar protective packaging and...
... with the rest of your work . Turn off, then disconnect, all battery packs and store them in a cool, dry place. 6. Maintenance, Shipping and Travel 3-1 Remove all CD-ROMs, DVD-ROMs, diskettes, disks, or PC Cards. 3. If you are shipping the notebook, place it in the original packing box or similar protective packaging and...

Hardware Guide
Page 4
... the Keypad 2-8 3 Battery Packs Running the Notebook on Battery Power 3-1 Inserting or Removing the Battery Pack 3-2 Charging a Battery Pack 3-3 Obtaining Accurate Charge Information 3-3 Accessing the Battery Charge Display 3-4 Placing the Power Meter Icon on the Taskbar 3-4 Managing Low-Battery Conditions 3-5 Identifying a Low-Battery Condition 3-5 Identifying a Critical Low-Battery Condition 3-5 Verifying Hibernation Settings 3-6 Resolving Low-Battery Conditions 3-6 Calibrating a Battery Pack 3-7 When to...
... the Keypad 2-8 3 Battery Packs Running the Notebook on Battery Power 3-1 Inserting or Removing the Battery Pack 3-2 Charging a Battery Pack 3-3 Obtaining Accurate Charge Information 3-3 Accessing the Battery Charge Display 3-4 Placing the Power Meter Icon on the Taskbar 3-4 Managing Low-Battery Conditions 3-5 Identifying a Low-Battery Condition 3-5 Identifying a Critical Low-Battery Condition 3-5 Verifying Hibernation Settings 3-6 Resolving Low-Battery Conditions 3-6 Calibrating a Battery Pack 3-7 When to...

Hardware Guide
Page 10
Blinking: Notebook is applied. Off: AC power is applied, with battery pack either fully charged or not installed, or no AC power is in Hibernation. Off: Notebook is off or in Standby. On: Battery pack is in Hibernation. Blinking: Battery pack has reached a low-battery condition. Blinking: Notebook is charging. Off: Notebook is off or in Standby. On: Notebook is turned on . Hardware Guide 1-3 Top Components Power Lights Hardware Components Component 1 Power button light 2 Power/Standby light 3 Battery light Description On: Notebook is turned on .
Blinking: Notebook is applied. Off: AC power is applied, with battery pack either fully charged or not installed, or no AC power is in Hibernation. Off: Notebook is off or in Standby. On: Battery pack is in Hibernation. Blinking: Battery pack has reached a low-battery condition. Blinking: Notebook is charging. Off: Notebook is off or in Standby. On: Notebook is turned on . Hardware Guide 1-3 Top Components Power Lights Hardware Components Component 1 Power button light 2 Power/Standby light 3 Battery light Description On: Notebook is turned on .

Hardware Guide
Page 16
Hardware Components 5 Battery light 6 Wireless On/Off button On: Battery pack is applied. Enables wireless functionality, but does not create a wireless connection. ✎ To set up and complete a wireless connection, additional hardware and software might be required. Blinking: Battery pack has reached a low-battery condition. Off: AC power is applied, with battery pack either fully charged or not installed, or no AC power is charging. Hardware Guide 1-9
Hardware Components 5 Battery light 6 Wireless On/Off button On: Battery pack is applied. Enables wireless functionality, but does not create a wireless connection. ✎ To set up and complete a wireless connection, additional hardware and software might be required. Blinking: Battery pack has reached a low-battery condition. Off: AC power is applied, with battery pack either fully charged or not installed, or no AC power is charging. Hardware Guide 1-9

Hardware Guide
Page 22
.... (Battery shipment and type vary by model.) Allow airflow to block airflow. As shipped, the memory slot might be filled with a replaceable memory module, or it might be vacant, depending on the notebook model. Hardware Guide 1-15 Holds the ...primary hard drive. Do not allow a hard surface, such as an adjoining printer, or a soft surface, such as bedding or clothing, to cool internal components. Ä To prevent overheating, do not obstruct the vent. Bottom Components Hardware Components Component 1 Battery release latch 2 Battery...
.... (Battery shipment and type vary by model.) Allow airflow to block airflow. As shipped, the memory slot might be filled with a replaceable memory module, or it might be vacant, depending on the notebook model. Hardware Guide 1-15 Holds the ...primary hard drive. Do not allow a hard surface, such as an adjoining printer, or a soft surface, such as bedding or clothing, to cool internal components. Ä To prevent overheating, do not obstruct the vent. Bottom Components Hardware Components Component 1 Battery release latch 2 Battery...

Hardware Guide
Page 23
... the inside of the battery compartment provides regulatory information about the notebook. ■ The Product identification label affixed to the inside of the battery compartment contains the serial number (S/N) of the notebook and a code describing the original configuration of the notebook. ■ The Modem... labels affixed to the inside of the battery compartment are specific to various types of optional wireless devices. Hardware Components Labels The labels affixed to the bottom of the notebook and to the inside of the battery compartment provide information you call customer support....
... the inside of the battery compartment provides regulatory information about the notebook. ■ The Product identification label affixed to the inside of the battery compartment contains the serial number (S/N) of the notebook and a code describing the original configuration of the notebook. ■ The Modem... labels affixed to the inside of the battery compartment are specific to various types of optional wireless devices. Hardware Components Labels The labels affixed to the bottom of the notebook and to the inside of the battery compartment provide information you call customer support....

Hardware Guide
Page 36
... power and also protects your work . Whether to leave a battery pack in the notebook or in the notebook slowly discharges even when the notebook is powered off. On the other hand, a battery pack in storage depends on how you work in case of ... always preferring AC power. Hardware Guide 3-1 Keeping a battery pack in the notebook enables the battery pack to charge whenever the notebook is disconnected from the notebook. 3 Battery Packs Running the Notebook on Battery Power The notebook switches between AC power and battery power according to the availability of a power outage....
... power and also protects your work . Whether to leave a battery pack in the notebook or in the notebook slowly discharges even when the notebook is powered off. On the other hand, a battery pack in storage depends on how you work in case of ... always preferring AC power. Hardware Guide 3-1 Keeping a battery pack in the notebook enables the battery pack to charge whenever the notebook is disconnected from the notebook. 3 Battery Packs Running the Notebook on Battery Power The notebook switches between AC power and battery power according to the availability of a power outage....

Hardware Guide
Page 37
...; To insert a battery pack, slide the battery into the battery bay until it is seated 1. ■ To remove a battery pack, slide and hold the battery release latch 2 toward the rear of work. To insert or remove a battery pack: ■ Turn off the notebook to prevent loss of the notebook as you pull the battery pack from the battery bay 3. Ä...
...; To insert a battery pack, slide the battery into the battery bay until it is seated 1. ■ To remove a battery pack, slide and hold the battery release latch 2 toward the rear of work. To insert or remove a battery pack: ■ Turn off the notebook to prevent loss of the notebook as you pull the battery pack from the battery bay 3. Ä...

Hardware Guide
Page 38
... to external power through an AC adapter. See "Calibrating a Battery Pack" in use , charging will reduce the need for battery calibration. ■ A battery pack in a notebook that has been idle for details. The battery light on the notebook stays on system activity. The battery pack charges whether the notebook is powered off or in this chapter for over...
... to external power through an AC adapter. See "Calibrating a Battery Pack" in use , charging will reduce the need for battery calibration. ■ A battery pack in a notebook that has been idle for details. The battery light on the notebook stays on system activity. The battery pack charges whether the notebook is powered off or in this chapter for over...

Hardware Guide
Page 39
...the taskbar, it will change shape according to provide power at the current level. Interpreting Battery Charge Displays Most battery charge displays report battery status in terms of percent of charge remaining in the battery pack: » Select Start > Control Panel > Performance and Maintenance > Power Options ...> Power Meter. ✎ If the Power Meter icon is placed on whether a battery pack or AC power is the primary power source. Battery Packs Accessing the Battery Charge Display To see the amount of charge remaining and run time will decrease if you start playing...
...the taskbar, it will change shape according to provide power at the current level. Interpreting Battery Charge Displays Most battery charge displays report battery status in terms of percent of charge remaining in the battery pack: » Select Start > Control Panel > Performance and Maintenance > Power Options ...> Power Meter. ✎ If the Power Meter icon is placed on whether a battery pack or AC power is the primary power source. Battery Packs Accessing the Battery Charge Display To see the amount of charge remaining and run time will decrease if you start playing...

Hardware Guide
Page 40
... in Standby, the notebook remains briefly in a low-battery condition. Identifying a Low-Battery Condition When the battery pack is the only power source for the notebook and drops to a low-battery or critical low-battery condition. By default, the notebook defines a critical low-battery condition as 3 percent of a full charge, the notebook has reached a low-battery condition. The battery light continues to...
... in Standby, the notebook remains briefly in a low-battery condition. Identifying a Low-Battery Condition When the battery pack is the only power source for the notebook and drops to a low-battery or critical low-battery condition. By default, the notebook defines a critical low-battery condition as 3 percent of a full charge, the notebook has reached a low-battery condition. The battery light continues to...


