

HP USB Digital Drive
Page 9
Gently unplug the Digital Drive from the USB port. ✎ If the USB connector cable is flashing. 1. Select the Digital Drive and wait until the "Safe to remove the Digital Drive when the status light on the Digital Drive is in the extended position, return it on its track for safe storage. 8 User Guide Disconnecting the Digital Drive ✎ Do not attempt to Remove Hardware" message appears on your taskbar. Select the "Safely Remove Hardware" icon on your screen. 3. A dialog box displays a list of connected devices. 2.
Gently unplug the Digital Drive from the USB port. ✎ If the USB connector cable is flashing. 1. Select the Digital Drive and wait until the "Safe to remove the Digital Drive when the status light on the Digital Drive is in the extended position, return it on its track for safe storage. 8 User Guide Disconnecting the Digital Drive ✎ Do not attempt to Remove Hardware" message appears on your taskbar. Select the "Safely Remove Hardware" icon on your screen. 3. A dialog box displays a list of connected devices. 2.
Compaq Notebook Series - Maintenance, Shipping and Travel Guide
Page 9
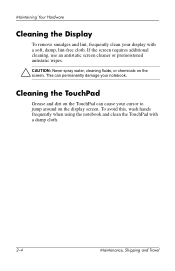
... on the TouchPad can permanently damage your notebook. To avoid this, wash hands frequently when using the notebook and clean the TouchPad with a soft, damp, lint-free cloth. This can cause your cursor to jump around on the screen. If the screen requires additional cleaning, use an antistatic screen cleaner or premoistened antistatic wipes. Ä...
... on the TouchPad can permanently damage your notebook. To avoid this, wash hands frequently when using the notebook and clean the TouchPad with a soft, damp, lint-free cloth. This can cause your cursor to jump around on the screen. If the screen requires additional cleaning, use an antistatic screen cleaner or premoistened antistatic wipes. Ä...
Wireless Setup Guide
Page 4
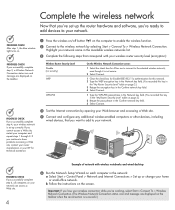
..., contact your router manufacturer or your network. Wireless Router Security Level Disable (no security) WEP WPA-PSK On the Wireless Network Connection screen: 1 Select the check box for Allow me to connect to the wireless network by opening your Web browser and accessing a Web site.... 5 Connect and configure any additional wireless-enabled computers or other devices, including wired devices, that correspond with wireless notebooks and wired desktop PROGRESS CHECK If you successfully complete step 6, all computers on your network can access a Web site. 4 6 Run ...
..., contact your router manufacturer or your network. Wireless Router Security Level Disable (no security) WEP WPA-PSK On the Wireless Network Connection screen: 1 Select the check box for Allow me to connect to the wireless network by opening your Web browser and accessing a Web site.... 5 Connect and configure any additional wireless-enabled computers or other devices, including wired devices, that correspond with wireless notebooks and wired desktop PROGRESS CHECK If you successfully complete step 6, all computers on your network can access a Web site. 4 6 Run ...
Hardware Guide
Page 9
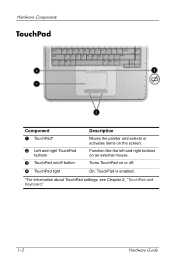
Hardware Components TouchPad Component Description 1 TouchPad* 2 Left and right TouchPad buttons 3 TouchPad on/off . 4 TouchPad light On: TouchPad is enabled. *For information about TouchPad settings, see Chapter 2, "TouchPad and Keyboard." 1-2 Hardware Guide Turns TouchPad on or off button Moves the pointer and selects or activates items on an external mouse. Function like the left and right buttons on the screen.
Hardware Components TouchPad Component Description 1 TouchPad* 2 Left and right TouchPad buttons 3 TouchPad on/off . 4 TouchPad light On: TouchPad is enabled. *For information about TouchPad settings, see Chapter 2, "TouchPad and Keyboard." 1-2 Hardware Guide Turns TouchPad on or off button Moves the pointer and selects or activates items on an external mouse. Function like the left and right buttons on the screen.

Hardware Guide
Page 14
... keys on an external numeric keypad. *For more information, refer to perform additional system and application tasks. Hardware Guide 1-7 For example, pressing Fn+F8 increases screen brightness. 2 Function keys (11)* Perform system and application tasks. When combined with the function keys to the "Hotkey Quick Reference" section in Chapter 2, "TouchPad and...
... keys on an external numeric keypad. *For more information, refer to perform additional system and application tasks. Hardware Guide 1-7 For example, pressing Fn+F8 increases screen brightness. 2 Function keys (11)* Perform system and application tasks. When combined with the function keys to the "Hotkey Quick Reference" section in Chapter 2, "TouchPad and...

Hardware Guide
Page 29
... identifies the hotkey functions set at the factory. Default Function Open Help and Support Center. Not used. Open Microsoft Internet Explorer. Switch display image. Increase screen brightness. Play the previous track or chapter of an audio CD or DVD. Initiate QuickLock. Hotkey Fn+F1 Fn+F2 Fn+F3 Fn+F4 Fn... resume an audio CD or DVD. Stop an audio CD or DVD. Play the next track of an audio CD or DVD. Initiate Standby. Decrease screen brightness.
... identifies the hotkey functions set at the factory. Default Function Open Help and Support Center. Not used. Open Microsoft Internet Explorer. Switch display image. Increase screen brightness. Play the previous track or chapter of an audio CD or DVD. Initiate QuickLock. Hotkey Fn+F1 Fn+F2 Fn+F3 Fn+F4 Fn... resume an audio CD or DVD. Stop an audio CD or DVD. Play the next track of an audio CD or DVD. Initiate Standby. Decrease screen brightness.
Hardware Guide
Page 31
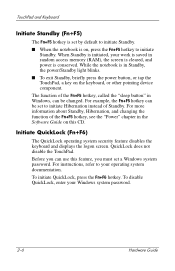
...component. The function of the Fn+F5 hotkey, see the "Power" chapter in Windows, can be changed. While the notebook is in random access memory (RAM), the screen is cleared, and power is saved in Standby, the power/Standby light blinks. ■ To exit Standby, briefly ...feature, you can use this CD. Initiate QuickLock (Fn+F6) The QuickLock operating system security feature disables the keyboard and displays the logon screen. To initiate QuickLock, press the Fn+F6 hotkey. To disable QuickLock, enter your operating system documentation. When Standby is initiated, your work...
...component. The function of the Fn+F5 hotkey, see the "Power" chapter in Windows, can be changed. While the notebook is in random access memory (RAM), the screen is cleared, and power is saved in Standby, the power/Standby light blinks. ■ To exit Standby, briefly ...feature, you can use this CD. Initiate QuickLock (Fn+F6) The QuickLock operating system security feature disables the keyboard and displays the logon screen. To initiate QuickLock, press the Fn+F6 hotkey. To disable QuickLock, enter your operating system documentation. When Standby is initiated, your work...
Hardware Guide
Page 32
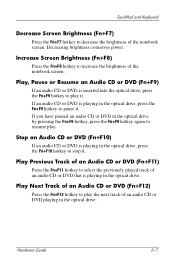
... optical drive by pressing the Fn+F9 hotkey, press the Fn+F9 hotkey again to play it . Increase Screen Brightness (Fn+F8) Press the Fn+F8 hotkey to decrease the brightness of the notebook screen. Play Next Track of an Audio CD or DVD (Fn+F12) Press the Fn+F12 hotkey to resume... next track of an audio CD or DVD playing in the optical drive, press the Fn+F9 hotkey to stop it . TouchPad and Keyboard Decrease Screen Brightness (Fn+F7) Press the Fn+F7 hotkey to increase the brightness of the...
... optical drive by pressing the Fn+F9 hotkey, press the Fn+F9 hotkey again to play it . Increase Screen Brightness (Fn+F8) Press the Fn+F8 hotkey to decrease the brightness of the notebook screen. Play Next Track of an Audio CD or DVD (Fn+F12) Press the Fn+F12 hotkey to resume... next track of an audio CD or DVD playing in the optical drive, press the Fn+F9 hotkey to stop it . TouchPad and Keyboard Decrease Screen Brightness (Fn+F7) Press the Fn+F7 hotkey to increase the brightness of the...

Hardware Guide
Page 45
...powered speakers instead of time. Battery Packs ■ Unplug external devices not connected to external power when you are not using. ■ Decreasing screen brightness by your work, initiate Standby or Hibernation or shut down list, and then select OK. To change display timeout settings, select Start >...the S-Video connector. ■ If you are not using them. ■ Stop or remove a PC Card or a digital media card that you leave your notebook is cool and dry. If the notebook will be unused and unplugged for extended periods of the internal speakers, or use the volume buttons ...
...powered speakers instead of time. Battery Packs ■ Unplug external devices not connected to external power when you are not using. ■ Decreasing screen brightness by your work, initiate Standby or Hibernation or shut down list, and then select OK. To change display timeout settings, select Start >...the S-Video connector. ■ If you are not using them. ■ Stop or remove a PC Card or a digital media card that you leave your notebook is cool and dry. If the notebook will be unused and unplugged for extended periods of the internal speakers, or use the volume buttons ...

Hardware Guide
Page 51
...DVD into an optical drive and close the tray. To display the drive designation of your media on the screen. Select Properties > AutoPlay, and follow the instructions on the screen when you can be disabled. Select Start > My Computer. 2. Hardware Guide 4-5 Press enter. ✎... A drive designation is a feature of the operating system. Drives Displaying Media Contents AutoPlay, sometimes called Autorun, is a letter of the alphabet that the notebook uses to ...
...DVD into an optical drive and close the tray. To display the drive designation of your media on the screen. Select Properties > AutoPlay, and follow the instructions on the screen when you can be disabled. Select Start > My Computer. 2. Hardware Guide 4-5 Press enter. ✎... A drive designation is a feature of the operating system. Drives Displaying Media Contents AutoPlay, sometimes called Autorun, is a letter of the alphabet that the notebook uses to ...
Hardware Guide
Page 69
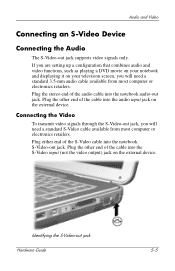
...external device. If you are setting up a configuration that combines audio and video functions, such as playing a DVD movie on your notebook and displaying it on the external device. Audio and Video Connecting an S-Video Device Connecting the Audio The S-Video-out jack supports video... signals only. Plug the stereo end of the cable into the S-Video input (not the video output) jack on your television screen, you will need a standard S-Video cable available from most computer or electronics retailers. Identifying the S-Video-out jack Hardware Guide 5-5 ...
...external device. If you are setting up a configuration that combines audio and video functions, such as playing a DVD movie on your notebook and displaying it on the external device. Audio and Video Connecting an S-Video Device Connecting the Audio The S-Video-out jack supports video... signals only. Plug the stereo end of the cable into the S-Video input (not the video output) jack on your television screen, you will need a standard S-Video cable available from most computer or electronics retailers. Identifying the S-Video-out jack Hardware Guide 5-5 ...
Hardware Guide
Page 98
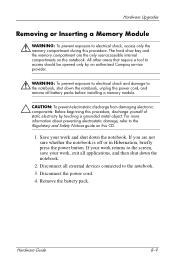
... a grounded metal object. If your work returns to the screen, save your work , exit all applications, and then shut down the notebook, unplug the power cord, and remove all external devices connected to the notebook. 3. Disconnect the power cord. 4. Hardware Upgrades Removing or...memory compartment during this CD. 1. Remove the battery pack. For more information about preventing electrostatic damage, refer to the notebook, shut down the notebook. 2. If you are the only user-accessible internal compartments on this procedure. Disconnect all battery packs before installing a ...
... a grounded metal object. If your work returns to the screen, save your work , exit all applications, and then shut down the notebook, unplug the power cord, and remove all external devices connected to the notebook. 3. Disconnect the power cord. 4. Hardware Upgrades Removing or...memory compartment during this CD. 1. Remove the battery pack. For more information about preventing electrostatic damage, refer to the notebook, shut down the notebook. 2. If you are the only user-accessible internal compartments on this procedure. Disconnect all battery packs before installing a ...

Hardware Guide
Page 103
...screen, save your work , exit all external devices connected to the notebook. 3. Disconnect the power cord or other external power source. 4. Remove any battery packs in Hibernation, briefly press the power button. To replace the primary hard drive: 1. Turn the notebook upside down the notebook.... 2. Save your work and shut down the notebook. Loosening the hard drive assembly retaining screws 8-14 Hardware Guide Loosen the 2 hard drive assembly...
...screen, save your work , exit all external devices connected to the notebook. 3. Disconnect the power cord or other external power source. 4. Remove any battery packs in Hibernation, briefly press the power button. To replace the primary hard drive: 1. Turn the notebook upside down the notebook.... 2. Save your work and shut down the notebook. Loosening the hard drive assembly retaining screws 8-14 Hardware Guide Loosen the 2 hard drive assembly...

Software Guide
Page 8
... insert or remove any drive media. ■ Do not change the notebook configuration. 1-2 Software Guide When the notebook is in random access memory (RAM) and the screen is in use. Standby Standby reduces power to the screen exactly as you left off. ■ Saving your work before initiating ...operation from Hibernation, your work returns to system components that are energy-saving features that can hold a charge to the screen where you or by notebook configuration and the condition of the battery pack. When you resume from Hibernation may not be initiated by you left it ...
... insert or remove any drive media. ■ Do not change the notebook configuration. 1-2 Software Guide When the notebook is in random access memory (RAM) and the screen is in use. Standby Standby reduces power to the screen exactly as you left off. ■ Saving your work before initiating ...operation from Hibernation, your work returns to system components that are energy-saving features that can hold a charge to the screen where you or by notebook configuration and the condition of the battery pack. When you resume from Hibernation may not be initiated by you left it ...
Software Guide
Page 10
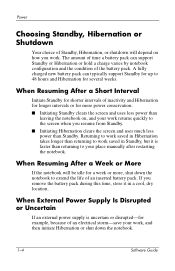
... to work saved in Hibernation takes longer than Standby. When Resuming After a Week or More If the notebook will depend on , and your work returns quickly to the screen when you work. Power Choosing Standby, Hibernation or Shutdown Your choice of Standby, Hibernation, or shutdown will... disrupted-for a week or more power conservation. ■ Initiating Standby clears the screen and uses less power than leaving the notebook on how you resume from Standby. ■ Initiating Hibernation clears the screen and uses much less power than returning to extend the life of an inserted battery...
... to work saved in Hibernation takes longer than Standby. When Resuming After a Week or More If the notebook will depend on , and your work returns quickly to the screen when you work. Power Choosing Standby, Hibernation or Shutdown Your choice of Standby, Hibernation, or shutdown will... disrupted-for a week or more power conservation. ■ Initiating Standby clears the screen and uses less power than leaving the notebook on how you resume from Standby. ■ Initiating Hibernation clears the screen and uses much less power than returning to extend the life of an inserted battery...
Software Guide
Page 14
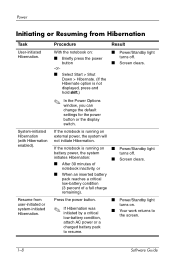
... on : ■ Briefly press the power button ■ Power/Standby light turns off . ■ Screen clears. ■ When an inserted battery pack reaches a critical low-battery condition (3 percent of notebook inactivity, or ■ Power/Standby light turns off . ■ Screen clears. -or- ■ Select Start > Shut Down > Hibernate. (If the Hibernate option is...
... on : ■ Briefly press the power button ■ Power/Standby light turns off . ■ Screen clears. ■ When an inserted battery pack reaches a critical low-battery condition (3 percent of notebook inactivity, or ■ Power/Standby light turns off . ■ Screen clears. -or- ■ Select Start > Shut Down > Hibernate. (If the Hibernate option is...
Software Guide
Page 15
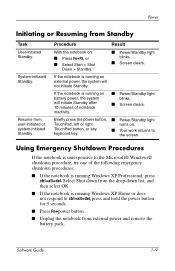
... the Microsoft® Windows® shutdown procedure, try one of notebook inactivity. ■ Power/Standby light blinks. ■ Screen clears. System-initiated Standby. If the notebook is running Windows XP Home or does not respond to the screen. Using Emergency Shutdown Procedures If the notebook is running on battery power, the system will not initiate...
... the Microsoft® Windows® shutdown procedure, try one of notebook inactivity. ■ Power/Standby light blinks. ■ Screen clears. System-initiated Standby. If the notebook is running Windows XP Home or does not respond to the screen. Using Emergency Shutdown Procedures If the notebook is running on battery power, the system will not initiate...

Software Guide
Page 22
... DriveLock passwords, the hard drive is permanently unusable. The QuickLock operating system security feature disables the keyboard and displays the logon screen. After you must set a Windows system password. For instructions, refer to contact a Compaq Product Information Center. ■ ...protection from the drive. ■ If you cannot start the notebook or resume from Hibernation until an authorized service provider resets the notebook. Refer to the Worldwide Telephone Numbers booklet included with the notebook to your keyboard may be lowercase (fn, f5). About QuickLock ...
... DriveLock passwords, the hard drive is permanently unusable. The QuickLock operating system security feature disables the keyboard and displays the logon screen. After you must set a Windows system password. For instructions, refer to contact a Compaq Product Information Center. ■ ...protection from the drive. ■ If you cannot start the notebook or resume from Hibernation until an authorized service provider resets the notebook. Refer to the Worldwide Telephone Numbers booklet included with the notebook to your keyboard may be lowercase (fn, f5). About QuickLock ...
Software Guide
Page 23
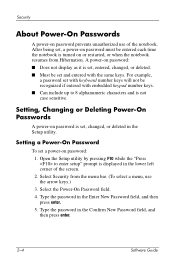
...Deleting Power-On Passwords A power-on or restarted, or when the notebook resumes from the menu bar. (To select a menu, use of the screen. 2. After being set, a power-on password must be entered each time the notebook is turned on password is set and entered with embedded keypad number keys...For example, a password set with keyboard number keys will not be set , entered, changed , or deleted in the lower left corner of the notebook. Select the Power-On Password field. 4. Type the password in the Enter New Password field, and then press enter. 5. Open the Setup utility ...
...Deleting Power-On Passwords A power-on or restarted, or when the notebook resumes from the menu bar. (To select a menu, use of the screen. 2. After being set, a power-on password must be entered each time the notebook is turned on password is set and entered with embedded keypad number keys...For example, a password set with keyboard number keys will not be set , entered, changed , or deleted in the lower left corner of the notebook. Select the Power-On Password field. 4. Type the password in the Enter New Password field, and then press enter. 5. Open the Setup utility ...

Software Guide
Page 24
...Power-On Password field. 4. Software Guide 2-5 Select Exit Saving Changes. Then follow the instructions on the screen. When you are prompted to continue, press enter. 7. Then follow the instructions on the screen. Select Security from the menu bar. (To select a menu, use the arrow keys.) 3. Type...To save your preferences and exit the Setup utility: a. Type the current password in the lower left corner of the screen. 2. Changing a Power-On Password To change a power-on password: 1. b. To save your preferences and exit the Setup utility: a. c. Security ...
...Power-On Password field. 4. Software Guide 2-5 Select Exit Saving Changes. Then follow the instructions on the screen. When you are prompted to continue, press enter. 7. Then follow the instructions on the screen. Select Security from the menu bar. (To select a menu, use the arrow keys.) 3. Type...To save your preferences and exit the Setup utility: a. Type the current password in the lower left corner of the screen. 2. Changing a Power-On Password To change a power-on password: 1. b. To save your preferences and exit the Setup utility: a. c. Security ...


