

Getting Started - Windows 7
Page 6
... or upgrading the hard drive 27 Removing the hard drive ...27 Installing the hard drive ...28 Adding or replacing memory modules 30 Updating programs and drivers ...33 Routine care ...33 Cleaning the display ...33 Cleaning the TouchPad and keyboard 33 6 Backup and recovery Recovery discs ...34 Performing a system recovery ...35 Recovering...
... or upgrading the hard drive 27 Removing the hard drive ...27 Installing the hard drive ...28 Adding or replacing memory modules 30 Updating programs and drivers ...33 Routine care ...33 Cleaning the display ...33 Cleaning the TouchPad and keyboard 33 6 Backup and recovery Recovery discs ...34 Performing a system recovery ...35 Recovering...

Getting Started - Windows 7
Page 8
... numbers This booklet is provided with several resources to help ● Software, driver, and BIOS (Setup Utility) updates ● Accessories available for the computer ● How to http://www.hp.com/ergo. Regulatory, Safety, and Environmental Notices ● Regulatory and safety ...instructions. Resources For information about Quick Setup poster ● How to set up the computer ● How to identify computer components HP Notebook Reference Guide ● Power management features To access this guide, select Start > Help and Support > User Guides. ● How...
... numbers This booklet is provided with several resources to help ● Software, driver, and BIOS (Setup Utility) updates ● Accessories available for the computer ● How to http://www.hp.com/ergo. Regulatory, Safety, and Environmental Notices ● Regulatory and safety ...instructions. Resources For information about Quick Setup poster ● How to set up the computer ● How to identify computer components HP Notebook Reference Guide ● Power management features To access this guide, select Start > Help and Support > User Guides. ● How...
Getting Started - Windows 7
Page 31
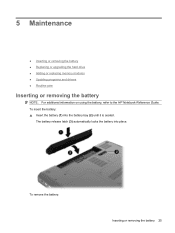
To remove the battery: Inserting or removing the battery 25 To insert the battery: ▲ Insert the battery (1) into place. The battery release latch (3) automatically locks the battery into the battery bay (2) until it is seated. 5 Maintenance ● Inserting or removing the battery ● Replacing or upgrading the hard drive ● Adding or replacing memory modules ● Updating programs and drivers ● Routine care Inserting or removing the battery NOTE: For additional information on using the battery, refer to the HP Notebook Reference Guide.
To remove the battery: Inserting or removing the battery 25 To insert the battery: ▲ Insert the battery (1) into place. The battery release latch (3) automatically locks the battery into the battery bay (2) until it is seated. 5 Maintenance ● Inserting or removing the battery ● Replacing or upgrading the hard drive ● Adding or replacing memory modules ● Updating programs and drivers ● Routine care Inserting or removing the battery NOTE: For additional information on using the battery, refer to the HP Notebook Reference Guide.

Getting Started - Windows 7
Page 39
Go to http://www.hp.com/support to remove dust, lint, and particles that you update your hands frequently ... cleaner. WARNING! To reduce the risk of compressed air with a soft damp, lint-free cloth. Updating programs and drivers 33 To avoid this, clean the TouchPad with the latest versions. A can of electric shock or damage to clean ... can deposit household debris on a regular basis with a damp cloth, and wash your programs and drivers on the keyboard surface. Clean the keyboard regularly to prevent keys from sticking, and to download the latest versions. Updating...
Go to http://www.hp.com/support to remove dust, lint, and particles that you update your hands frequently ... cleaner. WARNING! To reduce the risk of compressed air with a soft damp, lint-free cloth. Updating programs and drivers 33 To avoid this, clean the TouchPad with the latest versions. A can of electric shock or damage to clean ... can deposit household debris on a regular basis with a damp cloth, and wash your programs and drivers on the keyboard surface. Clean the keyboard regularly to prevent keys from sticking, and to download the latest versions. Updating...

Getting Started - Windows 7
Page 40
...recovery partition tools. To check for safeguarding your information and restoring it in the window. Tools provided by the operating system and HP Recovery Manager software are designed to help you create recovery discs immediately after a system failure is listed in case of a computer ... Recovery discs HP recommends that you create recovery discs to be sure that you with the following tasks for the presence of recovery discs (Recovery Manager software feature) ● Backing up your information ● Creating system restore points ● Recovering a program or driver ● ...
...recovery partition tools. To check for safeguarding your information and restoring it in the window. Tools provided by the operating system and HP Recovery Manager software are designed to help you create recovery discs immediately after a system failure is listed in case of a computer ... Recovery discs HP recommends that you create recovery discs to be sure that you with the following tasks for the presence of recovery discs (Recovery Manager software feature) ● Backing up your information ● Creating system restore points ● Recovering a program or driver ● ...

Getting Started - Windows 7
Page 49
... 9, 10 VGA 10 power button, identifying 7 power connector, identifying 9 power cord, identifying 14 power light, identifying 6 product name and number, computer 39 R recovering a program or driver 34 recovering from the dedicated recovery partition 35 recovering from the recovery discs 36 recovery discs 34 Recovery Manager 34, 35 recovery partition 34 recovery...
... 9, 10 VGA 10 power button, identifying 7 power connector, identifying 9 power cord, identifying 14 power light, identifying 6 product name and number, computer 39 R recovering a program or driver 34 recovering from the dedicated recovery partition 35 recovering from the recovery discs 36 recovery discs 34 Recovery Manager 34, 35 recovery partition 34 recovery...
Compaq Presario CQ56 Notebook PC and HP G56 Notebook PC - Maintenance and Service Guide
Page 23
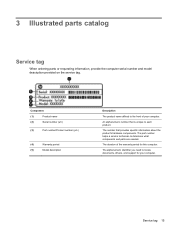
... on the service tag. Component (1) Product name (2) Serial number (s/n) (3) Part number/Product number (p/n) (4) Warranty period (5) Model description Description The product name affixed to locate documents, drivers, and support for this computer. Service tag 15
... on the service tag. Component (1) Product name (2) Serial number (s/n) (3) Part number/Product number (p/n) (4) Warranty period (5) Model description Description The product name affixed to locate documents, drivers, and support for this computer. Service tag 15
Compaq Presario CQ56 Notebook PC and HP G56 Notebook PC - Maintenance and Service Guide
Page 42
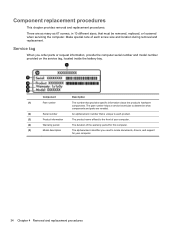
... provided on the service tag, located inside the battery bay. Make special note of each product. (3) Product information The product name affixed to locate documents, drivers, and support for your computer. (4) Warranty period The duration of your computer. 34 Chapter 4 Removal and replacement procedures Component replacement procedures This chapter provides removal...
... provided on the service tag, located inside the battery bay. Make special note of each product. (3) Product information The product name affixed to locate documents, drivers, and support for your computer. (4) Warranty period The duration of your computer. 34 Chapter 4 Removal and replacement procedures Component replacement procedures This chapter provides removal...
Compaq Presario CQ56 Notebook PC and HP G56 Notebook PC - Maintenance and Service Guide
Page 96
... system. Follow the on the computer are permanently removed. To recover your information using the Windows 7 operating system DVD and the Driver Recovery disc (both purchased separately). For additional information, refer to the "Using a Windows 7 operating system DVD (purchased separately)" ... well as installing software, running utilities, or changing Windows settings. The f11 recovery tool reinstalls the operating system and HP programs and drivers that were installed at the factory must be prompted for your permission or password for more information. Select Start > All...
... system. Follow the on the computer are permanently removed. To recover your information using the Windows 7 operating system DVD and the Driver Recovery disc (both purchased separately). For additional information, refer to the "Using a Windows 7 operating system DVD (purchased separately)" ... well as installing software, running utilities, or changing Windows settings. The f11 recovery tool reinstalls the operating system and HP programs and drivers that were installed at the factory must be prompted for your permission or password for more information. Select Start > All...

Compaq Presario CQ56 Notebook PC and HP G56 Notebook PC - Maintenance and Service Guide
Page 97
...USB CD-ROM drive is not listed, you must recover your operating system and programs using the Windows 7 operating system DVD and the Driver Recovery disc (both purchased separately). Click Next. 6. Windows 7 backup and recovery 89 NOTE: If your computer includes a solid-state ... recovery partition. All files you restore the operating system, as well as drivers, software, and utilities. Using a Windows 7 operating system DVD (purchased separately) If you may not have a partition. If the HP Recovery partition is listed, restart the computer, and then press esc while the...
...USB CD-ROM drive is not listed, you must recover your operating system and programs using the Windows 7 operating system DVD and the Driver Recovery disc (both purchased separately). Click Next. 6. Windows 7 backup and recovery 89 NOTE: If your computer includes a solid-state ... recovery partition. All files you restore the operating system, as well as drivers, software, and utilities. Using a Windows 7 operating system DVD (purchased separately) If you may not have a partition. If the HP Recovery partition is listed, restart the computer, and then press esc while the...

Compaq Presario CQ56 Notebook PC and HP G56 Notebook PC - Maintenance and Service Guide
Page 98
... fails, you have created and any software installed on the screen. 3. The f11 recovery tool reinstalls the original operating system and HP programs and drivers that were installed at the factory. To recover the original hard drive image using f11, follow these steps: 1. If possible, ...-screen instructions. 90 Chapter 7 Backup and recovery You can restore your information, back up all personal files. 2. Software, drivers, and updates not installed by HP must be manually reinstalled. To protect your important files from a backup. All files you can also use the options listed ...
... fails, you have created and any software installed on the screen. 3. The f11 recovery tool reinstalls the original operating system and HP programs and drivers that were installed at the factory. To recover the original hard drive image using f11, follow these steps: 1. If possible, ...-screen instructions. 90 Chapter 7 Backup and recovery You can restore your information, back up all personal files. 2. Software, drivers, and updates not installed by HP must be manually reinstalled. To protect your important files from a backup. All files you can also use the options listed ...
HP Notebook Reference Guide - Windows 7
Page 11
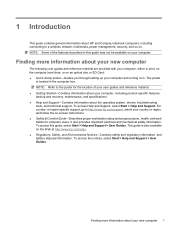
...and recovery, maintenance, and specifications. ● Help and Support-Contains information about the operating system, drivers, troubleshooting tools, and technical support. or region-specific support, go to http://www.hp.com/support, select your country or region, and follow the on-screen instructions. ● Safety ... in this guide, select Start > Help and Support > User Guides. 1 Introduction This guide contains general information about HP and Compaq notebook computers, including connecting to a wireless network, multimedia, power management, security, and so on the Web at http://www...
...and recovery, maintenance, and specifications. ● Help and Support-Contains information about the operating system, drivers, troubleshooting tools, and technical support. or region-specific support, go to http://www.hp.com/support, select your country or region, and follow the on-screen instructions. ● Safety ... in this guide, select Start > Help and Support > User Guides. 1 Introduction This guide contains general information about HP and Compaq notebook computers, including connecting to a wireless network, multimedia, power management, security, and so on the Web at http://www...
HP Notebook Reference Guide - Windows 7
Page 40
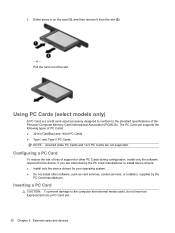
... prevent damage to the standard specifications of PC Cards: ● 32-bit (CardBus) and 16-bit PC Cards ● Type I and Type II PC Cards NOTE: Zoomed video PC Cards and 12-V PC Cards are instructed by the PC Card manufacturer to install device drivers: ● Install only the device drivers for your operating system. ● Do not...
... prevent damage to the standard specifications of PC Cards: ● 32-bit (CardBus) and 16-bit PC Cards ● Type I and Type II PC Cards NOTE: Zoomed video PC Cards and 12-V PC Cards are instructed by the PC Card manufacturer to install device drivers: ● Install only the device drivers for your operating system. ● Do not...
HP Notebook Reference Guide - Windows 7
Page 42
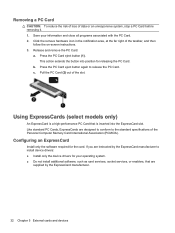
... into position for releasing the PC Card. Press the PC Card eject button (1). Using ExpressCards (select models only) An ExpressCard is a high-performance PC Card that are supplied by the ExpressCard manufacturer to install device drivers: ● Install only the device drivers for the card. Click the... remove hardware icon in the notification area, at the far right of the slot. If you are designed to conform to release the PC Card. c. This action extends...
... into position for releasing the PC Card. Press the PC Card eject button (1). Using ExpressCards (select models only) An ExpressCard is a high-performance PC Card that are supplied by the ExpressCard manufacturer to install device drivers: ● Install only the device drivers for the card. Click the... remove hardware icon in the notification area, at the far right of the slot. If you are designed to conform to release the PC Card. c. This action extends...
HP Notebook Reference Guide - Windows 7
Page 49
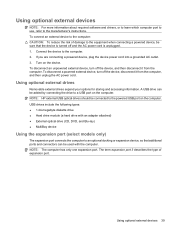
... device power cord into a grounded AC outlet. 3. To disconnect an unpowered external device, turn off the device, and then disconnect it from the computer. NOTE: HP external USB optical drives should be connected to an optional docking or expansion device, so that additional ports and connectors can be added by connecting... device, disconnect it from the computer, and then unplug the AC power cord. Using optional external devices NOTE: For more information about required software and drivers, or to learn which computer port to use, refer to the computer. 2.
... device power cord into a grounded AC outlet. 3. To disconnect an unpowered external device, turn off the device, and then disconnect it from the computer. NOTE: HP external USB optical drives should be connected to an optional docking or expansion device, so that additional ports and connectors can be added by connecting... device, disconnect it from the computer, and then unplug the AC power cord. Using optional external devices NOTE: For more information about required software and drivers, or to learn which computer port to use, refer to the computer. 2.
HP Notebook Reference Guide - Windows 7
Page 67
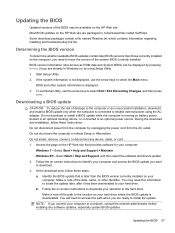
... where the BIOS update is displayed. 3. BIOS and other identifier. Windows XP-Select Start > Help and Support, and then select the software and drivers update. 2. Make a note of the BIOS may need to access this information to locate the update later, after it has been downloaded to reliable..., use the arrow keys to the location on your computer: Windows 7-Select Start > Help and Support > Maintain. Access the page on the HP Web site that is later than those currently installed on battery power, docked in compressed files called SoftPaqs. At the download area, follow these steps...
... where the BIOS update is displayed. 3. BIOS and other identifier. Windows XP-Select Start > Help and Support, and then select the software and drivers update. 2. Make a note of the BIOS may need to access this information to locate the update later, after it has been downloaded to reliable..., use the arrow keys to the location on your computer: Windows 7-Select Start > Help and Support > Maintain. Access the page on the HP Web site that is later than those currently installed on battery power, docked in compressed files called SoftPaqs. At the download area, follow these steps...
HP Notebook Reference Guide - Windows 7
Page 72
... 1394 cable, connecting 37 1394 devices connecting 37 defined 36 removing 37 16-bit PC Cards 30 32-bit PC Cards 30 A AC adapter, testing 28 action keys media 14 volume 14 administrator ...Cleanup software 42 Disk Defragmenter software 41 DisplayPort, connecting 17 docking connector 40 drive light 43 drive media 21 drivers 30 drives external 39 handling 41 hard 39 optical 39 using 41 E electrostatic discharge 61 entering a power-... 53 firewall software 6, 52 G GPS 9 graphics modes, switching 28 H hard drive external 39 HP ProtectSmart Hard Drive Protection 42 HDMI configuring audio 18 62 Index
... 1394 cable, connecting 37 1394 devices connecting 37 defined 36 removing 37 16-bit PC Cards 30 32-bit PC Cards 30 A AC adapter, testing 28 action keys media 14 volume 14 administrator ...Cleanup software 42 Disk Defragmenter software 41 DisplayPort, connecting 17 docking connector 40 drive light 43 drive media 21 drivers 30 drives external 39 handling 41 hard 39 optical 39 using 41 E electrostatic discharge 61 entering a power-... 53 firewall software 6, 52 G GPS 9 graphics modes, switching 28 H hard drive external 39 HP ProtectSmart Hard Drive Protection 42 HDMI configuring audio 18 62 Index

HP Notebook Reference Guide - Windows 7
Page 73
...initiated during critical battery level 25 initiating 21 high-definition devices, connecting 17 HP Connection Manager 4 HP MediaSmart 19 HP Mobile Broadband Module 7 HP ProtectSmart Hard Drive Protection 42 HP SkyRoom 16 HP USB Ethernet Adapter, connecting 12 HP Wireless Assistant 4 hubs 35 I icons network 2 wireless 2 installing critical...devices, using 39 P passwords set in Setup Utility 50 set in Windows 50 PC Cards configuring 30 description 30 inserting 30 removing 32 removing insert 31 software and drivers 30 supported types 30 ports DisplayPort 17 expansion 39 external monitor 16 HDMI 17 ...
...initiated during critical battery level 25 initiating 21 high-definition devices, connecting 17 HP Connection Manager 4 HP MediaSmart 19 HP Mobile Broadband Module 7 HP ProtectSmart Hard Drive Protection 42 HP SkyRoom 16 HP USB Ethernet Adapter, connecting 12 HP Wireless Assistant 4 hubs 35 I icons network 2 wireless 2 installing critical...devices, using 39 P passwords set in Setup Utility 50 set in Windows 50 PC Cards configuring 30 description 30 inserting 30 removing 32 removing insert 31 software and drivers 30 supported types 30 ports DisplayPort 17 expansion 39 external monitor 16 HDMI 17 ...


