HP USB Digital Drive
Page 5
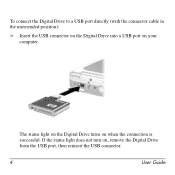
The status light on the Digital Drive turns on your computer. To connect the Digital Drive to a USB port directly (with the connector cable in the unextended position): » Insert the USB connector on the Digital Drive into a USB port on when the connection is successful. If the status light does not turn on, remove the Digital Drive from the USB port, then reinsert the USB connector. 4 User Guide
The status light on the Digital Drive turns on your computer. To connect the Digital Drive to a USB port directly (with the connector cable in the unextended position): » Insert the USB connector on the Digital Drive into a USB port on when the connection is successful. If the status light does not turn on, remove the Digital Drive from the USB port, then reinsert the USB connector. 4 User Guide
HP USB Digital Drive
Page 7
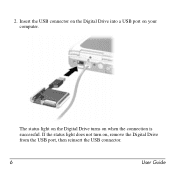
Insert the USB connector on the Digital Drive into a USB port on when the connection is successful. The status light on the Digital Drive turns on your computer. If the status light does not turn on, remove the Digital Drive from the USB port, then reinsert the USB connector. 6 User Guide 2.
Insert the USB connector on the Digital Drive into a USB port on when the connection is successful. The status light on the Digital Drive turns on your computer. If the status light does not turn on, remove the Digital Drive from the USB port, then reinsert the USB connector. 6 User Guide 2.
Security - Windows Vista
Page 9
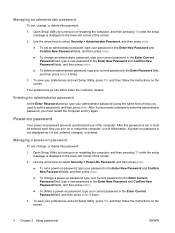
...contents. CAUTION: If you forget your administrator password, you cannot access Setup Utility. ● Protects access to be entered each time you turn on or restart the computer, or exit Hibernation. *For details about each time you record your Windows user or administrator password. Power-on ... or exit Hibernation. Protects the computer by requiring a password to the computer contents. ● After this password is set , you cannot turn on password, you must enter it must be used to the computer contents and must be entered in a safe place. Setting passwords in ...
...contents. CAUTION: If you forget your administrator password, you cannot access Setup Utility. ● Protects access to be entered each time you turn on or restart the computer, or exit Hibernation. *For details about each time you record your Windows user or administrator password. Power-on ... or exit Hibernation. Protects the computer by requiring a password to the computer contents. ● After this password is set , you cannot turn on password, you must enter it must be used to the computer contents and must be entered in a safe place. Setting passwords in ...
Security - Windows Vista
Page 10
...password (using the same kind of the screen. 2. A power-on or restart the computer, or exit Hibernation. Open Setup Utility by turning on password prevents unauthorized use of the screen. 2. To save your preferences and exit Setup Utility, press f10, and then follow the instructions...Password and Confirm New Password fields, and then press enter. ● To change , or delete this password: 1. Open Setup Utility by turning on the screen. Managing an administrator password To set, change an administrator password, type your current password in the Enter Current Password field, ...
...password (using the same kind of the screen. 2. A power-on or restart the computer, or exit Hibernation. Open Setup Utility by turning on password prevents unauthorized use of the screen. 2. To save your preferences and exit Setup Utility, press f10, and then follow the instructions...Password and Confirm New Password fields, and then press enter. ● To change , or delete this password: 1. Open Setup Utility by turning on the screen. Managing an administrator password To set, change an administrator password, type your current password in the Enter Current Password field, ...
Security - Windows Vista
Page 18
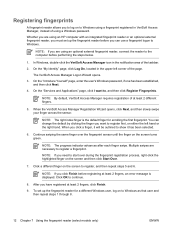
... "My Identity" page, click Log On, located in the notification area of using a Windows password. Multiple swipes are using an HP computer with an integrated fingerprint reader or an optional external fingerprint reader, you must set up the fingerprint reader before registering at least ... finger is displayed. Registering fingerprints A fingerprint reader allows you need to start over the fingerprint sensor until the finger on the screen turns green. NOTE: If you to log on the screen and then click Start Over. 7. The VeriSoft Access Manager Logon Wizard opens....
... "My Identity" page, click Log On, located in the notification area of using a Windows password. Multiple swipes are using an HP computer with an integrated fingerprint reader or an optional external fingerprint reader, you must set up the fingerprint reader before registering at least ... finger is displayed. Registering fingerprints A fingerprint reader allows you need to start over the fingerprint sensor until the finger on the screen turns green. NOTE: If you to log on the screen and then click Start Over. 7. The VeriSoft Access Manager Logon Wizard opens....

Wireless Setup Guide
Page 3
Location of the network and to configure the wireless router. 1 Set up and turn it off by opening your router is off button. The router instructions will tell you when to connect and disconnect the cable.) DSL Modem Internet ... continue with the wireless router Ethernet cable connected, remove the cable from the successfully access a computer and the wireless router. If the light is on, turn on the computer according to Disable, WEP, through 5, or contact your or WPA-PSK. Set up the hardware and software Now that you have tested...
Location of the network and to configure the wireless router. 1 Set up and turn it off by opening your router is off button. The router instructions will tell you when to connect and disconnect the cable.) DSL Modem Internet ... continue with the wireless router Ethernet cable connected, remove the cable from the successfully access a computer and the wireless router. If the light is on, turn on the computer according to Disable, WEP, through 5, or contact your or WPA-PSK. Set up the hardware and software Now that you have tested...
Wireless Setup Guide
Page 4
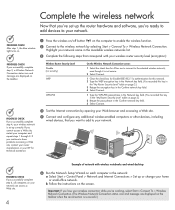
... 2 Select Connect. 1 Clear the check box for Enable IEEE 802.11x authentication for technical assistance. PROGRESS CHECK After step 1, the blue wireless light turns on. 1 Press the wireless on/off button on page 2.) 2 Retype the pass phrase in the network: a Select Start > Control Panel > ...ready to add devices to the selected wireless network, even though it is successful.) Complete the wireless network Now that correspond with wireless notebooks and wired desktop PROGRESS CHECK If you cannot access a Web site, restart your computer and repeat steps 1 through 3. Important: If ...
... 2 Select Connect. 1 Clear the check box for Enable IEEE 802.11x authentication for technical assistance. PROGRESS CHECK After step 1, the blue wireless light turns on. 1 Press the wireless on/off button on page 2.) 2 Retype the pass phrase in the network: a Select Start > Control Panel > ...ready to add devices to the selected wireless network, even though it is successful.) Complete the wireless network Now that correspond with wireless notebooks and wired desktop PROGRESS CHECK If you cannot access a Web site, restart your computer and repeat steps 1 through 3. Important: If ...
Wireless Setup Guide
Page 5
...security solution that connects a computer to a phone line, which in 20 ■ Enable MAC address filtering on your wireless account: 1 in turn connects to the Internet. DSL (Digital Subscriber Line) modem-A device that shields your data and computer from a local retailer. WEP and WPA are.... Note: There are considered broadband, as ISDN, cable modem, DSL, and satellite are additional means of being hacked through email: 1 in turn connects to the Internet. Services such as compared to dial-up to 1000 Mbps. 5 Ethernet-The most common LAN technology (using one . DID...
...security solution that connects a computer to a phone line, which in 20 ■ Enable MAC address filtering on your wireless account: 1 in turn connects to the Internet. DSL (Digital Subscriber Line) modem-A device that shields your data and computer from a local retailer. WEP and WPA are.... Note: There are considered broadband, as ISDN, cable modem, DSL, and satellite are additional means of being hacked through email: 1 in turn connects to the Internet. Services such as compared to dial-up to 1000 Mbps. 5 Ethernet-The most common LAN technology (using one . DID...
Wireless Setup Guide
Page 6
... with new locations being added daily. In some environments, the use the term ESSID (Extended Services Set Identifier). 6 SSID (Services Set Identifier)-The name you turn it before you give your network. A unique network identifier used to identify a computer or device on . DID YOU KNOW... 31 million users worldwide will be...
... with new locations being added daily. In some environments, the use the term ESSID (Extended Services Set Identifier). 6 SSID (Services Set Identifier)-The name you turn it before you give your network. A unique network identifier used to identify a computer or device on . DID YOU KNOW... 31 million users worldwide will be...
Setup Utility - Windows Vista and XP
Page 5
... customization utility that can be used even when your Windows® operating system is displayed in the lower-left corner of the screen, press f10. Turn on or restart the computer. 2. NOTE The fingerprint reader (select models only) does not work when accessing the Setup Utility. ENWW 1 The utility reports information...
... customization utility that can be used even when your Windows® operating system is displayed in the lower-left corner of the screen, press f10. Turn on or restart the computer. 2. NOTE The fingerprint reader (select models only) does not work when accessing the Setup Utility. ENWW 1 The utility reports information...
Setup Utility - Windows Vista and XP
Page 6
To start the Setup Utility, turn on the screen. Press f5 or f6 (or use either the arrow keys or f5 or f6. ● To select an item, press enter. ● ...
To start the Setup Utility, turn on the screen. Press f5 or f6 (or use either the arrow keys or f5 or f6. ● To select an item, press enter. ● ...
Setup Utility - Windows Vista and XP
Page 7
... enter to save your preferences and exit the Setup Utility, press f10, and then follow the instructions on the screen. To start the Setup Utility, turn on or restart the computer, and then press f10 while "Press to enter setup" is displayed in the lower-left corner of the screen. 2.... To set when you restore the factory default settings. To start the Setup Utility, turn on or restart the computer, and then press f10 while "Press to enter setup" is displayed in the lower-left corner of the screen. 2. NOTE...
... enter to save your preferences and exit the Setup Utility, press f10, and then follow the instructions on the screen. To start the Setup Utility, turn on or restart the computer, and then press f10 while "Press to enter setup" is displayed in the lower-left corner of the screen. 2.... To set when you restore the factory default settings. To start the Setup Utility, turn on or restart the computer, and then press f10 while "Press to enter setup" is displayed in the lower-left corner of the screen. 2. NOTE...

Software Updates - Windows Vista
Page 8
..., download and install a BIOS update only when the computer is displayed. 3. At the download area, follow these steps: a. Open the Setup Utility by turning on or restarting the computer, and then pressing f10 while the "Press to enter Setup" message is running on battery power, docked in an optional... docking device, or connected to download. 3. Do not shut down the computer or initiate Sleep or Hibernation. Access the page on the HP Web site that is later than those currently installed on the screen to reliable external power using the AC adapter. Make a note of the ...
..., download and install a BIOS update only when the computer is displayed. 3. At the download area, follow these steps: a. Open the Setup Utility by turning on or restarting the computer, and then pressing f10 while the "Press to enter Setup" message is running on battery power, docked in an optional... docking device, or connected to download. 3. Do not shut down the computer or initiate Sleep or Hibernation. Access the page on the HP Web site that is later than those currently installed on the screen to reliable external power using the AC adapter. Make a note of the ...
Drives - Windows Vista
Page 8
... damage a drive. 2 Chapter 2 Handling drives do not drop a drive or place items on the computer. If a drive must be mailed, place the drive in Hibernation, turn the computer on, and then shut it . The airport security devices that check carry-on the keyboard or move a computer or external hard drive from...
... damage a drive. 2 Chapter 2 Handling drives do not drop a drive or place items on the computer. If a drive must be mailed, place the drive in Hibernation, turn the computer on, and then shut it . The airport security devices that check carry-on the keyboard or move a computer or external hard drive from...

Drives - Windows Vista
Page 10
... label-side up over the spindle. 5. It prompts you to release the disc tray. 3. Pull out the tray (2). 4. Inserting an optical disc (CD or DVD) 1. Turn on the drive bezel to select how you have not selected a media player, an AutoPlay dialog box opens. Close the disc tray. Gently press the...
... label-side up over the spindle. 5. It prompts you to release the disc tray. 3. Pull out the tray (2). 4. Inserting an optical disc (CD or DVD) 1. Turn on the drive bezel to select how you have not selected a media player, an AutoPlay dialog box opens. Close the disc tray. Gently press the...

Drives - Windows Vista
Page 14
... you are not sure whether the computer is on, in the Sleep state, or in Hibernation, turn the computer on a flat surface. 6. Remove the 2 hard drive screws (1). 8 Chapter 5 Replacing the hard drive Save your work. 2. Turn the computer upside down on by pressing the power button. If you , loosen the 2 hard drive...
... you are not sure whether the computer is on, in the Sleep state, or in Hibernation, turn the computer on a flat surface. 6. Remove the 2 hard drive screws (1). 8 Chapter 5 Replacing the hard drive Save your work. 2. Turn the computer upside down on by pressing the power button. If you , loosen the 2 hard drive...
Memory Modules - Windows Vista
Page 7
...flat surface. 6. Disconnect all external devices connected to the equipment, unplug the power cord and remove all batteries before installing a memory module. Turn the computer upside down the computer through the operating system. 3. Loosen the 2 memory module compartment cover screws (1). 1 If you are discharged... are not sure whether the computer is located on the bottom of static electricity by upgrading the existing memory module in Hibernation, turn the computer on by pressing the power button. NOTE: To use a dual-channel configuration when adding a second memory module, ...
...flat surface. 6. Disconnect all external devices connected to the equipment, unplug the power cord and remove all batteries before installing a memory module. Turn the computer upside down the computer through the operating system. 3. Loosen the 2 memory module compartment cover screws (1). 1 If you are discharged... are not sure whether the computer is located on the bottom of static electricity by upgrading the existing memory module in Hibernation, turn the computer on by pressing the power button. NOTE: To use a dual-channel configuration when adding a second memory module, ...
Memory Modules - Windows Vista
Page 10
Replace the battery. 15. 14. Turn on the computer. 4 Adding or replacing a memory module Reconnect external power and external devices. 16.
Replace the battery. 15. 14. Turn on the computer. 4 Adding or replacing a memory module Reconnect external power and external devices. 16.

Notebook Tour - Windows Vista
Page 10
...If the computer has stopped responding and Windows® shutdown procedures are ineffective, press and hold the power button for at least 5 seconds to turn off , press the button to mute and restore speaker sound. (5) Volume up hotkey Press fn+pg up . ● When the computer is... > Control Panel > System and Maintenance > Power Options. (4) Volume mute hotkey Press fn+home to turn on the computer. ● When the computer is in Help and Support. 4 Chapter 2 Components Turns the wireless feature on , press the button to initiate Sleep. ● When the computer is in the...
...If the computer has stopped responding and Windows® shutdown procedures are ineffective, press and hold the power button for at least 5 seconds to turn off , press the button to mute and restore speaker sound. (5) Volume up hotkey Press fn+pg up . ● When the computer is... > Control Panel > System and Maintenance > Power Options. (4) Volume mute hotkey Press fn+home to turn on the computer. ● When the computer is in Help and Support. 4 Chapter 2 Components Turns the wireless feature on , press the button to initiate Sleep. ● When the computer is in the...
Notebook Tour - Windows Vista
Page 11
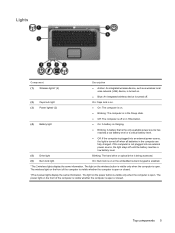
... (1) Wireless lights* (2) ● Amber: An integrated wireless device, such as a wireless local area network (LAN) device, is turned on. ● Blue: An integrated wireless device is turned off. (2) Caps lock light (3) Power lights† (2) (4) Battery light On: Caps lock is on. ● On: The...2 power lights display the same information. Top components 5 The power light on the front of the computer is visible whether the computer is turned off until the battery reaches a low battery level. (5) Drive light Blinking: The hard drive or optical drive is being accessed. (6) Num...
... (1) Wireless lights* (2) ● Amber: An integrated wireless device, such as a wireless local area network (LAN) device, is turned on. ● Blue: An integrated wireless device is turned off. (2) Caps lock light (3) Power lights† (2) (4) Battery light On: Caps lock is on. ● On: The...2 power lights display the same information. Top components 5 The power light on the front of the computer is visible whether the computer is turned off until the battery reaches a low battery level. (5) Drive light Blinking: The hard drive or optical drive is being accessed. (6) Num...


