Quick Start Guide
Page 6
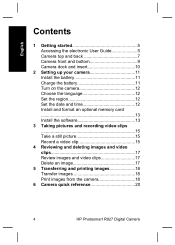
... pictures and recording video clips 15 Take a still picture 15 Record a video clip 15 4 Reviewing and deleting images and video clips 17 Review images and video clips 17 Delete an image 17 5 Transferring and printing images 18 Transfer images 18 Print images from the camera 18 6 Camera quick reference 20 4 HP Photosmart R927 Digital Camera
... pictures and recording video clips 15 Take a still picture 15 Record a video clip 15 4 Reviewing and deleting images and video clips 17 Review images and video clips 17 Delete an image 17 5 Transferring and printing images 18 Transfer images 18 Print images from the camera 18 6 Camera quick reference 20 4 HP Photosmart R927 Digital Camera

Quick Start Guide
Page 19
... select an image or video clip. 3. Press until appears briefly in Playback. 1. Use to display the Delete sub-menu. 4. Reviewing and deleting images and video clips 17 English 4 Reviewing and deleting images and video clips Review images and video clips You can delete individual images during Playback: 1. Delete an image You can... review and manipulate images and video clips in the upper right corner of the Image Display. Use to scroll through your images and video clips ...
... select an image or video clip. 3. Press until appears briefly in Playback. 1. Use to display the Delete sub-menu. 4. Reviewing and deleting images and video clips 17 English 4 Reviewing and deleting images and video clips Review images and video clips You can delete individual images during Playback: 1. Delete an image You can... review and manipulate images and video clips in the upper right corner of the Image Display. Use to scroll through your images and video clips ...
Quick Start Guide
Page 22
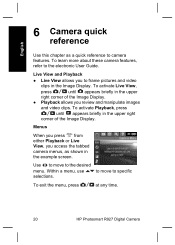
..., press until appears briefly in the upper right corner of the Image Display. ● Playback allows you review and manipulate images and video clips. To exit the menu, press at any time. 20 HP Photosmart R927 Digital Camera Use to move to the electronic User Guide. English 6 Camera quick reference Use this chapter as...
..., press until appears briefly in the upper right corner of the Image Display. ● Playback allows you review and manipulate images and video clips. To exit the menu, press at any time. 20 HP Photosmart R927 Digital Camera Use to move to the electronic User Guide. English 6 Camera quick reference Use this chapter as...
Quick Start Guide
Page 24
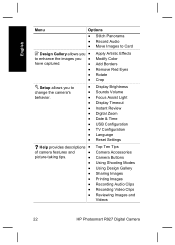
...Rotate Crop Setup allows you to change the camera's behavior. ● Display Brightness ● Sounds Volume ● Focus Assist Light ● Display Timeout ● Instant Review ● Digital Zoom ● Date & Time ● USB Configuration ● TV Configuration ● Language ● Reset Settings Help provides descriptions ● of ... ● Top Ten Tips Camera Accessories Camera Buttons Using Shooting Modes Using Design Gallery Sharing Images Printing Images Recording Audio Clips Recording Video Clips Reviewing Images and Videos 22 HP Photosmart R927 Digital Camera
...Rotate Crop Setup allows you to change the camera's behavior. ● Display Brightness ● Sounds Volume ● Focus Assist Light ● Display Timeout ● Instant Review ● Digital Zoom ● Date & Time ● USB Configuration ● TV Configuration ● Language ● Reset Settings Help provides descriptions ● of ... ● Top Ten Tips Camera Accessories Camera Buttons Using Shooting Modes Using Design Gallery Sharing Images Printing Images Recording Audio Clips Recording Video Clips Reviewing Images and Videos 22 HP Photosmart R927 Digital Camera
User Guide
Page 3
... 8 Install the software 9 Using your camera 10 2 Taking pictures and recording video clips 11 Taking still pictures 11 Recording video clips 12 Instant Review...12 Auto focus and exposure 12 Focusing on the subject 12 Optimizing focus 13 Using Focus Lock 13 Optimizing exposure 14 Other recommendations 14 Using...20 Using the Self-Timer settings 23 Using the Burst setting 24 Exposure Compensation 24 Adaptive Lighting 24 White Balance 25 ISO speed...25 3 Reviewing images and video clips 26 Using Playback...26 Saving frames from video clips 27 HP Photosmart R927 Digital Camera 3
... 8 Install the software 9 Using your camera 10 2 Taking pictures and recording video clips 11 Taking still pictures 11 Recording video clips 12 Instant Review...12 Auto focus and exposure 12 Focusing on the subject 12 Optimizing focus 13 Using Focus Lock 13 Optimizing exposure 14 Other recommendations 14 Using...20 Using the Self-Timer settings 23 Using the Burst setting 24 Exposure Compensation 24 Adaptive Lighting 24 White Balance 25 ISO speed...25 3 Reviewing images and video clips 26 Using Playback...26 Saving frames from video clips 27 HP Photosmart R927 Digital Camera 3
User Guide
Page 5
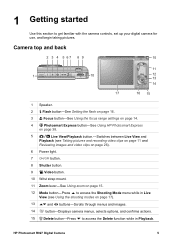
.... 3 Focus button-See Using the focus range settings on page 14. 4 Photosmart Express button-See Using HP Photosmart Express on page 38. 5 Live View/Playback button.-Switches between Live View and Playback (see Taking pictures and recording video clips on page 11 and Reviewing images and video clips on page 26). 6 Power light. 7 button..., and confirms actions. 15 Delete button-Press to get familiar with the camera controls, set up your digital camera for use, and begin taking pictures. HP Photosmart R927 Digital Camera 5
.... 3 Focus button-See Using the focus range settings on page 14. 4 Photosmart Express button-See Using HP Photosmart Express on page 38. 5 Live View/Playback button.-Switches between Live View and Playback (see Taking pictures and recording video clips on page 11 and Reviewing images and video clips on page 26). 6 Power light. 7 button..., and confirms actions. 15 Delete button-Press to get familiar with the camera controls, set up your digital camera for use, and begin taking pictures. HP Photosmart R927 Digital Camera 5

User Guide
Page 10
... systems with at least 128 MB of the software includes some extra features that you've completed setup, you can take and review still images and video clips. See Using HP Photosmart Express on transferring images from your computer. - Use the Share feature to e-mail images to addresses you specify, create online albums...
... systems with at least 128 MB of the software includes some extra features that you've completed setup, you can take and review still images and video clips. See Using HP Photosmart Express on transferring images from your computer. - Use the Share feature to e-mail images to addresses you specify, create online albums...

User Guide
Page 12
If appears in Instant Review. Long exposure required (see Image Advice under Using the Playback Menu on page 27) for tips on improving images taken under Using the Capture Menu ... the lower left corner, press to display Image Advice (see Optimizing exposure on the subject When set to determine focus. 12 Frame the subject. 3. Instant Review After you are in the upper right corner of the Image Display. To stop recording video, press and release the Video button again. Focus not...
If appears in Instant Review. Long exposure required (see Image Advice under Using the Playback Menu on page 27) for tips on improving images taken under Using the Capture Menu ... the lower left corner, press to display Image Advice (see Optimizing exposure on the subject When set to determine focus. 12 Frame the subject. 3. Instant Review After you are in the upper right corner of the Image Display. To stop recording video, press and release the Video button again. Focus not...

User Guide
Page 14
... the focus brackets. Optimizing exposure When you press the Shutter button halfway down to take the picture, but it is difficult to good images, you review it in Troubleshooting on page 43 ● Using the focus range settings on page 14 ● Auto Focus Area and AE Metering under Using the...
... the focus brackets. Optimizing exposure When you press the Shutter button halfway down to take the picture, but it is difficult to good images, you review it in Troubleshooting on page 43 ● Using the focus range settings on page 14 ● Auto Focus Area and AE Metering under Using the...
User Guide
Page 19
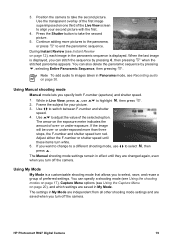
... saved in Panorama mode, see Recording audio on page 30. The Manual shooting mode settings remain in effect until these items turn red. HP Photosmart R927 Digital Camera 19 Position the camera to end the panoramic sequence. Continue adding more than three stops, the F-number and shutter speed turn white...overlay of the first image superimposed on the exposure meter indicates the amount of the Live View screen to select , then press . During Instant Review (see Using the Capture Menu on page 12), each image in Live View, press , use to align your picture. 3. When the ...
... saved in Panorama mode, see Recording audio on page 30. The Manual shooting mode settings remain in effect until these items turn red. HP Photosmart R927 Digital Camera 19 Position the camera to end the panoramic sequence. Continue adding more than three stops, the F-number and shutter speed turn white...overlay of the first image superimposed on the exposure meter indicates the amount of the Live View screen to select , then press . During Instant Review (see Using the Capture Menu on page 12), each image in Live View, press , use to align your picture. 3. When the ...
User Guide
Page 21
...Balances the relationship between Resolution and Compression, and to specify a setting. The greater the number, the higher the resolution. HP Photosmart R927 Digital Camera 21 For more information, see Red eye on page 17. Image Quality-Sets resolution and compression for Exposure Compensation... compression (see Deleting images on page 28. (continued) Self-Timer-For capturing images or recording video after a 10-second delay (see Instant Review on page 12), you can delete the entire bracketing sequence. Bracketing-Creates a set of resolution (8MP, 5MP, 2MP, VGA) and compression ...
...Balances the relationship between Resolution and Compression, and to specify a setting. The greater the number, the higher the resolution. HP Photosmart R927 Digital Camera 21 For more information, see Red eye on page 17. Image Quality-Sets resolution and compression for Exposure Compensation... compression (see Deleting images on page 28. (continued) Self-Timer-For capturing images or recording video after a 10-second delay (see Instant Review on page 12), you can delete the entire bracketing sequence. Bracketing-Creates a set of resolution (8MP, 5MP, 2MP, VGA) and compression ...
User Guide
Page 24
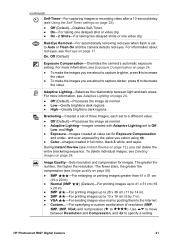
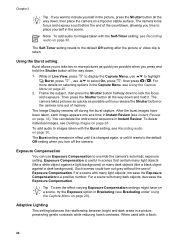
...when you turn out gray without the use to select On, press , then press . Exposure Compensation You can delete the entire burst sequence in Instant Review. For a scene with many dark objects (like a black object against a dark background). After the burst images have on a scene, try the ...Exposure option in the Capture Menu, see Deleting images on page 20. 2. Exposure Compensation is useful in Instant Review (see Recording audio on page 30. When used with the Self-Timer setting, see Bracketing under Using the Capture Menu on a tripod or ...
...when you turn out gray without the use to select On, press , then press . Exposure Compensation You can delete the entire burst sequence in Instant Review. For a scene with many dark objects (like a black object against a dark background). After the burst images have on a scene, try the ...Exposure option in the Capture Menu, see Deleting images on page 20. 2. Exposure Compensation is useful in Instant Review (see Recording audio on page 30. When used with the Self-Timer setting, see Bracketing under Using the Capture Menu on a tripod or ...

User Guide
Page 26
... Playback Menu on page 27 and Using the Design Gallery Menu on page 31. 3 Reviewing images and video clips You can review and manipulate images and video clips in a panoramic sequence. 4 Number of electronic Photosmart Share destinations (see Using HP Photosmart Express on page 38). 5 Number of images to print (see Transferring and printing images...
... Playback Menu on page 27 and Using the Design Gallery Menu on page 31. 3 Reviewing images and video clips You can review and manipulate images and video clips in a panoramic sequence. 4 Number of electronic Photosmart Share destinations (see Using HP Photosmart Express on page 38). 5 Number of images to print (see Transferring and printing images...

User Guide
Page 41
...Default), Off. Use to display the menu option's sub-menu. 3. Sounds Volume-Adjusts the speaker volume for the camera's behavior. 1. Instant Review-Adjusts the time an image or video clip is displayed in low-light situations. Date & Time-Sets the date and time. See Set ...-Recognizes the camera as button presses and shutter clicks) and recorded audio. Focus Assist Light-Enables the focus assist light used in Instant Review. HP Photosmart R927 Digital Camera 41 Off, Low (Default), High. 7 Using the Setup Menu The Setup Menu allows you to highlight . 2. See ...
...Default), Off. Use to display the menu option's sub-menu. 3. Sounds Volume-Adjusts the speaker volume for the camera's behavior. 1. Instant Review-Adjusts the time an image or video clip is displayed in low-light situations. Date & Time-Sets the date and time. See Set ...-Recognizes the camera as button presses and shutter clicks) and recorded audio. Focus Assist Light-Enables the focus assist light used in Instant Review. HP Photosmart R927 Digital Camera 41 Off, Low (Default), High. 7 Using the Setup Menu The Setup Menu allows you to highlight . 2. See ...

User Guide
Page 46
...cool place. Then restart the image transfer process (see Transferring images with a faster card. The camera gets warm (or even hot) to review images. If that does not fix the problem, reset the camera (see Resetting the camera on page 43). ● If the problem persists,... camera from the camera to my computer. ● Either install the HP Photosmart Software (see Install the software on page 9), or see Transferring images without HP Photosmart Software on page 35. ● Set your memory card with HP Photosmart Software on page 43). Remove the battery and reset the camera (see...
...cool place. Then restart the image transfer process (see Transferring images with a faster card. The camera gets warm (or even hot) to review images. If that does not fix the problem, reset the camera (see Resetting the camera on page 43). ● If the problem persists,... camera from the camera to my computer. ● Either install the HP Photosmart Software (see Install the software on page 9), or see Transferring images without HP Photosmart Software on page 35. ● Set your memory card with HP Photosmart Software on page 43). Remove the battery and reset the camera (see...
User Guide
Page 48
...section to -date product information and expert assistance, including: - HP support by product, country, and language. Review the electronic Help section within the software. - Visit HP online support at www.hp.com/support. 48 After the limited warranty period, help is...newsletter subscriptions, driver and software updates, purchase HP supplies and accessories www.hp.com www.hp.com/photosmart (English only) Customers with disabilities www.hp.com/hpinfo/community/accessibility (English only) HP Customer Care, driver www.hp.com/support and software updates, support information Getting...
...section to -date product information and expert assistance, including: - HP support by product, country, and language. Review the electronic Help section within the software. - Visit HP online support at www.hp.com/support. 48 After the limited warranty period, help is...newsletter subscriptions, driver and software updates, purchase HP supplies and accessories www.hp.com www.hp.com/photosmart (English only) Customers with disabilities www.hp.com/hpinfo/community/accessibility (English only) HP Customer Care, driver www.hp.com/support and software updates, support information Getting...
User Guide
Page 51
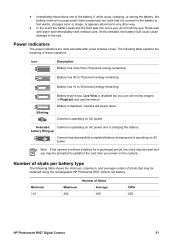
...still review images in any other way. ● In the event the battery leaks and the fluid gets into one's eye, do not rub the eye. Camera is low. Number of shots per battery type The following table explains the meaning of the battery if, while using the rechargeable HP Photosmart R07... appears abnormal in Playback and use . Animated Camera is operating on AC power. Minimum 110 Maximum 200 Number of Shots Average 165 CIPA 200 HP Photosmart R927 Digital Camera 51 Note If the camera is charging the battery. Icon Description Battery has more than 70 percent energy remaining.
...still review images in any other way. ● In the event the battery leaks and the fluid gets into one's eye, do not rub the eye. Camera is low. Number of shots per battery type The following table explains the meaning of the battery if, while using the rechargeable HP Photosmart R07... appears abnormal in Playback and use . Animated Camera is operating on AC power. Minimum 110 Maximum 200 Number of Shots Average 165 CIPA 200 HP Photosmart R927 Digital Camera 51 Note If the camera is charging the battery. Icon Description Battery has more than 70 percent energy remaining.
User Guide
Page 57
...settings 14, 54 Focus Assist light 41 Focus button 5 format memory card 8 G getting assistance 48 H HP Photosmart Express 38, 40 HP Photosmart Software 9, 10 I Image Display 6 Image Info 28 Image Quality 21, 56 images Contrast 23 Date &...23 shooting modes 17 transfer to computer 35 White Balance 22 Infinity focus 15 install memory card 8 install software 9 Instant Review 12, 19, 24, 41 interfaces 55 internal memory 11, 56 ISO Speed 22, 25 L Landscape mode 17 Language ... 55 Menu/OK button 5 menus Capture 20 Design Gallery 31 Photosmart Express 38 Playback 27 HP Photosmart R927 Digital Camera 57
...settings 14, 54 Focus Assist light 41 Focus button 5 format memory card 8 G getting assistance 48 H HP Photosmart Express 38, 40 HP Photosmart Software 9, 10 I Image Display 6 Image Info 28 Image Quality 21, 56 images Contrast 23 Date &...23 shooting modes 17 transfer to computer 35 White Balance 22 Infinity focus 15 install memory card 8 install software 9 Instant Review 12, 19, 24, 41 interfaces 55 internal memory 11, 56 ISO Speed 22, 25 L Landscape mode 17 Language ... 55 Menu/OK button 5 menus Capture 20 Design Gallery 31 Photosmart Express 38 Playback 27 HP Photosmart R927 Digital Camera 57
User Guide
Page 58
...images 56 O on/off 7 ON/OFF button 5 online destinations 38 print buying 40 optical zoom 15 P Panorama mode 17, 18, 29 parts of camera 5, 6 Photosmart Express Menu 38, 38, 39, 40 pictures 11, 23 Playback 26 Playback Menu 27 Portrait mode 17 power indicators 51 light 5 ON/OFF button 5 usage...eye removal 17, 21 redeye removal 33 Region 8 remaining pictures count 11 removing red eyes 21, 33 reset camera 43 Reset Settings 42 resolution 54 reviewing images 26 S safety precautions for batteries 50, 52 Saturation 23 Saved Settings, My Mode 20 selecting images for destinations 39, 40 Self-Timer light 6...
...images 56 O on/off 7 ON/OFF button 5 online destinations 38 print buying 40 optical zoom 15 P Panorama mode 17, 18, 29 parts of camera 5, 6 Photosmart Express Menu 38, 38, 39, 40 pictures 11, 23 Playback 26 Playback Menu 27 Portrait mode 17 power indicators 51 light 5 ON/OFF button 5 usage...eye removal 17, 21 redeye removal 33 Region 8 remaining pictures count 11 removing red eyes 21, 33 reset camera 43 Reset Settings 42 resolution 54 reviewing images 26 S safety precautions for batteries 50, 52 Saturation 23 Saved Settings, My Mode 20 selecting images for destinations 39, 40 Self-Timer light 6...
