
Quick Start Guide
Page 11
Getting started 9 English Camera front and bottom 1 2 3 6 5 4 1 Flash. 2 Self Timer/Focus assist light. 3 Microphone. 4 Tripod mount. 5 Dock connector. 6 Battery/Memory card door.
Getting started 9 English Camera front and bottom 1 2 3 6 5 4 1 Flash. 2 Self Timer/Focus assist light. 3 Microphone. 4 Tripod mount. 5 Dock connector. 6 Battery/Memory card door.

Quick Start Guide
Page 13
... (approximately 2-3 hours). Fully charge the battery before removing the battery. Charge the battery You can charge the battery in the camera, using it into an electrical outlet. 2. the battery is charging; The camera's blinking Battery Charging light indicates that the battery is fully charged when the light turns on the Battery/Memory card door. 2. Setting up your camera 11...
... (approximately 2-3 hours). Fully charge the battery before removing the battery. Charge the battery You can charge the battery in the camera, using it into an electrical outlet. 2. the battery is charging; The camera's blinking Battery Charging light indicates that the battery is fully charged when the light turns on the Battery/Memory card door. 2. Setting up your camera 11...
Quick Start Guide
Page 15
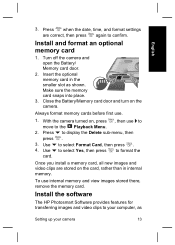
...then press to display the Delete sub-menu, then press . 3. Close the Battery/Memory card door and turn on , press , then use to move to your camera 13 To use . 1. Install the software The HP Photosmart Software provides features for transferring images and video clips to the Playback Menu. ...2. Turn off the camera and open the Battery/ Memory card door. 2. Press to format the card. With the camera turned on the ...
...then press to display the Delete sub-menu, then press . 3. Close the Battery/Memory card door and turn on , press , then use to move to your camera 13 To use . 1. Install the software The HP Photosmart Software provides features for transferring images and video clips to the Playback Menu. ...2. Turn off the camera and open the Battery/ Memory card door. 2. Press to format the card. With the camera turned on the ...

User Guide
Page 6
Camera front and bottom 1 2 3 6 5 4 1 Flash. 2 Self-Timer/Focus Assist light-See Using the Self-Timer settings on page 23. 3 Microphone. 4 Tripod mount. 5 Dock connector. 6 Battery/Memory card door. Camera dock and insert When setting up the dock for use with this camera, install the dock insert that shipped in the camera box. Attach the dock insert to the top of the camera dock by snapping it into place. 1 3 2 6 Chapter 1 (continued) 16 Battery Charging light. 17 Image Display.
Camera front and bottom 1 2 3 6 5 4 1 Flash. 2 Self-Timer/Focus Assist light-See Using the Self-Timer settings on page 23. 3 Microphone. 4 Tripod mount. 5 Dock connector. 6 Battery/Memory card door. Camera dock and insert When setting up the dock for use with this camera, install the dock insert that shipped in the camera box. Attach the dock insert to the top of the camera dock by snapping it into place. 1 3 2 6 Chapter 1 (continued) 16 Battery Charging light. 17 Image Display.
User Guide
Page 7
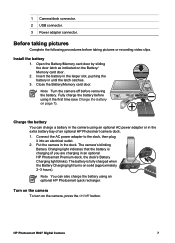
... the dock. The camera's blinking Battery Charging light indicates that the battery is fully charged when the Battery Charging light turns on the Battery/ Memory card door. 2. Note You can charge a battery in an optional HP Photosmart Premium dock, the dock's Battery Charging light blinks). Put the camera in until the latch catches. 3. HP Photosmart R927 Digital Camera 7 Before taking pictures or...
... the dock. The camera's blinking Battery Charging light indicates that the battery is fully charged when the Battery Charging light turns on the Battery/ Memory card door. 2. Note You can charge a battery in an optional HP Photosmart Premium dock, the dock's Battery Charging light blinks). Put the camera in until the latch catches. 3. HP Photosmart R927 Digital Camera 7 Before taking pictures or...

User Guide
Page 8
...HP Photosmart Premium dock or wireless dock base (see Using the Setup Menu on page 41). Use to select Yes, then press to select Format Card, then press . 4. Use to access the Delete sub-menu. 3. Press to adjust the highlighted value. 2. Turn off the camera and open the Battery/ Memory card door.... 2. Always format memory cards before first use. 1. Close the Battery/Memory card door and turn on page 41). With the camera turned on, press until the date and time...
...HP Photosmart Premium dock or wireless dock base (see Using the Setup Menu on page 41). Use to select Yes, then press to select Format Card, then press . 4. Use to access the Delete sub-menu. 3. Press to adjust the highlighted value. 2. Turn off the camera and open the Battery/ Memory card door.... 2. Always format memory cards before first use. 1. Close the Battery/Memory card door and turn on page 41). With the camera turned on, press until the date and time...

User Guide
Page 43
... does not respond when you are retained. If so, remove the memory card and turn on page 55). Reinstall the battery and close the Battery/Memory card door. 5. The camera does not turn on page 51. 8 Troubleshooting Use this information to find information on: ● ... card. If the camera still does not turn on. ● Install a new or recharged battery, ensuring that the HP AC power adapter is connected to find solutions to their factory defaults. HP Photosmart R927 Digital Camera 43 Turn off the camera. 2. See Power indicators on , format the memory card...
... does not respond when you are retained. If so, remove the memory card and turn on page 55). Reinstall the battery and close the Battery/Memory card door. 5. The camera does not turn on page 51. 8 Troubleshooting Use this information to find information on: ● ... card. If the camera still does not turn on. ● Install a new or recharged battery, ensuring that the HP AC power adapter is connected to find solutions to their factory defaults. HP Photosmart R927 Digital Camera 43 Turn off the camera. 2. See Power indicators on , format the memory card...

User Guide
Page 50
... months to a year to ensure that the camera is inserted improperly, the compartment door may close but the camera will decrease as the temperature drops. To further extend battery life: ● Set Display Brightness to Low (see Display Brightness under Using the... Do not pierce the battery or subject it before using batteries ● Do not place the battery in Playback without harm. ● If a rechargeable Lithium Ion battery has not been used at high temperatures. A Managing batteries Your camera uses a rechargeable HP Photosmart R07 Lithium Ion battery (L1812A/L1812B). After ...
... months to a year to ensure that the camera is inserted improperly, the compartment door may close but the camera will decrease as the temperature drops. To further extend battery life: ● Set Display Brightness to Low (see Display Brightness under Using the... Do not pierce the battery or subject it before using batteries ● Do not place the battery in Playback without harm. ● If a rechargeable Lithium Ion battery has not been used at high temperatures. A Managing batteries Your camera uses a rechargeable HP Photosmart R07 Lithium Ion battery (L1812A/L1812B). After ...
User Guide
Page 57
... 38, 40 HP Photosmart Software 9, 10 I Image Display 6 Image Info 28 Image Quality 21, 56 images Contrast 23 Date & Time Imprint 23 deleting 28 Image Quality 21, 56 magnifying 27 number remaining 11 Panorama mode 18 per battery 51 sending 39, 40 Sharpness 23 shooting modes 17 ...Lithium Ion battery 50, 52 Live View/Playback button 5 M Macro focus 13, 15 Magnify control 5 magnifying images 27 Manual focus 15 Manual mode 18, 19 memory capacity 56 card 11 card door 6 memory card 8, 55 Menu/OK button 5 menus Capture 20 Design Gallery 31 Photosmart Express 38 Playback 27 HP Photosmart R927 Digital ...
... 38, 40 HP Photosmart Software 9, 10 I Image Display 6 Image Info 28 Image Quality 21, 56 images Contrast 23 Date & Time Imprint 23 deleting 28 Image Quality 21, 56 magnifying 27 number remaining 11 Panorama mode 18 per battery 51 sending 39, 40 Sharpness 23 shooting modes 17 ...Lithium Ion battery 50, 52 Live View/Playback button 5 M Macro focus 13, 15 Magnify control 5 magnifying images 27 Manual focus 15 Manual mode 18, 19 memory capacity 56 card 11 card door 6 memory card 8, 55 Menu/OK button 5 menus Capture 20 Design Gallery 31 Photosmart Express 38 Playback 27 HP Photosmart R927 Digital ...


