Quick Start Guide
Page 2
... be recycled after its proprietor. Important recycling information for HP products and services are set forth in China 2 HP Photosmart E217/E317 Quick Start Guide The only warranties for our customers in the general trash. registered trademark of its useful life as... generally, please visit: www.hp.com/hpinfo/globalcitizenship/environment/recycle/index.html For future reference, please enter the following information: Model Number (on the front of the camera) Serial Number (10-digit number on the bottom of the camera) Date the camera was purchased Printed in the express ...
... be recycled after its proprietor. Important recycling information for HP products and services are set forth in China 2 HP Photosmart E217/E317 Quick Start Guide The only warranties for our customers in the general trash. registered trademark of its useful life as... generally, please visit: www.hp.com/hpinfo/globalcitizenship/environment/recycle/index.html For future reference, please enter the following information: Model Number (on the front of the camera) Serial Number (10-digit number on the bottom of the camera) Date the camera was purchased Printed in the express ...
Quick Start Guide
Page 3
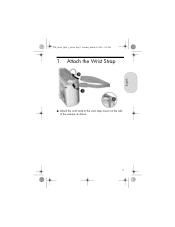
English Lee_Jackie_QSG_e_ok.fm Page 3 Tuesday, March 29, 2005 1:22 PM 1. Attach the Wrist Strap S Attach the wrist strap to the wrist strap mount on the side of the camera as shown. 3
English Lee_Jackie_QSG_e_ok.fm Page 3 Tuesday, March 29, 2005 1:22 PM 1. Attach the Wrist Strap S Attach the wrist strap to the wrist strap mount on the side of the camera as shown. 3
Quick Start Guide
Page 4
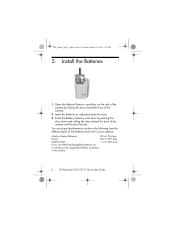
... Battery/Memory card door on the side of the camera by pushing the door down and sliding the door toward the front of the camera. 2. You can expect performance similar to the following from the different types of the camera until the door latches. Close the Battery/Memory card...(1800) 110 to 280 shots If you use NiMH (rechargeable) batteries, be sure that you fully charge them before using them in the camera. 4 HP Photosmart E217/E317 Quick Start Guide Lee_Jackie_QSG_e_ok.fm Page 4 Tuesday, March 29, 2005 1:22 PM 2. Insert the batteries as indicated inside the door. 3. Install...
... Battery/Memory card door on the side of the camera by pushing the door down and sliding the door toward the front of the camera. 2. You can expect performance similar to the following from the different types of the camera until the door latches. Close the Battery/Memory card...(1800) 110 to 280 shots If you use NiMH (rechargeable) batteries, be sure that you fully charge them before using them in the camera. 4 HP Photosmart E217/E317 Quick Start Guide Lee_Jackie_QSG_e_ok.fm Page 4 Tuesday, March 29, 2005 1:22 PM 2. Insert the batteries as indicated inside the door. 3. Install...
Quick Start Guide
Page 5
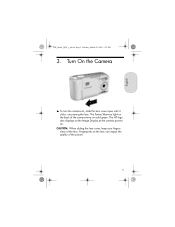
English Lee_Jackie_QSG_e_ok.fm Page 5 Tuesday, March 29, 2005 1:22 PM 3. CAUTION: When sliding the lens cover, keep your fingers clear of the camera turns on solid green. The Power/Memory light on , slide the lens cover open until it clicks, uncovering the lens. Fingerprints on the Image Display as the camera powers up. The HP logo also displays on the lens can impair the quality of the picture. 5 Turn On the Camera S To turn the camera on the back of the lens.
English Lee_Jackie_QSG_e_ok.fm Page 5 Tuesday, March 29, 2005 1:22 PM 3. CAUTION: When sliding the lens cover, keep your fingers clear of the camera turns on solid green. The Power/Memory light on , slide the lens cover open until it clicks, uncovering the lens. Fingerprints on the Image Display as the camera powers up. The HP logo also displays on the lens can impair the quality of the picture. 5 Turn On the Camera S To turn the camera on the back of the lens.
Quick Start Guide
Page 6
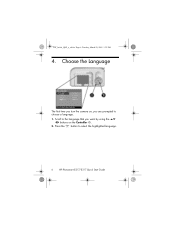
Lee_Jackie_QSG_e_ok.fm Page 6 Tuesday, March 29, 2005 1:22 PM 4. Scroll to the language that you want by using the buttons on , you turn the camera on the Controller . 2. Press the button to choose a language. 1. Choose the Language The first time you are prompted to select the highlighted language. 6 HP Photosmart E217/E317 Quick Start Guide
Lee_Jackie_QSG_e_ok.fm Page 6 Tuesday, March 29, 2005 1:22 PM 4. Scroll to the language that you want by using the buttons on , you turn the camera on the Controller . 2. Press the button to choose a language. 1. Choose the Language The first time you are prompted to select the highlighted language. 6 HP Photosmart E217/E317 Quick Start Guide
Quick Start Guide
Page 8
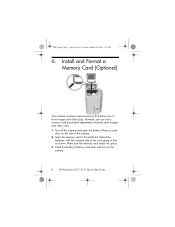
... memory card in the small slot behind the batteries, with the notched side of the camera. 2. However, you to store images and video clips. 1. Install and Format a Memory Card (Optional) Your camera contains internal memory that allows you can use a memory card (purchased separately) instead to... store images and video clips. Lee_Jackie_QSG_e_ok.fm Page 8 Tuesday, March 29, 2005 1:22 PM 6. Turn off the camera and open the Battery/Memory card door on the camera. 8 HP Photosmart E217/E317 Quick Start Guide Make sure the memory card snaps into place. 3.
... memory card in the small slot behind the batteries, with the notched side of the camera. 2. However, you to store images and video clips. 1. Install and Format a Memory Card (Optional) Your camera contains internal memory that allows you can use a memory card (purchased separately) instead to... store images and video clips. Lee_Jackie_QSG_e_ok.fm Page 8 Tuesday, March 29, 2005 1:22 PM 6. Turn off the camera and open the Battery/Memory card door on the camera. 8 HP Photosmart E217/E317 Quick Start Guide Make sure the memory card snaps into place. 3.
Quick Start Guide
Page 9
... door, press down on the top edge of the memory card, and it will spring outward from the camera, first turn the camera off. appears in the Image Display while the camera is displayed. When the camera has completed the formatting, the Total Images Summary screen is formatting the memory card. English Lee_Jackie_QSG_e_ok.fm...
... door, press down on the top edge of the memory card, and it will spring outward from the camera, first turn the camera off. appears in the Image Display while the camera is displayed. When the camera has completed the formatting, the Total Images Summary screen is formatting the memory card. English Lee_Jackie_QSG_e_ok.fm...
Quick Start Guide
Page 10
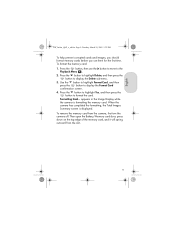
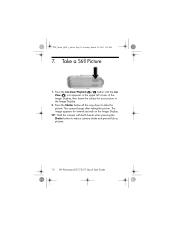
... both hands when pressing the Shutter button to take the picture. The camera beeps after taking the picture. Press the Live View/Playback button until the Live View icon appears in the upper left corner of the Image ...Display, then frame the subject for several seconds on the Image Display. Press the Shutter button all the way down to reduce camera shake and prevent blurry pictures. 10 HP Photosmart E217/E317 Quick Start Guide The image appears for your picture in the Image Display. 2. Lee_Jackie_QSG_e_ok.fm Page 10 Tuesday, March 29, 2005...
... both hands when pressing the Shutter button to take the picture. The camera beeps after taking the picture. Press the Live View/Playback button until the Live View icon appears in the upper left corner of the Image ...Display, then frame the subject for several seconds on the Image Display. Press the Shutter button all the way down to reduce camera shake and prevent blurry pictures. 10 HP Photosmart E217/E317 Quick Start Guide The image appears for your picture in the Image Display. 2. Lee_Jackie_QSG_e_ok.fm Page 10 Tuesday, March 29, 2005...

Quick Start Guide
Page 11
Record a Video Clip 1. To start recording video, press and release the Video button on the top of the Image Display, then frame the subject for your picture in the Image Display. 2. To stop recording video, press and release the Video button again; Press the Live View/Playback button until the camera runs out of memory. 11 otherwise, the video will continue recording until the Live View icon appears in the upper left corner of the camera. 3. English Lee_Jackie_QSG_e_ok.fm Page 11 Tuesday, March 29, 2005 1:22 PM 8.
Record a Video Clip 1. To start recording video, press and release the Video button on the top of the Image Display, then frame the subject for your picture in the Image Display. 2. To stop recording video, press and release the Video button again; Press the Live View/Playback button until the camera runs out of memory. 11 otherwise, the video will continue recording until the Live View icon appears in the upper left corner of the camera. 3. English Lee_Jackie_QSG_e_ok.fm Page 11 Tuesday, March 29, 2005 1:22 PM 8.

Quick Start Guide
Page 13
... instructions. if not, the process installs the HP Image Zone Express, which lacks some features contained in the full version. 1. If 13 If you to transfer images from the camera, and then view, edit, print, or e-mail them. Insert the HP Image Zone software CD into the CD Drive of... HP Image Zone; Windows To install the HP Image Zone software, your computer meets these requirements, the installation process ...
... instructions. if not, the process installs the HP Image Zone Express, which lacks some features contained in the full version. 1. If 13 If you to transfer images from the camera, and then view, edit, print, or e-mail them. Insert the HP Image Zone software CD into the CD Drive of... HP Image Zone; Windows To install the HP Image Zone software, your computer meets these requirements, the installation process ...
Quick Start Guide
Page 15
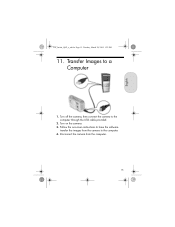
Transfer Images to the computer through the USB cable provided. 2. Turn on -screen instructions to have the software transfer the images from the computer. 15 Turn off the camera, then connect the camera to a Computer 1. Disconnect the camera from the camera to the computer. 4. Follow the on the camera. 3. English Lee_Jackie_QSG_e_ok.fm Page 15 Tuesday, March 29, 2005 1:22 PM 11.
Transfer Images to the computer through the USB cable provided. 2. Turn on -screen instructions to have the software transfer the images from the computer. 15 Turn off the camera, then connect the camera to a Computer 1. Disconnect the camera from the camera to the computer. 4. Follow the on the camera. 3. English Lee_Jackie_QSG_e_ok.fm Page 15 Tuesday, March 29, 2005 1:22 PM 11.
Quick Start Guide
Page 16
.... These features include 5 shooting modes, direct printing capability, oncamera Help, camera accessories, and much more effectively, visit www.hp.com/photosmart. • HP online service and support is your software CD. 16 HP Photosmart E217/E317 Quick Start Guide Get award winning assistance 24x7 at www.hp.com/support. • For help you through the most-used features...
.... These features include 5 shooting modes, direct printing capability, oncamera Help, camera accessories, and much more effectively, visit www.hp.com/photosmart. • HP online service and support is your software CD. 16 HP Photosmart E217/E317 Quick Start Guide Get award winning assistance 24x7 at www.hp.com/support. • For help you through the most-used features...
User's Manual
Page 3
...without notice. registered trademark of the camera) Date the camera was purchased Printed in the express warranty statements accompanying such products and services. For more information regarding return and recycling of HP products generally, please visit: www.hp.com/hpinfo/globalcitizenship/environment/recycle/index...: Model Number (on the front of the camera) Serial Number (10-digit number on the bottom of Microsoft Corporation. HP shall not be construed as required by law. Important recycling information for HP products and services are set forth in China Please...
...without notice. registered trademark of the camera) Date the camera was purchased Printed in the express warranty statements accompanying such products and services. For more information regarding return and recycling of HP products generally, please visit: www.hp.com/hpinfo/globalcitizenship/environment/recycle/index...: Model Number (on the front of the camera) Serial Number (10-digit number on the bottom of Microsoft Corporation. HP shall not be construed as required by law. Important recycling information for HP products and services are set forth in China Please...

User's Manual
Page 5
... 15 7 Install the Software 17 Windows 17 Macintosh 18 User's Manual on the CD 18 Camera Parts 19 Back of the Camera 19 Top of the Camera 21 Front, Left Side, and Bottom of the Camera. . . 22 Camera States 24 Camera Menus 24 2 Taking Pictures and Recording Video Clips . . . 27 Using Live View 27 Taking Still...
... 15 7 Install the Software 17 Windows 17 Macintosh 18 User's Manual on the CD 18 Camera Parts 19 Back of the Camera 19 Top of the Camera 21 Front, Left Side, and Bottom of the Camera. . . 22 Camera States 24 Camera Menus 24 2 Taking Pictures and Recording Video Clips . . . 27 Using Live View 27 Taking Still...

User's Manual
Page 6
... the Camera 62 5 Using the Setup Menu 65 Display Brightness 66 Camera Sounds 67 Date & Time 68 USB Configuration 69 Language 70 Move Images to Card 71 Reset Settings 72 6 Troubleshooting and Support 73 Resetting the Camera 74 HP Image Zone Software 75 System Requirements (Windows Only 75 HP Image Zone Express (Windows Only) . . . . 76 6 HP Photosmart E217...
... the Camera 62 5 Using the Setup Menu 65 Display Brightness 66 Camera Sounds 67 Date & Time 68 USB Configuration 69 Language 70 Move Images to Card 71 Reset Settings 72 6 Troubleshooting and Support 73 Resetting the Camera 74 HP Image Zone Software 75 System Requirements (Windows Only 75 HP Image Zone Express (Windows Only) . . . . 76 6 HP Photosmart E217...

User's Manual
Page 7
... Images to a Computer without HP Image Zone Software 77 Connecting Your Camera as a Digital Camera 77 Using a Memory Card Reader 78 Configuring the Camera as a Disk Drive. . 81 Problems and Solutions 83 Error Messages on the Camera 95 Error Messages on the Computer 104 Getting Assistance 106 HP Accessibility Website 106 HP Photosmart Website 106 Support Process 106...
... Images to a Computer without HP Image Zone Software 77 Connecting Your Camera as a Digital Camera 77 Using a Memory Card Reader 78 Configuring the Camera as a Disk Drive. . 81 Problems and Solutions 83 Error Messages on the Camera 95 Error Messages on the Computer 104 Getting Assistance 106 HP Accessibility Website 106 HP Photosmart Website 106 Support Process 106...
User's Manual
Page 8
C Caring for Your Camera 123 Basic Camera Care 123 Cleaning the Camera 125 Cleaning the Camera Lens 125 Cleaning the Camera Body and Image Display 126 D Specifications 127 Memory Capacity 131 8 HP Photosmart E217 User's Manual
C Caring for Your Camera 123 Basic Camera Care 123 Cleaning the Camera 125 Cleaning the Camera Lens 125 Cleaning the Camera Body and Image Display 126 D Specifications 127 Memory Capacity 131 8 HP Photosmart E217 User's Manual
User's Manual
Page 9
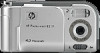
... 15. See page 62. • Internal memory or memory card-Store images in your camera's internal memory or on your purchase of the HP Photosmart E217 digital camera and welcome to the world of your choice. Getting Started 9 This manual explains camera features you can use to ensure great results while enjoying the photographic experience. See...
... 15. See page 62. • Internal memory or memory card-Store images in your camera's internal memory or on your purchase of the HP Photosmart E217 digital camera and welcome to the world of your choice. Getting Started 9 This manual explains camera features you can use to ensure great results while enjoying the photographic experience. See...

User's Manual
Page 10
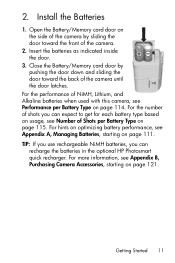
Attach the Wrist Strap Attach the wrist strap to the wrist strap mount on the side of the camera as a button or a light) while following the instructions in this section, see Camera Parts on your camera (such as shown. 10 HP Photosmart E217 User's Manual Setup To locate a part on page 19. 1.
Attach the Wrist Strap Attach the wrist strap to the wrist strap mount on the side of the camera as a button or a light) while following the instructions in this section, see Camera Parts on your camera (such as shown. 10 HP Photosmart E217 User's Manual Setup To locate a part on page 19. 1.
User's Manual
Page 11
... Started 11 2. Close the Battery/Memory card door by sliding the door toward the back of the camera. 2. For hints on optimizing battery performance, see Appendix B, Purchasing Camera Accessories, starting on page 121. Install the Batteries 1. Insert the batteries as indicated inside the door....on page 111. For the performance of NiMH, Lithium, and Alkaline batteries when used with this camera, see Number of Shots per Battery Type on page 114. TIP: If you use rechargeable NiMH batteries, you can recharge the batteries in the optional HP Photosmart quick recharger.
... Started 11 2. Close the Battery/Memory card door by sliding the door toward the back of the camera. 2. For hints on optimizing battery performance, see Appendix B, Purchasing Camera Accessories, starting on page 121. Install the Batteries 1. Insert the batteries as indicated inside the door....on page 111. For the performance of NiMH, Lithium, and Alkaline batteries when used with this camera, see Number of Shots per Battery Type on page 114. TIP: If you use rechargeable NiMH batteries, you can recharge the batteries in the optional HP Photosmart quick recharger.


