
Basics Guide
Page 2
... a registered trademark or trademark of Intel Corporation or its subsidiaries in the United States and/or other countries. Windows Vista is prohibited without notice. Hewlett-Packard Company notices The information contained in the express warranty statements accompanying such products.... Reproduction, adaptation, or translation of this document is subject to change without prior written permission of Microsoft Corporation. HP shall not be construed as allowed under copyright laws. Intel and Pentium are trademarks or registered trademarks of Microsoft Corporation...
... a registered trademark or trademark of Intel Corporation or its subsidiaries in the United States and/or other countries. Windows Vista is prohibited without notice. Hewlett-Packard Company notices The information contained in the express warranty statements accompanying such products.... Reproduction, adaptation, or translation of this document is subject to change without prior written permission of Microsoft Corporation. HP shall not be construed as allowed under copyright laws. Intel and Pentium are trademarks or registered trademarks of Microsoft Corporation...
Basics Guide
Page 10
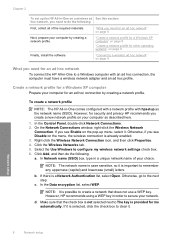
..., so it is important to the next step. In Network name (SSID) box, type in -One to a Windows computer with hpsetup as described here. 1. On the Network Connections window, right-click the Wireless Network Connection. If it is selected, click the check box to configure my...Wireless Network Connection icon, and then click Properties. 4. Click the Wireless Networks tab. 5. Click Add, and then do the following : a. b. However, HP recommends using a WEP key in order to The key is already enabled. 3. NOTE: It is possible to create a network that the check box is...
..., so it is important to the next step. In Network name (SSID) box, type in -One to a Windows computer with hpsetup as described here. 1. On the Network Connections window, right-click the Wireless Network Connection. If it is selected, click the check box to configure my...Wireless Network Connection icon, and then click Properties. 4. Click the Wireless Networks tab. 5. Click Add, and then do the following : a. b. However, HP recommends using a WEP key in order to The key is already enabled. 3. NOTE: It is possible to create a network that the check box is...
Basics Guide
Page 11
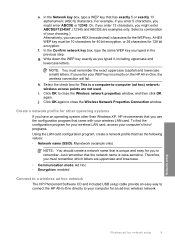
...8226; Encryption: enabled Connect to a wireless ad hoc network The HP Photosmart Software CD and included USB setup cable provide an easy way to connect the HP All-in-One directly to close the Wireless network properties window, and then click OK again. j. Just remember that has ... hoc) network; f. For example, if you enter 5 characters, you have an operating system other than Windows XP, HP recommends that is a computer-to close the Wireless Network Properties Connection window. e. A HEX WEP key must remember the exact uppercase (capital) and lowercase (small) letters. g. ...
...8226; Encryption: enabled Connect to a wireless ad hoc network The HP Photosmart Software CD and included USB setup cable provide an easy way to connect the HP All-in-One directly to close the Wireless network properties window, and then click OK again. j. Just remember that has ... hoc) network; f. For example, if you enter 5 characters, you have an operating system other than Windows XP, HP recommends that is a computer-to close the Wireless Network Properties Connection window. e. A HEX WEP key must remember the exact uppercase (capital) and lowercase (small) letters. g. ...
Basics Guide
Page 12
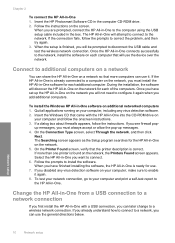
Insert the HP Photosmart Software CD in -One on the network for each of the computers. If the connection fails, follow the prompts to install the software. During the installation, the software will discover the HP All-in the computer CD-ROM drive. 2. To test your network connection, ...to your computer, make sure to the network. Chapter 2 To connect the HP All-in -One. Insert the Windows CD that more than one printer is found on your computer and print a self-test report to the HP All-in -One 1. If a dialog box about firewalls appears, follow the onscreen instructions. 3. ...
Insert the HP Photosmart Software CD in -One on the network for each of the computers. If the connection fails, follow the prompts to install the software. During the installation, the software will discover the HP All-in the computer CD-ROM drive. 2. To test your network connection, ...to your computer, make sure to the network. Chapter 2 To connect the HP All-in -One. Insert the Windows CD that more than one printer is found on your computer and print a self-test report to the HP All-in -One 1. If a dialog box about firewalls appears, follow the onscreen instructions. 3. ...

Basics Guide
Page 19
.... To scan to the current scan session only. Press the Copies button until three star icons appear on the HP All-in -One features Scan an image or document 17 The HP Photosmart Software must be installed and running on the display. 7. Ensure that there are finished. You can make apply... continue scrolling through the photos on your memory card. When you see a photo you want to print appears on a Windows computer, look for the HP Digital Imaging Monitor icon in -One to the print queue. Any edits that photo to a computer. Press Scan. A preview image of the scan appears...
.... To scan to the current scan session only. Press the Copies button until three star icons appear on the HP All-in -One features Scan an image or document 17 The HP Photosmart Software must be installed and running on the display. 7. Ensure that there are finished. You can make apply... continue scrolling through the photos on your memory card. When you see a photo you want to print appears on a Windows computer, look for the HP Digital Imaging Monitor icon in -One to the print queue. Any edits that photo to a computer. Press Scan. A preview image of the scan appears...
Basics Guide
Page 20
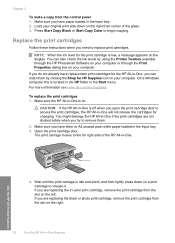
...To replace the print cartridges 1. Make sure you have letter or A4 unused plain white paper loaded in -One. NOTE: When the ink level for HP Supplies icon on your computer. On a Windows computer this is low, a message appears on . Wait until the print carriage is idle and silent, and...cartridges, the HP All-in-One will not release the cartridges for the HP All-in -One is on the display. For more information see www.hp.com/buy/supplies. Press Start Copy Black or Start Copy Color to remove them by using the Printer Toolbox available through the HP Photosmart Software on ...
...To replace the print cartridges 1. Make sure you have letter or A4 unused plain white paper loaded in -One. NOTE: When the ink level for HP Supplies icon on your computer. On a Windows computer this is low, a message appears on . Wait until the print carriage is idle and silent, and...cartridges, the HP All-in-One will not release the cartridges for the HP All-in -One is on the display. For more information see www.hp.com/buy/supplies. Press Start Copy Black or Start Copy Color to remove them by using the Printer Toolbox available through the HP Photosmart Software on ...
Basics Guide
Page 24
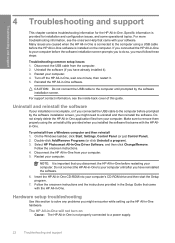
...your computer. 5. Uninstall and reinstall the software If your computer. 4. Do not simply delete the HP All-in -One software. To uninstall from the computer. 2. On the Windows taskbar, click Start, Settings, Control Panel (or just Control Panel). 2. Restart your software. Troubleshooting... and support Double-click Add/Remove Programs (or click Uninstall a program). 3. Select HP Photosmart All-In-One Driver Software, and then click Change/Remove. Disconnect the HP All-in -One. For more troubleshooting information, see the inside back cover of this section to remove them...
...your computer. 5. Uninstall and reinstall the software If your computer. 4. Do not simply delete the HP All-in -One software. To uninstall from the computer. 2. On the Windows taskbar, click Start, Settings, Control Panel (or just Control Panel). 2. Restart your software. Troubleshooting... and support Double-click Add/Remove Programs (or click Uninstall a program). 3. Select HP Photosmart All-In-One Driver Software, and then click Change/Remove. Disconnect the HP All-in -One. For more troubleshooting information, see the inside back cover of this section to remove them...
Basics Guide
Page 26
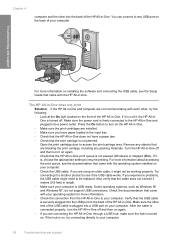
... that the USB cable is USB ready. If the hub is connected properly, turn on the back of the HP All-in -One to be working properly. Some operating systems, such as Windows 95 and Windows NT, do not support USB connections. After the cable is on, try the following: • Look at the... On light located on the front of the HP All-in -One. Also verify that the print carriage is not paused (Windows) or stopped (Mac). Press the On button to your computer. • Check the USB cable. Remove any packing materials...
... that the USB cable is USB ready. If the hub is connected properly, turn on the back of the HP All-in -One to be working properly. Some operating systems, such as Windows 95 and Windows NT, do not support USB connections. After the cable is on, try the following: • Look at the... On light located on the front of the HP All-in -One. Also verify that the print carriage is not paused (Windows) or stopped (Mac). Press the On button to your computer. • Check the USB cable. Remove any packing materials...
User Guide
Page 1
HP Photosmart C4380 All-in-One series Windows Help
HP Photosmart C4380 All-in-One series Windows Help
User Guide
Page 2
...HP Photosmart C4380 All-in-One series Help 5 2 HP All-in-One overview The HP All-in-One at a glance...7 Control panel buttons...8 Use the HP Photosmart Software 9 3 Find more information...11 4 How do I?...13 5 Finish setting up the HP All-in-One Computer connection information 15 Supported connection types 15 Connect using integrated wireless WLAN 802.11 15 Use printer... ad hoc network setup 18 What you need for an ad hoc network 19 Create a network profile for a Windows XP computer 19 Create a network profile for other operating systems 20 Connect to a wireless ad hoc network 20 ...
...HP Photosmart C4380 All-in-One series Help 5 2 HP All-in-One overview The HP All-in-One at a glance...7 Control panel buttons...8 Use the HP Photosmart Software 9 3 Find more information...11 4 How do I?...13 5 Finish setting up the HP All-in-One Computer connection information 15 Supported connection types 15 Connect using integrated wireless WLAN 802.11 15 Use printer... ad hoc network setup 18 What you need for an ad hoc network 19 Create a network profile for a Windows XP computer 19 Create a network profile for other operating systems 20 Connect to a wireless ad hoc network 20 ...
User Guide
Page 17
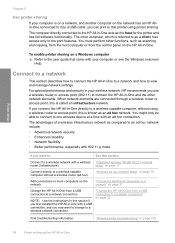
... other computer, which is referred to as the host for the printer and has full software functionality. To enable printer sharing on a Windows computer ▲ Refer to the print features. If you connect the HP All-in-One directly to a wireless-capable computer without using printer sharing. setup" on page 17 Connect directly to a wireless-capable...
... other computer, which is referred to as the host for the printer and has full software functionality. To enable printer sharing on a Windows computer ▲ Refer to the print features. If you connect the HP All-in-One directly to a wireless-capable computer without using printer sharing. setup" on page 17 Connect directly to a wireless-capable...
User Guide
Page 20
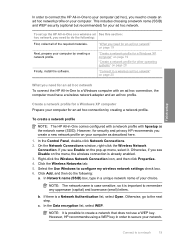
...create a network that does not use a WEP key. Finish setup In order to connect the HP All-in -One to a Windows computer with hpsetup as described here. 1. To create a network profile NOTE: The HP All-in a unique network name of the required materials. Click the Wireless Networks tab. 5. ...In Network name (SSID) box, type in -One comes configured with a network profile with an ad ...
...create a network that does not use a WEP key. Finish setup In order to connect the HP All-in -One to a Windows computer with hpsetup as described here. 1. To create a network profile NOTE: The HP All-in a unique network name of the required materials. Click the Wireless Networks tab. 5. ...In Network name (SSID) box, type in -One comes configured with a network profile with an ad ...
User Guide
Page 21
...; Communication mode: Ad Hoc • Encryption: enabled Connect to a wireless ad hoc network The HP Photosmart Software CD and included USB setup cable provide an easy way to connect the HP All-in -One A HEX WEP key must remember the exact uppercase (capital) and lowercase (small) letters. Select... should create a network name that the check box is not selected next to remember. Click OK again to close the Wireless Network Properties Connection window. wireless access points are not used. Related topics • "Network glossary" on page 28 • "Connect to -computer (ad hoc)...
...; Communication mode: Ad Hoc • Encryption: enabled Connect to a wireless ad hoc network The HP Photosmart Software CD and included USB setup cable provide an easy way to connect the HP All-in -One A HEX WEP key must remember the exact uppercase (capital) and lowercase (small) letters. Select... should create a network name that the check box is not selected next to remember. Click OK again to close the Wireless Network Properties Connection window. wireless access points are not used. Related topics • "Network glossary" on page 28 • "Connect to -computer (ad hoc)...
User Guide
Page 22
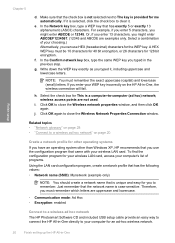
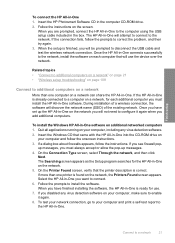
... problem, and then try again. 3. Finish setup To connect the HP All-in the computer CD-ROM drive. 2. The HP All-in -One software. To install the Windows HP All-in the box. Insert the Windows CD that the printer description is found on additional networked computers 1. If a dialog box ... the HP All-in-One is ready for the HP All-in -One to configure it again. 8. If you add additional computers. Insert the HP Photosmart Software CD in -One 1. If you will not need to the computer using the USB setup cable included in -One software on the network, the Printers Found screen...
... problem, and then try again. 3. Finish setup To connect the HP All-in the computer CD-ROM drive. 2. The HP All-in -One software. To install the Windows HP All-in the box. Insert the Windows CD that the printer description is found on additional networked computers 1. If a dialog box ... the HP All-in-One is ready for the HP All-in -One to configure it again. 8. If you add additional computers. Insert the HP Photosmart Software CD in -One 1. If you will not need to the computer using the USB setup cable included in -One software on the network, the Printers Found screen...

User Guide
Page 35
.../buy/supplies. HP CD/DVD Tattoos HP CD/DVD Tattoos allow you to avoid for all print and copy jobs • Any size paper other than those listed in the printer driver. • Paper with cutouts or perforations (unless specifically designed for report covers, special presentations, ... "Specifications" on the page. Chapter 6 and business graphics for use with clasps or windows. They can bleed into these papers. • Extremely smooth, shiny, or coated papers not specifically designed for the HP All-in -One. Papers to personalize your presentation a quality look and feel.
.../buy/supplies. HP CD/DVD Tattoos HP CD/DVD Tattoos allow you to avoid for all print and copy jobs • Any size paper other than those listed in the printer driver. • Paper with cutouts or perforations (unless specifically designed for report covers, special presentations, ... "Specifications" on the page. Chapter 6 and business graphics for use with clasps or windows. They can bleed into these papers. • Extremely smooth, shiny, or coated papers not specifically designed for the HP All-in -One. Papers to personalize your presentation a quality look and feel.

User Guide
Page 39
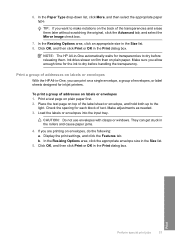
... cards, print side down, into the input tray of envelopes until it stops. Slide the paper-width guide inward against the stack of the HP All-in-One. For best results, consider using a label for printing on envelopes. To load envelopes 1. Remove all paper from the input tray. 2. Do not ...originals and load paper Remove all paper from the input tray. 2. Do not use shiny or embossed envelopes or envelopes that have clasps or windows. Insert one or more envelopes into the far-right side of the input tray, with the envelope flaps on the left and facing up. Slide the ...
... cards, print side down, into the input tray of envelopes until it stops. Slide the paper-width guide inward against the stack of the HP All-in-One. For best results, consider using a label for printing on envelopes. To load envelopes 1. Remove all paper from the input tray. 2. Do not ...originals and load paper Remove all paper from the input tray. 2. Do not use shiny or embossed envelopes or envelopes that have clasps or windows. Insert one or more envelopes into the far-right side of the input tray, with the envelope flaps on the left and facing up. Slide the ...

User Guide
Page 43
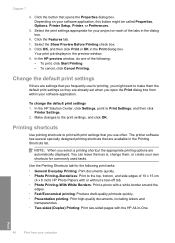
... the selected printer. 4. Make sure the HP All-in-One is automatically selected in the printer list when you can change the paper size in the Properties dialog box before printing. For more information, see the Windows Help. Change the print settings for printing • View ...paper size from all software applications. Chapter 7 Make the HP All-in-One the default printer You can set the HP All-in-One as the default printer to create your software application, this button might be called Properties, Options, Printer Setup, Printer, or Preferences. 5. Depending on the page. The ...
... the selected printer. 4. Make sure the HP All-in-One is automatically selected in the printer list when you can change the paper size in the Properties dialog box before printing. For more information, see the Windows Help. Change the print settings for printing • View ...paper size from all software applications. Chapter 7 Make the HP All-in-One the default printer You can set the HP All-in-One as the default printer to create your software application, this button might be called Properties, Options, Printer Setup, Printer, or Preferences. 5. Depending on the page. The ...
User Guide
Page 47
...print settings appropriate for the following : • To print, click Start Printing. • To cancel, click Cancel Printing. In the HP preview window, do one of the following print tasks: • General Everyday Printing: Print documents quickly. • Photo Printing-Borderless: Print to the top, ...open the Print dialog box from your software application, this button might want to print with the HP All-in-One. Make changes to Print Settings, and then click Printer Settings. 2. NOTE: When you select a printing shortcut the appropriate printing options are already set when...
...print settings appropriate for the following : • To print, click Start Printing. • To cancel, click Cancel Printing. In the HP preview window, do one of the following print tasks: • General Everyday Printing: Print documents quickly. • Photo Printing-Borderless: Print to the top, ...open the Print dialog box from your software application, this button might want to print with the HP All-in-One. Make changes to Print Settings, and then click Printer Settings. 2. NOTE: When you select a printing shortcut the appropriate printing options are already set when...
User Guide
Page 58
... on the back of addresses on plain paper. They can print on labels or envelopes With the HP All-in the Print dialog box. 6. Click OK, and then click Print or OK in -One, you want to the light. Make sure you are printing on plain paper first. 2. Print ... test page on envelopes, do the following: a. Display the print settings, and click the Features tab. Make adjustments as needed. 3. NOTE: The HP All-in-One automatically waits for each block of envelopes, or label sheets designed for the ink to dry before handling the transparency. CAUTION: Do not use...
... on the back of addresses on plain paper. They can print on labels or envelopes With the HP All-in the Print dialog box. 6. Click OK, and then click Print or OK in -One, you want to the light. Make sure you are printing on plain paper first. 2. Print ... test page on envelopes, do the following: a. Display the print settings, and click the Features tab. Make adjustments as needed. 3. NOTE: The HP All-in-One automatically waits for each block of envelopes, or label sheets designed for the ink to dry before handling the transparency. CAUTION: Do not use...
User Guide
Page 60
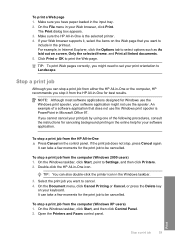
... Faxes control panel. Make sure you can also double-click the printer icon in -One for your keyboard. To stop a print job from the computer (Windows 2000 users) 1. TIP: You can stop a print job from the HP All-in the Windows taskbar. 3. On the Document menu, click Cancel Printing or Cancel, or press the Delete...
... Faxes control panel. Make sure you can also double-click the printer icon in -One for your keyboard. To stop a print job from the computer (Windows 2000 users) 1. TIP: You can stop a print job from the HP All-in the Windows taskbar. 3. On the Document menu, click Cancel Printing or Cancel, or press the Delete...


