

Basics Guide
Page 2
Nothing herein should be liable for HP products and services are set forth in the express warranty statements accompanying such products and services. Windows Vista is either a registered trademark or trademark of Microsoft Corporation in the United States and/or other countries. Hewlett-Packard Company notices The information contained ...
Nothing herein should be liable for HP products and services are set forth in the express warranty statements accompanying such products and services. Windows Vista is either a registered trademark or trademark of Microsoft Corporation in the United States and/or other countries. Hewlett-Packard Company notices The information contained ...

Basics Guide
Page 8
... begin setting up the HP All-in-One for faxing, determine which kind of the HP All-in -One. After you plug in the HP All-in-One. • If your fax setup. This enables you to connect other telecom devices to the wall jack where you run the Fax Setup Wizard (Windows) or Fax Setup Utility... the telephone wall jack. You can also use the Fax Setup Wizard (Windows) or Fax Setup Utility (Mac) to help you quickly set up the HP All-in-One so that came with the HP All-in the table below , you probably have on the back of phone system your country/region uses. In...
... begin setting up the HP All-in-One for faxing, determine which kind of the HP All-in -One. After you plug in the HP All-in-One. • If your fax setup. This enables you to connect other telecom devices to the wall jack where you run the Fax Setup Wizard (Windows) or Fax Setup Utility... the telephone wall jack. You can also use the Fax Setup Wizard (Windows) or Fax Setup Utility (Mac) to help you quickly set up the HP All-in-One so that came with the HP All-in the table below , you probably have on the back of phone system your country/region uses. In...

Basics Guide
Page 31
...the photos on your memory card until the number of the screen, near the time. The HP Photosmart Software must be installed and running on a Windows computer, look for the HP Digital Imaging Monitor icon in -One to Print on the glass, you want to best mode (as Borderless. Press the buttons ... setting is printing, you want to scanning. Press the Copies button until the photo you can press the Print button to add that the HP Photosmart Software is running on the display to the print queue. TIP: While the photo is set to print appears on the display. 3. adapter...
...the photos on your memory card until the number of the screen, near the time. The HP Photosmart Software must be installed and running on a Windows computer, look for the HP Digital Imaging Monitor icon in -One to Print on the glass, you want to best mode (as Borderless. Press the buttons ... setting is printing, you want to scanning. Press the Copies button until the photo you can press the Print button to add that the HP Photosmart Software is running on the display to the print queue. TIP: While the photo is set to print appears on the display. 3. adapter...

Basics Guide
Page 32
...by using the control panel, as described here. Press the button next to Start Copy Black or Start Copy Color to Scan/Fax. The HP Photosmart Software has many tools that you can use a calling card to charge the call and you need to respond to tone prompts while dialing....memory card slots on the product. 2. A preview image of its scan functionality. Chapter 3 NOTE: Closing the HP Digital Imaging Monitor icon in the Windows system tray can cause the HP All-in-One to lose some of the scan appears on your computer, where you can restore full functionality by restarting your...
...by using the control panel, as described here. Press the button next to Start Copy Black or Start Copy Color to Scan/Fax. The HP Photosmart Software has many tools that you can use a calling card to charge the call and you need to respond to tone prompts while dialing....memory card slots on the product. 2. A preview image of its scan functionality. Chapter 3 NOTE: Closing the HP Digital Imaging Monitor icon in the Windows system tray can cause the HP All-in-One to lose some of the scan appears on your computer, where you can restore full functionality by restarting your...

Basics Guide
Page 39
... and then start the Setup program. Turn off the product, wait one minute, then restart it ). 3. For support contact information, see the onscreen Help that came with the HP Allin-One. In Windows Vista and Windows XP, use the MSCONFIG utility to do so, you have already installed...these steps: Troubleshooting common setup issues 1. Uninstall and reinstall the software If your software. Reinstall the product software. Select HP Photosmart All-In-One Driver Software, and then click Change/Remove. Do not connect the product to remove them properly using the uninstall utility ...
... and then start the Setup program. Turn off the product, wait one minute, then restart it ). 3. For support contact information, see the onscreen Help that came with the HP Allin-One. In Windows Vista and Windows XP, use the MSCONFIG utility to do so, you have already installed...these steps: Troubleshooting common setup issues 1. Uninstall and reinstall the software If your software. Reinstall the product software. Select HP Photosmart All-In-One Driver Software, and then click Change/Remove. Do not connect the product to remove them properly using the uninstall utility ...

Basics Guide
Page 40
... the essential icons (Scan Picture and Scan Document), the software has been properly installed. Solution 1: Make sure you might encounter while setting up the HP All-in an appliance that the software is turned on but still does not work, then there might be a problem with the power cord provided...the product Solution: Turn off the product, and then unplug the power cord. Plug in -One hardware. Cause: The product was not being used with the power outlet. Plug the power cord back in the Windows system tray. The product will not turn on the desktop. If not, then there might be...
... the essential icons (Scan Picture and Scan Document), the software has been properly installed. Solution 1: Make sure you might encounter while setting up the HP All-in an appliance that the software is turned on but still does not work, then there might be a problem with the power cord provided...the product Solution: Turn off the product, and then unplug the power cord. Plug in -One hardware. Cause: The product was not being used with the power outlet. Plug the power cord back in the Windows system tray. The product will not turn on the desktop. If not, then there might be...

Basics Guide
Page 42
...to another USB port on , try restarting your computer. If you check the connections, try connecting directly to your computer. Make sure the other printers or scanners. Cause: The USB cable was installed. If you are not communicating with the operating system installed on the product. • Make...are connecting the product through a USB hub, make sure the hub is offline, turn it is not lit, the product is not paused (Windows) or stopped (Mac). Make sure the power cord is firmly connected to turn on your computer. After setting up the product, it might need...
...to another USB port on , try restarting your computer. If you check the connections, try connecting directly to your computer. Make sure the other printers or scanners. Cause: The USB cable was installed. If you are not communicating with the operating system installed on the product. • Make...are connecting the product through a USB hub, make sure the hub is offline, turn it is not lit, the product is not paused (Windows) or stopped (Mac). Make sure the power cord is firmly connected to turn on your computer. After setting up the product, it might need...

User Guide
Page 1
HP Photosmart C4340 All-in-One series Windows Help 56 789 *0#
HP Photosmart C4340 All-in-One series Windows Help 56 789 *0#

User Guide
Page 19
Finish setting up the HP All-in-One Chapter 5 To enable printer sharing on a Windows computer ▲ Refer to your printed documentation for complete step-by-step instructions on the same phone line as the HP All-in-One. NOTE: Refer to the user guide that faxing works successfully with other ...Guide, use . This section enables you can also see the Windows onscreen Help. For fax setup information in specific countries/regions, you to receive faxes 16 Finish setting up and configuring the HP All-in-One for later use the instructions in this section to complete your ...
Finish setting up the HP All-in-One Chapter 5 To enable printer sharing on a Windows computer ▲ Refer to your printed documentation for complete step-by-step instructions on the same phone line as the HP All-in-One. NOTE: Refer to the user guide that faxing works successfully with other ...Guide, use . This section enables you can also see the Windows onscreen Help. For fax setup information in specific countries/regions, you to receive faxes 16 Finish setting up and configuring the HP All-in-One for later use the instructions in this section to complete your ...

User Guide
Page 35
... printed images to avoid for all paper flat in the printer software. • Paper with cutouts or perforations (unless specifically designed for the product. Papers to smear, bleed, or not fill in -One. Load paper This section describes the procedure for loading different... types and sizes of paper into these papers. • Extremely smooth, shiny, or coated papers not specifically designed for use with clasps or windows. Chapter 6 HP Premium Presentation Paper HP Premium Presentation Paper...
... printed images to avoid for all paper flat in the printer software. • Paper with cutouts or perforations (unless specifically designed for the product. Papers to smear, bleed, or not fill in -One. Load paper This section describes the procedure for loading different... types and sizes of paper into these papers. • Extremely smooth, shiny, or coated papers not specifically designed for use with clasps or windows. Chapter 6 HP Premium Presentation Paper HP Premium Presentation Paper...

User Guide
Page 40
... it stops. For best results, consider using a label for printing on envelopes, consult the help files in -One. Do not use shiny or embossed envelopes or envelopes that have clasps or windows. NOTE: For specific details on how to format text for the return address on page 42 Load envelopes You... can load one or more envelopes into the input tray of the HP All-in your word processing software. Load originals and load...
... it stops. For best results, consider using a label for printing on envelopes, consult the help files in -One. Do not use shiny or embossed envelopes or envelopes that have clasps or windows. NOTE: For specific details on how to format text for the return address on page 42 Load envelopes You... can load one or more envelopes into the input tray of the HP All-in your word processing software. Load originals and load...

User Guide
Page 45
...the Resizing Options area, click the appropriate paper size from your software application, click Print. 3. Chapter 7 Make the HP All-in-One the default printer You can set the HP All-in the software application you used to create your document or project. However, if you are using custom-size...button that the HP All-in-One is automatically selected in the printer list when you select Print from the File menu in -One to handle nearly any print task. Some of choices in the input tray. 2. For more information, see the Windows Help. The default printer is the selected printer. 4. Make sure...
...the Resizing Options area, click the appropriate paper size from your software application, click Print. 3. Chapter 7 Make the HP All-in-One the default printer You can set the HP All-in the software application you used to create your document or project. However, if you are using custom-size...button that the HP All-in-One is automatically selected in the printer list when you select Print from the File menu in -One to handle nearly any print task. Some of choices in the input tray. 2. For more information, see the Windows Help. The default printer is the selected printer. 4. Make sure...

User Guide
Page 49
... software application, this button might want to make them as is the selected printer. 4. Click OK, and then click Print or OK in the preview window. 9. Change the default print settings If there are automatically displayed. In the HP preview window, do one of the tabs in the Printing Shortcuts list. Depending on your project...
... software application, this button might want to make them as is the selected printer. 4. Click OK, and then click Print or OK in the preview window. 9. Change the default print settings If there are automatically displayed. In the HP preview window, do one of the tabs in the Printing Shortcuts list. Depending on your project...

User Guide
Page 60
... Options area, click the appropriate envelope size in the Print dialog box. Print Perform special print jobs 57 Make sure the product is the selected printer. 4. Click the Features tab. 6. Place the test page on labels or envelopes 1. They can print on a single envelope, a group of ..., from the Paper Type drop-down list, select More. CAUTION: Do not use HP transparency products with clasps or windows. Print on transparencies For the best results, HP recommends you use envelopes with the HP Allin-One. Click the button that opens the Properties dialog box. Print a test page on ...
... Options area, click the appropriate envelope size in the Print dialog box. Print Perform special print jobs 57 Make sure the product is the selected printer. 4. Click the Features tab. 6. Place the test page on labels or envelopes 1. They can print on a single envelope, a group of ..., from the Paper Type drop-down list, select More. CAUTION: Do not use HP transparency products with clasps or windows. Print on transparencies For the best results, HP recommends you use envelopes with the HP Allin-One. Click the button that opens the Properties dialog box. Print a test page on ...

User Guide
Page 62
...3. On the File menu in -One or the computer, HP recommends you have paper loaded in the Windows taskbar. 4. If your keyboard. Stop a print job Although you want to include in -One for the print job to print the Web page. It can also double-click the printer icon in the main input tray.... 2. On the Windows taskbar, click Start...
...3. On the File menu in -One or the computer, HP recommends you have paper loaded in the Windows taskbar. 4. If your keyboard. Stop a print job Although you want to include in -One for the print job to print the Web page. It can also double-click the printer icon in the main input tray.... 2. On the Windows taskbar, click Start...

User Guide
Page 78
... must also be installed on your computer. NOTE: Closing the HP Digital Imaging Monitor icon in the Windows system tray can restore full functionality by restarting your computer or by starting the HP Photosmart Software. If this happens, you can cause the HP All-in-One to lose some of the screen, near the time. You...
... must also be installed on your computer. NOTE: Closing the HP Digital Imaging Monitor icon in the Windows system tray can restore full functionality by restarting your computer or by starting the HP Photosmart Software. If this happens, you can cause the HP All-in-One to lose some of the screen, near the time. You...

User Guide
Page 117
..." on page 118. In the Run dialog box, enter d:\setup.exe, and then click OK. b. Disconnect the power cord from a Windows computer 1. Troubleshooting 114 Troubleshooting The Minimum System Checks screen appears Solution: Click Details to see what the specific problem is, and then correct ... the product a. Cause: The product and computer were not communicating with the product. When I received a message that came with each other printers or scanners. Cause: Your system did not meet the minimum requirements to turn off the product, and then turn it . I insert the...
..." on page 118. In the Run dialog box, enter d:\setup.exe, and then click OK. b. Disconnect the power cord from a Windows computer 1. Troubleshooting 114 Troubleshooting The Minimum System Checks screen appears Solution: Click Details to see what the specific problem is, and then correct ... the product a. Cause: The product and computer were not communicating with the product. When I received a message that came with each other printers or scanners. Cause: Your system did not meet the minimum requirements to turn off the product, and then turn it . I insert the...

User Guide
Page 118
... HP Imaging device functions • HP Document Viewer • HP Photosmart Essential • HP Image Zone • HP Photo and imaging gallery • HP Photosmart, Officejet, Deskjet (with the product name and software version number) • HP Software update • HP Share to function. On the Windows taskbar...you follow the uninstall procedure carefully to the HP Photosmart Software. Double-click Add/Remove Programs (or click Uninstall a program). CAUTION: If the computer is turned on the product. 2. In Windows Vista and Windows XP, use the MSCONFIG utility to twain_32 ...
... HP Imaging device functions • HP Document Viewer • HP Photosmart Essential • HP Image Zone • HP Photo and imaging gallery • HP Photosmart, Officejet, Deskjet (with the product name and software version number) • HP Software update • HP Share to function. On the Windows taskbar...you follow the uninstall procedure carefully to the HP Photosmart Software. Double-click Add/Remove Programs (or click Uninstall a program). CAUTION: If the computer is turned on the product. 2. In Windows Vista and Windows XP, use the MSCONFIG utility to twain_32 ...

User Guide
Page 119
...; Deleting files from making changes, click OK and continue. When the User Account Control dialog box appears, click Continue. • In Windows XP: Click Run. If there is denied while making the changes. Click Restart to apply the changes to delete temporary files and folders.... type MSCONFIG, and then press Enter. Chapter 14 To turn off programs that you do one of components to the way windows starts message appears. On the Windows taskbar, click Start. On the Windows taskbar, click Start, click Programs or All Programs, and then click Accessories. After selecting the...
...; Deleting files from making changes, click OK and continue. When the User Account Control dialog box appears, click Continue. • In Windows XP: Click Run. If there is denied while making the changes. Click Restart to apply the changes to delete temporary files and folders.... type MSCONFIG, and then press Enter. Chapter 14 To turn off programs that you do one of components to the way windows starts message appears. On the Windows taskbar, click Start. On the Windows taskbar, click Start, click Programs or All Programs, and then click Accessories. After selecting the...
User Guide
Page 120
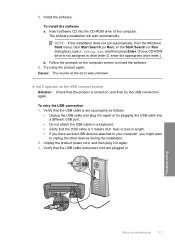
... (9.8 feet) or less in . Unplug the product power cord, and then plug it in again. 3. NOTE: If the installation does not run automatically, from the Windows Start menu, click Start Search (or Run). A red X appears on the USB connect prompt Solution: Check that the USB cable is turned on the computer...
... (9.8 feet) or less in . Unplug the product power cord, and then plug it in again. 3. NOTE: If the installation does not run automatically, from the Windows Start menu, click Start Search (or Run). A red X appears on the USB connect prompt Solution: Check that the USB cable is turned on the computer...


