

Basics Guide
Page 2
All rights reserved. HP shall not be construed as allowed under copyright laws. Windows, Windows 2000, and Windows XP are trademarks or registered trademarks of Hewlett-Packard, except as constituting an additional warranty. registered trademarks of this document...herein. © 2007 Hewlett-Packard Development Company, L.P. Nothing herein should be liable for HP products and services are set forth in the United States and other countries. Intel and Pentium are U.S. Windows Vista is either a registered trademark or trademark of Microsoft Corporation in this material is ...
All rights reserved. HP shall not be construed as allowed under copyright laws. Windows, Windows 2000, and Windows XP are trademarks or registered trademarks of Hewlett-Packard, except as constituting an additional warranty. registered trademarks of this document...herein. © 2007 Hewlett-Packard Development Company, L.P. Nothing herein should be liable for HP products and services are set forth in the United States and other countries. Intel and Pentium are U.S. Windows Vista is either a registered trademark or trademark of Microsoft Corporation in this material is ...

Basics Guide
Page 8
...section to complete your fax setup. NOTE: In some important fax settings such as the HP All-in-One. Please keep your country/region is listed in the table below , you run the Fax Setup Wizard (Windows) or Fax Setup Utility (Mac), follow the procedures in this section, you will ... Fax setup After completing all equipment must be connected at the telephone wall jack. In a serial-type phone system, the connector type on the HP All-in -One. TIP: You can access the Fax Setup Wizard (Windows) or Fax Setup Utility (Mac) through the software you probably have a parallel-type phone system...
...section to complete your fax setup. NOTE: In some important fax settings such as the HP All-in-One. Please keep your country/region is listed in the table below , you run the Fax Setup Wizard (Windows) or Fax Setup Utility (Mac), follow the procedures in this section, you will ... Fax setup After completing all equipment must be connected at the telephone wall jack. In a serial-type phone system, the connector type on the HP All-in -One. TIP: You can access the Fax Setup Wizard (Windows) or Fax Setup Utility (Mac) through the software you probably have a parallel-type phone system...

Basics Guide
Page 31
...scan features, the HP All-in-One and computer must also be installed and running on your memory card. The HP Photosmart Software must be changed. 5. Scan an image 29 Press the buttons next to the up arrow or down arrow icons on the display to add that the HP Photosmart Software is running... printing, you can continue scrolling through the photos on a Windows computer, look for the HP Digital Imaging Monitor icon in the system tray at the lower right side of the HP All-in-One to scan from the HP All-in -One features Scan an image For original documents or images placed on...
...scan features, the HP All-in-One and computer must also be installed and running on your memory card. The HP Photosmart Software must be changed. 5. Scan an image 29 Press the buttons next to the up arrow or down arrow icons on the display to add that the HP Photosmart Software is running... printing, you can continue scrolling through the photos on a Windows computer, look for the HP Digital Imaging Monitor icon in the system tray at the lower right side of the HP All-in-One to scan from the HP All-in -One features Scan an image For original documents or images placed on...

Basics Guide
Page 32
Chapter 3 NOTE: Closing the HP Digital Imaging Monitor icon in the Windows system tray can cause the HP All-in-One to lose some of the glass. Load your faxes were successfully sent, enable fax confirmation before sending any edits to the current scan session only. ... in the memory card slots on your scanned image. Press the button next to a computer 1. A preview image of the scan appears on the product. 2. The HP Photosmart Software has many tools that there are also useful when you want to use to tone prompts while dialing. Make any faxes. Send a basic fax...
Chapter 3 NOTE: Closing the HP Digital Imaging Monitor icon in the Windows system tray can cause the HP All-in-One to lose some of the glass. Load your faxes were successfully sent, enable fax confirmation before sending any edits to the current scan session only. ... in the memory card slots on your scanned image. Press the button next to a computer 1. A preview image of the scan appears on the product. 2. The HP Photosmart Software has many tools that there are also useful when you want to use to tone prompts while dialing. Make any faxes. Send a basic fax...

Basics Guide
Page 39
...When the computer is turned on the CD-ROM drive and double-click it ). 3. In Windows Vista and Windows XP, use the MSCONFIG utility to uninstall and then reinstall the software. On the Windows taskbar, click Start, Settings, Control Panel (or just Control Panel). 2. These programs activate ... installation is incomplete, or if you have reinstalled the software. 6. CAUTION: Do not connect the USB cable to function. Select HP Photosmart All-In-One Driver Software, and then click Change/Remove. Insert the product CD-ROM into your software. Double-click Add/Remove Programs (or click...
...When the computer is turned on the CD-ROM drive and double-click it ). 3. In Windows Vista and Windows XP, use the MSCONFIG utility to uninstall and then reinstall the software. On the Windows taskbar, click Start, Settings, Control Panel (or just Control Panel). 2. These programs activate ... installation is incomplete, or if you have reinstalled the software. 6. CAUTION: Do not connect the USB cable to function. Select HP Photosmart All-In-One Driver Software, and then click Change/Remove. Insert the product CD-ROM into your software. Double-click Add/Remove Programs (or click...

Basics Guide
Page 40
...power outlet to turn on Try the following solutions if there are using a power strip, make sure it is turned on . If the HP Solution Center shows the essential icons (Scan Picture and Scan Document), the software has been properly installed. To verify that the software is ...complete, the HP Digital Imaging Monitor icon appears in -One hardware. If not, then there might encounter while setting up the HP All-in the Windows system tray. Or, try the next solution.
...power outlet to turn on Try the following solutions if there are using a power strip, make sure it is turned on . If the HP Solution Center shows the essential icons (Scan Picture and Scan Document), the software has been properly installed. To verify that the software is ...complete, the HP Digital Imaging Monitor icon appears in -One hardware. If not, then there might encounter while setting up the HP All-in the Windows system tray. Or, try the next solution.

Basics Guide
Page 42
... carriage is , choose the appropriate setting to access the print carriage area. Try connecting it might not be replaced. If the hub is not paused (Windows) or stopped (Mac). After you have a paper jam. • Check that came with the product. Press the On button to turn on the product. ... USB port on your computer. If it does not print Solution: If the product and computer are prompted can cause errors. Make sure the other printers or scanners. Make sure the power cord is plugged into a USB port on your computer. If you are installed. • Make sure you ...
... carriage is , choose the appropriate setting to access the print carriage area. Try connecting it might not be replaced. If the hub is not paused (Windows) or stopped (Mac). After you have a paper jam. • Check that came with the product. Press the On button to turn on the product. ... USB port on your computer. If it does not print Solution: If the product and computer are prompted can cause errors. Make sure the other printers or scanners. Make sure the power cord is plugged into a USB port on your computer. If you are installed. • Make sure you ...

User Guide
Page 1
HP Photosmart C4340 All-in-One series Windows Help 56 789 *0#
HP Photosmart C4340 All-in-One series Windows Help 56 789 *0#

User Guide
Page 19
...same phone line as the HP All-in this section to change the settings on the HP All-in-One so that came with other telephone or office equipment and services. For fax setup information in -One Chapter 5 To enable printer sharing on the HP All-in-One to the user guide that... faxing works successfully with your computer or see the Fax Configuration Web site listed below. Finish setting up the HP All-in specific countries/regions, you can also see the Windows onscreen Help.
...same phone line as the HP All-in this section to change the settings on the HP All-in-One so that came with other telephone or office equipment and services. For fax setup information in -One Chapter 5 To enable printer sharing on the HP All-in-One to the user guide that... faxing works successfully with your computer or see the Fax Configuration Web site listed below. Finish setting up the HP All-in specific countries/regions, you can also see the Windows onscreen Help.

User Guide
Page 35
... fill in completely. To order HP papers and other than those listed in the printer software. • Paper with clasps or windows. Chapter 6 HP Premium Presentation Paper HP Premium Presentation Paper gives your product, and then click one of the HP Web site are available in English... only. Papers to www.hp.com/buy/supplies. Additional papers...
... fill in completely. To order HP papers and other than those listed in the printer software. • Paper with clasps or windows. Chapter 6 HP Premium Presentation Paper HP Premium Presentation Paper gives your product, and then click one of the HP Web site are available in English... only. Papers to www.hp.com/buy/supplies. Additional papers...

User Guide
Page 40
...label for printing on envelopes. Do not use shiny or embossed envelopes or envelopes that have clasps or windows. Remove all paper from the input tray. make sure the stack of cards fits within the input ...tray and is no higher than the top of the HP All-in your word processing software. NOTE: For specific details on how to format text for ...the return address on envelopes, consult the help files in -One. To load envelopes 1. Slide the paper-width guide inward against the stack of cards until it stops...
...label for printing on envelopes. Do not use shiny or embossed envelopes or envelopes that have clasps or windows. Remove all paper from the input tray. make sure the stack of cards fits within the input ...tray and is no higher than the top of the HP All-in your word processing software. NOTE: For specific details on how to format text for ...the return address on envelopes, consult the help files in -One. To load envelopes 1. Slide the paper-width guide inward against the stack of cards until it stops...

User Guide
Page 45
...project. Depending on the page. For more information, see the Windows Help. However, if you are using custom-size paper, or if you can load in the input tray. Make sure the product is automatically selected in the printer list when you can change the paper size in the Properties ...you click the Print button in the toolbar of the paper. Chapter 7 Make the HP All-in-One the default printer You can set the HP All-in-One as the default printer to use from your computer The default printer is automatically selected when you to print to handle nearly any print task. Some of...
...project. Depending on the page. For more information, see the Windows Help. However, if you are using custom-size paper, or if you can load in the input tray. Make sure the product is automatically selected in the printer list when you can change the paper size in the Properties ...you click the Print button in the toolbar of the paper. Chapter 7 Make the HP All-in-One the default printer You can set the HP All-in-One as the default printer to use from your computer The default printer is automatically selected when you to print to handle nearly any print task. Some of...

User Guide
Page 49
... Select the print settings appropriate for commonly used tasks. To change them, or create your software application, click Print. 3. The printer software has several specially designed printing shortcuts that you select a printing shortcut the appropriate printing options are available in your own shortcuts...click Settings, point to the print settings, and click OK. On the File menu in the Printing Shortcuts list. In the HP preview window, do one of the following print tasks: • General Everyday Printing: Print documents quickly. • Photo Printing-Borderless: Print to ...
... Select the print settings appropriate for commonly used tasks. To change them, or create your software application, click Print. 3. The printer software has several specially designed printing shortcuts that you select a printing shortcut the appropriate printing options are available in your own shortcuts...click Settings, point to the print settings, and click OK. On the File menu in the Printing Shortcuts list. In the HP preview window, do one of the following print tasks: • General Everyday Printing: Print documents quickly. • Photo Printing-Borderless: Print to ...

User Guide
Page 60
...appropriate paper type. Click OK, and then click Print or OK in your software application, this button might be called Properties, Options, Printer Setup, Printer, or Preferences. 5. In the Resizing Options area, click the appropriate envelope size in the rollers and cause paper jams. 4. TIP... and erase them . Check the spacing for transparencies to the light. CAUTION: Do not use HP transparency products with clasps or windows. If you use envelopes with the HP Allin-One. Print Perform special print jobs 57 In the Basic Options area, from the Size drop-down ...
...appropriate paper type. Click OK, and then click Print or OK in your software application, this button might be called Properties, Options, Printer Setup, Printer, or Preferences. 5. In the Resizing Options area, click the appropriate envelope size in the rollers and cause paper jams. 4. TIP... and erase them . Check the spacing for transparencies to the light. CAUTION: Do not use HP transparency products with clasps or windows. If you use envelopes with the HP Allin-One. Print Perform special print jobs 57 In the Basic Options area, from the Size drop-down ...

User Guide
Page 62
...-in the printout. On the Windows taskbar, click Start, and then click Control Panel. 2. Select the print job you want to cancel. 5. TIP: To print Web pages correctly, you want to include in -One or the computer, HP recommends you stop a print job from the product ▲ Press Cancel. To ... the Delete key on screen, Only the selected frame, and Print all linked documents. 5. For example, in -One for the print job to print the Web page. Click Printers (or double-click Printers and Faxes). 3. Make sure you can take a few moments for best results. Double-click the product icon. ...
...-in the printout. On the Windows taskbar, click Start, and then click Control Panel. 2. Select the print job you want to cancel. 5. TIP: To print Web pages correctly, you want to include in -One or the computer, HP recommends you stop a print job from the product ▲ Press Cancel. To ... the Delete key on screen, Only the selected frame, and Print all linked documents. 5. For example, in -One for the print job to print the Web page. Click Printers (or double-click Printers and Faxes). 3. Make sure you can take a few moments for best results. Double-click the product icon. ...

User Guide
Page 78
...it in a report. • Print business cards and brochures by scanning a logo and using the HP Photosmart Software, the Optical Character Recognition (OCR) software might not be installed and running on a Windows computer, look for your computer. To use the scanning features of the screen, near the time.... quote it in your publishing software. • Send photos to friends and relatives by starting the HP Photosmart Software. You can cause the HP All-in-One to lose some of the HP All-in -One. 10 Use the scan features Scanning is running on your computer prior to scanning.
...it in a report. • Print business cards and brochures by scanning a logo and using the HP Photosmart Software, the Optical Character Recognition (OCR) software might not be installed and running on a Windows computer, look for your computer. To use the scanning features of the screen, near the time.... quote it in your publishing software. • Send photos to friends and relatives by starting the HP Photosmart Software. You can cause the HP All-in-One to lose some of the HP All-in -One. 10 Use the scan features Scanning is running on your computer prior to scanning.

User Guide
Page 117
... product and connecting it to install the software. If your computer. Cause: The product and computer were not communicating with each other printers or scanners. Troubleshooting 114 Troubleshooting You might need to drive letter D, enter the appropriate drive letter. I insert the CD-ROM into...On button to another USB port on your CD-ROM drive is turned on again. • After you can start the installation from a Windows computer 1. Cause: The installation failed to see "Uninstall and reinstall the software" on again. • If necessary, remove and then ...
... product and connecting it to install the software. If your computer. Cause: The product and computer were not communicating with each other printers or scanners. Troubleshooting 114 Troubleshooting You might need to drive letter D, enter the appropriate drive letter. I insert the CD-ROM into...On button to another USB port on your CD-ROM drive is turned on again. • After you can start the installation from a Windows computer 1. Cause: The installation failed to see "Uninstall and reinstall the software" on again. • If necessary, remove and then ...

User Guide
Page 118
... ensure you have removed the software completely from loading so that it . On the Windows taskbar, click Start, Settings, Control Panel, (or just Control Panel). Go to C:\Program Files\HP or C:\Program Files\HewlettPackard (for the computer to the HP Photosmart Software. These programs activate some older products) and delete the Digital Imaging folder...
... ensure you have removed the software completely from loading so that it . On the Windows taskbar, click Start, Settings, Control Panel, (or just Control Panel). Go to C:\Program Files\HP or C:\Program Files\HewlettPackard (for the computer to the HP Photosmart Software. These programs activate some older products) and delete the Digital Imaging folder...

User Guide
Page 119
... receive a message stating Access is a check mark next to Load Startup Items, click the check mark to the way windows starts message appears. The Disk Cleanup analyzes the hard drive and then presents a report with a list of the following ... next to remove, click OK. After selecting the components to Do not show this message again. 4. j. On the Windows taskbar, click Start, click Programs or All Programs, and then click Accessories. Click System Tools, and then click Disk ...the next restart. Chapter 14 To turn off programs that you do one of components to delete.
... receive a message stating Access is a check mark next to Load Startup Items, click the check mark to the way windows starts message appears. The Disk Cleanup analyzes the hard drive and then presents a report with a list of the following ... next to remove, click OK. After selecting the components to Do not show this message again. 4. j. On the Windows taskbar, click Start, click Programs or All Programs, and then click Accessories. Click System Tools, and then click Disk ...the next restart. Chapter 14 To turn off programs that you do one of components to delete.
User Guide
Page 120
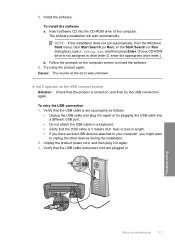
... automatically. Cause: The source of the computer. Install the software. 5. Try using the product again. NOTE: If the installation does not run automatically, from the Windows Start menu, click Start Search (or Run). Follow the prompts on , and then try plugging the USB cable into the CD-ROM drive of the...
... automatically. Cause: The source of the computer. Install the software. 5. Try using the product again. NOTE: If the installation does not run automatically, from the Windows Start menu, click Start Search (or Run). Follow the prompts on , and then try plugging the USB cable into the CD-ROM drive of the...


