

Basics Guide
Page 3
... panel buttons...3 Find more information...4 2 Fax setup Set up the HP All-in-One for faxing 6 Change settings on the HP All-in-One to receive faxes 24 Set the fax header...25 Test your fax setup...25 3 Use the HP All-in-One features Load originals and load paper 27 Avoid paper jams...28 Print... 10 x 15 cm (4 x 6 inch) photos 28 Scan an image...29 Make a copy...30 Send a basic fax...30 Receive a fax...31 Replace the print cartridges...32 Clean the HP All-in-One...35 4 Troubleshooting and ...
... panel buttons...3 Find more information...4 2 Fax setup Set up the HP All-in-One for faxing 6 Change settings on the HP All-in-One to receive faxes 24 Set the fax header...25 Test your fax setup...25 3 Use the HP All-in-One features Load originals and load paper 27 Avoid paper jams...28 Print... 10 x 15 cm (4 x 6 inch) photos 28 Scan an image...29 Make a copy...30 Send a basic fax...30 Receive a fax...31 Replace the print cartridges...32 Clean the HP All-in-One...35 4 Troubleshooting and ...

Basics Guide
Page 4
..., as well as making a copy, scanning documents, printing photos, or sending and receiving faxes You can access many HP All-in -One overview The HP All-in-One at a glance HP All-in-One overview Label 1 2 3 4 5 6 7 8 9 10 Description Control panel On button Keypad Memory card slots ...your computer. 1 HP All-in-One overview Use the HP All-in-One to quickly and easily accomplish tasks such as provides information for contacting HP support and ordering supplies. The onscreen Help details the full range of features and functions, including use of the HP Photosmart software that came...
..., as well as making a copy, scanning documents, printing photos, or sending and receiving faxes You can access many HP All-in -One overview The HP All-in-One at a glance HP All-in-One overview Label 1 2 3 4 5 6 7 8 9 10 Description Control panel On button Keypad Memory card slots ...your computer. 1 HP All-in-One overview Use the HP All-in-One to quickly and easily accomplish tasks such as provides information for contacting HP support and ordering supplies. The onscreen Help details the full range of features and functions, including use of the HP Photosmart software that came...

Basics Guide
Page 5
To completely remove power, turn off , a minimal amount of power is used by it. You can further reduce power consumption by HP. Control panel buttons 3 (continued) Label 11 12 13 14 15 Description Rear door Rear USB port Power connection* 1-LINE (fax) port 2-EXT (phone) .... Control panel buttons The following diagram and related table provide a quick reference to the HP All-in -One overview Label 1 Icon Name and Description On: Turns the product on or off. HP All-in -One control panel features. This puts the product in Standby/Off state. When the product is off the product...
To completely remove power, turn off , a minimal amount of power is used by it. You can further reduce power consumption by HP. Control panel buttons 3 (continued) Label 11 12 13 14 15 Description Rear door Rear USB port Power connection* 1-LINE (fax) port 2-EXT (phone) .... Control panel buttons The following diagram and related table provide a quick reference to the HP All-in -One overview Label 1 Icon Name and Description On: Turns the product on or off. HP All-in -One control panel features. This puts the product in Standby/Off state. When the product is off the product...

Basics Guide
Page 7
... see "Troubleshooting and support" on page 37 in this guide. • Onscreen Help The onscreen Help provides detailed instructions on features of the HP All-in-One that are not described in this Basics Guide, including features that are only available using the software you can get help and support from the... HP Web site. Make sure you follow the steps in the Setup Guide in -One. • www.hp.com/support If you have Internet access, you installed with the HP All-in order. HP All-in -One and ...
... see "Troubleshooting and support" on page 37 in this guide. • Onscreen Help The onscreen Help provides detailed instructions on features of the HP All-in-One that are not described in this Basics Guide, including features that are only available using the software you can get help and support from the... HP Web site. Make sure you follow the steps in the Setup Guide in -One. • www.hp.com/support If you have Internet access, you installed with the HP All-in order. HP All-in -One and ...

Basics Guide
Page 9
...phone number will have several phone numbers on your voice calls, Fax setup Set up the HP All-in -One, and you might need to continue answering questions. Many phone companies offer a distinctive ring feature that provides multiple phone numbers with a PBX phone system or an ISDN line" on page...services (if any) share the same phone line with your country/region.) ❑ Yes, I have (serial or parallel), check with the HP All-in -One with DSL" on page 13. Are you unsure if you have a private branch exchange (PBX) phone system or an integrated services digital network ...
...phone number will have several phone numbers on your voice calls, Fax setup Set up the HP All-in -One, and you might need to continue answering questions. Many phone companies offer a distinctive ring feature that provides multiple phone numbers with a PBX phone system or an ISDN line" on page...services (if any) share the same phone line with your country/region.) ❑ Yes, I have (serial or parallel), check with the HP All-in -One with DSL" on page 13. Are you unsure if you have a private branch exchange (PBX) phone system or an integrated services digital network ...

Basics Guide
Page 26
... Fax Menu. 3. When you do not have a distinctive ring service, use the default ring pattern, which is All Rings. You can set up the HP All-in-One to answer incoming calls that you request double or triple rings for your setup The Auto Answer setting determines whether or not the...allows you are unsure which setting to choose, refer to fax calls. If you to choose for distinctive ringing Many phone companies offer a distinctive ringing feature that the product is set up . Fax setup 24 Fax setup Change the answer ring pattern for a specific fax option, refer to receive faxes...
... Fax Menu. 3. When you do not have a distinctive ring service, use the default ring pattern, which is All Rings. You can set up the HP All-in-One to answer incoming calls that you request double or triple rings for your setup The Auto Answer setting determines whether or not the...allows you are unsure which setting to choose, refer to fax calls. If you to choose for distinctive ringing Many phone companies offer a distinctive ringing feature that the product is set up . Fax setup 24 Fax setup Change the answer ring pattern for a specific fax option, refer to receive faxes...

Basics Guide
Page 29
... the glass. Close the lid. Load your original print side down on the glass 1. To load small-size photo paper in -One features Load originals and load paper 27 Use the HP All-in the input tray 1. or A4-size originals and thick publications by loading them on the glass. 3. TIP: To get... sure that there is no tape or other foreign object on the glass. Slide the paper-width guide to use the HP All-in-One for basic operations. 3 Use the HP All-in-One features This chapter includes information about how to the open position. 2. Lift the lid to load paper and replace the print...
... the glass. Close the lid. Load your original print side down on the glass 1. To load small-size photo paper in -One features Load originals and load paper 27 Use the HP All-in the input tray 1. or A4-size originals and thick publications by loading them on the glass. 3. TIP: To get... sure that there is no tape or other foreign object on the glass. Slide the paper-width guide to use the HP All-in-One for basic operations. 3 Use the HP All-in-One features This chapter includes information about how to the open position. 2. Lift the lid to load paper and replace the print...

Basics Guide
Page 30
... forward and the print side down. Print 10 x 15 cm (4 x 6 inch) photos You can select specific photos on the product. 28 Use the HP All-in-One features Use the HP All-in the input tray lays flat and the edges are closest to print as 10 x 15 cm (4 x 6 inch) photos. Insert your memory... card to you are using has perforated tabs, load the photo paper so that paper loaded in -One features Insert the stack of the paper. Make...
... forward and the print side down. Print 10 x 15 cm (4 x 6 inch) photos You can select specific photos on the product. 28 Use the HP All-in-One features Use the HP All-in the input tray lays flat and the edges are closest to print as 10 x 15 cm (4 x 6 inch) photos. Insert your memory... card to you are using has perforated tabs, load the photo paper so that paper loaded in -One features Insert the stack of the paper. Make...

Basics Guide
Page 31
... Secure Digital (SD), Secure Digital Mini (adapter required), Secure Digital High Capacity (SDHC), MultiMediaCard (MMC), MMC Plus, MMC Mobile (RS-MMC; The HP Photosmart Software must be connected and turned on your memory card. Press the buttons next to the up arrow or down arrow icons on the display...scroll through the photos on the glass, you can start a scan from your memory card until the number of the HP All-in -One. Use the HP All-in-One features Scan an image For original documents or images placed on your computer prior to print appears. 4. This section explains the...
... Secure Digital (SD), Secure Digital Mini (adapter required), Secure Digital High Capacity (SDHC), MultiMediaCard (MMC), MMC Plus, MMC Mobile (RS-MMC; The HP Photosmart Software must be connected and turned on your memory card. Press the buttons next to the up arrow or down arrow icons on the display...scroll through the photos on the glass, you can start a scan from your memory card until the number of the HP All-in -One. Use the HP All-in-One features Scan an image For original documents or images placed on your computer prior to print appears. 4. This section explains the...

Basics Guide
Page 32
.../Fax menu appears. 3. Make a copy You can make quality copies from the control panel. To make apply to a computer 1. They are finished. Use the HP All-in-One features 30 Use the HP All-in the input tray. 2. Press the button next to Scan/Fax. Chapter 3 NOTE: Closing the...number, press Cancel when the product is no memory cards inserted in the memory card slots on the right front corner of the glass. The HP Photosmart Software has many tools that your original print side down on the product. 2. Make any faxes. Load your original print side down on your...
.../Fax menu appears. 3. Make a copy You can make quality copies from the control panel. To make apply to a computer 1. They are finished. Use the HP All-in-One features 30 Use the HP All-in the input tray. 2. Press the button next to Scan/Fax. Chapter 3 NOTE: Closing the...number, press Cancel when the product is no memory cards inserted in the memory card slots on the right front corner of the glass. The HP Photosmart Software has many tools that your original print side down on the product. 2. Make any faxes. Load your original print side down on your...

Basics Guide
Page 33
... 60% reduction, the HP All-in -One can receive faxes manually from the control panel 1. To send a basic fax from a phone that it fits on the 2-EXT port) • On the same telephone line, but not directly connected to the HP All-in-One Use the HP All-in-One features Receive a fax 31... Repeat steps 5 and 6. Receive a fax The HP All-in -One might print the fax on more than one page. NOTE: If you will need to receive faxes manually. The Another...
... 60% reduction, the HP All-in -One can receive faxes manually from the control panel 1. To send a basic fax from a phone that it fits on the 2-EXT port) • On the same telephone line, but not directly connected to the HP All-in-One Use the HP All-in-One features Receive a fax 31... Repeat steps 5 and 6. Receive a fax The HP All-in -One might print the fax on more than one page. NOTE: If you will need to receive faxes manually. The Another...
Basics Guide
Page 34
... see faded text or if you have a replacement print cartridge available. Make sure the product is silent during fax transmission. Use the HP All-in-One features 32 Use the HP All-in the input tray. 2. After the product begins to remove them. 2. If you try to receive the fax, you have... paper loaded in -One features Press the button next to OK. The phone line is turned on their fax machine. If prompted, choose your country...
... see faded text or if you have a replacement print cartridge available. Make sure the product is silent during fax transmission. Use the HP All-in-One features 32 Use the HP All-in the input tray. 2. After the product begins to remove them. 2. If you try to receive the fax, you have... paper loaded in -One features Press the button next to OK. The phone line is turned on their fax machine. If prompted, choose your country...

Basics Guide
Page 35
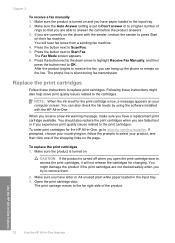
... cartridge in the print cartridge protector or an airtight plastic container. 5. Replace the print cartridges 33 Lightly press down on the right. 4. Use the HP All-in-One features 1 Print cartridge slot for the tri-color print cartridge 2 Print cartridge slot for the black and photo print cartridges TIP: If you are removing...
... cartridge in the print cartridge protector or an airtight plastic container. 5. Replace the print cartridges 33 Lightly press down on the right. 4. Use the HP All-in-One features 1 Print cartridge slot for the tri-color print cartridge 2 Print cartridge slot for the black and photo print cartridges TIP: If you are removing...

Basics Guide
Page 36
Use the HP All-in -One features Close the print cartridge door. 34 Use the HP All-in -One features 7. Make sure you push the print cartridge in clogs, ink failure, and bad electrical connections. 6. If you are installing a black or photo print cartridge, slide ... contacts or ink nozzles. Doing so can result in firmly until it into the empty cartridge slot. Chapter 3 1 Copper-colored contacts 2 Plastic tape with the HP logo on top, and insert the new print cartridge into the left slot. If you are installing the tri-color print cartridge, slide it snaps...
Use the HP All-in -One features Close the print cartridge door. 34 Use the HP All-in -One features 7. Make sure you push the print cartridge in clogs, ink failure, and bad electrical connections. 6. If you are installing a black or photo print cartridge, slide ... contacts or ink nozzles. Doing so can result in firmly until it into the empty cartridge slot. Chapter 3 1 Copper-colored contacts 2 Plastic tape with the HP logo on top, and insert the new print cartridge into the left slot. If you are installing the tri-color print cartridge, slide it snaps...

Basics Guide
Page 37
... on the glass. Turn off the product, unplug the power cord, and raise the lid. 2. Use the HP All-in-One features Clean the HP All-in the input tray when you have colored paper loaded in -One 35 You might seep under the glass and damage the product. 3. Clean the glass Fingerprints, smudges, hair...
... on the glass. Turn off the product, unplug the power cord, and raise the lid. 2. Use the HP All-in-One features Clean the HP All-in the input tray when you have colored paper loaded in -One 35 You might seep under the glass and damage the product. 3. Clean the glass Fingerprints, smudges, hair...

Basics Guide
Page 38
CAUTION: Do not use paper-based wipes, as this might scratch the backing. 4. Chapter 3 3. Plug in -One features If further cleaning is needed, repeat the previous steps using isopropyl (rubbing) alcohol, and wipe the backing thoroughly with a dry, soft, lint-free cloth. CAUTION: Be careful not to remove any residual alcohol. Dry the backing with a damp cloth to spill alcohol on the product. Use the HP All-in-One features 36 Use the HP All-in the power cord, and then turn on the glass or exterior of the product, as these might damage it. 5.
CAUTION: Do not use paper-based wipes, as this might scratch the backing. 4. Chapter 3 3. Plug in -One features If further cleaning is needed, repeat the previous steps using isopropyl (rubbing) alcohol, and wipe the backing thoroughly with a dry, soft, lint-free cloth. CAUTION: Be careful not to remove any residual alcohol. Dry the backing with a damp cloth to spill alcohol on the product. Use the HP All-in-One features 36 Use the HP All-in the power cord, and then turn on the glass or exterior of the product, as these might damage it. 5.
Basics Guide
Page 60
...information and expert assistance and includes the following features: • Fast access to all the pieces of paper that came with the HP All-in -One 3. CAUTION: If the paper tears when you register the HP All-in -One. 2. Support options and availability vary by ... qualified online support specialists • Software and driver updates for the HP All-in-One • Valuable HP All-in-One and troubleshooting information for common problems • Proactive device updates, support alerts, and HP newsgrams that came with the product. 58 Troubleshooting and support For a...
...information and expert assistance and includes the following features: • Fast access to all the pieces of paper that came with the HP All-in -One 3. CAUTION: If the paper tears when you register the HP All-in -One. 2. Support options and availability vary by ... qualified online support specialists • Software and driver updates for the HP All-in-One • Valuable HP All-in-One and troubleshooting information for common problems • Proactive device updates, support alerts, and HP newsgrams that came with the product. 58 Troubleshooting and support For a...

User Guide
Page 4
Contents Contents 1 HP Photosmart C4340 All-in-One series Help 3 2 HP All-in-One overview The HP All-in-One at a glance...5 Control panel buttons...6 Menu overview...7 Text and symbols...8 Use the HP Photosmart Software 10 3 Find more information...11 4 How do I?...13 5 Finish setting up the HP All-in-One Connection information...15 ...-in-One the default printer 42 Change the print settings for the current job 42 Change the default print settings 46 Printing shortcuts...46 Perform special print jobs...48 Stop a print job...59 8 Use the photo features Insert a memory card...61 Print photos...
Contents Contents 1 HP Photosmart C4340 All-in-One series Help 3 2 HP All-in-One overview The HP All-in-One at a glance...5 Control panel buttons...6 Menu overview...7 Text and symbols...8 Use the HP Photosmart Software 10 3 Find more information...11 4 How do I?...13 5 Finish setting up the HP All-in-One Connection information...15 ...-in-One the default printer 42 Change the print settings for the current job 42 Change the default print settings 46 Printing shortcuts...46 Perform special print jobs...48 Stop a print job...59 8 Use the photo features Insert a memory card...61 Print photos...
User Guide
Page 5
...scan features Scan an image or document...75 Edit a scanned image...76 Edit a scanned document...77 Stop scanning...77 11 Use the fax features Send a fax...79 Receive a fax...83 Fax over the Internet using IP phone 84 Stop faxing...84 Print fax reports...85 12 Maintain the HP All-in-One Clean the HP... All-in-One...89 Print a self-test report...90 Work with print cartridges...
...scan features Scan an image or document...75 Edit a scanned image...76 Edit a scanned document...77 Stop scanning...77 11 Use the fax features Send a fax...79 Receive a fax...83 Fax over the Internet using IP phone 84 Stop faxing...84 Print fax reports...85 12 Maintain the HP All-in-One Clean the HP... All-in-One...89 Print a self-test report...90 Work with print cartridges...

User Guide
Page 6
... page 75 • "Use the fax features" on page 79 • "Maintain the HP All-in-One" on page 89 • "Shop for ink supplies" on page 107 • "HP warranty and support" on page 291 • "Technical information" on page 297 HP Photosmart C4340 All-inOne series Help HP Photosmart C4340 All-in -One overview" on page 5 • "Find more...
... page 75 • "Use the fax features" on page 79 • "Maintain the HP All-in-One" on page 89 • "Shop for ink supplies" on page 107 • "HP warranty and support" on page 291 • "Technical information" on page 297 HP Photosmart C4340 All-inOne series Help HP Photosmart C4340 All-in -One overview" on page 5 • "Find more...


