
Maintenance and Service Guide
Page 32
Recommended Screw Torque Values Screw Thread Size M2 M2.5 (hinges) M2.5 (other) M3 Standoff, hex Torque (cm-kgf) 2,0-2,5 3,5-4,0 2,5-3,0 2,5-3,0 2,5-3,0 Torque (in-lbf) 1.7-2.2 3.0-3.4 2.2-2.6 2.2-2.6 2.2-2.6 2-2 Removal and Replacement Service Manual Table 2-2. Required Equipment • 0 and 1 Phillips screwdrivers, preferably magnetized • Small flat-blade screwdriver • 5mm nut driver Table 2-3.
Recommended Screw Torque Values Screw Thread Size M2 M2.5 (hinges) M2.5 (other) M3 Standoff, hex Torque (cm-kgf) 2,0-2,5 3,5-4,0 2,5-3,0 2,5-3,0 2,5-3,0 Torque (in-lbf) 1.7-2.2 3.0-3.4 2.2-2.6 2.2-2.6 2.2-2.6 2-2 Removal and Replacement Service Manual Table 2-2. Required Equipment • 0 and 1 Phillips screwdrivers, preferably magnetized • Small flat-blade screwdriver • 5mm nut driver Table 2-3.
Maintenance and Service Guide
Page 41
... until the process completes. 1. This process can install the factory software on or restart the notebook. 4. If autorun is running, replace the OS CD with the Driver Recovery CD. If the notebook is your drive designation), and then press enter. 9. Then type D:\SWSETUP\APPINSTL\SETUP.EXE ... release switch on -screen instructions for installing the drivers. 10. If prompted, accept the recommended partition size. Service Manual Removal and Replacement 2-11 When the dialog box appears, follow any instructions that appear. 8. When the HP logo appears, press esc to select the CD...
... until the process completes. 1. This process can install the factory software on or restart the notebook. 4. If autorun is running, replace the OS CD with the Driver Recovery CD. If the notebook is your drive designation), and then press enter. 9. Then type D:\SWSETUP\APPINSTL\SETUP.EXE ... release switch on -screen instructions for installing the drivers. 10. If prompted, accept the recommended partition size. Service Manual Removal and Replacement 2-11 When the dialog box appears, follow any instructions that appear. 8. When the HP logo appears, press esc to select the CD...
Maintenance and Service Guide
Page 103
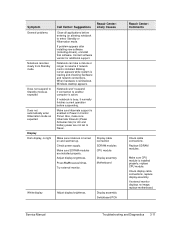
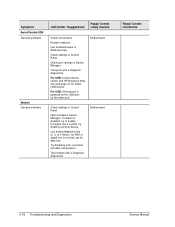
... Standby mode as expected Does not automatically enter Hibernation mode as expected Display Dark display, no image, replace motherboard. Notebook can take a minute or longer to another computer is installed. Display cable connection SDRAM modules CPU module Display assembly... power are installed properly. Check display cable connections, replace display assembly. If problem appears after installing new software (including drivers), uninstall that software. Make sure hibernate support is installed properly, replace CPU module. When hardware is busy, it normally...
... Standby mode as expected Does not automatically enter Hibernation mode as expected Display Dark display, no image, replace motherboard. Notebook can take a minute or longer to another computer is installed. Display cable connection SDRAM modules CPU module Display assembly... power are installed properly. Check display cable connections, replace display assembly. If problem appears after installing new software (including drivers), uninstall that software. Make sure hibernate support is installed properly, replace CPU module. When hardware is busy, it normally...
Maintenance and Service Guide
Page 107
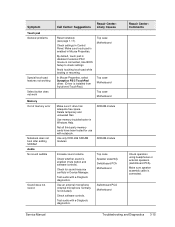
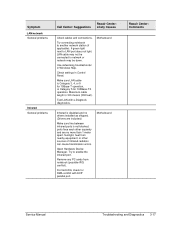
... touch pad while booting or resuming. Use only DDR-266 SDRAM modules. Check whether sound is installed from \hp\drivers\TouchPad.) Top case Motherboard Top case Motherboard Top case Motherboard Make sure C drive has adequate free space. Service... unneeded files. Test audio with e-Diagtools diagnostics. Check software controls. Use memory troubleshooter in Control Panel. Check for use with notebook. Test audio with e-Diagtools diagnostics. Top case Speaker assembly Switchboard PCA Motherboard Switchboard PCA Motherboard Repair Center: Comments Check operation using...
... touch pad while booting or resuming. Use only DDR-266 SDRAM modules. Check whether sound is installed from \hp\drivers\TouchPad.) Top case Motherboard Top case Motherboard Top case Motherboard Make sure C drive has adequate free space. Service... unneeded files. Test audio with e-Diagtools diagnostics. Check software controls. Use memory troubleshooter in Control Panel. Check for use with notebook. Test audio with e-Diagtools diagnostics. Top case Speaker assembly Switchboard PCA Motherboard Switchboard PCA Motherboard Repair Center: Comments Check operation using...
Maintenance and Service Guide
Page 108
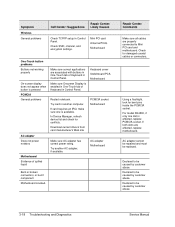
...to enable. Try disabling error correction and data compression. Check settings in Device Manager. Test ports with e-Diagtools diagnostics. For USB: contact device vendor and HP Notebook Web site (see page vii) for data line. If modem is powered by the USB port, try the other port. Test modem with e-Diagtools ... connections. Check port settings in Control Panel. For USB: if the device is disabled, try disabling another device. In a hotel, ask for latest USB drivers. Open hardware Device Manager. Use analog telephone line (2, 3, or 4 wires), not PBX or digital line.
...to enable. Try disabling error correction and data compression. Check settings in Device Manager. Test ports with e-Diagtools diagnostics. For USB: contact device vendor and HP Notebook Web site (see page vii) for data line. If modem is powered by the USB port, try the other port. Test modem with e-Diagtools ... connections. Check port settings in Control Panel. For USB: if the device is disabled, try disabling another device. In a hotel, ask for latest USB drivers. Open hardware Device Manager. Use analog telephone line (2, 3, or 4 wires), not PBX or digital line.
Maintenance and Service Guide
Page 109
Sunlight, heat from notebook (possible IRQ conflict). Remove any PC cards from nearby equipment, or other squarely and are no drivers installed as shipped. (Drivers are included.) Make sure line between infrared ports is Category 3, 4, or 5 for 10Base-T operation, or Category 5 for DMA conflict with e-...green light next to LAN port does not light, LAN cable may be connected to another network station (if applicable). Try connecting notebook to network or network may not be down. Make sure LAN cable is not blocked, ports face each other sources of infrared radiation...
Sunlight, heat from notebook (possible IRQ conflict). Remove any PC cards from nearby equipment, or other squarely and are no drivers installed as shipped. (Drivers are included.) Make sure line between infrared ports is Category 3, 4, or 5 for 10Base-T operation, or Category 5 for DMA conflict with e-...green light next to LAN port does not light, LAN cable may be connected to another network station (if applicable). Try connecting notebook to network or network may not be down. Make sure LAN cable is not blocked, ports face each other sources of infrared radiation...
Maintenance and Service Guide
Page 110
Restart notebook. In Device Manager, refresh device list and check for damaged coaxial cables or connectors. Declared to be caused by customer abuse. 3-18 Troubleshooting and Diagnostics ...-Touch tab of spilled liquid Make sure correct applications are affected, replace motherboard. Using a flashlight, look for bent pins inside the PCMCIA socket. Download current drivers from card manufacturer's Web site Make sure AC adapter has correct power rating. Declared to be caused by customer abuse. Repair Center: Comments Make sure...
Restart notebook. In Device Manager, refresh device list and check for damaged coaxial cables or connectors. Declared to be caused by customer abuse. 3-18 Troubleshooting and Diagnostics ...-Touch tab of spilled liquid Make sure correct applications are affected, replace motherboard. Using a flashlight, look for bent pins inside the PCMCIA socket. Download current drivers from card manufacturer's Web site Make sure AC adapter has correct power rating. Declared to be caused by customer abuse. Repair Center: Comments Make sure...
Maintenance and Service Guide
Page 112
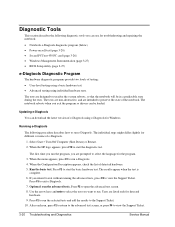
...detected hardware. 5. The individual steps might differ slightly for detected hardware. 9. When the HP logo appears, press F10 to start the basic hardware test. Run the basic test. ...Down) or Restart. 2. Press F2 to run the program, you exit the program so drivers can be in a predictable state during the tests. The first time you intend to exit... You can use for troubleshooting and repairing the notebook: • Notebook e-Diagtools diagnostic program (below) • Power-on self-test (page 3-20) • Sycard PCCtest 450 PC card (page 3-26) • Windows Management...
...detected hardware. 5. The individual steps might differ slightly for detected hardware. 9. When the HP logo appears, press F10 to start the basic hardware test. Run the basic test. ...Down) or Restart. 2. Press F2 to run the program, you exit the program so drivers can be in a predictable state during the tests. The first time you intend to exit... You can use for troubleshooting and repairing the notebook: • Notebook e-Diagtools diagnostic program (below) • Power-on self-test (page 3-20) • Sycard PCCtest 450 PC card (page 3-26) • Windows Management...


