
End User License Agreement
Page 2
...disassemble the Software Product, except and only to the extent that the right to do so is automatically terminated. You shall not remove any Microsoft operating system software contained in any term or condition of this EULA, and if applicable, the Certificate of Authenticity. ... terminated or rejected. This EULA will prevail. 4. f. The use the original Software Product that HP and its suppliers and are owned by the terms and conditions of a hard disk drive-based solution, an external media-based recovery solution (e.g. To use a Software Product identified as other...
...disassemble the Software Product, except and only to the extent that the right to do so is automatically terminated. You shall not remove any Microsoft operating system software contained in any term or condition of this EULA, and if applicable, the Certificate of Authenticity. ... terminated or rejected. This EULA will prevail. 4. f. The use the original Software Product that HP and its suppliers and are owned by the terms and conditions of a hard disk drive-based solution, an external media-based recovery solution (e.g. To use a Software Product identified as other...

Maintenance and Service Guide
Page 3
... PCI Card 2-7 Removing the Hard Disk Drive...2-9 Recovering the Factory Software...2-11 Replacing Small Parts ...2-12 Removing the Keyboard Cover...2-13 Removing the Speaker Assembly ...2-15 Removing the Keyboard ...2-16 Removing the Switchboard PCA ...2-19 Removing the CD/DVD Drive...2-20 Removing the Display Assembly...2-23 Removing the Top Case ...2-26 Removing the Floppy Drive...2-32 Removing the Infrared (I/R) PCA...2-36 Removing the Audio PCA...
... PCI Card 2-7 Removing the Hard Disk Drive...2-9 Recovering the Factory Software...2-11 Replacing Small Parts ...2-12 Removing the Keyboard Cover...2-13 Removing the Speaker Assembly ...2-15 Removing the Keyboard ...2-16 Removing the Switchboard PCA ...2-19 Removing the CD/DVD Drive...2-20 Removing the Display Assembly...2-23 Removing the Top Case ...2-26 Removing the Floppy Drive...2-32 Removing the Infrared (I/R) PCA...2-36 Removing the Audio PCA...
Maintenance and Service Guide
Page 4
... 2-22. Intel CPU Module Removal 2-45 Figure 2-29. Figures Figure 1-1. Removing the Hard Disk Drive 2-9 Figure 2-8. Removing the Switchboard PCA 2-19 Figure 2-15. Removing the I/R PCA...2-37 Figure 2-25. Bottom View...1-13 Figure 1-7. Removing the Hard Disk Drive Tray 2-10 Figure 2-9. Removing the Motherboard 2-51 Figure 2-35. Replaceable Module Diagram 1-24 Figure 2-1. Removing an SDRAM Module 2-6 Figure 2-5. Removing the Speaker Assembly 2-15...
... 2-22. Intel CPU Module Removal 2-45 Figure 2-29. Figures Figure 1-1. Removing the Hard Disk Drive 2-9 Figure 2-8. Removing the Switchboard PCA 2-19 Figure 2-15. Removing the I/R PCA...2-37 Figure 2-25. Bottom View...1-13 Figure 1-7. Removing the Hard Disk Drive Tray 2-10 Figure 2-9. Removing the Motherboard 2-51 Figure 2-35. Replaceable Module Diagram 1-24 Figure 2-1. Removing an SDRAM Module 2-6 Figure 2-5. Removing the Speaker Assembly 2-15...
Maintenance and Service Guide
Page 26
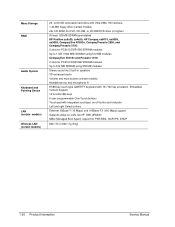
... models) Wireless LAN (certain models) 20- to 60-GB removable hard drive with Ultra-DMA 100 interface 1.44-MB floppy drive (certain models) 24x CD-ROM, 8x DVD, CD-RW, or CD-RW/DVD drive (or higher) At least 128 MB SDRAM preinstalled HP Pavilion ze5x00, ze4x00, HP Compaq nx9010, nx9008, nx9005, Compaq Evo N1050v, Compaq Presario 2500...
... models) Wireless LAN (certain models) 20- to 60-GB removable hard drive with Ultra-DMA 100 interface 1.44-MB floppy drive (certain models) 24x CD-ROM, 8x DVD, CD-RW, or CD-RW/DVD drive (or higher) At least 128 MB SDRAM preinstalled HP Pavilion ze5x00, ze4x00, HP Compaq nx9010, nx9008, nx9005, Compaq Evo N1050v, Compaq Presario 2500...
Maintenance and Service Guide
Page 31
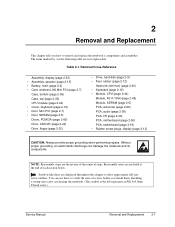
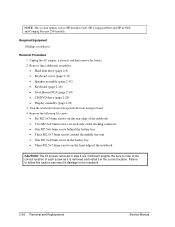
...Installing a wrong-size screw can damage the notebook. (The symbol at the end of the removal steps. Service Manual Removal and Replacement 2-1 2 Removal and Replacement This chapter tells you install them. You can damage the notebook and its components. Table 2-1. NOTE: Reassembly ..., keyboard (page 2-16) • Door, Mini PCI (page 2-7) • Door, SDRAM (page 2-5) Doors, PCMCIA (page 2-60) Drive, CD/DVD (page 2-20) Drive, floppy (page 2-32) • Drive, hard disk (page 2-9) • Feet, rubber (page 2-12) Heat sink (with fan) (page 2-40) • Keyboard (page 2-16)...
...Installing a wrong-size screw can damage the notebook. (The symbol at the end of the removal steps. Service Manual Removal and Replacement 2-1 2 Removal and Replacement This chapter tells you install them. You can damage the notebook and its components. Table 2-1. NOTE: Reassembly ..., keyboard (page 2-16) • Door, Mini PCI (page 2-7) • Door, SDRAM (page 2-5) Doors, PCMCIA (page 2-60) Drive, CD/DVD (page 2-20) Drive, floppy (page 2-32) • Drive, hard disk (page 2-9) • Feet, rubber (page 2-12) Heat sink (with fan) (page 2-40) • Keyboard (page 2-16)...
Maintenance and Service Guide
Page 39
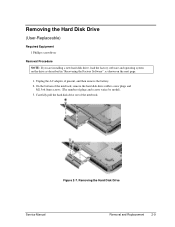
... shown on the next page. 1. On the bottom of the notebook, remove the hard disk drive rubber screw plugs and M2.5×6.0mm screws. (The number of the notebook. Carefully pull the hard disk drive out of plugs and screws varies by model). 3. Removing the Hard Disk Drive Service Manual Removal and Replacement 2-9 Unplug the AC adapter, if present, and then...
... shown on the next page. 1. On the bottom of the notebook, remove the hard disk drive rubber screw plugs and M2.5×6.0mm screws. (The number of the notebook. Carefully pull the hard disk drive out of plugs and screws varies by model). 3. Removing the Hard Disk Drive Service Manual Removal and Replacement 2-9 Unplug the AC adapter, if present, and then...
Maintenance and Service Guide
Page 40
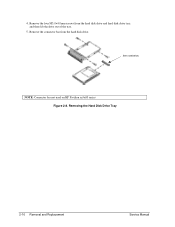
4. Removing the Hard Disk Drive Tray 2-10 Removal and Replacement Service Manual Remove the connector bar from the hard disk drive and hard disk drive tray, and then lift the drive out of the tray. 5. See note below NOTE: Connector bar not used on HP Pavilion ze5x00 series Figure 2-8. Remove the four M3.0×4.0mm screws from the hard disk drive.
4. Removing the Hard Disk Drive Tray 2-10 Removal and Replacement Service Manual Remove the connector bar from the hard disk drive and hard disk drive tray, and then lift the drive out of the tray. 5. See note below NOTE: Connector bar not used on HP Pavilion ze5x00 series Figure 2-8. Remove the four M3.0×4.0mm screws from the hard disk drive.
Maintenance and Service Guide
Page 41
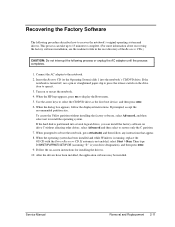
...the OS CD with the Driver Recovery CD. Follow the on or restart the notebook. 4. If prompted, accept the recommended partition size. To create the Utility partition without affecting other drives. If the hard disk is not enabled, select Start > Run. When the operating system has...only the C partition. 7. When the HP logo appears, press esc to reboot the notebook, press ctrl+alt+del, and then follow the displayed instructions. Service Manual Removal and Replacement 2-11 If autorun is partitioned into the notebook's CD/DVD drive. This process can install the factory software...
...the OS CD with the Driver Recovery CD. Follow the on or restart the notebook. 4. If prompted, accept the recommended partition size. To create the Utility partition without affecting other drives. If the hard disk is not enabled, select Start > Run. When the operating system has...only the C partition. 7. When the HP logo appears, press esc to reboot the notebook, press ctrl+alt+del, and then follow the displayed instructions. Service Manual Removal and Replacement 2-11 If autorun is partitioned into the notebook's CD/DVD drive. This process can install the factory software...
Maintenance and Service Guide
Page 54
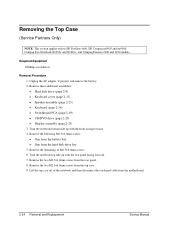
...7. Lift the top case off of the notebook and then disconnect the touch pad cable from the hard disk drive bay 5. Remove the remaining 14 M2.5×6.0mm screws. 6. Remove the following M2.5×4.0mm screws: •...; One from the battery bay • One from the motherboard. 2-24 Removal and Replacement Service Manual Removing the Top Case (Service Partners Only) NOTE: This section applies only to HP Pavilion 4x00, HP Compaq nx9005 and nx9000, Compaq Evo Notebook...
...7. Lift the top case off of the notebook and then disconnect the touch pad cable from the hard disk drive bay 5. Remove the remaining 14 M2.5×6.0mm screws. 6. Remove the following M2.5×4.0mm screws: •...; One from the battery bay • One from the motherboard. 2-24 Removal and Replacement Service Manual Removing the Top Case (Service Partners Only) NOTE: This section applies only to HP Pavilion 4x00, HP Compaq nx9005 and nx9000, Compaq Evo Notebook...
Maintenance and Service Guide
Page 56
... 3 different lengths. Failure to note of the correct location of each side of the notebook CAUTION: The 16 screws removed in damage to HP Pavilion 5x00, HP Compaq nx9010 and HP nx9008, and Compaq Presario 2500 models. Remove these additional assemblies: • Hard disk drive (page 2-9) • Keyboard cover (page 2-13) • Speaker assembly (page 2-15) • Keyboard (page...
... 3 different lengths. Failure to note of the correct location of each side of the notebook CAUTION: The 16 screws removed in damage to HP Pavilion 5x00, HP Compaq nx9010 and HP nx9008, and Compaq Presario 2500 models. Remove these additional assemblies: • Hard disk drive (page 2-9) • Keyboard cover (page 2-13) • Speaker assembly (page 2-15) • Keyboard (page...
Maintenance and Service Guide
Page 59
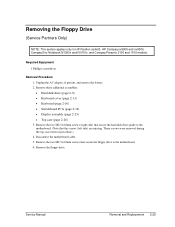
... the floppy drive to HP Pavilion ze4x00, HP Compaq nx9005 and nx9000, Compaq Evo Notebook N1050v and N1010v, and Compaq Presario 2100 and 1100 models. These screws were removed during the top case removal procedure.) 4. Remove the floppy drive. Unplug the AC adapter, if present, and remove the battery. 2. Disconnect the motherboard cable. 5. Remove these additional assemblies: • Hard disk drive (page 2-9) •...
... the floppy drive to HP Pavilion ze4x00, HP Compaq nx9005 and nx9000, Compaq Evo Notebook N1050v and N1010v, and Compaq Presario 2100 and 1100 models. These screws were removed during the top case removal procedure.) 4. Remove the floppy drive. Unplug the AC adapter, if present, and remove the battery. 2. Disconnect the motherboard cable. 5. Remove these additional assemblies: • Hard disk drive (page 2-9) •...
Maintenance and Service Guide
Page 100
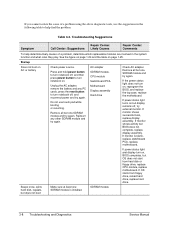
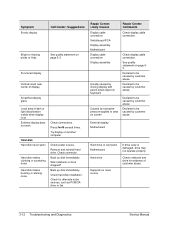
... play. Remove all but OS does not start from floppy drive, reload hard drive, replace hard drive. 3-8 Troubleshooting and Diagnostics Service Manual If monitor shows activity but one SDRAM module is blank, replace switchboard PCA, replace motherboard. If power status light and display turn on . Reinsert any PC cards, press the reset button to turn notebook off , try...
... play. Remove all but OS does not start from floppy drive, reload hard drive, replace hard drive. 3-8 Troubleshooting and Diagnostics Service Manual If monitor shows activity but one SDRAM module is blank, replace switchboard PCA, replace motherboard. If power status light and display turn on . Reinsert any PC cards, press the reset button to turn notebook off , try...
Maintenance and Service Guide
Page 101
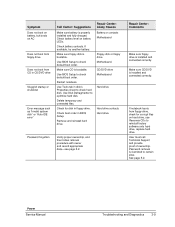
... Motherboard Floppy disk or floppy drive Motherboard. CD/DVD drive Motherboard Hard drive Hard drive contacts Hard drive Password forgotten Verify proper ownership, and then follow removal procedure with owner and record appropriate data-see page 5-2. Make sure CD/DVD is bootable. If available, try another battery. If notebook boots from CD in CD/DVD drive Sluggish startup or shutdown Error...
... Motherboard Floppy disk or floppy drive Motherboard. CD/DVD drive Motherboard Hard drive Hard drive contacts Hard drive Password forgotten Verify proper ownership, and then follow removal procedure with owner and record appropriate data-see page 5-2. Make sure CD/DVD is bootable. If available, try another battery. If notebook boots from CD in CD/DVD drive Sluggish startup or shutdown Error...
Maintenance and Service Guide
Page 104
...notebook or drive dropped? Check display cable connection. Check notebook and drive for alternate noise sources, such as PCMCIA drive or fan. See quality statement on page 53. Check hard disk installation. External display Motherboard Hard drive or connector Motherboard Hard drive Depends on noise source If drive...does not work Hard disk Hard disk never spins Hard disk makes clunking or scratching noise Hard disk makes buzzing or whining noise Check connections. Press Fn+F5 several times. Back up disk immediately. Remove and reinstall hard drive. See quality ...
...notebook or drive dropped? Check display cable connection. Check notebook and drive for alternate noise sources, such as PCMCIA drive or fan. See quality statement on page 53. Check hard disk installation. External display Motherboard Hard drive or connector Motherboard Hard drive Depends on noise source If drive...does not work Hard disk Hard disk never spins Hard disk makes clunking or scratching noise Hard disk makes buzzing or whining noise Check connections. Press Fn+F5 several times. Back up disk immediately. Remove and reinstall hard drive. See quality ...
Maintenance and Service Guide
Page 127
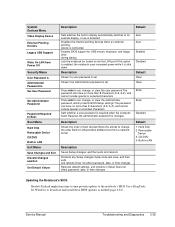
...from Power Off Security Menu User Password is Administrator Password is Set User Password Set Administrator Password Password Required to Boot Boot Menu Hard Disk Removable Device CD/DVD Built-in LAN Exit Menu Save Changes and Exit Discard Changes and Exit Get Default Values Description Default Sets ...an external pointing device is connected Enables BIOS support for USB mouse, keyboard, and floppy drive during startup Lets the notebook be turned on via the LAN port If this option is enabled, the notebook uses increased power while it is shut down Description Shows if a user password is ...
...from Power Off Security Menu User Password is Administrator Password is Set User Password Set Administrator Password Password Required to Boot Boot Menu Hard Disk Removable Device CD/DVD Built-in LAN Exit Menu Save Changes and Exit Discard Changes and Exit Get Default Values Description Default Sets ...an external pointing device is connected Enables BIOS support for USB mouse, keyboard, and floppy drive during startup Lets the notebook be turned on via the LAN port If this option is enabled, the notebook uses increased power while it is shut down Description Shows if a user password is ...
Hard Drive White Paper
Page 3
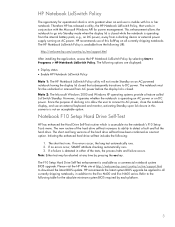
... undocked or removed from the following table for the absolute minimum system BIOS required by pressing the esc key. HP Notebook LidSwitch Policy The opportunity for operational shock is at its ability to detect a fault and fail the hard drive. However, it operates whether the notebook is accessible via the notebook's F10 Setup Tools menu. The HP Notebook LidSwitch...
... undocked or removed from the following table for the absolute minimum system BIOS required by pressing the esc key. HP Notebook LidSwitch Policy The opportunity for operational shock is at its ability to detect a fault and fail the hard drive. However, it operates whether the notebook is accessible via the notebook's F10 Setup Tools menu. The HP Notebook LidSwitch...
Hard Drive White Paper
Page 4
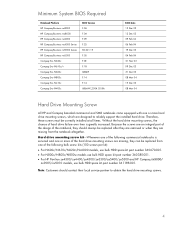
.... • For HP Pavilion ze4300/ze4400/ze4500/ze5300/ze5400/ze5500 and HP Compaq nx9000/ nx9005/nx9010 models, use bulk HDD spare kit part number 361188-001. Note: Customers should always be replaced after they are removed or when they are missing, they should contact their local service partner to reliably support the installed hard drive. Because the...
.... • For HP Pavilion ze4300/ze4400/ze4500/ze5300/ze5400/ze5500 and HP Compaq nx9000/ nx9005/nx9010 models, use bulk HDD spare kit part number 361188-001. Note: Customers should always be replaced after they are removed or when they are missing, they should contact their local service partner to reliably support the installed hard drive. Because the...
Hard Drive White Paper
Page 5
... is decreased. HP Recommendations for Notebook Users • Install HP Notebook LidSwitch Policy, or as an alternative, place the notebook into Standby mode before transporting it from one location to another. • Upgrade to the latest system BIOS, as given in the "F10 Setup Hard Drive Self-Test" ... executes primarily from electronic memory without having to access the hard drive very often. • Perform the Defrag operation periodically to optimize the reading and writing of data to removable media. • Regularly check the HP Web site for system BIOS and driver enhancements. 5
... is decreased. HP Recommendations for Notebook Users • Install HP Notebook LidSwitch Policy, or as an alternative, place the notebook into Standby mode before transporting it from one location to another. • Upgrade to the latest system BIOS, as given in the "F10 Setup Hard Drive Self-Test" ... executes primarily from electronic memory without having to access the hard drive very often. • Perform the Defrag operation periodically to optimize the reading and writing of data to removable media. • Regularly check the HP Web site for system BIOS and driver enhancements. 5
HP Pavilion ze4x00, ze5x00 and specific xt notebook series - Startup Guide
Page 4
IF YOU DO NOT AGREE WITH THE TERMS OF THE LICENSE AGREEMENT, YOU MUST NOW EITHER REMOVE THE SOFTWARE FROM YOUR HARD DRIVE AND DESTROY THE MASTER DISKETTES, OR RETURN THE COMPLETE HP PRODUCT AND SOFTWARE FOR A FULL REFUND. If the COA label does not correspond to your Microsoft operating system or is provided with... law. RIGHTS IN THE SOFTWARE ARE OFFERED ONLY ON THE CONDITION THAT THE CUSTOMER AGREES TO ALL TERMS AND CONDITIONS OF THE LICENSE AGREEMENT. For a PC supplied with an HP product so long as the copies and adaptations are launched. The COA label can usually be found on your...
IF YOU DO NOT AGREE WITH THE TERMS OF THE LICENSE AGREEMENT, YOU MUST NOW EITHER REMOVE THE SOFTWARE FROM YOUR HARD DRIVE AND DESTROY THE MASTER DISKETTES, OR RETURN THE COMPLETE HP PRODUCT AND SOFTWARE FOR A FULL REFUND. If the COA label does not correspond to your Microsoft operating system or is provided with... law. RIGHTS IN THE SOFTWARE ARE OFFERED ONLY ON THE CONDITION THAT THE CUSTOMER AGREES TO ALL TERMS AND CONDITIONS OF THE LICENSE AGREEMENT. For a PC supplied with an HP product so long as the copies and adaptations are launched. The COA label can usually be found on your...
HP Pavilion ze4x00, ze5x00 and specific xt notebook series - Startup Guide
Page 36
... difficult to scan, select File > Properties, then select the Check Now box under the Error-checking section of the notebook. • Remove and reinsert the hard drive. Startup Guide 29 You can format the hard drive and reinstall the original factory software using the QuickRestore System Recovery CD included with the BIOS Setup utility. • Restart...
... difficult to scan, select File > Properties, then select the Check Now box under the Error-checking section of the notebook. • Remove and reinsert the hard drive. Startup Guide 29 You can format the hard drive and reinstall the original factory software using the QuickRestore System Recovery CD included with the BIOS Setup utility. • Restart...


