
End User License Agreement
Page 2
...notices or proprietary restrictions from the Software Product. 6. Any transfer must agree to the original Software Product provided by HP as a consignment. You shall not remove any term or condition of a conflict between such terms, the other applicable laws and international treaty provisions. This..., decompile, or disassemble the Software Product, except and only to the extent that formed the basis for restoring the hard disk of a hard disk drive-based solution, an external media-based recovery solution (e.g. To use the original Software Product that the right to the...
...notices or proprietary restrictions from the Software Product. 6. Any transfer must agree to the original Software Product provided by HP as a consignment. You shall not remove any term or condition of a conflict between such terms, the other applicable laws and international treaty provisions. This..., decompile, or disassemble the Software Product, except and only to the extent that formed the basis for restoring the hard disk of a hard disk drive-based solution, an external media-based recovery solution (e.g. To use the original Software Product that the right to the...
Reference Guide
Page 4
... DVDs 2-10 To Insert or Remove a CD or DVD 2-10 To Play DVD Movies 2-11 To Write to DVD Media (Select Models Only) . . . 2-12 To Create or Copy CDs 2-12 Securing Your Notebook 2-13 To Set Up Password Protection 2-13 To Lock Your Notebook 2-13 To Attach an Optional ...2-14 To Protect Against Viruses 2-14 To Lock the Hard Drive 2-15 Taking Care of Your Notebook 2-15 To Protect Your Hard Drive 2-15 To Maintain Your Notebook 2-16 To Safeguard Your Data 2-16 To Extend the Life of the Display 2-17 To Clean Your Notebook 2-17 3 Battery Packs and Power Management Managing Power Consumption...
... DVDs 2-10 To Insert or Remove a CD or DVD 2-10 To Play DVD Movies 2-11 To Write to DVD Media (Select Models Only) . . . 2-12 To Create or Copy CDs 2-12 Securing Your Notebook 2-13 To Set Up Password Protection 2-13 To Lock Your Notebook 2-13 To Attach an Optional ...2-14 To Protect Against Viruses 2-14 To Lock the Hard Drive 2-15 Taking Care of Your Notebook 2-15 To Protect Your Hard Drive 2-15 To Maintain Your Notebook 2-16 To Safeguard Your Data 2-16 To Extend the Life of the Display 2-17 To Clean Your Notebook 2-17 3 Battery Packs and Power Management Managing Power Consumption...
Reference Guide
Page 5
...Off . . . . . 4-7 5 Add-On Devices Connecting External Devices 5-1 To Insert or Remove a PC Card 5-1 To Connect an Audio Device 5-3 To Connect a TV to Your Notebook (Select Models Only 5-4 Switching the Display to the External Monitor (Select Models Only 5-5 To ...Memory 5-9 To Install a RAM Expansion Module 5-9 To Remove a RAM Expansion Module 5-10 Replacing the Hard Drive 5-12 To Replace the Hard Drive 5-12 To Replace the Hard Drive Holder 5-13 To Prepare a New Hard Drive 5-14 6 Troubleshooting Troubleshooting Your Notebook 6-1 Audio Problems 6-2 CD-ROM and DVD Problems 6-3...
...Off . . . . . 4-7 5 Add-On Devices Connecting External Devices 5-1 To Insert or Remove a PC Card 5-1 To Connect an Audio Device 5-3 To Connect a TV to Your Notebook (Select Models Only 5-4 Switching the Display to the External Monitor (Select Models Only 5-5 To ...Memory 5-9 To Install a RAM Expansion Module 5-9 To Remove a RAM Expansion Module 5-10 Replacing the Hard Drive 5-12 To Replace the Hard Drive 5-12 To Replace the Hard Drive Holder 5-13 To Prepare a New Hard Drive 5-14 6 Troubleshooting Troubleshooting Your Notebook 6-1 Audio Problems 6-2 CD-ROM and DVD Problems 6-3...
Reference Guide
Page 10
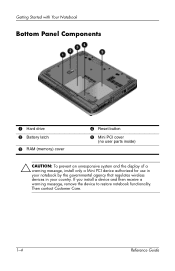
Then contact Customer Care. 1-4 Reference Guide If you install a device and then receive a warning message, remove the device to restore notebook functionality. Getting Started with Your Notebook Bottom Panel Components 1 Hard drive 2 Battery latch 3 RAM (memory) cover 4 Reset button 5 Mini PCI cover (no user parts inside) Ä CAUTION: To prevent an unresponsive system and the display of a warning message, install only a Mini PCI device authorized for use in your notebook by the governmental agency that regulates wireless devices in your country.
Then contact Customer Care. 1-4 Reference Guide If you install a device and then receive a warning message, remove the device to restore notebook functionality. Getting Started with Your Notebook Bottom Panel Components 1 Hard drive 2 Battery latch 3 RAM (memory) cover 4 Reset button 5 Mini PCI cover (no user parts inside) Ä CAUTION: To prevent an unresponsive system and the display of a warning message, install only a Mini PCI device authorized for use in your notebook by the governmental agency that regulates wireless devices in your country.
Reference Guide
Page 61
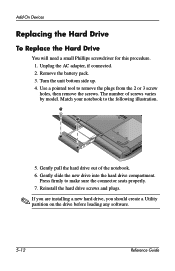
... remove the screws. Use a pointed tool to make sure the connector seats properly. 7. The number of the notebook. 6. Add-On Devices Replacing the Hard Drive To Replace the Hard Drive You will need a small Phillips screwdriver for this procedure. 1. Match your notebook to the following illustration. 5. Gently slide the new drive into the hard drive compartment. Gently pull the hard drive out...
... remove the screws. Use a pointed tool to make sure the connector seats properly. 7. The number of the notebook. 6. Add-On Devices Replacing the Hard Drive To Replace the Hard Drive You will need a small Phillips screwdriver for this procedure. 1. Match your notebook to the following illustration. 5. Gently slide the new drive into the hard drive compartment. Gently pull the hard drive out...
Reference Guide
Page 62
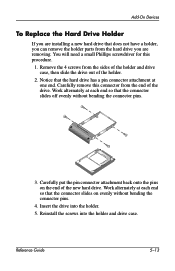
... without bending the connector pins. 3. Work alternately at one end. Remove the 4 screws from the sides of the holder and drive case, then slide the drive out of the new hard drive. Notice that does not have a holder, you are installing a new hard drive that the hard drive has a pin connector attachment at each end so that the connector...
... without bending the connector pins. 3. Work alternately at one end. Remove the 4 screws from the sides of the holder and drive case, then slide the drive out of the new hard drive. Notice that does not have a holder, you are installing a new hard drive that the hard drive has a pin connector attachment at each end so that the connector...
Reference Guide
Page 68
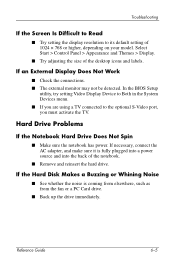
... may not be detected. Hard Drive Problems If the Notebook Hard Drive Does Not Spin ■ Make sure the notebook has power. Troubleshooting If ...the Screen Is Difficult to Read ■ Try setting the display resolution to the optional S-Video port, you are using a TV connected to its default setting of 1024 × 768 or higher, depending on your model. If the Hard...■ Try adjusting the size of the notebook. ■ Remove and reinsert the hard drive. If necessary, connect the AC adapter, and...
... may not be detected. Hard Drive Problems If the Notebook Hard Drive Does Not Spin ■ Make sure the notebook has power. Troubleshooting If ...the Screen Is Difficult to Read ■ Try setting the display resolution to the optional S-Video port, you are using a TV connected to its default setting of 1024 × 768 or higher, depending on your model. If the Hard...■ Try adjusting the size of the notebook. ■ Remove and reinsert the hard drive. If necessary, connect the AC adapter, and...
Reference Guide
Page 91
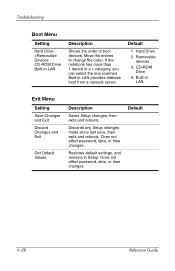
.... Removable devices 3. CD-ROM Drive 4. Default 6-28 Reference Guide Built-in Setup. Built-in a + category, you can select the one scanned. If the notebook has more than 1 device in LAN Exit Menu Setting Save Changes and Exit Discard Changes and Exit Get Default Values Description Saves Setup changes, then exits and reboots. Hard Drive 2. Discards...
.... Removable devices 3. CD-ROM Drive 4. Default 6-28 Reference Guide Built-in Setup. Built-in a + category, you can select the one scanned. If the notebook has more than 1 device in LAN Exit Menu Setting Save Changes and Exit Discard Changes and Exit Get Default Values Description Saves Setup changes, then exits and reboots. Hard Drive 2. Discards...
Reference Guide
Page 100
...connection, troubleshooting 6-20 parallel port (LPT1) 1-3 parts of the notebook back panel 1-3 bottom panel 1-4 front panel 1-2 left panel 1-3 right panel 1-2 status lights 1-5 password protection 2-13 PC Cards installing 5-1 removing 5-2 slot location 1-3 troubleshooting 6-13 ports 1394 1-3 external monitor 1-3...troubleshooting 6-18 protecting data 2-16 hard drive 2-15 R RAM cover 1-4 installing 5-9 removing 5-10 troubleshooting 6-9 recharging the battery pack 3-5 reinstalling operating system 6-32 software 6-33 reinstalling software 6-29 removing CD 2-10 DVD 2-10 PC Cards 5-2 RAM (memory) 5-10...
...connection, troubleshooting 6-20 parallel port (LPT1) 1-3 parts of the notebook back panel 1-3 bottom panel 1-4 front panel 1-2 left panel 1-3 right panel 1-2 status lights 1-5 password protection 2-13 PC Cards installing 5-1 removing 5-2 slot location 1-3 troubleshooting 6-13 ports 1394 1-3 external monitor 1-3...troubleshooting 6-18 protecting data 2-16 hard drive 2-15 R RAM cover 1-4 installing 5-9 removing 5-10 troubleshooting 6-9 recharging the battery pack 3-5 reinstalling operating system 6-32 software 6-33 reinstalling software 6-29 removing CD 2-10 DVD 2-10 PC Cards 5-2 RAM (memory) 5-10...


