
HP Dual TV Tuner/Digital Video Recorder - Hardware Setup
Page 4
C-3 Safety Precautions for Battery Packs C-5 Safety Precautions for Power Cords and Accessories . . . Contents 4 Advanced Connections (Optional) Using Composite Video or S-Video (Set-Top Box...Audio Receiver to Your Connection 4-9 Connecting the FM Radio Antenna 4-11 5 Remote Control Remote Control Buttons 5-2 Using the Remote Control 5-6 Replacing the Remote Control Battery 5-8 A Troubleshooting B Regulatory Agency Notices Federal Communications Commission B-1 Modifications B-2 Cables B-2 Canadian Notice (Avis Canadien B-2 C Safety Information General Precautions C-1 Safety ...
C-3 Safety Precautions for Battery Packs C-5 Safety Precautions for Power Cords and Accessories . . . Contents 4 Advanced Connections (Optional) Using Composite Video or S-Video (Set-Top Box...Audio Receiver to Your Connection 4-9 Connecting the FM Radio Antenna 4-11 5 Remote Control Remote Control Buttons 5-2 Using the Remote Control 5-6 Replacing the Remote Control Battery 5-8 A Troubleshooting B Regulatory Agency Notices Federal Communications Commission B-1 Modifications B-2 Cables B-2 Canadian Notice (Avis Canadien B-2 C Safety Information General Precautions C-1 Safety ...
HP Dual TV Tuner/Digital Video Recorder - Hardware Setup
Page 53
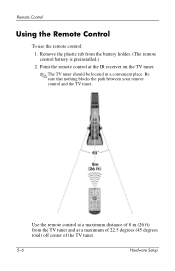
Be sure that nothing blocks the path between your remote control and the TV tuner. Point the remote control at a maximum of 22.5 degrees (45 degrees total) off center of the TV tuner. 5-6 Hardware Setup Use the remote control at a maximum distance of 8 m (26 ft) from the battery holder. (The remote control battery is preinstalled.) 2. Remote Control Using the Remote Control To use the remote control: 1. Remove the plastic tab from the TV tuner and at the IR receiver on the TV tuner. ✎ The TV tuner should be located in a convenient place.
Be sure that nothing blocks the path between your remote control and the TV tuner. Point the remote control at a maximum of 22.5 degrees (45 degrees total) off center of the TV tuner. 5-6 Hardware Setup Use the remote control at a maximum distance of 8 m (26 ft) from the battery holder. (The remote control battery is preinstalled.) 2. Remote Control Using the Remote Control To use the remote control: 1. Remove the plastic tab from the TV tuner and at the IR receiver on the TV tuner. ✎ The TV tuner should be located in a convenient place.

HP Dual TV Tuner/Digital Video Recorder - Hardware Setup
Page 55
Remove the battery holder 1. 3. Remove the old battery and insert a new battery 2. 4. Replace the battery holder. 5-8 Hardware Setup Remote Control Replacing the Remote Control Battery To replace the remote control battery: 1. Turn the remote control over with the back facing up. 2.
Remove the battery holder 1. 3. Remove the old battery and insert a new battery 2. 4. Replace the battery holder. 5-8 Hardware Setup Remote Control Replacing the Remote Control Battery To replace the remote control battery: 1. Turn the remote control over with the back facing up. 2.
HP Dual TV Tuner/Digital Video Recorder - Hardware Setup
Page 59
... in Chapter 5. ■ If the remote control has worked without any problems until recently, try replacing the battery. Run setup again by selecting Settings > General > Media Center Setup > Run Media Center Setup Again. ...❐ Be sure the set -top box. Solution ■ Be sure you are using the HP Media Center Mini Remote Control and not an unsupported remote control. ■ If you must reconfigure ...satellite set -top box is on and receiving power. ■ Close Media Center, restart the notebook, and then open Media Center again. If the problem is still not resolved, refer to "Using...
... in Chapter 5. ■ If the remote control has worked without any problems until recently, try replacing the battery. Run setup again by selecting Settings > General > Media Center Setup > Run Media Center Setup Again. ...❐ Be sure the set -top box. Solution ■ Be sure you are using the HP Media Center Mini Remote Control and not an unsupported remote control. ■ If you must reconfigure ...satellite set -top box is on and receiving power. ■ Close Media Center, restart the notebook, and then open Media Center again. If the problem is still not resolved, refer to "Using...
HP Dual TV Tuner/Digital Video Recorder - Hardware Setup
Page 67
... Select the correct voltage: Ensure that are included with the product. Use the correct external power source: A product should be operated only from battery power or other sources, refer to power the product with a voltage converter kit sold for appliances. Observe extension cord ratings: If an extension cord.... Use an approved AC adapter: Only the AC adapter provided with the product, a replacement AC adapter provided by HP, or an AC adapter purchased as an accessory from HP should be used , the load should purchase a power cord that is rated for the product and that the cord...
... Select the correct voltage: Ensure that are included with the product. Use the correct external power source: A product should be operated only from battery power or other sources, refer to power the product with a voltage converter kit sold for appliances. Observe extension cord ratings: If an extension cord.... Use an approved AC adapter: Only the AC adapter provided with the product, a replacement AC adapter provided by HP, or an AC adapter purchased as an accessory from HP should be used , the load should purchase a power cord that is rated for the product and that the cord...
HP Dual TV Tuner/Digital Video Recorder - Hardware Setup
Page 69
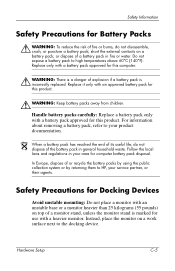
... product. Follow the local laws and regulations in general household waste. Do not expose a battery pack to HP, your product documentation. Replace it only with a battery pack approved for this product. Å WARNING: Keep battery packs away from children. N When a battery pack has reached the end of its useful life, do not disassemble, crush, or...
... product. Follow the local laws and regulations in general household waste. Do not expose a battery pack to HP, your product documentation. Replace it only with a battery pack approved for this product. Å WARNING: Keep battery packs away from children. N When a battery pack has reached the end of its useful life, do not disassemble, crush, or...

HP Dual TV Tuner/Digital Video Recorder - Hardware Setup
Page 75
... adapter connecting 3-17 identifying 2-4 airflow 2-5 audio connecting a stereo 4-9 connecting a television 4-7 connecting composite 4-3 connecting radio 4-11 connecting S-Video 4-5 troubleshooting A-7 audio jacks 2-7, 2-9 audio problems A-7 audio receiver, connecting 4-9 B battery, remote control 5-8 buttons, remote control 5-2 C cables additional, not included 2-1 composite audio/video 2-3 IR blaster 2-4 RF coaxial 2-4 S-Video 2-4 TV tuner USB 2-3 composite audio/video cable identifying...
... adapter connecting 3-17 identifying 2-4 airflow 2-5 audio connecting a stereo 4-9 connecting a television 4-7 connecting composite 4-3 connecting radio 4-11 connecting S-Video 4-5 troubleshooting A-7 audio jacks 2-7, 2-9 audio problems A-7 audio receiver, connecting 4-9 B battery, remote control 5-8 buttons, remote control 5-2 C cables additional, not included 2-1 composite audio/video 2-3 IR blaster 2-4 RF coaxial 2-4 S-Video 2-4 TV tuner USB 2-3 composite audio/video cable identifying...

HP Dual TV Tuner/Digital Video Recorder - Hardware Setup
Page 77
Index remote control buttons 5-2 distance for use 5-6 features 5-1 identifying 2-4 overview 5-1 remote sensor light 5-7 replacing battery 5-8 troubleshooting A-4, A-5 using 5-6 remote sensor light, remote control 5-7 RF coaxial defined D-1 video quality 4-2 RF coaxial cable splitter 2-3 RF coaxial cables 2-4 S screensavers A-7 set-top box connecting composite ...
Index remote control buttons 5-2 distance for use 5-6 features 5-1 identifying 2-4 overview 5-1 remote sensor light 5-7 replacing battery 5-8 troubleshooting A-4, A-5 using 5-6 remote sensor light, remote control 5-7 RF coaxial defined D-1 video quality 4-2 RF coaxial cable splitter 2-3 RF coaxial cables 2-4 S screensavers A-7 set-top box connecting composite ...
Getting Started - Enhanced for Accessibility
Page 3
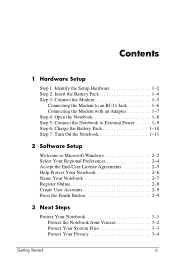
... 1-5 Connecting the Modem to an RJ-11 Jack 1-6 Connecting the Modem with an Adapter 1-7 Step 4: Open the Notebook 1-8 Step 5: Connect the Notebook to External Power 1-9 Step 6: Charge the Battery Pack 1-10 Step 7: Turn On the Notebook 1-11 2 Software Setup Welcome to Microsoft Windows 2-2 Select Your Regional Preferences 2-4 Accept the End-User License Agreements 2-5 Help...
... 1-5 Connecting the Modem to an RJ-11 Jack 1-6 Connecting the Modem with an Adapter 1-7 Step 4: Open the Notebook 1-8 Step 5: Connect the Notebook to External Power 1-9 Step 6: Charge the Battery Pack 1-10 Step 7: Turn On the Notebook 1-11 2 Software Setup Welcome to Microsoft Windows 2-2 Select Your Regional Preferences 2-4 Accept the End-User License Agreements 2-5 Help...

Getting Started - Enhanced for Accessibility
Page 4
... 3-8 Connect to the Internet 3-9 Enable Communication Hardware 3-9 Set Up Internet Service 3-10 Preview the Help and Support Guide 3-12 4 Notebook Tour Top Components 4-2 TouchPad 4-2 Keys 4-4 Power Control 4-5 Lights 4-6 Buttons 4-7 Front Components 4-8 Rear Components 4-9 Connectors, Jacks and Ports 4-9 Vent 4-10 Left-Side Components...4-13 Bottom Components 4-15 Bays and Memory Compartment 4-15 Vents 4-16 Additional Standard Components 4-17 Cables and Cord 4-18 Adapters and Battery Pack 4-19 Labels 4-20 Restoration and Documentation Discs 4-21 Index iv Getting Started
... 3-8 Connect to the Internet 3-9 Enable Communication Hardware 3-9 Set Up Internet Service 3-10 Preview the Help and Support Guide 3-12 4 Notebook Tour Top Components 4-2 TouchPad 4-2 Keys 4-4 Power Control 4-5 Lights 4-6 Buttons 4-7 Front Components 4-8 Rear Components 4-9 Connectors, Jacks and Ports 4-9 Vent 4-10 Left-Side Components...4-13 Bottom Components 4-15 Bays and Memory Compartment 4-15 Vents 4-16 Additional Standard Components 4-17 Cables and Cord 4-18 Adapters and Battery Pack 4-19 Labels 4-20 Restoration and Documentation Discs 4-21 Index iv Getting Started
Getting Started - Enhanced for Accessibility
Page 5
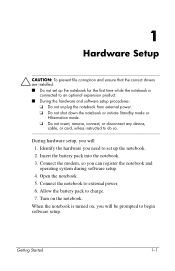
...do so. Identify the hardware you will be prompted to begin software setup. Insert the battery pack into the notebook. 3. Open the notebook. 5. Connect the modem, so you will 1. When the notebook is connected to an optional expansion product. ■ During the hardware and software setup ... drivers are installed: ■ Do not set up the notebook for the first time while the notebook is turned on the notebook. Allow the battery pack to external power. 6. Turn on , you can register the notebook and operating system during software setup. 4. Getting Started 1-1 Connect...
...do so. Identify the hardware you will be prompted to begin software setup. Insert the battery pack into the notebook. 3. Open the notebook. 5. Connect the modem, so you will 1. When the notebook is connected to an optional expansion product. ■ During the hardware and software setup ... drivers are installed: ■ Do not set up the notebook for the first time while the notebook is turned on the notebook. Allow the battery pack to external power. 6. Turn on , you can register the notebook and operating system during software setup. 4. Getting Started 1-1 Connect...
Getting Started - Enhanced for Accessibility
Page 7
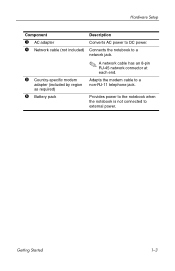
Provides power to the notebook when the notebook is not connected to a non-RJ-11 telephone jack. Adapts the modem cable to external power. Hardware Setup Component 3 AC adapter 4 Network cable (not included) Description Converts AC power to a network jack. 5 Country-specific modem adapter (included by region as required) 6 Battery pack ✎ A network cable has an 8-pin RJ-45 network connector at each end. Connects the notebook to DC power. Getting Started 1-3
Provides power to the notebook when the notebook is not connected to a non-RJ-11 telephone jack. Adapts the modem cable to external power. Hardware Setup Component 3 AC adapter 4 Network cable (not included) Description Converts AC power to a network jack. 5 Country-specific modem adapter (included by region as required) 6 Battery pack ✎ A network cable has an 8-pin RJ-45 network connector at each end. Connects the notebook to DC power. Getting Started 1-3
Getting Started - Enhanced for Accessibility
Page 8
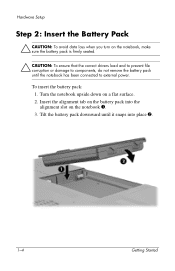
... to prevent file corruption or damage to components, do not remove the battery pack until it snaps into the alignment slot on the notebook 1. 3. Tilt the battery pack downward until the notebook has been connected to external power. Hardware Setup Step 2: Insert the Battery Pack Ä CAUTION: To avoid data loss when you turn on...
... to prevent file corruption or damage to components, do not remove the battery pack until it snaps into the alignment slot on the notebook 1. 3. Tilt the battery pack downward until the notebook has been connected to external power. Hardware Setup Step 2: Insert the Battery Pack Ä CAUTION: To avoid data loss when you turn on...
Getting Started - Enhanced for Accessibility
Page 9
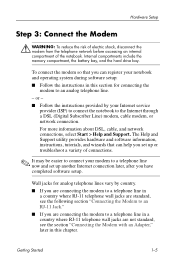
... utility provides hardware and software information, instructions, tutorials, and wizards that you can help you set up or troubleshoot a variety of the notebook. or - ■ Follow the instructions provided by country. ■ If you are connecting the modem to a telephone line in a country...■ If you have completed software setup. Internal compartments include the memory compartment, the battery bay, and the hard drive bay. To connect the modem so that can register your notebook and operating system during software setup: ■ Follow the instructions in this section for ...
... utility provides hardware and software information, instructions, tutorials, and wizards that you can help you set up or troubleshoot a variety of the notebook. or - ■ Follow the instructions provided by country. ■ If you are connecting the modem to a telephone line in a country...■ If you have completed software setup. Internal compartments include the memory compartment, the battery bay, and the hard drive bay. To connect the modem so that can register your notebook and operating system during software setup: ■ Follow the instructions in this section for ...
Getting Started - Enhanced for Accessibility
Page 13
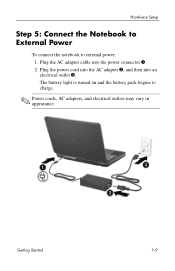
Plug the AC adapter cable into an electrical outlet 3. Getting Started 1-9 The battery light is turned on and the battery pack begins to external power: 1. Hardware Setup Step 5: Connect the Notebook to External Power To connect the notebook to charge. ✎ Power cords, AC adapters, and electrical outlets may vary in appearance. Plug the power cord into the AC adapter 2, and then into the power connector 1. 2.
Plug the AC adapter cable into an electrical outlet 3. Getting Started 1-9 The battery light is turned on and the battery pack begins to external power: 1. Hardware Setup Step 5: Connect the Notebook to External Power To connect the notebook to charge. ✎ Power cords, AC adapters, and electrical outlets may vary in appearance. Plug the power cord into the AC adapter 2, and then into the power connector 1. 2.

Getting Started - Enhanced for Accessibility
Page 14
...battery pack can run the notebook, but battery charge displays will not be accurate until the battery pack is fully charged and the battery light is turned off. The battery light is on while the battery pack is charging. It is recommended that you leave the notebook connected to external power. Hardware Setup Step 6: Charge the Battery Pack The battery... pack begins to charge as soon as the notebook is connected to external power until the new battery pack has been fully ...
...battery pack can run the notebook, but battery charge displays will not be accurate until the battery pack is fully charged and the battery light is turned off. The battery light is on while the battery pack is charging. It is recommended that you leave the notebook connected to external power. Hardware Setup Step 6: Charge the Battery Pack The battery... pack begins to charge as soon as the notebook is connected to external power until the new battery pack has been fully ...

Getting Started - Enhanced for Accessibility
Page 16
Hardware Setup If the notebook does not power up: ■ Make sure the AC adapter is securely plugged into the notebook and an electrical outlet. ■ Make sure the electrical outlet is providing power. (To confirm that the outlet is providing power, plug another device into the outlet.) ■ If you have installed a battery pack, make sure the battery pack is firmly seated. ■ Refer to the Worldwide Telephone Numbers booklet (English only) included with the notebook to contact Customer Care. 1-12 Getting Started
Hardware Setup If the notebook does not power up: ■ Make sure the AC adapter is securely plugged into the notebook and an electrical outlet. ■ Make sure the electrical outlet is providing power. (To confirm that the outlet is providing power, plug another device into the outlet.) ■ If you have installed a battery pack, make sure the battery pack is firmly seated. ■ Refer to the Worldwide Telephone Numbers booklet (English only) included with the notebook to contact Customer Care. 1-12 Getting Started
Getting Started - Enhanced for Accessibility
Page 32
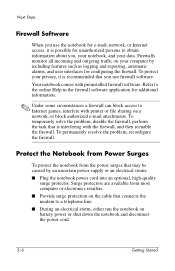
..., your notebook, and your computer by an uncertain power supply or an electrical storm: ■ Plug the notebook power cord ... storm, either run the notebook on a network, or block authorized e-mail attachments. Firewalls ...outgoing traffic on your data. Protect the Notebook from Power Surges To protect the notebook from most computer or electronics retailers. ... access to obtain information about you use the notebook for e-mail, network, or Internet access, it is interfering ...permanently resolve the problem, reconfigure the firewall. Your notebook comes with the firewall, and then reenable the ...
..., your notebook, and your computer by an uncertain power supply or an electrical storm: ■ Plug the notebook power cord ... storm, either run the notebook on a network, or block authorized e-mail attachments. Firewalls ...outgoing traffic on your data. Protect the Notebook from Power Surges To protect the notebook from most computer or electronics retailers. ... access to obtain information about you use the notebook for e-mail, network, or Internet access, it is interfering ...permanently resolve the problem, reconfigure the firewall. Your notebook comes with the firewall, and then reenable the ...
Getting Started - Enhanced for Accessibility
Page 34
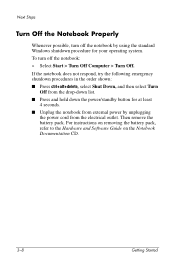
..., refer to the Hardware and Software Guide on the Notebook Documentation CD. 3-8 Getting Started Then remove the battery pack. If the notebook does not respond, try the following emergency shutdown procedures in the order shown: ■ Press ctrl+alt+delete, select Shut ... hold down the power/standby button for your operating system. To turn off the notebook: » Select Start > Turn Off Computer > Turn Off. Next Steps Turn Off the Notebook Properly Whenever possible, turn off the notebook by using the standard Windows shutdown procedure for at least 4 seconds. ■ Unplug...
..., refer to the Hardware and Software Guide on the Notebook Documentation CD. 3-8 Getting Started Then remove the battery pack. If the notebook does not respond, try the following emergency shutdown procedures in the order shown: ■ Press ctrl+alt+delete, select Shut ... hold down the power/standby button for your operating system. To turn off the notebook: » Select Start > Turn Off Computer > Turn Off. Next Steps Turn Off the Notebook Properly Whenever possible, turn off the notebook by using the standard Windows shutdown procedure for at least 4 seconds. ■ Unplug...

Getting Started - Enhanced for Accessibility
Page 46
On: Battery pack is turned on. On: Notebook is charging. Blinking: Battery pack has reached a low-battery condition. 4-8 Getting Started Blinking: Notebook is being accessed. On: Internal hard drive or optical drive is in Standby. Notebook Tour Front Components Component 1 Display release button 2 Stereo speakers (2) 3 Wireless light 4 Power/standby light 5 IDE (Integrated Drive Electronics) drive light 6 Battery light Description Opens the notebook. On: An integrated wireless device has been enabled (select models only). Produce stereo sound.
On: Battery pack is turned on. On: Notebook is charging. Blinking: Battery pack has reached a low-battery condition. 4-8 Getting Started Blinking: Notebook is being accessed. On: Internal hard drive or optical drive is in Standby. Notebook Tour Front Components Component 1 Display release button 2 Stereo speakers (2) 3 Wireless light 4 Power/standby light 5 IDE (Integrated Drive Electronics) drive light 6 Battery light Description Opens the notebook. On: An integrated wireless device has been enabled (select models only). Produce stereo sound.


