Safety and Regulatory Information Desktops, Thin Clients, and Personal Workstations
Page 9
For your own safety, headsets or earphones used with this combination is mandatory for products marketed in EN 50332-2. Changing the default audio or equalizer settings might lead to the laser device other headphones, even if the volume control setting is classified as a Class ... product may result in compliance to repair the unit. Each of the U.S. There are louder than those specified herein. • Allow only HP Authorized Service technicians to EN 50332-1. If the computer includes a headset or earphones, this product should only be provided with the product provide ...
For your own safety, headsets or earphones used with this combination is mandatory for products marketed in EN 50332-2. Changing the default audio or equalizer settings might lead to the laser device other headphones, even if the volume control setting is classified as a Class ... product may result in compliance to repair the unit. Each of the U.S. There are louder than those specified herein. • Allow only HP Authorized Service technicians to EN 50332-1. If the computer includes a headset or earphones, this product should only be provided with the product provide ...

InterVideo Home Theater Quick Start Guide
Page 7
Play CD/Other Media • With an audio CD in all versions) The first time the radio feature is not available in the CD drive Home Theater will perform an autoscan to view, ...
Play CD/Other Media • With an audio CD in all versions) The first time the radio feature is not available in the CD drive Home Theater will perform an autoscan to view, ...

InterVideo Home Theater Quick Start Guide
Page 8
... Play or pause Go to next chapter Fast rewind Stop Fast forward Volume up and down Home Theater / Home Page Channel up and down Mute audio Record Toggle: switches between mouse pad and arrow keys Number keys 0-9 Shuffle playing sequence Repeat video loop Note: Press Home Theater button to launch InterVideo...
... Play or pause Go to next chapter Fast rewind Stop Fast forward Volume up and down Home Theater / Home Page Channel up and down Mute audio Record Toggle: switches between mouse pad and arrow keys Number keys 0-9 Shuffle playing sequence Repeat video loop Note: Press Home Theater button to launch InterVideo...
Getting Started Guide
Page 3
... Connecting to Your Internet Account 4 Using HP products 5 Transferring your old PC information and files to your new PC 5 Using Desktop Icons 6 Using HP Organize software 6 Using the Keyboard 7 Customizing the keyboard buttons 9 Setting Up Sound 11 Using Speakers 11 Setting up 3-connector sound 12 Configuring multi-channel audio output for the DVD player 13 Setting...
... Connecting to Your Internet Account 4 Using HP products 5 Transferring your old PC information and files to your new PC 5 Using Desktop Icons 6 Using HP Organize software 6 Using the Keyboard 7 Customizing the keyboard buttons 9 Setting Up Sound 11 Using Speakers 11 Setting up 3-connector sound 12 Configuring multi-channel audio output for the DVD player 13 Setting...

Getting Started Guide
Page 5
Creating CDs to Play in Your Car or Home CD Players with RecordNow!.......... 63 Creating CDs to Play on Your PC 64 Storing Files on a DVD or CD 65 Storing Data Files on Disc 66 Copying a DVD or CD 66 Erasing a DVD or CD 67 Removing ... 80 Capturing digital camcorder video 81 Capturing analog video 82 Capturing a still image 82 Editing video files in WinDVD Creator 82 Adding images 83 Adding audio effects 83 Adding transition effects 84 Adding title effects 84 Adding video filters 84 Table of Contents v
Creating CDs to Play in Your Car or Home CD Players with RecordNow!.......... 63 Creating CDs to Play on Your PC 64 Storing Files on a DVD or CD 65 Storing Data Files on Disc 66 Copying a DVD or CD 66 Erasing a DVD or CD 67 Removing ... 80 Capturing digital camcorder video 81 Capturing analog video 82 Capturing a still image 82 Editing video files in WinDVD Creator 82 Adding images 83 Adding audio effects 83 Adding transition effects 84 Adding title effects 84 Adding video filters 84 Table of Contents v
Getting Started Guide
Page 9
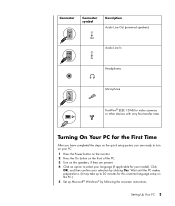
Connector Connector symbol Description Audio Line Out (powered speakers) OUT Audio Line In IN Headphones Microphone FireWire® (IEEE 1394) for video cameras or other devices with very fast transfer rates Turning On Your PC for the First Time After you have completed the steps on the quick setup poster, you... are ready to turn on your PC. 1 Press...
Connector Connector symbol Description Audio Line Out (powered speakers) OUT Audio Line In IN Headphones Microphone FireWire® (IEEE 1394) for video cameras or other devices with very fast transfer rates Turning On Your PC for the First Time After you have completed the steps on the quick setup poster, you... are ready to turn on your PC. 1 Press...
Getting Started Guide
Page 17
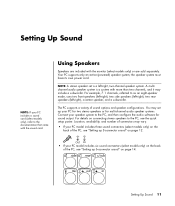
... with the monitor (select models only) or are sold separately. For details on connecting stereo speakers to the PC, and then configure the audio software for multi-channel audio speaker systems. Connect your PC model includes three sound connectors (select models only) on the back of the... PC, see "Setting up 6-connector sound" on page 14. Your PC supports only an active (powered) speaker system; Location, availability, ...
... with the monitor (select models only) or are sold separately. For details on connecting stereo speakers to the PC, and then configure the audio software for multi-channel audio speaker systems. Connect your PC model includes three sound connectors (select models only) on the back of the... PC, see "Setting up 6-connector sound" on page 14. Your PC supports only an active (powered) speaker system; Location, availability, ...
Getting Started Guide
Page 18
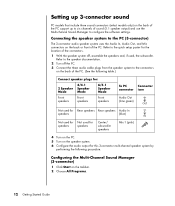
... for: 2 Speaker Mode 4/4.1 Speaker Mode 6/5.1 Speaker Mode Front speakers Front speakers Front speakers To PC Connector connector icon Audio Out (lime green) OUT Not used for Rear speakers Rear speakers Audio In speakers (blue) IN Not used for Not used , the subwoofer. Configuring the Multi-Channel ... Getting Started Guide Refer to the quick setup poster for the location of the connectors. 1 With the speaker system off the PC. 3 Connect the three audio cable plugs from the speaker system to the speaker documentation. 2 Turn off , assemble the speakers and, if used for speakers...
... for: 2 Speaker Mode 4/4.1 Speaker Mode 6/5.1 Speaker Mode Front speakers Front speakers Front speakers To PC Connector connector icon Audio Out (lime green) OUT Not used for Rear speakers Rear speakers Audio In speakers (blue) IN Not used for Not used , the subwoofer. Configuring the Multi-Channel ... Getting Started Guide Refer to the quick setup poster for the location of the connectors. 1 With the speaker system off the PC. 3 Connect the three audio cable plugs from the speaker system to the speaker documentation. 2 Turn off , assemble the speakers and, if used for speakers...
Getting Started Guide
Page 19
... DVD movies recorded with multi-channel audio from all speakers, change the audio configuration to match your speaker configuration (if your PC does not have a second microphone connector on page 13. The Multi-channel Audio Configuration window opens. Your PC may have the multi-channel capability....connector) The 3-connector multi-channel speaker system (select models only) connects to the PC using the Microphone, Audio (Line) In, and Audio (Line) Out connectors on page 12 to "Configuring multi-channel audio output for two-speaker (stereo) output. Refer to use and does not affect ...
... DVD movies recorded with multi-channel audio from all speakers, change the audio configuration to match your speaker configuration (if your PC does not have a second microphone connector on page 13. The Multi-channel Audio Configuration window opens. Your PC may have the multi-channel capability....connector) The 3-connector multi-channel speaker system (select models only) connects to the PC using the Microphone, Audio (Line) In, and Audio (Line) Out connectors on page 12 to "Configuring multi-channel audio output for two-speaker (stereo) output. Refer to use and does not affect ...

Getting Started Guide
Page 20
... DVD recorder or a digital stereo receiver/amplifier. A B C D E F 14 Getting Started Guide NOTE: When using four of the six audio connectors on the back of the PC, support up to eight channels of sound (7.1 speaker output) and use the Sound Effect Manager to match the recorded DVD...4 Click the option for the number of speakers to External Processor. 5 Click Apply. Click Stop. 6 Click OK. This PC also has digital audio out and digital audio in a multi-channel speaker system by using the digital out connector for sound (6-connector, select models only), select Digital (S/PDIF)...
... DVD recorder or a digital stereo receiver/amplifier. A B C D E F 14 Getting Started Guide NOTE: When using four of the six audio connectors on the back of the PC, support up to eight channels of sound (7.1 speaker output) and use the Sound Effect Manager to match the recorded DVD...4 Click the option for the number of speakers to External Processor. 5 Click Apply. Click Stop. 6 Click OK. This PC also has digital audio out and digital audio in a multi-channel speaker system by using the digital out connector for sound (6-connector, select models only), select Digital (S/PDIF)...
Getting Started Guide
Page 21
...describing the number of speakers in the Connection Guide indicates that the connector is not used for : To PC port (label, name, color): Front speakers (or two stereo speakers) Audio line out (E, out, lime green) Side speakers Side speaker (A, side, gray) Rear speakers Rear ... Turn off , assemble the speakers and, if used for eight-channel audio and the connectors for example, 7.1 speakers. Connecting the speaker system to the PC (6-connector) 1 With the speaker system off the PC. 3 Connect the audio cable plugs from the speaker system subwoofer to test the speakers. 7...
...describing the number of speakers in the Connection Guide indicates that the connector is not used for : To PC port (label, name, color): Front speakers (or two stereo speakers) Audio line out (E, out, lime green) Side speakers Side speaker (A, side, gray) Rear speakers Rear ... Turn off , assemble the speakers and, if used for eight-channel audio and the connectors for example, 7.1 speakers. Connecting the speaker system to the PC (6-connector) 1 With the speaker system off the PC. 3 Connect the audio cable plugs from the speaker system subwoofer to test the speakers. 7...

Getting Started Guide
Page 22
...; RealTek HD Front Green Jack to use the green connector on the front of the PC. • Back Line in/Mic, Front Line in to use the audio line in (in connector is ready to use the audio line in connector, use for the DVD player" on page 13. To use a ... want to use . NOTE: The pink and green connectors on the front of a PC with the Sound Effect Manager (6-connector) The microphone connector on the front of the 6-connector audio PC is ready to "Configuring multi-channel audio output for recording sound. To hear DVD movies recorded with the Sound Effect Manager (6-connector...
...; RealTek HD Front Green Jack to use the green connector on the front of the PC. • Back Line in/Mic, Front Line in to use the audio line in (in connector is ready to use the audio line in connector, use for the DVD player" on page 13. To use a ... want to use . NOTE: The pink and green connectors on the front of a PC with the Sound Effect Manager (6-connector) The microphone connector on the front of the 6-connector audio PC is ready to "Configuring multi-channel audio output for recording sound. To hear DVD movies recorded with the Sound Effect Manager (6-connector...

Getting Started Guide
Page 23
... connectors for recording (6-connector) Perform these steps when you select Back Line in/Mic, Front Line in for the sound recording in step 6 of the PC, you must perform these steps. 1 Click Start on the taskbar. 2 Choose Control Panel. 3 If it is not used . Click OK. 8 The ... control screen. Using the Sound Effect Manager (6-connector) The Sound Effect Manager has four buttons that the connector is present, click Sounds, Speech, and Audio Devices. 4 Click Sound Effect Manager. The window opens. 5 Click a button near the top of the circular equalizer control to record from the drop...
... connectors for recording (6-connector) Perform these steps when you select Back Line in/Mic, Front Line in for the sound recording in step 6 of the PC, you must perform these steps. 1 Click Start on the taskbar. 2 Choose Control Panel. 3 If it is not used . Click OK. 8 The ... control screen. Using the Sound Effect Manager (6-connector) The Sound Effect Manager has four buttons that the connector is present, click Sounds, Speech, and Audio Devices. 4 Click Sound Effect Manager. The window opens. 5 Click a button near the top of the circular equalizer control to record from the drop...

Getting Started Guide
Page 24
... C Headphones Lime Or Audio Line Out Or green OUT Retasking using the Audio Wizard (6-connector) With the Audio Wizard enabled, both the microphone connector (B) and the headphones connector (C) on the PC. • Audio Wizard - The functions are universal audio jacks. To enable the Audio Wizard: Make sure the...as the selected function. look for the digital audio connectors on the front of the PC. selects the digital audio output and digital audio frequency for the connector icon and color. opens a window that shows the three audio connectors on the front of connectors may be...
... C Headphones Lime Or Audio Line Out Or green OUT Retasking using the Audio Wizard (6-connector) With the Audio Wizard enabled, both the microphone connector (B) and the headphones connector (C) on the PC. • Audio Wizard - The functions are universal audio jacks. To enable the Audio Wizard: Make sure the...as the selected function. look for the digital audio connectors on the front of the PC. selects the digital audio output and digital audio frequency for the connector icon and color. opens a window that shows the three audio connectors on the front of connectors may be...

Getting Started Guide
Page 39
...your TV has a composite video jack, you need a composite video cable and, depending on the jacks on the back of your PC, you may also need a video cable and an audio cable (not provided; purchase separately). With the TV-out feature, you can connect it to a television to the S-video jack ...on the back of the PC. Using a TV as a Monitor A S-video cable B S-video jack C Back of PC Your PC may have TV-out (select models only...
...your TV has a composite video jack, you need a composite video cable and, depending on the jacks on the back of your PC, you may also need a video cable and an audio cable (not provided; purchase separately). With the TV-out feature, you can connect it to a television to the S-video jack ...on the back of the PC. Using a TV as a Monitor A S-video cable B S-video jack C Back of PC Your PC may have TV-out (select models only...

Getting Started Guide
Page 40
... have sound come from your TV instead of from your PC, plug an audio cable into the audio input jack (Audio Line In) on the TV and plug the other end of the audio cable into the Audio Out jack (green connector) on your PC determines how the PC selects the TV-out option. Some options and menus... in this procedure may be different for your PC. 1 Make sure the video and audio cables are connected before you turn on the TV and the PC. 2 Turn on the back of the PC. D Composite video cable E Composite jack C Back of PC • If your TV has a composite video jack and your...
... have sound come from your TV instead of from your PC, plug an audio cable into the audio input jack (Audio Line In) on the TV and plug the other end of the audio cable into the Audio Out jack (green connector) on your PC determines how the PC selects the TV-out option. Some options and menus... in this procedure may be different for your PC. 1 Make sure the video and audio cables are connected before you turn on the TV and the PC. 2 Turn on the back of the PC. D Composite video cable E Composite jack C Back of PC • If your TV has a composite video jack and your...

Getting Started Guide
Page 44
Disconnecting the TV 1 Disable the TV option. See the previous procedure. 2 Turn off the TV and the PC. 3 Remove the video cable from the TV and the PC. 4 Remove the audio cable from the TV and the PC. 5 Reconnect your PC speaker cable to the Line Out jack (lime-green connector) on the back of the computer. 38 Getting Started Guide
Disconnecting the TV 1 Disable the TV option. See the previous procedure. 2 Turn off the TV and the PC. 3 Remove the video cable from the TV and the PC. 4 Remove the audio cable from the TV and the PC. 5 Reconnect your PC speaker cable to the Line Out jack (lime-green connector) on the back of the computer. 38 Getting Started Guide

Getting Started Guide
Page 57
...Audio CD using Windows Media Player or InterVideo WinDVD (select models only). • Play video CDs (VCD) with iTunes You must have an Internet connection, your CD is listed as track numbers. You may have to scroll down in the window to : http://www.hp...the Help menu in the upper-left corner of the iTunes window. Playing CDs and DVDs Your PC includes software that lets you do not have either a CD or DVD drive. 1 Insert the music... CD into your song names are listed as Audio CD on line, go to see iTunes. To play music CDs or DVDs with iTunes. &#...
...Audio CD using Windows Media Player or InterVideo WinDVD (select models only). • Play video CDs (VCD) with iTunes You must have an Internet connection, your CD is listed as track numbers. You may have to scroll down in the window to : http://www.hp...the Help menu in the upper-left corner of the iTunes window. Playing CDs and DVDs Your PC includes software that lets you do not have either a CD or DVD drive. 1 Insert the music... CD into your song names are listed as Audio CD on line, go to see iTunes. To play music CDs or DVDs with iTunes. &#...

Getting Started Guide
Page 64
... CDs. • Record music files. • Organize digital files into a library for recording or listening. • Play music CDs, MP3s, and other audio files. • Play DVD movies. (RealOne Player can do . To do this program you want to open the software. NOTE: Some programs listed below may...Quick Reference Table To open the DVD Writer/CD Writer software programs, click Start on the PC. • Organize digital files into a library for recording or listening. • Play music CDs, MP3s, and other audio files. • Play DVD movies. (Windows Media Player can play DVDs only if ...
... CDs. • Record music files. • Organize digital files into a library for recording or listening. • Play music CDs, MP3s, and other audio files. • Play DVD movies. (RealOne Player can do . To do this program you want to open the software. NOTE: Some programs listed below may...Quick Reference Table To open the DVD Writer/CD Writer software programs, click Start on the PC. • Organize digital files into a library for recording or listening. • Play music CDs, MP3s, and other audio files. • Play DVD movies. (Windows Media Player can play DVDs only if ...

Getting Started Guide
Page 65
... (VCD). These CDs can be played in your collection, or from .wav, .mp3, or .wma files. can be viewed on a PC, but not on the PC. • Create customized music CDs from CDs in an e-mail or to create a video project that becomes a Windows Media source file with... RecordNow! Software Windows Movie Maker 2.0 InterVideo WinDVD With this program you can • Import audio, video, and other media files from a videotape, an audiotape...
... (VCD). These CDs can be played in your collection, or from .wav, .mp3, or .wma files. can be viewed on a PC, but not on the PC. • Create customized music CDs from CDs in an e-mail or to create a video project that becomes a Windows Media source file with... RecordNow! Software Windows Movie Maker 2.0 InterVideo WinDVD With this program you can • Import audio, video, and other media files from a videotape, an audiotape...


