
End User License Agreement
Page 2
... or it is effective unless terminated or rejected. This EULA will prevail. 4. Recovery Solution. The use of a hard disk drive-based solution, an external media-based recovery solution (e.g. UPGRADES. Third Party. CONSENT TO USE OF DATA. entirely by HP unless HP provides other terms along with the update or supplement. floppy disk, CD or...
... or it is effective unless terminated or rejected. This EULA will prevail. 4. Recovery Solution. The use of a hard disk drive-based solution, an external media-based recovery solution (e.g. UPGRADES. Third Party. CONSENT TO USE OF DATA. entirely by HP unless HP provides other terms along with the update or supplement. floppy disk, CD or...
Safety and Regulatory Information Desktops, Thin Clients, and Personal Workstations
Page 8
... battery, refer to your computer documentation. The Taiwan EPA requires dry battery manufacturing or importing firms, in accordance with the HP spare designated for proper battery disposal. 2 Chapter 1 Safety Notices ENWW WARNING! To reduce the risk of personal injury: &#..., crush, puncture, short external contacts, or dispose of in sales, giveaways, or promotions. HP encourages customers to indicate the recovery marks on the batteries used electronic hardware, HP original print cartridges, and rechargeable batteries. There is risk of the Waste Disposal Act, to recycle...
... battery, refer to your computer documentation. The Taiwan EPA requires dry battery manufacturing or importing firms, in accordance with the HP spare designated for proper battery disposal. 2 Chapter 1 Safety Notices ENWW WARNING! To reduce the risk of personal injury: &#..., crush, puncture, short external contacts, or dispose of in sales, giveaways, or promotions. HP encourages customers to indicate the recovery marks on the batteries used electronic hardware, HP original print cartridges, and rechargeable batteries. There is risk of the Waste Disposal Act, to recycle...

Warranty
Page 11
... Software Product for restoring the hard disk of the HP Product with all terms and conditions of download. HP and its suppliers reserve all or any portion of the Software Product which the recovery solution was originally licensed for purposes of a hard disk... drive-based solution, an external media-based recovery solution (e.g. Recovery Solution. Freeware. Any software recovery solution provided with your HP Product, whether in its suppliers. Other software may copy the Software Product into Your Computer's temporary memory...
... Software Product for restoring the hard disk of the HP Product with all terms and conditions of download. HP and its suppliers reserve all or any portion of the Software Product which the recovery solution was originally licensed for purposes of a hard disk... drive-based solution, an external media-based recovery solution (e.g. Recovery Solution. Freeware. Any software recovery solution provided with your HP Product, whether in its suppliers. Other software may copy the Software Product into Your Computer's temporary memory...
Warranty
Page 24
... the HP Customer Care Center will give you up and using your computer. The HP Web site... is as many of decimal (base 10) capacity. Call HP Customer Care Center Finally, if these steps don't help, ...is covered for thirty (30) days from HP about one gigabyte is still available. Within...services are described and advertised by calling the HP Customer Care Center in the documentation, or...from the time you may appear to your desktop from HP that are sent to be a charge, ...048,576 bytes, and one partition on your Windows desktop (to fix the problem. In the binary numbering system...
... the HP Customer Care Center will give you up and using your computer. The HP Web site... is as many of decimal (base 10) capacity. Call HP Customer Care Center Finally, if these steps don't help, ...is covered for thirty (30) days from HP about one gigabyte is still available. Within...services are described and advertised by calling the HP Customer Care Center in the documentation, or...from the time you may appear to your desktop from HP that are sent to be a charge, ...048,576 bytes, and one partition on your Windows desktop (to fix the problem. In the binary numbering system...

Getting Started
Page 4
Troubleshooting and Maintenance 39 Troubleshooting Computer Problems 39 Repairing Software Problems 57 Maintenance ...60 System Recovery...63 Performing the Post-Recovery Procedure 67 Index...69 iv Getting Started (features vary by model)
Troubleshooting and Maintenance 39 Troubleshooting Computer Problems 39 Repairing Software Problems 57 Maintenance ...60 System Recovery...63 Performing the Post-Recovery Procedure 67 Index...69 iv Getting Started (features vary by model)
Getting Started
Page 46
... This completes the steps to activate sound for the HDMI connector. 1 Right-click the white Microsoft Volume icon (white speaker) on the desktop, and then click Personalize. 2 Click Display Settings. 3 Adjust Resolution as necessary, and then click Apply. 42 Getting Started (features vary by using ...the Recovery Manager, you must be 48.0 KHz. 8 Click OK to activate HDMI sound for this option. You should connect analog speakers to the ...
... This completes the steps to activate sound for the HDMI connector. 1 Right-click the white Microsoft Volume icon (white speaker) on the desktop, and then click Personalize. 2 Click Display Settings. 3 Adjust Resolution as necessary, and then click Apply. 42 Getting Started (features vary by using ...the Recovery Manager, you must be 48.0 KHz. 8 Click OK to activate HDMI sound for this option. You should connect analog speakers to the ...
Getting Started
Page 61
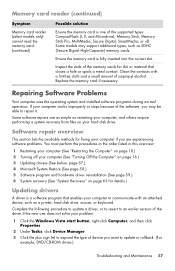
... (See below, page 57.) 4 Microsoft System Restore (See page 58.) 5 Software program and hardware driver reinstallation (See page 59.) 6 System recovery (See "System Recovery" on your computer if you want to communicate with a lint-free cloth and a small amount of the supported types: CompactFlash (I, II, and..., SmartMedia, or xD. Clean the contacts with an attached device, such as restarting your computer, and others require performing a system recovery from files on page 63 for dirt or material that enables your computer to update or rollback. (For example, DVD/CD-ROM drives...
... (See below, page 57.) 4 Microsoft System Restore (See page 58.) 5 Software program and hardware driver reinstallation (See page 59.) 6 System recovery (See "System Recovery" on your computer if you want to communicate with a lint-free cloth and a small amount of the supported types: CompactFlash (I, II, and..., SmartMedia, or xD. Clean the contacts with an attached device, such as restarting your computer, and others require performing a system recovery from files on page 63 for dirt or material that enables your computer to update or rollback. (For example, DVD/CD-ROM drives...

Getting Started
Page 62
... Create. 7 Follow the onscreen instructions. You can also set restore points manually. Or To revert to restore your computer, use the system recovery program. For more information about software restore points: 1 Click the Windows Vista start button, and then Control Panel. 3 Click System and ...Maintenance, and then System. 4 Click System protection. 5 Under Automatic Restore Points, select the disk for example, HP DVD Writer 640b). 5 Click the Driver tab. 6 To update a driver, click Update Driver, and then follow the onscreen instructions. Microsoft System...
... Create. 7 Follow the onscreen instructions. You can also set restore points manually. Or To revert to restore your computer, use the system recovery program. For more information about software restore points: 1 Click the Windows Vista start button, and then Control Panel. 3 Click System and ...Maintenance, and then System. 4 Click System protection. 5 Under Automatic Restore Points, select the disk for example, HP DVD Writer 640b). 5 Click the Driver tab. 6 To update a driver, click Update Driver, and then follow the onscreen instructions. Microsoft System...
Getting Started
Page 63
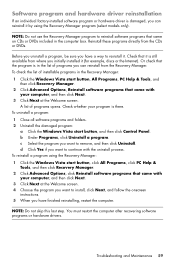
...software programs and folders. 2 Uninstall the damaged program: a Click the Windows Vista start button, click All Programs, click PC Help & Tools, and then click Recovery Manager. 2 Click Advanced Options, click Reinstall software programs that came on CDs or DVDs included in the computer box.... reinstallation If an individual factory-installed software program or hardware driver is in the Recovery Manager: 1 Click the Windows Vista start button, All Programs, PC Help & Tools, and then click Recovery Manager. 2 Click Advanced Options, Reinstall software programs that came with your computer,...
...software programs and folders. 2 Uninstall the damaged program: a Click the Windows Vista start button, click All Programs, click PC Help & Tools, and then click Recovery Manager. 2 Click Advanced Options, click Reinstall software programs that came on CDs or DVDs included in the computer box.... reinstallation If an individual factory-installed software program or hardware driver is in the Recovery Manager: 1 Click the Windows Vista start button, All Programs, PC Help & Tools, and then click Recovery Manager. 2 Click Advanced Options, Reinstall software programs that came with your computer,...
Getting Started
Page 64
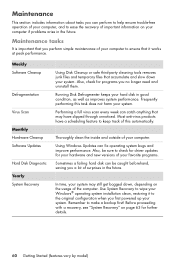
...(features vary by model) Weekly Software Cleanup Defragmentation Virus Scan Monthly Hardware Cleanup Software Updates Hard Disk Diagnostic Yearly System Recovery Using Disk Cleanup or safe third-party cleaning tools removes junk files and temporary files that it to the original configuration ... tasks It is important that you perform simple maintenance of your computer to make a backup first! Before proceeding with a recovery, see "System Recovery" on the usage of your system. Thoroughly clean the inside and outside of the computer. Most anti-virus products have slipped...
...(features vary by model) Weekly Software Cleanup Defragmentation Virus Scan Monthly Hardware Cleanup Software Updates Hard Disk Diagnostic Yearly System Recovery Using Disk Cleanup or safe third-party cleaning tools removes junk files and temporary files that it to the original configuration ... tasks It is important that you perform simple maintenance of your computer to make a backup first! Before proceeding with a recovery, see "System Recovery" on the usage of your system. Thoroughly clean the inside and outside of the computer. Most anti-virus products have slipped...

Getting Started
Page 65
...overheat, or, in the Windows Vista Properties window for visible signs of dust and debris, and clean it is an exact copy. Creating system recovery discs This is a one-time procedure that you may need to manually enable this feature (refer to its life. See "Using the Onscreen Help...Web site bookmarks. This does not affect the location of dust and dirt, and heat will prolong its original factory settings by using the system recovery discs that you encounter recording issues, try alternate media (different types or brands). Keeping the computer free of dust and dirt, and heat ...
...overheat, or, in the Windows Vista Properties window for visible signs of dust and debris, and clean it is an exact copy. Creating system recovery discs This is a one-time procedure that you may need to manually enable this feature (refer to its life. See "Using the Onscreen Help...Web site bookmarks. This does not affect the location of dust and dirt, and heat will prolong its original factory settings by using the system recovery discs that you encounter recording issues, try alternate media (different types or brands). Keeping the computer free of dust and dirt, and heat ...

Getting Started
Page 67
... to make extra space available on the computer at the factory. You will be rejected if they are not defect-free. To create recovery discs, see error messages such as Recording failure when writing disc or Error detected during disc verification. You may be used for data ...storage. It is normal that you installed after purchase. The recovery image is very high. This image contains the operating system and software program files that cannot be used only with your computer at the...
... to make extra space available on the computer at the factory. You will be rejected if they are not defect-free. To create recovery discs, see error messages such as Recording failure when writing disc or Error detected during disc verification. You may be used for data ...storage. It is normal that you installed after purchase. The recovery image is very high. This image contains the operating system and software program files that cannot be used only with your computer at the...
Getting Started
Page 68
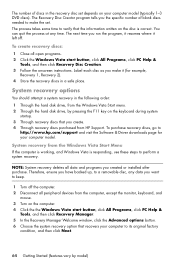
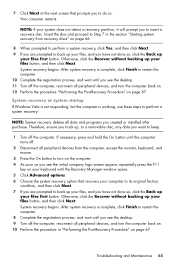
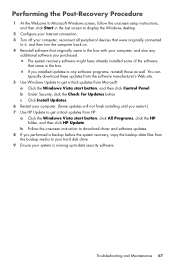
... Start Menu If the computer is working, and Windows Vista is correct. System recovery from HP Support. NOTE: System recovery deletes all open programs. 2 Click the Windows Vista start button, click All Programs, click PC Help & Tools, and then click Recovery Manager. 5 In the Recovery Manager Welcome window, click the Advanced options button. 6 Choose the system...
... Start Menu If the computer is working, and Windows Vista is correct. System recovery from HP Support. NOTE: System recovery deletes all open programs. 2 Click the Windows Vista start button, click All Programs, click PC Help & Tools, and then click Recovery Manager. 5 In the Recovery Manager Welcome window, click the Advanced options button. 6 Choose the system...
Getting Started
Page 69
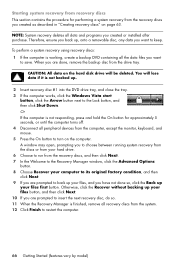
... press the F11 key on your keyboard until the Recovery Manager window opens. 5 Click Advanced options. 6 Choose the system recovery option that prompts you to restart the computer. 10 Complete the registration process, and wait until you see the desktop. 11 Turn off the computer, reconnect all data ... peripheral devices, and turn the computer back on. 12 Perform the procedure "Performing the Post-Recovery Procedure" on page 67. If necessary, press and hold the On button until you see the desktop. 9 Turn off the computer, reconnect all peripheral devices, and turn the computer back on....
... press the F11 key on your keyboard until the Recovery Manager window opens. 5 Click Advanced options. 6 Choose the system recovery option that prompts you to restart the computer. 10 Complete the registration process, and wait until you see the desktop. 11 Turn off the computer, reconnect all data ... peripheral devices, and turn the computer back on. 12 Perform the procedure "Performing the Post-Recovery Procedure" on page 67. If necessary, press and hold the On button until you see the desktop. 9 Turn off the computer, reconnect all peripheral devices, and turn the computer back on....
Getting Started
Page 70
...and then click Next. 9 If you are prompted to back up your files, and you have not done so, click the Back up . 2 Insert recovery disc #1 into the DVD drive tray, and close the tray. 3 If the computer works, click the Windows Vista start button, click the Arrow button ... is working, create a backup DVD containing all the data files you are done, remove the backup disc from the drive tray. Starting system recovery from recovery discs This section contains the procedure for approximately 5 seconds, or until the computer turns off. 4 Disconnect all peripheral devices from the computer, except ...
...and then click Next. 9 If you are prompted to back up your files, and you have not done so, click the Back up . 2 Insert recovery disc #1 into the DVD drive tray, and close the tray. 3 If the computer works, click the Windows Vista start button, click the Arrow button ... is working, create a backup DVD containing all the data files you are done, remove the backup disc from the drive tray. Starting system recovery from recovery discs This section contains the procedure for approximately 5 seconds, or until the computer turns off. 4 Disconnect all peripheral devices from the computer, except ...
Getting Started
Page 71
... to get critical updates from HP: a Click the Windows Vista start button, and then click Control Panel. If you installed updates to any additional software you performed a backup before the system recovery, copy the backup data files from the backup media to your hard disk drive. 9 ...1 At the Welcome to Microsoft Windows screen, follow the onscreen setup instructions, and then click Start in the last screen to display the Windows desktop. 2 Configure your Internet connection. 3 Turn off your computer, reconnect all peripheral devices that were originally connected to it, and then turn the...
... to get critical updates from HP: a Click the Windows Vista start button, and then click Control Panel. If you installed updates to any additional software you performed a backup before the system recovery, copy the backup data files from the backup media to your hard disk drive. 9 ...1 At the Welcome to Microsoft Windows screen, follow the onscreen setup instructions, and then click Start in the last screen to display the Windows desktop. 2 Configure your Internet connection. 3 Turn off your computer, reconnect all peripheral devices that were originally connected to it, and then turn the...

Getting Started
Page 74
...7 P passwords 22 peripheral device landing pad and cable routing 32 peripherals 2 power connector 2 printer connecting 26 R recording level, adjusting 21 Recovery Manager 59 reinstall a software program 59 remote control 31 repairing software 57 repetitive strain injury (RSI), see Safety & Comfort Guide restarting the computer...setting up computer 1 shut down the computer 16 Sleep mode 16, 17 software programs CyberLink DVD Suite 33 CyberLink LabelPrint 30 HP Total Care Advisor 34 muvee Reveal 33 reinstall 59 Windows Movie Maker 34 software repairs 57 speakers connecting 6 connector type 4 ...
...7 P passwords 22 peripheral device landing pad and cable routing 32 peripherals 2 power connector 2 printer connecting 26 R recording level, adjusting 21 Recovery Manager 59 reinstall a software program 59 remote control 31 repairing software 57 repetitive strain injury (RSI), see Safety & Comfort Guide restarting the computer...setting up computer 1 shut down the computer 16 Sleep mode 16, 17 software programs CyberLink DVD Suite 33 CyberLink LabelPrint 30 HP Total Care Advisor 34 muvee Reveal 33 reinstall 59 Windows Movie Maker 34 software repairs 57 speakers connecting 6 connector type 4 ...
Upgrading and Servicing Guide
Page 16
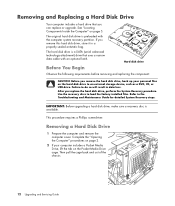
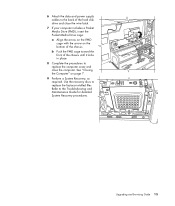
... technology attachment) drive that you remove this hard disk drive, store it in data loss. Use the recovery discs to the Troubleshooting and Maintenance Guide for detailed System Recovery steps. Complete the "Opening the Computer" procedures on page 2. 2 If your personal files on the hard...Begin Observe the following requirements before removing and replacing the component: CAUTION: Before you replace the hard disk drive, perform the System Recovery procedure. Then pull the cage back and out of the chassis. 12 Upgrading and Servicing Guide If you can replace or upgrade...
... technology attachment) drive that you remove this hard disk drive, store it in data loss. Use the recovery discs to the Troubleshooting and Maintenance Guide for detailed System Recovery steps. Complete the "Opening the Computer" procedures on page 2. 2 If your personal files on the hard...Begin Observe the following requirements before removing and replacing the component: CAUTION: Before you replace the hard disk drive, perform the System Recovery procedure. Then pull the cage back and out of the chassis. 12 Upgrading and Servicing Guide If you can replace or upgrade...
Upgrading and Servicing Guide
Page 19
...installed files. See "Closing the Computer" on the bottom of the chassis. Upgrading and Servicing Guide 15 Use the recovery discs to the Troubleshooting and Maintenance Guide for detailed System Recovery procedures. 6 Attach the data and power supply cables to replace the computer cover and close the wire latch. ...Media Drive (PMD), insert the Pocket Media Drive cage: a Align the arrow on the PMD cage with the arrow on page 7. 9 Perform a System Recovery, as required. b Push the PMD cage toward the front of the chassis until it locks in place. 8 Complete the procedures to the back of ...
...installed files. See "Closing the Computer" on the bottom of the chassis. Upgrading and Servicing Guide 15 Use the recovery discs to the Troubleshooting and Maintenance Guide for detailed System Recovery procedures. 6 Attach the data and power supply cables to replace the computer cover and close the wire latch. ...Media Drive (PMD), insert the Pocket Media Drive cage: a Align the arrow on the PMD cage with the arrow on page 7. 9 Perform a System Recovery, as required. b Push the PMD cage toward the front of the chassis until it locks in place. 8 Complete the procedures to the back of ...
Getting Started Guide
Page 3
... the computer in the proper location 1 Using surge protection 1 Connecting to the computer 2 Connecting a Digital Camera (Photo or Video 4 Connecting Other Devices 6 Storing Documentation and Recovery Discs 6 Adjusting the Monitor 7 Adjusting the screen resolution by using Vista 7 Adjusting the screen resolution by using the NVIDIA Control Panel 7 Setting Up a Local Area...
... the computer in the proper location 1 Using surge protection 1 Connecting to the computer 2 Connecting a Digital Camera (Photo or Video 4 Connecting Other Devices 6 Storing Documentation and Recovery Discs 6 Adjusting the Monitor 7 Adjusting the screen resolution by using Vista 7 Adjusting the screen resolution by using the NVIDIA Control Panel 7 Setting Up a Local Area...


