Security - Windows Vista
Page 8
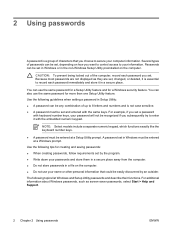
NOTE: Select models include a separate numeric keypad, which functions exactly like the keyboard number keys. ● A password must be set in Windows or in a secure place. Use the following tips for creating and saving passwords: ● When creating passwords, follow requirements set by an outsider. The following guidelines when setting a password in Setup Utility: ● A password can be entered at a Setup Utility prompt. Several types of the computer, record each password immediately and store it...
NOTE: Select models include a separate numeric keypad, which functions exactly like the keyboard number keys. ● A password must be set in Windows or in a secure place. Use the following tips for creating and saving passwords: ● When creating passwords, follow requirements set by an outsider. The following guidelines when setting a password in Setup Utility: ● A password can be entered at a Setup Utility prompt. Several types of the computer, record each password immediately and store it...
HP Pavilion dv9000 Notebook PC - Maintenance and Service Guide
Page 34
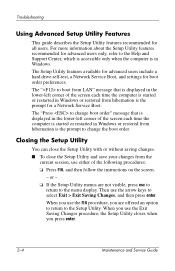
... Windows or restored from hibernation is started or restarted in Windows. or - ❏ If the Setup Utility menus are offered an option to return to the menu display. When you use the f10 procedure, you press enter. 2-4 Maintenance and Service Guide When you use the Exit Saving Changes procedure, the Setup Utility closes when you are not visible, press esc to return to the Setup Utility. The "Press to change the boot order...
... Windows or restored from hibernation is started or restarted in Windows. or - ❏ If the Setup Utility menus are offered an option to return to the menu display. When you use the f10 procedure, you press enter. 2-4 Maintenance and Service Guide When you use the Exit Saving Changes procedure, the Setup Utility closes when you are not visible, press esc to return to the Setup Utility. The "Press to change the boot order...
HP Pavilion dv9000 Notebook PC - Maintenance and Service Guide
Page 40
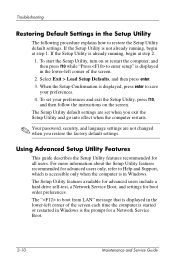
... enter setup" is in Windows is displayed, press enter to save your preferences and exit the Setup Utility, press f10, and then follow the instructions on the screen. The Setup Utility default settings are not changed when you restore the factory default settings. Troubleshooting Restoring Default Settings in the lower-left corner of the screen each time the computer is started or restarted in Windows. For more information about the Setup Utility features recommended for a Network Service Boot. 2-10 Maintenance and Service Guide...
... enter setup" is in Windows is displayed, press enter to save your preferences and exit the Setup Utility, press f10, and then follow the instructions on the screen. The Setup Utility default settings are not changed when you restore the factory default settings. Troubleshooting Restoring Default Settings in the lower-left corner of the screen each time the computer is started or restarted in Windows. For more information about the Setup Utility features recommended for a Network Service Boot. 2-10 Maintenance and Service Guide...
HP Pavilion dv9000 Notebook PC - Maintenance and Service Guide
Page 59
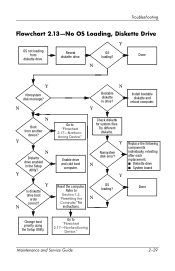
... drive. Y N Diskette drive enabled in drive? Y Replace the following components Nonsystem disk error? Change boot priority using the Setup Utility. N N Boot from diskette drive. Y Y Is diskette drive boot order correct? Install bootable diskette and reboot computer. Check diskette for instructions. N N Bootable diskette in the Setup utility? Go to "Flowchart 2.17-Nonfunctioning Device." Y Go to "Flowchart 2.17-Nonfunctioning Device." Done N Y Nonsystem disk message? Maintenance and Service Guide 2-29 Try different diskette. Troubleshooting...
... drive. Y N Diskette drive enabled in drive? Y Replace the following components Nonsystem disk error? Change boot priority using the Setup Utility. N N Boot from diskette drive. Y Y Is diskette drive boot order correct? Install bootable diskette and reboot computer. Check diskette for instructions. N N Bootable diskette in the Setup utility? Go to "Flowchart 2.17-Nonfunctioning Device." Y Go to "Flowchart 2.17-Nonfunctioning Device." Done N Y Nonsystem disk message? Maintenance and Service Guide 2-29 Try different diskette. Troubleshooting...
HP Pavilion dv9000 Notebook PC - Maintenance and Service Guide
Page 266
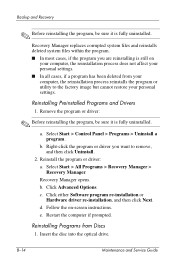
...still on -screen instructions. Recovery Manager opens. Select Start > All Programs > Recovery Manager > Recovery Manager. Reinstalling Programs from your computer, the reinstallation process reinstalls the program or utility to remove, and then click Uninstall. 2. e. B-14 Maintenance and Service Guide Reinstalling Preinstalled Programs and Drivers 1. a. Select Start > Control Panel > Programs > Uninstall a program. Insert the disc into the optical drive. c. Backup and Recovery ✎ Before reinstalling the program, be sure it is fully uninstalled. Recovery Manager replaces...
...still on -screen instructions. Recovery Manager opens. Select Start > All Programs > Recovery Manager > Recovery Manager. Reinstalling Programs from your computer, the reinstallation process reinstalls the program or utility to remove, and then click Uninstall. 2. e. B-14 Maintenance and Service Guide Reinstalling Preinstalled Programs and Drivers 1. a. Select Start > Control Panel > Programs > Uninstall a program. Insert the disc into the optical drive. c. Backup and Recovery ✎ Before reinstalling the program, be sure it is fully uninstalled. Recovery Manager replaces...
HP Pavilion dv9000 Notebook PC - Maintenance and Service Guide
Page 299
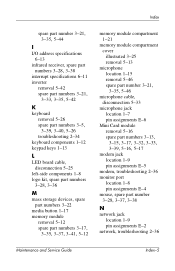
... 2-34 keyboard components 1-12 keypad keys 1-13 L LED board cable, disconnection 5-25 left-side components 1-8 logo kit, spare part numbers 3-28, 3-36 M mass storage devices, spare part numbers 3-22 media button 1-17 memory module removal 5-12 spare part numbers 3-17, 3-35, 3-37, 3-41, 5-12 memory module compartment 1-21 memory module compartment cover illustrated 3-25 removal 5-13 microphone location 1-15 removal 5-46 spare part number 3-21, 3-35, 5-46 microphone cable, disconnection 5-33 microphone jack location 1-7 pin assignments E-6 Mini Card module removal 5-16 spare part numbers 3-13...
... 2-34 keyboard components 1-12 keypad keys 1-13 L LED board cable, disconnection 5-25 left-side components 1-8 logo kit, spare part numbers 3-28, 3-36 M mass storage devices, spare part numbers 3-22 media button 1-17 memory module removal 5-12 spare part numbers 3-17, 3-35, 3-37, 3-41, 5-12 memory module compartment 1-21 memory module compartment cover illustrated 3-25 removal 5-13 microphone location 1-15 removal 5-46 spare part number 3-21, 3-35, 5-46 microphone cable, disconnection 5-33 microphone jack location 1-7 pin assignments E-6 Mini Card module removal 5-16 spare part numbers 3-13...
HP Pavilion dv9000 Notebook PC - Maintenance and Service Guide
Page 301
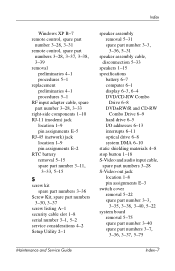
... security cable slot 1-8 serial number 3-1, 5-2 service considerations 4-2 Setup Utility 2-1 speaker assembly removal 5-31 spare part number 3-3, 3-36, 5-31 speaker assembly cable, disconnection 5-33 speakers 1-15 specifications battery 6-7 computer 6-1 display 6-3, 6-4 DVD/CD-RW Combo Drive 6-8 DVD±RW/R and CD-RW Combo Drive 6-9 hard drive 6-5 I/O addresses 6-13 interrupts 6-11 optical drive 6-8 system DMA 6-10 static shielding materials 4-8 stop button 1-18 S-Video and audio input cable, spare part numbers 3-28 S-Video-out jack location 1-8 pin assignments E-3 switch cover removal 5-22...
... security cable slot 1-8 serial number 3-1, 5-2 service considerations 4-2 Setup Utility 2-1 speaker assembly removal 5-31 spare part number 3-3, 3-36, 5-31 speaker assembly cable, disconnection 5-33 speakers 1-15 specifications battery 6-7 computer 6-1 display 6-3, 6-4 DVD/CD-RW Combo Drive 6-8 DVD±RW/R and CD-RW Combo Drive 6-9 hard drive 6-5 I/O addresses 6-13 interrupts 6-11 optical drive 6-8 system DMA 6-10 static shielding materials 4-8 stop button 1-18 S-Video and audio input cable, spare part numbers 3-28 S-Video-out jack location 1-8 pin assignments E-3 switch cover removal 5-22...
Software Update, Backup, and Recovery - Windows Vista
Page 5
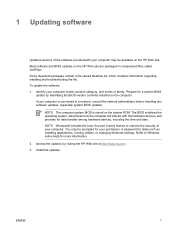
... software and BIOS updates on the computer. NOTE Windows® includes the User Account Control feature to Windows online Help for tasks such as installing applications, running utilities, or changing Windows settings. Prepare for data transfer among hardware devices, including the time and date. The BIOS initializes the operating system, determines how the computer will interact with your computer may be available on the system ROM. ENWW...
... software and BIOS updates on the computer. NOTE Windows® includes the User Account Control feature to Windows online Help for tasks such as installing applications, running utilities, or changing Windows settings. Prepare for data transfer among hardware devices, including the time and date. The BIOS initializes the operating system, determines how the computer will interact with your computer may be available on the system ROM. ENWW...
Software Update, Backup, and Recovery - Windows Vista
Page 6
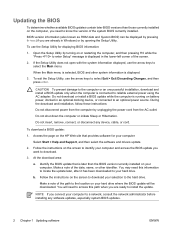
... external power using the AC adapter. Access the page on the HP Web site that is connected to your hard drive where the BIOS update will need to enter Setup" message is displayed in an optional docking device, or connected to download your computer: Select Start > Help and Support, and then select the software and drivers update. 2. You may need this path when you are already in Windows) or by opening the Setup Utility. Make a note of the path to a network...
... external power using the AC adapter. Access the page on the HP Web site that is connected to your hard drive where the BIOS update will need to enter Setup" message is displayed in an optional docking device, or connected to download your computer: Select Start > Help and Support, and then select the software and drivers update. 2. You may need this path when you are already in Windows) or by opening the Setup Utility. Make a note of the path to a network...
Software Update, Backup, and Recovery - Windows Vista
Page 13
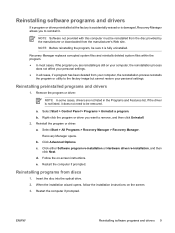
... the on the screen. 3. Insert the disc into the optical drive. 2. d. Restart the computer if prompted. ENWW Reinstalling software programs and drivers 9 Select Start > Control Panel > Programs > Uninstall a program. c. Click either Software program re-installation or Hardware driver re-installation, and then click Next. Restart the computer if prompted. NOTE Software not provided with this computer must be sure it . Recovery Manager replaces corrupted system files and...
... the on the screen. 3. Insert the disc into the optical drive. 2. d. Restart the computer if prompted. ENWW Reinstalling software programs and drivers 9 Select Start > Control Panel > Programs > Uninstall a program. c. Click either Software program re-installation or Hardware driver re-installation, and then click Next. Restart the computer if prompted. NOTE Software not provided with this computer must be sure it . Recovery Manager replaces corrupted system files and...

Wireless (Select Models Only) - Windows Vista
Page 11
... the left pane, click Device Manager. 3. Identify the WLAN device from the Network adapters list. NOTE If no WLAN device is listed, either your computer. The listing for tasks such as installing applications, running utilities, or changing Windows settings. Select Start > Computer > System properties tab. 2. Refer to Windows online Help for the WLAN device is installed on your computer: NOTE Windows includes the User Account Control feature to improve the security...
... the left pane, click Device Manager. 3. Identify the WLAN device from the Network adapters list. NOTE If no WLAN device is listed, either your computer. The listing for tasks such as installing applications, running utilities, or changing Windows settings. Select Start > Computer > System properties tab. 2. Refer to Windows online Help for the WLAN device is installed on your computer: NOTE Windows includes the User Account Control feature to improve the security...
Notebook Tour - Windows Vista
Page 7
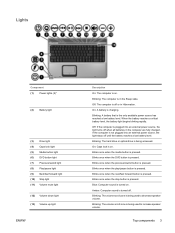
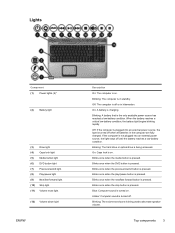
...into an external power source, the light turns off until the battery reaches a low battery level. Blinking: The hard drive or optical drive is being used to increase speaker volume. Amber: Computer sound is turned off or in the Sleep state. On: A battery is pressed. Lights Component (1) Power lights (2)* (2) Battery light (3) Drive light (4) Caps lock light (5) Media button light (6) DVD button light (7) Previous/rewind light (8) Play/pause light (9) Next/fast forward light (10) Stop light (11) Volume mute light (12) Volume down light (13) Volume up light ENWW Description...
...into an external power source, the light turns off until the battery reaches a low battery level. Blinking: The hard drive or optical drive is being used to increase speaker volume. Amber: Computer sound is turned off or in the Sleep state. On: A battery is pressed. Lights Component (1) Power lights (2)* (2) Battery light (3) Drive light (4) Caps lock light (5) Media button light (6) DVD button light (7) Previous/rewind light (8) Play/pause light (9) Next/fast forward light (10) Stop light (11) Volume mute light (12) Volume down light (13) Volume up light ENWW Description...
Drives - Windows XP
Page 9
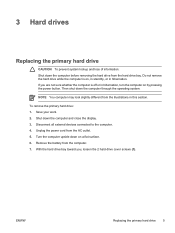
... down the computer and close the display. 3. Remove the battery from the illustrations in this section. To remove the primary hard drive: 1. Disconnect all external devices connected to the computer. 4. If you , loosen the 2 hard drive cover screws (1). NOTE You computer may look slightly different from the computer. 7. Do not remove the hard drive while the computer is off or in hibernation. ENWW Replacing the primary hard drive 5
... down the computer and close the display. 3. Remove the battery from the illustrations in this section. To remove the primary hard drive: 1. Disconnect all external devices connected to the computer. 4. If you , loosen the 2 hard drive cover screws (1). NOTE You computer may look slightly different from the computer. 7. Do not remove the hard drive while the computer is off or in hibernation. ENWW Replacing the primary hard drive 5
Multimedia
Page 13
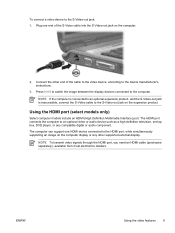
Connect the other supported external display. The HDMI port connects the computer to the device manufacturer's instructions. 3. The computer can support one end of the S-Video cable into the S-Video-out jack on the computer display or any other end of the cable to the video device, according to an optional video or audio device such as a high-definition television, set-top box, DVD player, or any compatible digital or audio component. ENWW Using the video features 9 NOTE...
Connect the other supported external display. The HDMI port connects the computer to the device manufacturer's instructions. 3. The computer can support one end of the S-Video cable into the S-Video-out jack on the computer display or any other end of the cable to the video device, according to an optional video or audio device such as a high-definition television, set-top box, DVD player, or any compatible digital or audio component. ENWW Using the video features 9 NOTE...
Multimedia - Windows Vista
Page 12
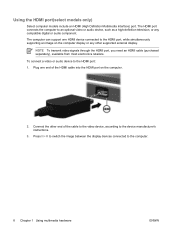
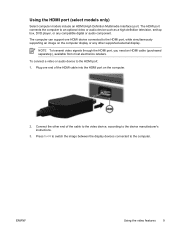
... 1 Using multimedia hardware ENWW NOTE To transmit video signals through the HDMI port, you need an HDMI cable (purchased separately), available from most electronics retailers. Using the HDMI port(select models only) Select computer models include an HDMI (High Definition Multimedia Interface) port. Connect the other supported external display. The HDMI port connects the computer to the HDMI port: 1. Press fn+f4 to switch the image between the display devices connected to the device manufacturer's instructions. 3. Plug one HDMI device connected to the HDMI port...
... 1 Using multimedia hardware ENWW NOTE To transmit video signals through the HDMI port, you need an HDMI cable (purchased separately), available from most electronics retailers. Using the HDMI port(select models only) Select computer models include an HDMI (High Definition Multimedia Interface) port. Connect the other supported external display. The HDMI port connects the computer to the HDMI port: 1. Press fn+f4 to switch the image between the display devices connected to the device manufacturer's instructions. 3. Plug one HDMI device connected to the HDMI port...

Multimedia - Windows Vista
Page 25
...D DVD changing region setting 20 inserting 11 playing 19 protecting 17 removing, with power 12 removing, without power 13 writing to 17 DVD button 5 DVD region settings 20 E earbuds 2 external monitor port 6 H headphones 2 J jack audio-in (microphone) 1 audio-out (headphone) 2 jacks audio-in (microphone) 3 audio-out (headphone) 3 S-Video-out 7 M media activity buttons 15 media activity hotkeys 14 media button 5 microphones, supported 3 monitor, connecting 6 multimedia software described 17 using 18 mute button 2, 4 O optical disc inserting 11 removing, with power 12 removing, without power 13...
...D DVD changing region setting 20 inserting 11 playing 19 protecting 17 removing, with power 12 removing, without power 13 writing to 17 DVD button 5 DVD region settings 20 E earbuds 2 external monitor port 6 H headphones 2 J jack audio-in (microphone) 1 audio-out (headphone) 2 jacks audio-in (microphone) 3 audio-out (headphone) 3 S-Video-out 7 M media activity buttons 15 media activity hotkeys 14 media button 5 microphones, supported 3 monitor, connecting 6 multimedia software described 17 using 18 mute button 2, 4 O optical disc inserting 11 removing, with power 12 removing, without power 13...
Notebook Tour
Page 7
.... Top components 3 Blinking: The hard drive or optical drive is being accessed. When the battery reaches a critical low-battery condition, the battery light begins blinking rapidly. Blinking: The volume scroll zone is being used to decrease speaker volume. Off: The computer is on . On: Caps lock is off when all batteries in hibernation. Blinks once when the previous/rewind button is on . Lights Component (1) Power lights (2)* (2) Battery light (3) Drive light (4) Caps lock light (5) Media button light (6) DVD button light (7) Previous/rewind light (8) Play/pause...
.... Top components 3 Blinking: The hard drive or optical drive is being accessed. When the battery reaches a critical low-battery condition, the battery light begins blinking rapidly. Blinking: The volume scroll zone is being used to decrease speaker volume. Off: The computer is on . On: Caps lock is off when all batteries in hibernation. Blinks once when the previous/rewind button is on . Lights Component (1) Power lights (2)* (2) Battery light (3) Drive light (4) Caps lock light (5) Media button light (6) DVD button light (7) Previous/rewind light (8) Play/pause...

Notebook Tour
Page 28
keys esc 7 fn 7 function 7 keypad 7 Windows applications 7 Windows logo 7 L labels Bluetooth 17 Microsoft Certificate of Authenticity 17 modem approval 17 regulatory 17 service tag 17 wireless certification 17 WLAN 17 latch, battery release 13 lights battery 3 caps lock 3 Digital Media Slot 12 drive 3 DVD button 3 integrated camera 14 media button 3 mute 3 next/fast forward 3 num lock 4 optical drive 11 play/pause 3 power 3 previous/rewind 3 stop 3 TouchPad 2 volume down 3 volume mute 3 volume up 4 wireless 9 M media activity buttons, identifying 6 media activity lights, identifying 3 media ...
keys esc 7 fn 7 function 7 keypad 7 Windows applications 7 Windows logo 7 L labels Bluetooth 17 Microsoft Certificate of Authenticity 17 modem approval 17 regulatory 17 service tag 17 wireless certification 17 WLAN 17 latch, battery release 13 lights battery 3 caps lock 3 Digital Media Slot 12 drive 3 DVD button 3 integrated camera 14 media button 3 mute 3 next/fast forward 3 num lock 4 optical drive 11 play/pause 3 power 3 previous/rewind 3 stop 3 TouchPad 2 volume down 3 volume mute 3 volume up 4 wireless 9 M media activity buttons, identifying 6 media activity lights, identifying 3 media ...
Multimedia - Windows XP
Page 13
... transmit video signals through the HDMI port, you need an HDMI cable (purchased separately), available from most electronics retailers. The HDMI port connects the computer to the HDMI port, while simultaneously supporting an image on the computer. 2. Plug one HDMI device connected to an optional video or audio device such as a high-definition television, set-top box, DVD player, or any other end of the HDMI cable into the HDMI port on the computer display or...
... transmit video signals through the HDMI port, you need an HDMI cable (purchased separately), available from most electronics retailers. The HDMI port connects the computer to the HDMI port, while simultaneously supporting an image on the computer. 2. Plug one HDMI device connected to an optional video or audio device such as a high-definition television, set-top box, DVD player, or any other end of the HDMI cable into the HDMI port on the computer display or...

Notebook Tour - Windows XP
Page 7
... pressed. Blue: Computer sound is turned on . Off: If the computer is pressed. Blinks once when the media button is plugged into an external power source, the light stays off . Blinks once when the DVD button is being accessed. Blinking: The volume scroll zone is pressed. Lights Component (1) Power lights (2)* (2) Battery light (3) Drive light (4) Caps lock light (5) Media button light (6) DVD button light (7) Previous/rewind light (8) Play/pause light (9) Next/fast forward light (10) Stop light (11) Volume mute light (12) Volume down light ENWW Description On: The...
... pressed. Blue: Computer sound is turned on . Off: If the computer is pressed. Blinks once when the media button is plugged into an external power source, the light stays off . Blinks once when the DVD button is being accessed. Blinking: The volume scroll zone is pressed. Lights Component (1) Power lights (2)* (2) Battery light (3) Drive light (4) Caps lock light (5) Media button light (6) DVD button light (7) Previous/rewind light (8) Play/pause light (9) Next/fast forward light (10) Stop light (11) Volume mute light (12) Volume down light ENWW Description On: The...


