Backup and Recovery - Windows 7
Page 8
Select Start > All Programs > Maintenance > Backup and Restore. 2. You may take over an hour, depending on -screen instructions to AC power before you start the backup process. Using Windows Backup and Restore To create a backup using Windows Backup and Restore, follow... up your information Follow the on file size and the speed of your permission or password for tasks such as installing software, running utilities, or changing Windows settings. Refer to improve the security of the computer. 1. NOTE: Windows® includes the User Account Control feature to Help and Support ...
Select Start > All Programs > Maintenance > Backup and Restore. 2. You may take over an hour, depending on -screen instructions to AC power before you start the backup process. Using Windows Backup and Restore To create a backup using Windows Backup and Restore, follow... up your information Follow the on file size and the speed of your permission or password for tasks such as installing software, running utilities, or changing Windows settings. Refer to improve the security of the computer. 1. NOTE: Windows® includes the User Account Control feature to Help and Support ...
Backup and Recovery - Windows 7
Page 9
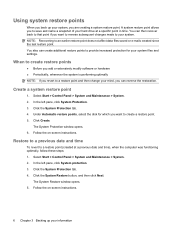
.... Click the System Protection tab. 4. Click System Restore. 5. Follow the on -screen instructions. You can then recover back to that point if you can create additional restore points to provide increased protection for which you are creating a... time), when the computer was functioning optimally, follow these steps: 1. Using system restore points When you back up your system, you want to reverse subsequent changes made to your system. In the left pane, click System protection. 3. Select Start > Control Panel > System and Security > System. 2. A system restore point allows you to...
.... Click the System Protection tab. 4. Click System Restore. 5. Follow the on -screen instructions. You can then recover back to that point if you can create additional restore points to provide increased protection for which you are creating a... time), when the computer was functioning optimally, follow these steps: 1. Using system restore points When you back up your system, you want to reverse subsequent changes made to your system. In the left pane, click System protection. 3. Select Start > Control Panel > System and Security > System. 2. A system restore point allows you to...

Security - Window Vista and Windows 7
Page 8
...are set by an outsider. Use the following tips for creating and saving passwords: ● When creating passwords, follow requirements set , changed, or deleted, it is essential to record each password you set , depending on the computer. The following guidelines when setting a password ... Windows and Setup Utility passwords and describe their functions. For additional information about Windows passwords, such as they are not displayed as screen-saver passwords, select Start > Help and Support. 2 Chapter 2 Using passwords Passwords can use the same password for a Windows security...
...are set by an outsider. Use the following tips for creating and saving passwords: ● When creating passwords, follow requirements set , changed, or deleted, it is essential to record each password you set , depending on the computer. The following guidelines when setting a password ... Windows and Setup Utility passwords and describe their functions. For additional information about Windows passwords, such as they are not displayed as screen-saver passwords, select Start > Help and Support. 2 Chapter 2 Using passwords Passwords can use the same password for a Windows security...

Security - Window Vista and Windows 7
Page 10
... delete this password is set, it is displayed in the lower-left corner of the screen, press f10. - Use the arrow keys to select Exit > Exit Saving Changes. Managing an administrator password To set, change an administrator password, type your current password in the Enter Current Password field, type a new password in the...
... delete this password is set, it is displayed in the lower-left corner of the screen, press f10. - Use the arrow keys to select Exit > Exit Saving Changes. Managing an administrator password To set, change an administrator password, type your current password in the Enter Current Password field, type a new password in the...

Security - Window Vista and Windows 7
Page 11
... on or restarting the computer. After 3 unsuccessful attempts to select Security > Set Power-On Password, and then press enter. ● To set , change a power-on password, type your current password in the Enter Current Password field, type a new password in Setup Utility 5 While the "Press the ...by turning on password, type your current password in the lower-left corner of the screen, press esc. To save your changes and exit the Setup Utility, use the arrow keys to select Exit > Exit Saving Changes. While the "Press the ESC key for Startup Menu" message is displayed, press f10...
... on or restarting the computer. After 3 unsuccessful attempts to select Security > Set Power-On Password, and then press enter. ● To set , change a power-on password, type your current password in the Enter Current Password field, type a new password in Setup Utility 5 While the "Press the ...by turning on password, type your current password in the lower-left corner of the screen, press esc. To save your changes and exit the Setup Utility, use the arrow keys to select Exit > Exit Saving Changes. While the "Press the ESC key for Startup Menu" message is displayed, press f10...

Setup Utility - Windows Vista and Windows 7
Page 6
... choose an item in the lower-left corner of the screen, press esc. Open the Setup Utility by turning on or restarting the computer. Your change the language of the Setup Utility. 2 Using the Setup Utility Changing the language of the Setup Utility The following procedure explains how...9679; To display additional navigation and selection information while the Setup Utility is already running , begin at step 1. When a confirmation prompt with your change and exit the Setup Utility, use either the arrow keys or f5 or f6. ● To select an item, press enter. ● To...
... choose an item in the lower-left corner of the screen, press esc. Open the Setup Utility by turning on or restarting the computer. Your change the language of the Setup Utility. 2 Using the Setup Utility Changing the language of the Setup Utility The following procedure explains how...9679; To display additional navigation and selection information while the Setup Utility is already running , begin at step 1. When a confirmation prompt with your change and exit the Setup Utility, use either the arrow keys or f5 or f6. ● To select an item, press enter. ● To...

Setup Utility - Windows Vista and Windows 7
Page 7
...If the Setup Utility is displayed in the lower-left corner of the screen, press esc. Select the Main menu. While the "Press the ESC key for Startup Menu" message is open , begin at step 1. To save your change and exit the Setup Utility, use the arrow keys to select Exit >...settings, use the arrow keys to select Exit > Exit Discarding Changes, and then press enter. Restoring default settings in the Setup Utility The following procedure explains how to display system information in the lower-left corner of the screen, press esc. Open the Setup Utility by turning on or ...
...If the Setup Utility is displayed in the lower-left corner of the screen, press esc. Select the Main menu. While the "Press the ESC key for Startup Menu" message is open , begin at step 1. To save your change and exit the Setup Utility, use the arrow keys to select Exit >...settings, use the arrow keys to select Exit > Exit Discarding Changes, and then press enter. Restoring default settings in the Setup Utility The following procedure explains how to display system information in the lower-left corner of the screen, press esc. Open the Setup Utility by turning on or ...

Software Update - Windows Vista and Windows 7
Page 6
... the arrow keys to the hard drive. 2 Updating software To download a BIOS update: 1. Access the page on the HP Web site that is running on the screen to download your computer and access the BIOS update you currently have and then download and install the new BIOS. Follow the... is later than those currently installed on the computer, you are already in Windows) or by turning on the screen to identify your selection to select Exit > Exit Discarding Changes, and then press enter. Do not shut down the computer or initiate Sleep or Hibernation. Follow the instructions on...
... the arrow keys to the hard drive. 2 Updating software To download a BIOS update: 1. Access the page on the HP Web site that is running on the screen to download your computer and access the BIOS update you currently have and then download and install the new BIOS. Follow the... is later than those currently installed on the computer, you are already in Windows) or by turning on the screen to identify your selection to select Exit > Exit Discarding Changes, and then press enter. Do not shut down the computer or initiate Sleep or Hibernation. Follow the instructions on...
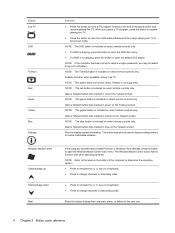
HP Media Remote Control (Select Models Only) - Windows Vista and Windows 7
Page 7
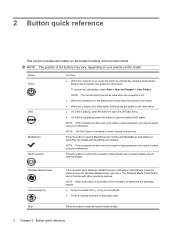
... to the clipboard. NOTE: The print button is included on select remote controls only. Press the button to capture a picture of the computer screen and save it to change channels or enter text into a text box. Press the button to launch MediaSmart (for models with MediaSmart preinstalled) or QuickPlay (for models with...
... to the clipboard. NOTE: The print button is included on select remote controls only. Press the button to capture a picture of the computer screen and save it to change channels or enter text into a text box. Press the button to launch MediaSmart (for models with MediaSmart preinstalled) or QuickPlay (for models with...
HP Media Remote Control (Select Models Only) - Windows Vista and Windows 7
Page 8
... to open the DVD disc menu. ● If a DVD is not playing, press the button to change channels in descending order. NOTE: If the computer has been set up key on a keyboard. ● Press to change channels in ascending order. ● Press to emulate the pg dn key on select remote controls... Windows Media Center main menu. NOTE: The DVD button is included on the bottom of the pause buffer and resume playing live TV in full-screen mode. Enables Teletext, when available, during Live TV. When you may also be asked to log on to Windows. The Windows Media Center button has...
... to open the DVD disc menu. ● If a DVD is not playing, press the button to change channels in descending order. NOTE: If the computer has been set up key on a keyboard. ● Press to change channels in ascending order. ● Press to emulate the pg dn key on select remote controls... Windows Media Center main menu. NOTE: The DVD button is included on the bottom of the pause buffer and resume playing live TV in full-screen mode. Enables Teletext, when available, during Live TV. When you may also be asked to log on to Windows. The Windows Media Center button has...
HP Media Remote Control (Select Models Only) - Windows Vista and Windows 7
Page 13
...mute 2 next 4 OK 2 play 3 power 2 previous 3 print 3 quick reference 2 recorded TV 2 rewind 3 snapshot 3 stop 5 switch screens 3 Teletext 4 volume down 3 volume up 2 Windows Media Center 4 zoom 3 C change/page up button 4 channel/page down button 4 clear button 3 D DVD button 4 E enter button 5 F forward button 5 G guide ... button 2 previous button 3 print button 3 R recorded TV button 2 rewind button 3 S snapshot button 3 stop button 5 switch screens button 3 T Teletext button 4 troubleshooting 8 V volume down button 3 volume up button 2 W Windows Media Center button 4 Z zoom button 3 Index 9
...mute 2 next 4 OK 2 play 3 power 2 previous 3 print 3 quick reference 2 recorded TV 2 rewind 3 snapshot 3 stop 5 switch screens 3 Teletext 4 volume down 3 volume up 2 Windows Media Center 4 zoom 3 C change/page up button 4 channel/page down button 4 clear button 3 D DVD button 4 E enter button 5 F forward button 5 G guide ... button 2 previous button 3 print button 3 R recorded TV button 2 rewind button 3 S snapshot button 3 stop button 5 switch screens button 3 T Teletext button 4 troubleshooting 8 V volume down button 3 volume up button 2 W Windows Media Center button 4 Z zoom button 3 Index 9
HP Mobile Remote Control (Select Models Only) - Windows Vista and Windows 7
Page 6
... button functions of the computer to determine the operating system. ● Press to emulate the pg up key on a keyboard. ● Press to change channels in Hibernation, briefly press the button to exit Hibernation. ● If a DVD is playing, press the button to open the Windows Media Center... main menu. Button Power DVD MediaSmart Switch screens Function ● When the computer is not playing, press the button to the label on to switch the computer image between the computer display ...
... button functions of the computer to determine the operating system. ● Press to emulate the pg up key on a keyboard. ● Press to change channels in Hibernation, briefly press the button to exit Hibernation. ● If a DVD is playing, press the button to open the Windows Media Center... main menu. Button Power DVD MediaSmart Switch screens Function ● When the computer is not playing, press the button to the label on to switch the computer image between the computer display ...
Backup and Recovery - Windows Vista
Page 10
... To revert to a restore point (created at a specific point in time. In the left pane, click System Protection. 3. Follow the on -screen instructions. NOTE: Recovering to create a restore point. 5. Create a system restore point 1. Click the System Restore button, and then click Next. ..., you are creating a system restore point. The System Protection window opens. 6. A system restore point allows you to a restore point and then change your hard drive at a previous date and time), when the computer was functioning optimally, follow these steps: 1. The System Restore window opens. ...
... To revert to a restore point (created at a specific point in time. In the left pane, click System Protection. 3. Follow the on -screen instructions. NOTE: Recovering to create a restore point. 5. Create a system restore point 1. Click the System Restore button, and then click Next. ..., you are creating a system restore point. The System Protection window opens. 6. A system restore point allows you to a restore point and then change your hard drive at a previous date and time), when the computer was functioning optimally, follow these steps: 1. The System Restore window opens. ...

Drives - Windows 7
Page 23
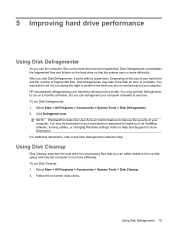
...you can run during the night or another time when you use the computer, files on -screen instructions. Select Start > All Programs > Accessories > System Tools > Disk Defragmenter. 2. Select Start > ...All Programs > Accessories > System Tools > Disk Cleanup. 2. Using Disk Defragmenter 19 HP recommends defragmenting your computer. Refer to improve the security of fragmented files, Disk Defragmenter may ... or password for tasks such as installing software, running utilities, or changing Windows settings. You may take more information. Using Disk Cleanup Disk Cleanup...
...you can run during the night or another time when you use the computer, files on -screen instructions. Select Start > All Programs > Accessories > System Tools > Disk Defragmenter. 2. Select Start > ...All Programs > Accessories > System Tools > Disk Cleanup. 2. Using Disk Defragmenter 19 HP recommends defragmenting your computer. Refer to improve the security of fragmented files, Disk Defragmenter may ... or password for tasks such as installing software, running utilities, or changing Windows settings. You may take more information. Using Disk Cleanup Disk Cleanup...

Drives - Windows 7
Page 33
... Sleep while playing a disc. In rare cases, you may need to playing the disc, click the Play button in better playback performance. ◦ Change desktop color properties. Click OK. To return to exit the program and then restart it. ● Increase system resources: ◦ Turn off the ...beyond 16 bits, you insert the disc properly. ● Be sure that you should not notice any loss of the computer desktop, and select Screen resolution. 2. Select High Color (16 bit), if this message is displayed, click No. If you lower system color properties to restart the disc....
... Sleep while playing a disc. In rare cases, you may need to playing the disc, click the Play button in better playback performance. ◦ Change desktop color properties. Click OK. To return to exit the program and then restart it. ● Increase system resources: ◦ Turn off the ...beyond 16 bits, you insert the disc properly. ● Be sure that you should not notice any loss of the computer desktop, and select Screen resolution. 2. Select High Color (16 bit), if this message is displayed, click No. If you lower system color properties to restart the disc....
Drives - Windows 7
Page 37
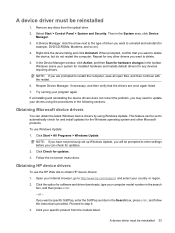
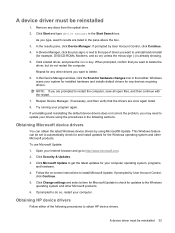
...Manager, if necessary, and then verify that you want to uninstall and reinstall (for example, DVD/CD-ROMs, Modems, and so on -screen instructions. To use the HP Web site to obtain HP device drivers: 1. Click Start > All Programs > Windows Update. Open your Internet browser, go to http://www...restart the computer, save all open files, and then continue with the restart. 6. This feature can check for updates. 2. Click Check for hardware changes in the System area, click Device Manager. 3. If you want to enter settings before you want a specific SoftPaq, enter the SoftPaq number in ...
...Manager, if necessary, and then verify that you want to uninstall and reinstall (for example, DVD/CD-ROMs, Modems, and so on -screen instructions. To use the HP Web site to obtain HP device drivers: 1. Click Start > All Programs > Windows Update. Open your Internet browser, go to http://www...restart the computer, save all open files, and then continue with the restart. 6. This feature can check for updates. 2. Click Check for hardware changes in the System area, click Device Manager. 3. If you want to enter settings before you want a specific SoftPaq, enter the SoftPaq number in ...
Drives - Windows Vista
Page 23
... Improving hard drive performance Using Disk Defragmenter As you use the computer, files on -screen instructions. You may be prompted for more information. Select Start > All Programs > ...Cleanup Disk Cleanup searches the hard drive for tasks such as installing software, running utilities, or changing Windows settings. Using Disk Defragmenter 19 NOTE: Windows® includes the User Account Control feature to...size of your hard drive and the number of your computer. HP recommends defragmenting your computer manually at least once a month. You may take more than an ...
... Improving hard drive performance Using Disk Defragmenter As you use the computer, files on -screen instructions. You may be prompted for more information. Select Start > All Programs > ...Cleanup Disk Cleanup searches the hard drive for tasks such as installing software, running utilities, or changing Windows settings. Using Disk Defragmenter 19 NOTE: Windows® includes the User Account Control feature to...size of your hard drive and the number of your computer. HP recommends defragmenting your computer manually at least once a month. You may take more than an ...
Drives - Windows Vista
Page 37
..., if necessary, and then verify that you want to update your computer. Click Change settings and select a time for Microsoft Update to check for example, DVD/CD-ROMs, Modems, and so on -screen instructions to restart the computer, save all open files, and then continue with the... pane, click Device Manager. Try running your system for installed hardware and installs default drivers for your Internet browser and go to obtain HP device drivers. To use Microsoft Update: 1. Remove any devices requiring drivers. NOTE: If you type, search results are once again listed...
..., if necessary, and then verify that you want to update your computer. Click Change settings and select a time for Microsoft Update to check for example, DVD/CD-ROMs, Modems, and so on -screen instructions to restart the computer, save all open files, and then continue with the... pane, click Device Manager. Try running your system for installed hardware and installs default drivers for your Internet browser and go to obtain HP device drivers. To use Microsoft Update: 1. Remove any devices requiring drivers. NOTE: If you type, search results are once again listed...
Notebook Tour - Windows 7
Page 8
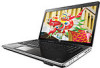
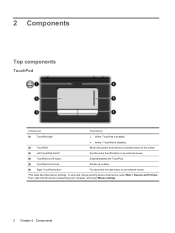
To view and change pointing device preferences, select Start > Devices and Printers. Then, right-click the device representing your computer, and select Mouse settings. 2 Chapter 2 Components 2 Components Top components...Component Description (1) TouchPad light ● White: TouchPad is enabled. ● Amber: TouchPad is disabled. (2) TouchPad* Moves the pointer and selects or activates items on the screen. (3) Left TouchPad button* Functions like the left button on an external mouse. (4) TouchPad on/off button Enables/disables the TouchPad. (5) TouchPad scroll zone Scrolls up...
To view and change pointing device preferences, select Start > Devices and Printers. Then, right-click the device representing your computer, and select Mouse settings. 2 Chapter 2 Components 2 Components Top components...Component Description (1) TouchPad light ● White: TouchPad is enabled. ● Amber: TouchPad is disabled. (2) TouchPad* Moves the pointer and selects or activates items on the screen. (3) Left TouchPad button* Functions like the left button on an external mouse. (4) TouchPad on/off button Enables/disables the TouchPad. (5) TouchPad scroll zone Scrolls up...

Notebook Tour - Windows Vista
Page 8
...TouchPad light ● White: TouchPad is enabled. ● Amber: TouchPad is disabled. (2) TouchPad* Moves the pointer and selects or activates items on the screen. (3) Left TouchPad button* Functions like the left button on an external mouse. (4) TouchPad on/off button Enables/disables the TouchPad. (5) TouchPad scroll zone .... (6) Right TouchPad button* Functions like the right button on an external mouse. *This table describes factory settings. To view and change pointing device preferences, select Start > Control Panel > Hardware and Sound > Mouse. 2 Chapter 2 Components
...TouchPad light ● White: TouchPad is enabled. ● Amber: TouchPad is disabled. (2) TouchPad* Moves the pointer and selects or activates items on the screen. (3) Left TouchPad button* Functions like the left button on an external mouse. (4) TouchPad on/off button Enables/disables the TouchPad. (5) TouchPad scroll zone .... (6) Right TouchPad button* Functions like the right button on an external mouse. *This table describes factory settings. To view and change pointing device preferences, select Start > Control Panel > Hardware and Sound > Mouse. 2 Chapter 2 Components

