HP Pavilion Entertainment PC - Quick Reference Guide
Page 15
... Support. Updating the software installed on -screen instructions. 3. Save your work and close all open applications. 2. Shut down the computer through the operating system by the hardware manufacturer to the Lock button, and then clicking Shut Down. 441259-001.book Page 7 Wednesday, February 14, 2007 9:21 AM Next steps 2. To install additional hardware, such as the computer is updated frequently by using the software, refer to the Internet. Update the operating...
... Support. Updating the software installed on -screen instructions. 3. Save your work and close all open applications. 2. Shut down the computer through the operating system by the hardware manufacturer to the Lock button, and then clicking Shut Down. 441259-001.book Page 7 Wednesday, February 14, 2007 9:21 AM Next steps 2. To install additional hardware, such as the computer is updated frequently by using the software, refer to the Internet. Update the operating...
HP Pavilion Entertainment PC - Quick Reference Guide
Page 21
... (access point) is properly connected to turn the power off and then back on the device manufacturer's Web site. 441259-001.book Page 5 Wednesday, February 14, 2007 9:21 AM Troubleshooting ■ Turn on the computer is blue. For more information about updating drivers, select Start > Help and Support. If the light is amber, slide the wireless switch to its power adapter and the cable modem, and that the wireless device...
... (access point) is properly connected to turn the power off and then back on the device manufacturer's Web site. 441259-001.book Page 5 Wednesday, February 14, 2007 9:21 AM Troubleshooting ■ Turn on the computer is blue. For more information about updating drivers, select Start > Help and Support. If the light is amber, slide the wireless switch to its power adapter and the cable modem, and that the wireless device...
HP Pavilion Entertainment PC - Quick Reference Guide
Page 28
... or utility to the factory image but cannot restore your personal settings. Select Start > Control Panel > Programs > Uninstall a program. Select Start > All Programs > Recovery Manager > Recovery Manager. c. Right-click the program or driver you are not listed in the Programs and Features list. e. Restart the computer if prompted. 4-6 Quick Reference Click Advanced Options. b. Click either Software program re-installation or Hardware driver re-installation, and then click Next. Reinstall a program or driver: a. Remove the...
... or utility to the factory image but cannot restore your personal settings. Select Start > Control Panel > Programs > Uninstall a program. Select Start > All Programs > Recovery Manager > Recovery Manager. c. Right-click the program or driver you are not listed in the Programs and Features list. e. Restart the computer if prompted. 4-6 Quick Reference Click Advanced Options. b. Click either Software program re-installation or Hardware driver re-installation, and then click Next. Reinstall a program or driver: a. Remove the...
HP Pavilion Entertainment PC - Quick Reference Guide
Page 43
...-001.book Page 1 Wednesday, February 14, 2007 9:21 AM Index A AC adapter, troubleshooting 3-2 antivirus software 2-1, 3-3 B backing up computer 4-2 backup and recovery 4-1 C cables and cords modem 2-2 power 2-2, 3-1 CD inserting A-1 removing, with power A-2 removing, without power A-2 cleaning the display C-1 cleaning the keyboard C-1 cleaning the TouchPad C-1 computer backing up 4-2 turning off correctly 2-7 using safely 2-3 computer viruses 2-1, 3-3 cord, power 2-3, 3-2 customer support Help and Support 1-1 user guides 1-1 D Device Manager 1-2 devices, external drivers 3-5 troubleshooting...
...-001.book Page 1 Wednesday, February 14, 2007 9:21 AM Index A AC adapter, troubleshooting 3-2 antivirus software 2-1, 3-3 B backing up computer 4-2 backup and recovery 4-1 C cables and cords modem 2-2 power 2-2, 3-1 CD inserting A-1 removing, with power A-2 removing, without power A-2 cleaning the display C-1 cleaning the keyboard C-1 cleaning the TouchPad C-1 computer backing up 4-2 turning off correctly 2-7 using safely 2-3 computer viruses 2-1, 3-3 cord, power 2-3, 3-2 customer support Help and Support 1-1 user guides 1-1 D Device Manager 1-2 devices, external drivers 3-5 troubleshooting...
HP Pavilion dv6000 Notebook PC Maintenance and Service Guide
Page 19
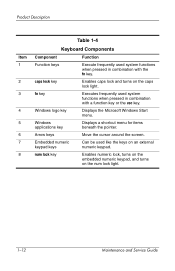
... pressed in combination with a function key or the esc key. Embedded numeric keypad keys Can be used like the keys on the num lock light. 1-12 Maintenance and Service Guide caps lock key Enables caps lock and turns on the caps lock light. Arrow keys Move the cursor around the screen. Product Description Item 1 2 3 4 5 6 7 8 Table 1-4 Keyboard Components Component Function Function keys Execute frequently used system functions when pressed in combination with the fn key. Windows logo key Displays the Microsoft Windows Start menu.
... pressed in combination with a function key or the esc key. Embedded numeric keypad keys Can be used like the keys on the num lock light. 1-12 Maintenance and Service Guide caps lock key Enables caps lock and turns on the caps lock light. Arrow keys Move the cursor around the screen. Product Description Item 1 2 3 4 5 6 7 8 Table 1-4 Keyboard Components Component Function Function keys Execute frequently used system functions when pressed in combination with the fn key. Windows logo key Displays the Microsoft Windows Start menu.
HP Pavilion dv6000 Notebook PC Maintenance and Service Guide
Page 32
... of the screen each time the computer is started or restarted in Windows or restored from hibernation is the prompt for advanced users only, refer to boot from the current session, use the arrow keys to the menu display. For more information about the Setup Utility features recommended for a Network Service Boot. The "Press to the Setup Utility. Troubleshooting Using Advanced Setup Utility Features This guide describes the Setup Utility features recommended for boot order preferences...
... of the screen each time the computer is started or restarted in Windows or restored from hibernation is the prompt for advanced users only, refer to boot from the current session, use the arrow keys to the menu display. For more information about the Setup Utility features recommended for a Network Service Boot. The "Press to the Setup Utility. Troubleshooting Using Advanced Setup Utility Features This guide describes the Setup Utility features recommended for boot order preferences...
HP Pavilion dv6000 Notebook PC Maintenance and Service Guide
Page 38
... is started or restarted in Windows is displayed in Windows. If the Setup Utility is in the lower-left corner of the screen. 2. If the Setup Utility is displayed, press enter to restore the Setup Utility default settings. The Setup Utility features available for advanced users include a hard drive self-test, a Network Service Boot, and settings for all users. When the Setup Confirmation is already running , begin at step 1. Using Advanced Setup Utility Features This guide describes the Setup Utility features recommended for boot order...
... is started or restarted in Windows is displayed in Windows. If the Setup Utility is in the lower-left corner of the screen. 2. If the Setup Utility is displayed, press enter to restore the Setup Utility default settings. The Setup Utility features available for advanced users include a hard drive self-test, a Network Service Boot, and settings for all users. When the Setup Confirmation is already running , begin at step 1. Using Advanced Setup Utility Features This guide describes the Setup Utility features recommended for boot order...
HP Pavilion dv6000 Notebook PC Maintenance and Service Guide
Page 243
... to the factory image but cannot restore your personal settings. Select Start > All Programs > Recovery Manager > Recovery Manager. Insert the disc into the optical drive. 2. b. Restart the computer if prompted. Backup and Recovery in the Programs and Features list. Reinstalling Preinstalled Programs and Drivers 1. If the driver is not listed, it does not need to be removed. Select Start > Control Panel > Programs > Uninstall a program. Recovery Manager opens. b. Click either Software program re-installation or Hardware driver re-installation, and...
... to the factory image but cannot restore your personal settings. Select Start > All Programs > Recovery Manager > Recovery Manager. Insert the disc into the optical drive. 2. b. Restart the computer if prompted. Backup and Recovery in the Programs and Features list. Reinstalling Preinstalled Programs and Drivers 1. If the driver is not listed, it does not need to be removed. Select Start > Control Panel > Programs > Uninstall a program. Recovery Manager opens. b. Click either Software program re-installation or Hardware driver re-installation, and...
HP Pavilion dv6000 Notebook PC Maintenance and Service Guide
Page 276
...board removal 5-31 spare part number 3-3, 3-38, 5-31 power connector 1-10 power cord set requirements F-2 spare part numbers 3-29, 3-31 power light 1-6 power management features 1-5 power, troubleshooting 2-18 previous/rewind button 1-17 processor removal 5-69 spare part numbers 3-9, 3-35, 3-36, 3-40, 3-41, 3-42, 3-44, 5-69 R rear components 1-8 recovering from partition on hard drive Windows Vista C-7 Windows XP B-8 recovering from the recovery discs Windows Vista C-7 Windows XP B-8 remote control, spare part numbers 3-28, 3-34, 3-41, 3-42 removal preliminaries 4-1 procedures 5-1 replacement...
...board removal 5-31 spare part number 3-3, 3-38, 5-31 power connector 1-10 power cord set requirements F-2 spare part numbers 3-29, 3-31 power light 1-6 power management features 1-5 power, troubleshooting 2-18 previous/rewind button 1-17 processor removal 5-69 spare part numbers 3-9, 3-35, 3-36, 3-40, 3-41, 3-42, 3-44, 5-69 R rear components 1-8 recovering from partition on hard drive Windows Vista C-7 Windows XP B-8 recovering from the recovery discs Windows Vista C-7 Windows XP B-8 remote control, spare part numbers 3-28, 3-34, 3-41, 3-42 removal preliminaries 4-1 procedures 5-1 replacement...
Setup Instructions
Page 2
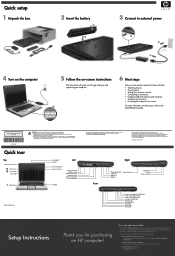
Quick tour Top Internal microphones* DVD button* Power button Power light Media button Camera light* Camera* Left Volume mute button Volume scroll zone Security cable slot S-Video-out jack External monitor port Expansion port 3 RJ-45 (network) jack RJ-11 (modem) jack TouchPad *Select models only For more safety and regulatory information, and for battery disposal information, refer to online diagnostics. Select Start > Help and Support > User Guides. © Copyright 2007 Hewlett-Packard Development Company, L.P. Nothing herein should be liable for technical or editorial errors or...
Quick tour Top Internal microphones* DVD button* Power button Power light Media button Camera light* Camera* Left Volume mute button Volume scroll zone Security cable slot S-Video-out jack External monitor port Expansion port 3 RJ-45 (network) jack RJ-11 (modem) jack TouchPad *Select models only For more safety and regulatory information, and for battery disposal information, refer to online diagnostics. Select Start > Help and Support > User Guides. © Copyright 2007 Hewlett-Packard Development Company, L.P. Nothing herein should be liable for technical or editorial errors or...
Drives - Windows XP
Page 9
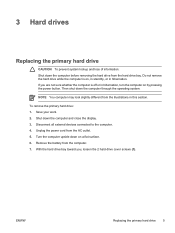
... all external devices connected to the computer. 4. NOTE You computer may look slightly different from the computer. 7. With the hard drive bay toward you are not sure whether the computer is on, in standby, or in hibernation. Save your work. 2. ENWW Replacing the primary hard drive 5 Shut down the computer through the operating system. Remove the battery from the illustrations in hibernation, turn...
... all external devices connected to the computer. 4. NOTE You computer may look slightly different from the computer. 7. With the hard drive bay toward you are not sure whether the computer is on, in standby, or in hibernation. Save your work. 2. ENWW Replacing the primary hard drive 5 Shut down the computer through the operating system. Remove the battery from the illustrations in hibernation, turn...
Drives - Windows XP
Page 19
Index A airport security devices 1 C CD inserting 10 removing, with power 11 removing, without power 12 CD drive 9 D drive light 3 drives caring for 1 drive light 3 hard 5, 6 optical 9 secondary hard 7 See also hard drive, optical drive DVD inserting 10 removing, with power 11 removing, without power 12 DVD drive 9 O optical disc inserting 10 removing, with power 11 removing, without power 12 optical drive 9 S secondary hard drive 7 standby 13 H hard disk drive installing 6 removing 5 replacing 5 hard drive installing 6 removing 5 replacing 5 hibernation 13 L light, drive 3 ENWW Index 15
Index A airport security devices 1 C CD inserting 10 removing, with power 11 removing, without power 12 CD drive 9 D drive light 3 drives caring for 1 drive light 3 hard 5, 6 optical 9 secondary hard 7 See also hard drive, optical drive DVD inserting 10 removing, with power 11 removing, without power 12 DVD drive 9 O optical disc inserting 10 removing, with power 11 removing, without power 12 optical drive 9 S secondary hard drive 7 standby 13 H hard disk drive installing 6 removing 5 replacing 5 hard drive installing 6 removing 5 replacing 5 hibernation 13 L light, drive 3 ENWW Index 15
Bluetooth for Windows XP
Page 7
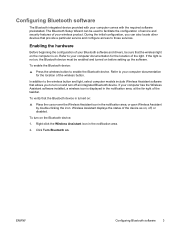
... Wireless Assistant software installed, a wireless icon is on . To verify that allows you can be used to turn off , or disabled. To turn on and turn on the Bluetooth device: 1. Enabling the hardware Before beginning the configuration of the light. If the light is turned on , off an integrated Bluetooth device. ENWW Configuring Bluetooth software 3 During the initial configuration, you to facilitate the configuration of service and security features of the wireless button. Refer to the wireless button and light...
... Wireless Assistant software installed, a wireless icon is on . To verify that allows you can be used to turn off , or disabled. To turn on and turn on the Bluetooth device: 1. Enabling the hardware Before beginning the configuration of the light. If the light is turned on , off an integrated Bluetooth device. ENWW Configuring Bluetooth software 3 During the initial configuration, you to facilitate the configuration of service and security features of the wireless button. Refer to the wireless button and light...
Multimedia - Windows XP
Page 13
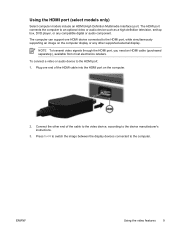
... the HDMI port, while simultaneously supporting an image on the computer. 2. The computer can support one end of the HDMI cable into the HDMI port on the computer display or any compatible digital or audio component. Using the HDMI port (select models only) Select computer models include an HDMI (High Definition Multimedia Interface) port. Plug one HDMI device connected to an optional video or audio device such as a high-definition television, set-top box, DVD player...
... the HDMI port, while simultaneously supporting an image on the computer. 2. The computer can support one end of the HDMI cable into the HDMI port on the computer display or any compatible digital or audio component. Using the HDMI port (select models only) Select computer models include an HDMI (High Definition Multimedia Interface) port. Plug one HDMI device connected to an optional video or audio device such as a high-definition television, set-top box, DVD player...
Notebook Tour - Windows XP
Page 7
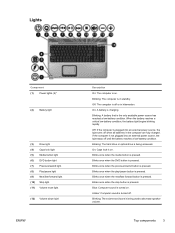
... battery reaches a low-battery condition. Blinks once when the DVD button is the only available power source has reached a low-battery condition. Amber: Computer sound is not plugged into an external power source, the light turns off or in hibernation. Blinking: The computer is being used to decrease speaker volume. Blinking: The hard drive or optical drive is in the computer are fully charged. Blinking: The volume scroll zone is plugged into an external power...
... battery reaches a low-battery condition. Blinks once when the DVD button is the only available power source has reached a low-battery condition. Amber: Computer sound is not plugged into an external power source, the light turns off or in hibernation. Blinking: The computer is being used to decrease speaker volume. Blinking: The hard drive or optical drive is in the computer are fully charged. Blinking: The volume scroll zone is plugged into an external power...
Security - Windows XP
Page 6
... passwords are not displayed as screen-saver passwords, select Start > Help and Support. 2 Chapter 2 Using passwords ENWW The following guidelines when setting a password in Setup Utility: ● A password can be entered at a Windows prompt. You can use the same password for a Setup Utility feature and for more than one Setup Utility feature. You can also use the same password for a Windows security feature. NOTE Select models include a separate numeric keypad, which functions exactly like the keyboard number keys. ● A password...
... passwords are not displayed as screen-saver passwords, select Start > Help and Support. 2 Chapter 2 Using passwords ENWW The following guidelines when setting a password in Setup Utility: ● A password can be entered at a Windows prompt. You can use the same password for a Setup Utility feature and for more than one Setup Utility feature. You can also use the same password for a Windows security feature. NOTE Select models include a separate numeric keypad, which functions exactly like the keyboard number keys. ● A password...
Software Update, Backup and Recovery - Windows XP
Page 6
... to enter Setup" message is connected to reliable external power using the AC adapter. Follow the instructions on the computer, you need to access this information to locate the update later, after it has been downloaded to your computer to a network, consult the network administrator before installing any device, cable, or cord. NOTE If you connect your hard drive. Do not insert, remove, connect, or disconnect any software updates, especially system BIOS updates. 2 Chapter 1 Updating software ENWW Updating the BIOS To...
... to enter Setup" message is connected to reliable external power using the AC adapter. Follow the instructions on the computer, you need to access this information to locate the update later, after it has been downloaded to your computer to a network, consult the network administrator before installing any device, cable, or cord. NOTE If you connect your hard drive. Do not insert, remove, connect, or disconnect any software updates, especially system BIOS updates. 2 Chapter 1 Updating software ENWW Updating the BIOS To...

TouchPad and Keyboard
Page 15
.... Enabling and disabling the embedded numeric keypad Press fn+num lk to an optional expansion product. NOTE The embedded numeric keypad will not function while an external keyboard or numeric keypad is on . Switching key functions on the embedded numeric keypad You can also be turned on . When num lock on an external keypad is on the keypad performs the function indicated by using the ports...
.... Enabling and disabling the embedded numeric keypad Press fn+num lk to an optional expansion product. NOTE The embedded numeric keypad will not function while an external keyboard or numeric keypad is on . Switching key functions on the embedded numeric keypad You can also be turned on . When num lock on an external keypad is on the keypad performs the function indicated by using the ports...
Wireless (Select Models Only) - Windows XP
Page 11
... Computer window. 3. Select Properties > Hardware tab > Device Manager > Network Adapters. 4. The listing for the WLAN device is displayed. NOTE If no WLAN device is listed, either your computer does not have an integrated WLAN device, or the driver for a WLAN device may include the term wireless, wireless LAN, WLAN, or 802.11. Identify the WLAN device from the list that the integrated WLAN device is installed on your computer: 1. Select Start > My...
... Computer window. 3. Select Properties > Hardware tab > Device Manager > Network Adapters. 4. The listing for the WLAN device is displayed. NOTE If no WLAN device is listed, either your computer does not have an integrated WLAN device, or the driver for a WLAN device may include the term wireless, wireless LAN, WLAN, or 802.11. Identify the WLAN device from the list that the integrated WLAN device is installed on your computer: 1. Select Start > My...
Troubleshooting
Page 10
... a wireless network. Drivers may be available on the device as monitors and printers, may not be powered by the computer, and must be sure that the wireless devices are enabled. ● Be sure that the wireless devices are installed and updated. b. If an external device does not function as expected: ● Turn on a CD included with your operating system. Some devices, such as instructed in the window and select Properties > Hardware tab > Device Manager...
... a wireless network. Drivers may be available on the device as monitors and printers, may not be powered by the computer, and must be sure that the wireless devices are enabled. ● Be sure that the wireless devices are installed and updated. b. If an external device does not function as expected: ● Turn on a CD included with your operating system. Some devices, such as instructed in the window and select Properties > Hardware tab > Device Manager...


