Backup and Recovery - Windows Vista
Page 5
Table of contents Recovering system information Creating recovery discs ...2 Backing up your information ...3 When to back up ...3 Backup suggestions ...3 Using system restore points 3 When to create restore points 3 Create a system restore point 4 Restore to a previous date and time 4 Performing a recovery ...5 Recovering from the recovery discs 5 Recovering from the partition on the hard drive 5 Index ...6 v
Table of contents Recovering system information Creating recovery discs ...2 Backing up your information ...3 When to back up ...3 Backup suggestions ...3 Using system restore points 3 When to create restore points 3 Create a system restore point 4 Restore to a previous date and time 4 Performing a recovery ...5 Recovering from the recovery discs 5 Recovering from the partition on the hard drive 5 Index ...6 v
Backup and Recovery - Windows Vista
Page 7
... (Recovery Manager software feature). Recovery discs are designed to help you experience system failure or instability. Recovery Manager works from a dedicated recovery partition on the hard drive or from recovery discs you reinstall a program or driver without performing a full system recovery. ● Performing a full system recovery (Recovery Manager software feature). This feature...
... (Recovery Manager software feature). Recovery discs are designed to help you experience system failure or instability. Recovery Manager works from a dedicated recovery partition on the hard drive or from recovery discs you reinstall a program or driver without performing a full system recovery. ● Performing a full system recovery (Recovery Manager software feature). This feature...
Backup and Recovery - Windows Vista
Page 9
.... ● Back up templates stored in their associated programs. ● Save customized settings in a window, toolbar, or menu bar by taking a screen shot of your hard drive at a specific point in the Documents folder and back up these steps: a. c. Using system restore points When you back up your information 3 Open a word-processing...
.... ● Back up templates stored in their associated programs. ● Save customized settings in a window, toolbar, or menu bar by taking a screen shot of your hard drive at a specific point in the Documents folder and back up these steps: a. c. Using system restore points When you back up your information 3 Open a word-processing...
Backup and Recovery - Windows Vista
Page 11
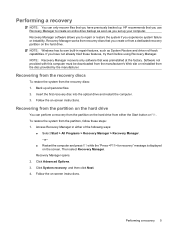
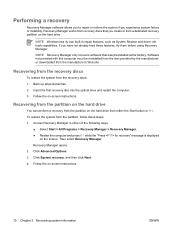
...the on -screen instructions. Recovery Manager opens. 2. Click Advanced Options. 3. Performing a recovery 5 Recovering from the partition on the hard drive You can only recover files that you use Recovery Manager to repair or restore the system if you have not already tried these ...the partition on the hard drive from either of the following ways: ● Select Start > All Programs > Recovery Manager > Recovery Manager. -or- ● Restart the computer and press f11 while the "Press for recovery" message is displayed on the hard drive. HP recommends that you experience ...
...the on -screen instructions. Recovery Manager opens. 2. Click Advanced Options. 3. Performing a recovery 5 Recovering from the partition on the hard drive You can only recover files that you use Recovery Manager to repair or restore the system if you have not already tried these ...the partition on the hard drive from either of the following ways: ● Select Start > All Programs > Recovery Manager > Recovery Manager. -or- ● Restart the computer and press f11 while the "Press for recovery" message is displayed on the hard drive. HP recommends that you experience ...
Setup Utility - Windows Vista
Page 8
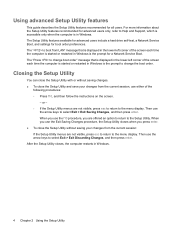
... press enter. Then use the f10 procedure, you use the arrow keys to the menu display. The Setup Utility features available for advanced users include a hard drive self-test, a Network Service Boot, and settings for all users. or - ◦ If the Setup Utility menus are not visible, press esc to return to...
... press enter. Then use the f10 procedure, you use the arrow keys to the menu display. The Setup Utility features available for advanced users include a hard drive self-test, a Network Service Boot, and settings for all users. or - ◦ If the Setup Utility menus are not visible, press esc to return to...
Setup Utility - Windows Vista
Page 10
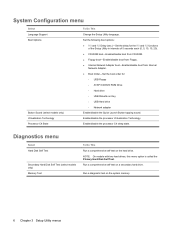
... on the system memory. 6 Chapter 3 Setup Utility menus Enable/disable the processor C4 sleep state. Run a diagnostic test on the hard drive. Enable/disable the processor Virtualization Technology. Set the following boot options: ● f10 and f12 Delay (sec.)―Set the delay...;Set the boot order for: ◦ USB Floppy ◦ ATAPI CD/DVD ROM Drive ◦ Hard drive ◦ USB Diskette on a secondary hard drive. Run a comprehensive self-test on Key ◦ USB Hard drive ◦ Network adapter Enable/disable the Quick Launch Button tapping sound. System Configuration menu ...
... on the system memory. 6 Chapter 3 Setup Utility menus Enable/disable the processor C4 sleep state. Run a diagnostic test on the hard drive. Enable/disable the processor Virtualization Technology. Set the following boot options: ● f10 and f12 Delay (sec.)―Set the delay...;Set the boot order for: ◦ USB Floppy ◦ ATAPI CD/DVD ROM Drive ◦ Hard drive ◦ USB Diskette on a secondary hard drive. Run a comprehensive self-test on Key ◦ USB Hard drive ◦ Network adapter Enable/disable the Quick Launch Button tapping sound. System Configuration menu ...

Setup Utility - Windows Vista
Page 11
...sound 6 C changing the Setup Utility language 2 closing the Setup Utility 4 D Diagnostics menu 6 displaying system information 3 drives, boot order 6 F fingerprint reader 1 S secondary hard drive self test 6 Security menu 5 selecting in the Setup Utility 2 Setup Utility changing the language 2 closing 4 Diagnostics menu...starting 1 System Configuration menu 6 using 2 using advanced features 4 System Configuration menu 6 system information 5 H hard drive self test 6 L language support 6 M Main menu 5 N navigating in the Setup Utility 2 P passwords 5 power-on password 5 R restoring default ...
...sound 6 C changing the Setup Utility language 2 closing the Setup Utility 4 D Diagnostics menu 6 displaying system information 3 drives, boot order 6 F fingerprint reader 1 S secondary hard drive self test 6 Security menu 5 selecting in the Setup Utility 2 Setup Utility changing the language 2 closing 4 Diagnostics menu...starting 1 System Configuration menu 6 using 2 using advanced features 4 System Configuration menu 6 system information 5 H hard drive self test 6 L language support 6 M Main menu 5 N navigating in the Setup Utility 2 P passwords 5 power-on password 5 R restoring default ...
Setup Utility - Windows Vista and XP
Page 8
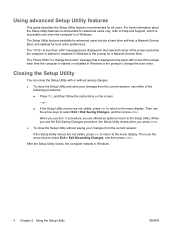
.... When you use the arrow keys to select Exit > Exit Saving Changes, and then press enter. The Setup Utility features available for advanced users include a hard drive self-test, a Network Service Boot, and settings for all users. or - ● If the Setup Utility menus are not visible, press esc to return to...
.... When you use the arrow keys to select Exit > Exit Saving Changes, and then press enter. The Setup Utility features available for advanced users include a hard drive self-test, a Network Service Boot, and settings for all users. or - ● If the Setup Utility menus are not visible, press esc to return to...

Setup Utility - Windows Vista and XP
Page 10
... for the f10 and f12 functions of the Setup Utility in intervals of video memory. NOTE On models with two hard drives, this menu option is called the Primary Hard Disk Self Test. Enable/disable enhanced SATA mode. System Configuration menu Select Language Support Enhanced SATA support (select models only...select models only) Video memory up to (select models only) To Do This Change the Setup Utility language. Run a comprehensive self-test on the hard drive. Set the following boot options: ● f10 and f12 Delay (sec.)―Set the delay for : ● USB Floppy ● ATAPI CD/...
... for the f10 and f12 functions of the Setup Utility in intervals of video memory. NOTE On models with two hard drives, this menu option is called the Primary Hard Disk Self Test. Enable/disable enhanced SATA mode. System Configuration menu Select Language Support Enhanced SATA support (select models only...select models only) Video memory up to (select models only) To Do This Change the Setup Utility language. Run a comprehensive self-test on the hard drive. Set the following boot options: ● f10 and f12 Delay (sec.)―Set the delay for : ● USB Floppy ● ATAPI CD/...
Setup Utility - Windows Vista and XP
Page 11
... 6 boot order 6 button sound 6 C changing the Setup Utility language 2 closing the Setup Utility 4 D Diagnostics menu 6 displaying system information 3 drives, boot order 6 E enhanced SATA support 6 F fingerprint reader 1 H hard drive self test 6 R restoring default settings 3 S secondary hard drive self test 6 Security menu 5 selecting in the Setup Utility 2 Setup Utility changing the language 2 closing 4 Diagnostics menu 6 displaying system...
... 6 boot order 6 button sound 6 C changing the Setup Utility language 2 closing the Setup Utility 4 D Diagnostics menu 6 displaying system information 3 drives, boot order 6 E enhanced SATA support 6 F fingerprint reader 1 H hard drive self test 6 R restoring default settings 3 S secondary hard drive self test 6 Security menu 5 selecting in the Setup Utility 2 Setup Utility changing the language 2 closing 4 Diagnostics menu 6 displaying system...
Software Update, Backup, and Recovery - Windows Vista
Page 3
... drivers 9 Reinstalling preinstalled programs and drivers 9 Reinstalling programs from discs 9 Performing a recovery ...10 Recovering from the recovery discs 10 Recovering from the partition on the hard drive 10 Deleting the recovery partition on the hard drive 11 Updating reinstalled software ...12 Index ...13 ENWW iii
... drivers 9 Reinstalling preinstalled programs and drivers 9 Reinstalling programs from discs 9 Performing a recovery ...10 Recovering from the recovery discs 10 Recovering from the partition on the hard drive 10 Deleting the recovery partition on the hard drive 11 Updating reinstalled software ...12 Index ...13 ENWW iii
Software Update, Backup, and Recovery - Windows Vista
Page 6
... a note of the date, name, or other system information is displayed in the lower-left corner of the screen. 2. Access the page on the HP Web site that is running on battery power, docked in Windows) or by pressing fn+esc (if you need to reliable external power using the.... You will be displayed by opening the Setup Utility. NOTE If you connect your hard drive where the BIOS update will need this path when you want to the hard drive. To use the Setup Utility for your hard drive. Open the Setup Utility by unplugging the power cord from the AC outlet. CAUTION ...
... a note of the date, name, or other system information is displayed in the lower-left corner of the screen. 2. Access the page on the HP Web site that is running on battery power, docked in Windows) or by pressing fn+esc (if you need to reliable external power using the.... You will be displayed by opening the Setup Utility. NOTE If you connect your hard drive where the BIOS update will need this path when you want to the hard drive. To use the Setup Utility for your hard drive. Open the Setup Utility by unplugging the power cord from the AC outlet. CAUTION ...

Software Update, Backup, and Recovery - Windows Vista
Page 7
...screen. Double-click the file that are displayed, follow these steps: 1. The BIOS installation begins. 5. Double-click your hard drive. NOTE After a message on the screen reports a successful installation, you recorded earlier, open the folder on the screen...filename.exe). If no instructions are displayed on your hard drive that contains the update. 4. ENWW Updating the BIOS 3 The hard drive designation is complete. Using the hard drive path you can delete the downloaded file from your hard drive designation. Complete the installation by selecting Start > ...
...screen. Double-click the file that are displayed, follow these steps: 1. The BIOS installation begins. 5. Double-click your hard drive. NOTE After a message on the screen reports a successful installation, you recorded earlier, open the folder on the screen...filename.exe). If no instructions are displayed on your hard drive that contains the update. 4. ENWW Updating the BIOS 3 The hard drive designation is complete. Using the hard drive path you can delete the downloaded file from your hard drive designation. Complete the installation by selecting Start > ...
Software Update, Backup, and Recovery - Windows Vista
Page 8
.... Double-click your hard drive. 4 Chapter 1 Updating software ENWW Using the hard drive path you are ready to access this path when you recorded earlier, open Windows Explorer by following the instructions on the HP Web site that contains the update. 7. Complete the installation by selecting Start > ...Computer. 5. NOTE Make a note of the path to the location on your hard drive where the software will need to install the software....
.... Double-click your hard drive. 4 Chapter 1 Updating software ENWW Using the hard drive path you are ready to access this path when you recorded earlier, open Windows Explorer by following the instructions on the HP Web site that contains the update. 7. Complete the installation by selecting Start > ...Computer. 5. NOTE Make a note of the path to the location on your hard drive where the software will need to install the software....

Software Update, Backup, and Recovery - Windows Vista
Page 9
.... ● Make a set of system failure or instability. ● Create system restore points (operating system feature). Recovery Manager works from a dedicated recovery partition on the hard drive or from recovery discs you experience system failure or instability. ENWW 5 This feature helps you to reverse undesirable changes to your computer and restore the...
.... ● Make a set of system failure or instability. ● Create system restore points (operating system feature). Recovery Manager works from a dedicated recovery partition on the hard drive or from recovery discs you experience system failure or instability. ENWW 5 This feature helps you to reverse undesirable changes to your computer and restore the...

Software Update, Backup, and Recovery - Windows Vista
Page 11
...; Before you add or extensively modify software or hardware. ● Periodically, whenever the system is performing optimally. When to save and name a snapshot of your hard drive at a previous date and time), when the computer was functioning optimally, follow these steps: 1. Create a system restore point 1. Select Start > Control Panel > System and Maintenance...
...; Before you add or extensively modify software or hardware. ● Periodically, whenever the system is performing optimally. When to save and name a snapshot of your hard drive at a previous date and time), when the computer was functioning optimally, follow these steps: 1. Create a system restore point 1. Select Start > Control Panel > System and Maintenance...
Software Update, Backup, and Recovery - Windows Vista
Page 14
...the on -screen instructions. 10 Chapter 2 Recovering system information ENWW Recovering from the partition on the hard drive You can perform a recovery from the partition on the hard drive from a dedicated recovery partition on the screen. Follow the on -screen instructions. NOTE Recovery Manager only... ● Restart the computer and press f11 while the "Press for recovery" message is displayed on the hard drive. Insert the first recovery disc into the optical drive and restart the computer. 3. Access Recovery Manager in repair features, such as System Restore and driver rollback ...
...the on -screen instructions. 10 Chapter 2 Recovering system information ENWW Recovering from the partition on the hard drive You can perform a recovery from the partition on the hard drive from a dedicated recovery partition on the screen. Follow the on -screen instructions. NOTE Recovery Manager only... ● Restart the computer and press f11 while the "Press for recovery" message is displayed on the hard drive. Insert the first recovery disc into the optical drive and restart the computer. 3. Access Recovery Manager in repair features, such as System Restore and driver rollback ...
Software Update, Backup, and Recovery - Windows Vista
Page 15
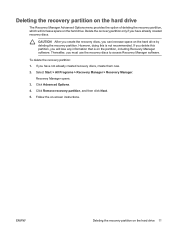
... Delete the recovery partition only if you have already created recovery discs. However, doing this partition, you will increase space on the hard drive. If you delete this is on the partition, including Recovery Manager software. Select Start > All Programs > Recovery Manager > Recovery ...discs to access Recovery Manager software. ENWW Deleting the recovery partition on -screen instructions. Deleting the recovery partition on the hard drive The Recovery Manager Advanced Options menu provides the option of deleting the recovery partition, which will lose any information that ...
... Delete the recovery partition only if you have already created recovery discs. However, doing this partition, you will increase space on the hard drive. If you delete this is on the partition, including Recovery Manager software. Select Start > All Programs > Recovery Manager > Recovery ...discs to access Recovery Manager software. ENWW Deleting the recovery partition on -screen instructions. Deleting the recovery partition on the hard drive The Recovery Manager Advanced Options menu provides the option of deleting the recovery partition, which will lose any information that ...

Software Updates - Windows Vista
Page 8
... install the new BIOS. If the Setup Utility does not open with the system information displayed, use the Setup Utility for your selection to the hard drive. 2 Updating software Identify the BIOS update that provides software for displaying BIOS information: 1. b. Open the Setup Utility by turning on your computer.... instructions: Do not disconnect power from the computer by unplugging the power cord from the AC outlet. Access the page on the HP Web site that is later than those currently installed on the screen to select Exit > Exit Discarding Changes, and then press enter.
... install the new BIOS. If the Setup Utility does not open with the system information displayed, use the Setup Utility for your selection to the hard drive. 2 Updating software Identify the BIOS update that provides software for displaying BIOS information: 1. b. Open the Setup Utility by turning on your computer.... instructions: Do not disconnect power from the computer by unplugging the power cord from the AC outlet. Access the page on the HP Web site that is later than those currently installed on the screen to select Exit > Exit Discarding Changes, and then press enter.

Software Updates - Windows Vista
Page 9
...by selecting Start > Computer. 2. Make a note of the path to the location on your hard drive that contains the update. 4. NOTE: If you recorded earlier, open the folder on your hard drive where the BIOS update will need to install the update. BIOS installation procedures vary. NOTE: ... be downloaded. If no instructions are ready to access this path when you can delete the downloaded file from your hard drive designation. Open Windows Explorer by following the instructions on the screen reports a successful installation, you are displayed, follow these steps: ...
...by selecting Start > Computer. 2. Make a note of the path to the location on your hard drive that contains the update. 4. NOTE: If you recorded earlier, open the folder on your hard drive where the BIOS update will need to install the update. BIOS installation procedures vary. NOTE: ... be downloaded. If no instructions are ready to access this path when you can delete the downloaded file from your hard drive designation. Open Windows Explorer by following the instructions on the screen reports a successful installation, you are displayed, follow these steps: ...


