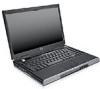
HP Pavilion dv1600 Notebook PC - Maintenance and Service Guide
Page 6
Contents 6 Specifications A Screw Listing B Software Update and Recovery C Display Component Recycling D Connector Pin Assignments E Power Cord Set Requirements Index vi Maintenance and Service Guide
Contents 6 Specifications A Screw Listing B Software Update and Recovery C Display Component Recycling D Connector Pin Assignments E Power Cord Set Requirements Index vi Maintenance and Service Guide

HP Pavilion dv1600 Notebook PC - Maintenance and Service Guide
Page 17
.... USB connector Connects an optional USB device. Expansion port 2 Connects the computer to an optional expansion product or docking device. Power connector Connects an AC adapter cable. Maintenance and Service Guide 1-11 Do not allow a hard surface, such as a printer, or a soft surface, such as a wireless LAN device and/or a Bluetooth device, is turned on. ✎ To establish a wireless connection, a wireless network must already be set up. Product Description Item 1 2 3 4 5 6 7 8 9 10 Table 1-3 Rear and Left-Side Components Component Function Wireless light...
.... USB connector Connects an optional USB device. Expansion port 2 Connects the computer to an optional expansion product or docking device. Power connector Connects an AC adapter cable. Maintenance and Service Guide 1-11 Do not allow a hard surface, such as a printer, or a soft surface, such as a wireless LAN device and/or a Bluetooth device, is turned on. ✎ To establish a wireless connection, a wireless network must already be set up. Product Description Item 1 2 3 4 5 6 7 8 9 10 Table 1-3 Rear and Left-Side Components Component Function Wireless light...

HP Pavilion dv1600 Notebook PC - Maintenance and Service Guide
Page 19
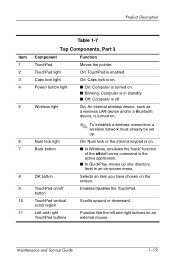
... Windows, can be used like the keys on the num lock light. Maintenance and Service Guide 1-13 Windows logo key In Windows, displays the Windows Start menu. num lock key Enables numeric lock, turns on the embedded numeric keypad, and turns on an external numeric keypad. For example, pressing fn+f7 decreases screen brightness. caps lock key Enables caps lock and turns on the caps lock light. Product Description Item 1 2 3 4 5 6 7 8 Table 1-4 Keyboard Components Component Function fn key Combines with the fn key, several keys and buttons perform...
... Windows, can be used like the keys on the num lock light. Maintenance and Service Guide 1-13 Windows logo key In Windows, displays the Windows Start menu. num lock key Enables numeric lock, turns on the embedded numeric keypad, and turns on an external numeric keypad. For example, pressing fn+f7 decreases screen brightness. caps lock key Enables caps lock and turns on the caps lock light. Product Description Item 1 2 3 4 5 6 7 8 Table 1-4 Keyboard Components Component Function fn key Combines with the fn key, several keys and buttons perform...
HP Pavilion dv1600 Notebook PC - Maintenance and Service Guide
Page 25
... lock light On: Caps lock is turned on . Back button ■ In Windows, emulates the "back" function of the alt+left and right buttons on the screen. Maintenance and Service Guide 1-19 Wireless light On: An internal wireless device, such as a wireless LAN device and/or a Bluetooth device, is on . ✎ To establish a wireless connection, a wireless network must already be set up one directory level in standby. ■ Off: Computer is enabled. Num lock light On: Num lock or the internal keypad...
... lock light On: Caps lock is turned on . Back button ■ In Windows, emulates the "back" function of the alt+left and right buttons on the screen. Maintenance and Service Guide 1-19 Wireless light On: An internal wireless device, such as a wireless LAN device and/or a Bluetooth device, is on . ✎ To establish a wireless connection, a wireless network must already be set up one directory level in standby. ■ Off: Computer is enabled. Num lock light On: Num lock or the internal keypad...
HP Pavilion dv1600 Notebook PC - Maintenance and Service Guide
Page 28
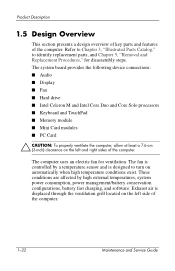
The fan is controlled by high external temperatures, system power consumption, power management/battery conservation configurations, battery fast charging, and software. Exhaust air is designed to identify replacement parts, and Chapter 5, "Removal and Replacement Procedures," for ventilation. The system board provides the following device connections: ■ Audio ■ Display ■ Fan ■ Hard drive ■ Intel Celeron M and Intel Core Duo and Core Solo processors ■ Keyboard and TouchPad ■ Memory module ■ Mini Card modules ■ PC Card Ä ...
The fan is controlled by high external temperatures, system power consumption, power management/battery conservation configurations, battery fast charging, and software. Exhaust air is designed to identify replacement parts, and Chapter 5, "Removal and Replacement Procedures," for ventilation. The system board provides the following device connections: ■ Audio ■ Display ■ Fan ■ Hard drive ■ Intel Celeron M and Intel Core Duo and Core Solo processors ■ Keyboard and TouchPad ■ Memory module ■ Mini Card modules ■ PC Card Ä ...

HP Pavilion dv1600 Notebook PC - Maintenance and Service Guide
Page 31
..., change a DriveLock user or master password. Smart Card Security ✎ DriveLock Settings are accessible only when you enter Computer Setup by turning on restart. Maintenance and Service Guide 2-3 Troubleshooting Selecting from the Security Menu Table 2-2 Security Menu Select Setup Password Power-On Password Password Options (Password options can be established to SuperDisk LS-120 drives. Enable/disable ■ Stringent security. ■ Requirement of password on (not restarting) the computer. Enable/disable smart card power-on support. ✎ A setup password...
..., change a DriveLock user or master password. Smart Card Security ✎ DriveLock Settings are accessible only when you enter Computer Setup by turning on restart. Maintenance and Service Guide 2-3 Troubleshooting Selecting from the Security Menu Table 2-2 Security Menu Select Setup Password Power-On Password Password Options (Password options can be established to SuperDisk LS-120 drives. Enable/disable ■ Stringent security. ■ Requirement of password on (not restarting) the computer. Enable/disable smart card power-on support. ✎ A setup password...

HP Pavilion dv1600 Notebook PC - Maintenance and Service Guide
Page 42
Reset monitor cable connector at docking device. Y Docking Done device Done operating? Check voltage setting on docking device. N Replace docking device. Reinstall computer into docking device. N Test replacement docking device with new computer. 2-14 Maintenance and Service Guide Reset power cord in docking device and power outlet. Y Docking device operating? Troubleshooting Flowchart 2.8-Nonfunctioning Docking Device (if applicable) Nonfunctioning docking device.
Reset monitor cable connector at docking device. Y Docking Done device Done operating? Check voltage setting on docking device. N Replace docking device. Reinstall computer into docking device. N Test replacement docking device with new computer. 2-14 Maintenance and Service Guide Reset power cord in docking device and power outlet. Y Docking device operating? Troubleshooting Flowchart 2.8-Nonfunctioning Docking Device (if applicable) Nonfunctioning docking device.
HP Pavilion dv1600 Notebook PC - Maintenance and Service Guide
Page 97
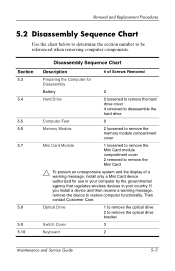
... drive bracket Switch Cover 3 Keyboard 2 Maintenance and Service Guide 5-3 Section 5.3 5.4 5.5 5.6 5.7 5.8 5.9 5.10 Disassembly Sequence Chart Description # of a warning message, install only a Mini Card device authorized for Disassembly Battery 0 Hard Drive 2 loosened to remove the hard drive cover 4 removed to disassemble the hard drive Computer Feet 0 Memory Module 2 loosened to remove the memory module compartment cover Mini Card Module 1 loosened to remove the Mini Card module compartment cover 2 removed to restore computer functionality. If you install a device...
... drive bracket Switch Cover 3 Keyboard 2 Maintenance and Service Guide 5-3 Section 5.3 5.4 5.5 5.6 5.7 5.8 5.9 5.10 Disassembly Sequence Chart Description # of a warning message, install only a Mini Card device authorized for Disassembly Battery 0 Hard Drive 2 loosened to remove the hard drive cover 4 removed to disassemble the hard drive Computer Feet 0 Memory Module 2 loosened to remove the memory module compartment cover Mini Card Module 1 loosened to remove the Mini Card module compartment cover 2 removed to restore computer functionality. If you install a device...
HP Pavilion dv1600 Notebook PC - Maintenance and Service Guide
Page 211
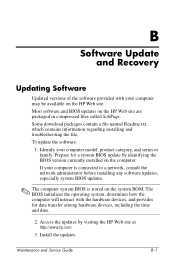
... information regarding installing and troubleshooting the file. Identify your computer model, product category, and series or family. Access the updates by identifying the BIOS version currently installed on the system ROM. Maintenance and Service Guide B-1 To update the software: 1. If your computer is connected to a network, consult the network administrator before installing any software updates, especially system BIOS updates. ✎ The computer system BIOS is stored on the computer. The BIOS initializes the operating system...
... information regarding installing and troubleshooting the file. Identify your computer model, product category, and series or family. Access the updates by identifying the BIOS version currently installed on the system ROM. Maintenance and Service Guide B-1 To update the software: 1. If your computer is connected to a network, consult the network administrator before installing any software updates, especially system BIOS updates. ✎ The computer system BIOS is stored on the computer. The BIOS initializes the operating system...

HP Pavilion dv1600 Notebook PC - Maintenance and Service Guide
Page 213
... download area: a. Follow the instructions on your computer: Select Start > Help and Support, and then select the software and drivers update. 2. Make a note of the path to the location on the screen to download your selection to locate the update later, after the download is complete. Click My Computer and then your computer. b. BIOS installation procedures vary. Follow any software updates, especially system BIOS updates. Maintenance and Service Guide B-3 Identify the BIOS update that are displayed...
... download area: a. Follow the instructions on your computer: Select Start > Help and Support, and then select the software and drivers update. 2. Make a note of the path to the location on the screen to download your selection to locate the update later, after the download is complete. Click My Computer and then your computer. b. BIOS installation procedures vary. Follow any software updates, especially system BIOS updates. Maintenance and Service Guide B-3 Identify the BIOS update that are displayed...

HP Pavilion dv1600 Notebook PC - Maintenance and Service Guide
Page 252
...troubleshooting 2-24 keyboard components 1-12 keypad keys 1-13 L label area 1-21 LED board removal 5-68 spare part number 3-5, 3-30, 5-68 left-side components 1-10 Logo Kit, spare part number 3-21, 3-30 M mass storage devices, spare part numbers 3-18 Media button 1-15 memory module removal 5-11 spare part numbers 3-15, 3-27, 3-28, 5-11 memory module compartment 1-21 memory module compartment cover illustrated 3-20 removal 5-12 menu control button board removal 5-54 spare part number 3-9, 3-30, 5-54 microphone jack location 1-7 pin assignments D-6 microphone, removal 5-40 Mini Card compartment...
...troubleshooting 2-24 keyboard components 1-12 keypad keys 1-13 L label area 1-21 LED board removal 5-68 spare part number 3-5, 3-30, 5-68 left-side components 1-10 Logo Kit, spare part number 3-21, 3-30 M mass storage devices, spare part numbers 3-18 Media button 1-15 memory module removal 5-11 spare part numbers 3-15, 3-27, 3-28, 5-11 memory module compartment 1-21 memory module compartment cover illustrated 3-20 removal 5-12 menu control button board removal 5-54 spare part number 3-9, 3-30, 5-54 microphone jack location 1-7 pin assignments D-6 microphone, removal 5-40 Mini Card compartment...
Hardware and Software Guide
Page 8
...Removing an ExpressCard 7-13 Drives 7-15 Adding a Drive to the System 7-15 Using the IDE Drive Light 7-15 Caring for Drives 7-16 Replacing the Internal Hard Drive 7-17 Memory 7-21 Increasing Memory 7-21 Removing or Inserting a Memory Module 7-22 8 Software Updates and Recovery and System Software Software Updates 8-1 Preparing for a Software Update 8-2 Downloading and Installing an Update 8-4 Software Recovery 8-10 Using System Restore 8-10 Quick Launch Buttons (Select Models Only 8-12 Setup Utility 8-13 Opening the Setup Utility 8-13 Changing the Language of the Setup Utility...
...Removing an ExpressCard 7-13 Drives 7-15 Adding a Drive to the System 7-15 Using the IDE Drive Light 7-15 Caring for Drives 7-16 Replacing the Internal Hard Drive 7-17 Memory 7-21 Increasing Memory 7-21 Removing or Inserting a Memory Module 7-22 8 Software Updates and Recovery and System Software Software Updates 8-1 Preparing for a Software Update 8-2 Downloading and Installing an Update 8-4 Software Recovery 8-10 Using System Restore 8-10 Quick Launch Buttons (Select Models Only 8-12 Setup Utility 8-13 Opening the Setup Utility 8-13 Changing the Language of the Setup Utility...

Hardware and Software Guide
Page 45
... access memory (RAM), the screen is cleared, and power is in standby, the power lights blink. ■ To initiate standby, the computer must restore from hibernation before you can set by the fn+f4 hotkey: ■ LCD (computer display) ■ External VGA (most external monitors) ■ S-Video (televisions, camcorders, VCRs, and video capture cards with S-Video-in jacks) ■ Composite video (televisions, camcorders, VCRs, and video capture boards with composite video-in jacks) ✎ Composite video devices can be changed...
... access memory (RAM), the screen is cleared, and power is in standby, the power lights blink. ■ To initiate standby, the computer must restore from hibernation before you can set by the fn+f4 hotkey: ■ LCD (computer display) ■ External VGA (most external monitors) ■ S-Video (televisions, camcorders, VCRs, and video capture cards with S-Video-in jacks) ■ Composite video (televisions, camcorders, VCRs, and video capture boards with composite video-in jacks) ✎ Composite video devices can be changed...
Hardware and Software Guide
Page 108
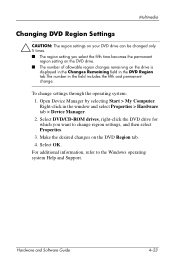
.... Open Device Manager by selecting Start > My Computer. Make the desired changes on the drive is displayed in the Changes Remaining field in the DVD Region tab.The number in the window and select Properties > Hardware tab > Device Manager. 2. Hardware and Software Guide 4-23 Right-click in the field includes the fifth and permanent change settings through the operating system: 1. Multimedia Changing DVD Region Settings Ä CAUTION: The region settings on your DVD drive can be changed only...
.... Open Device Manager by selecting Start > My Computer. Make the desired changes on the drive is displayed in the Changes Remaining field in the DVD Region tab.The number in the window and select Properties > Hardware tab > Device Manager. 2. Hardware and Software Guide 4-23 Right-click in the field includes the fifth and permanent change settings through the operating system: 1. Multimedia Changing DVD Region Settings Ä CAUTION: The region settings on your DVD drive can be changed only...

Hardware and Software Guide
Page 126
... entered at a Setup Utility prompt. A password set in the Setup Utility: ■ Can be set in Windows must be entered to 8 letters and numbers and is set, entered, changed, or deleted. Be sure you use the same password for a Windows security feature. For example, a password set with keyboard number keys will not be recognized if it is thereafter entered with an administrator password set and entered with the same keys. You can be identical. ■ Is not displayed...
... entered at a Setup Utility prompt. A password set in the Setup Utility: ■ Can be set in Windows must be entered to 8 letters and numbers and is set, entered, changed, or deleted. Be sure you use the same password for a Windows security feature. For example, a password set with keyboard number keys will not be recognized if it is thereafter entered with an administrator password set and entered with the same keys. You can be identical. ■ Is not displayed...
Hardware and Software Guide
Page 131
... use the computer for e-mail, network, or Internet access, it is possible for configuring the firewall. To permanently resolve the problem, reconfigure the firewall. Refer to the firewall user guides or contact the firewall manufacturer. ✎ Under some circumstances a firewall can block access to perform, and then reenable the firewall. Security Firewall Software When you use firewall software. To temporarily solve the problem, disable...
... use the computer for e-mail, network, or Internet access, it is possible for configuring the firewall. To permanently resolve the problem, reconfigure the firewall. Refer to the firewall user guides or contact the firewall manufacturer. ✎ Under some circumstances a firewall can block access to perform, and then reenable the firewall. Security Firewall Software When you use firewall software. To temporarily solve the problem, disable...

Hardware and Software Guide
Page 149
To remove the internal hard drive: 1. Hardware and Software Guide 7-17 Turn the computer upside down the computer before removing the hard drive from the hard drive bay. Then shut down the computer and close the display. 3. Shut down the computer through the operating system. Hardware Upgrades and Replacements Replacing the Internal Hard Drive The hard drive in hibernation, turn on computer by pressing the power button. Save your information. 2. Loosen the 2 hard drive security screws. Do not remove the hard drive while...
To remove the internal hard drive: 1. Hardware and Software Guide 7-17 Turn the computer upside down the computer before removing the hard drive from the hard drive bay. Then shut down the computer and close the display. 3. Shut down the computer through the operating system. Hardware Upgrades and Replacements Replacing the Internal Hard Drive The hard drive in hibernation, turn on computer by pressing the power button. Save your information. 2. Loosen the 2 hard drive security screws. Do not remove the hard drive while...

Hardware and Software Guide
Page 169
... Support > System Restore. 2. Select Start > Help and Support > System Restore. 3. Restoring to a Restore Point To restore the computer to reliable external power through the AC adapter. 2. Hardware and Software Guide 8-11 Select Restore my computer to an earlier time, and then follow the instructions on the screen. Select Create a restore point, and then follow the instructions on the screen. Software Updates and Recovery and System Software Setting a Restore Point To set a system restore point manually: 1. Be sure the computer is connected...
... Support > System Restore. 2. Select Start > Help and Support > System Restore. 3. Restoring to a Restore Point To restore the computer to reliable external power through the AC adapter. 2. Hardware and Software Guide 8-11 Select Restore my computer to an earlier time, and then follow the instructions on the screen. Select Create a restore point, and then follow the instructions on the screen. Software Updates and Recovery and System Software Setting a Restore Point To set a system restore point manually: 1. Be sure the computer is connected...

Hardware and Software Guide
Page 176
Software Updates and Recovery and System Software Using Advanced Setup Utility Features This guide describes the Setup Utility features recommended for boot order preferences. For more information about the Setup Utility features recommended for a Network Service Boot. The " to change the boot order. 8-18 Hardware and Software Guide The "Press to boot from LAN" message that is displayed in the lower-left corner of the screen each time the computer is started or restarted in Windows or restored from hibernation is...
Software Updates and Recovery and System Software Using Advanced Setup Utility Features This guide describes the Setup Utility features recommended for boot order preferences. For more information about the Setup Utility features recommended for a Network Service Boot. The " to change the boot order. 8-18 Hardware and Software Guide The "Press to boot from LAN" message that is displayed in the lower-left corner of the screen each time the computer is started or restarted in Windows or restored from hibernation is...
Hardware and Software Guide
Page 190
... downloading and installing 8-5 obtaining updates 8-4 ROM Update 8-4 S S/PDIF signals 4-6 scanner 7-4 screen saver 3-30 scrolling region, TouchPad 1-4, 2-3 Secure Digital (SD) Memory Card 1-22, 7-6 security cable lock, connecting 6-12 security cable slot 1-20 security features 6-1 Security menu 8-20 serial number, computer 1-27, 2-7, 8-20 series, computer 8-2 service tag 1-27 Setup Utility Advanced menu 8-21 changing language 8-14 Diagnostics menu 8-21 displaying system information 8-16 Main menu 8-20 navigation and selection 8-15 Network Service Boot 7-5, 8-18 opening 8-13 restoring default...
... downloading and installing 8-5 obtaining updates 8-4 ROM Update 8-4 S S/PDIF signals 4-6 scanner 7-4 screen saver 3-30 scrolling region, TouchPad 1-4, 2-3 Secure Digital (SD) Memory Card 1-22, 7-6 security cable lock, connecting 6-12 security cable slot 1-20 security features 6-1 Security menu 8-20 serial number, computer 1-27, 2-7, 8-20 series, computer 8-2 service tag 1-27 Setup Utility Advanced menu 8-21 changing language 8-14 Diagnostics menu 8-21 displaying system information 8-16 Main menu 8-20 navigation and selection 8-15 Network Service Boot 7-5, 8-18 opening 8-13 restoring default...


