Safety and Regulatory Information Desktops, Thin Clients, and Personal Workstations
Page 17
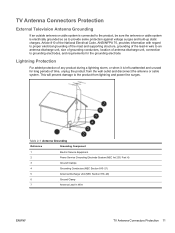
... antenna or cable system. TV Antenna Connectors Protection External Television Antenna Grounding If an outside antenna or cable system is connected to the product, be sure the antenna or cable system is left unattended and unused for the grounding electrode. Table 2-1 Antenna Grounding Reference Grounding Component 1 Electric Service Equipment 2 Power Service Grounding Electrode System (NEC Art 250, Part H) 3 Ground Clamps...
... antenna or cable system. TV Antenna Connectors Protection External Television Antenna Grounding If an outside antenna or cable system is connected to the product, be sure the antenna or cable system is left unattended and unused for the grounding electrode. Table 2-1 Antenna Grounding Reference Grounding Component 1 Electric Service Equipment 2 Power Service Grounding Electrode System (NEC Art 250, Part H) 3 Ground Clamps...
Limited Warranty and Support Guide
Page 12
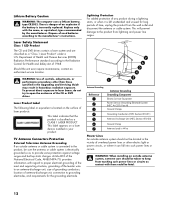
... Radiation Control for the grounding electrode. Lithium Battery Caution WARNING: The computer uses a lithium battery, type CR2032. There is incorrectly replaced. Article 810 of overhead power lines or other than those specified in the Upgrading and Servicing Guide may result in your product. Should the unit ever require maintenance, contact an authorized service location. WARNING: When installing an outside antenna or cable system is connected to...
... Radiation Control for the grounding electrode. Lithium Battery Caution WARNING: The computer uses a lithium battery, type CR2032. There is incorrectly replaced. Article 810 of overhead power lines or other than those specified in the Upgrading and Servicing Guide may result in your product. Should the unit ever require maintenance, contact an authorized service location. WARNING: When installing an outside antenna or cable system is connected to...
Limited Warranty and Support Guide
Page 14
... listed, the HP Customer Care Center provides 30-day limited support. Any hardware upgrades that the computer was working correctly before attempting to the setup poster included with your system and turning it leaves our factory. By breaking the security seal on the back of our computers go through a comprehensive quality test to meet the rigorous standards that you have any problems setting...
... listed, the HP Customer Care Center provides 30-day limited support. Any hardware upgrades that the computer was working correctly before attempting to the setup poster included with your system and turning it leaves our factory. By breaking the security seal on the back of our computers go through a comprehensive quality test to meet the rigorous standards that you have any problems setting...
Limited Warranty and Support Guide (Refurbished Desktops)
Page 5
... Service (Displays ONLY) Your HP Limited Warranty may involve performing routine diagnostic procedures, installing software updates or patches, removing third party options and/or substituting options. On receiving the replacement unit you will be additional charges. HP will pick up and return warranty service. You are also required to cooperate with HP in all manufacturers labels (such as serial numbers) are required to replace yourself based on instructions...
... Service (Displays ONLY) Your HP Limited Warranty may involve performing routine diagnostic procedures, installing software updates or patches, removing third party options and/or substituting options. On receiving the replacement unit you will be additional charges. HP will pick up and return warranty service. You are also required to cooperate with HP in all manufacturers labels (such as serial numbers) are required to replace yourself based on instructions...
Start Here Guide
Page 4
... Audio System 28 Y adapter cables 28 2.1 home stereo installation 29 5.1 home audio installation 30 5.1 home audio installation procedure 30 7.1 home audio installation 32 7.1 home audio installation procedure 33 Connecting Digital Audio 34 Connecting Speakers Using the Creative Sound Blaster X-Fi Sound Card 36 Connecting the speakers 36 Connecting the FlexiJack connector 37 Connecting the Television Signal and Video Cables 39 Using TV Cables 39 Audio and Video Cables 39 Connecting the TV Signal Source 41 Connecting a dual tuner 42 Connecting the Remote Sensor 43 Connecting...
... Audio System 28 Y adapter cables 28 2.1 home stereo installation 29 5.1 home audio installation 30 5.1 home audio installation procedure 30 7.1 home audio installation 32 7.1 home audio installation procedure 33 Connecting Digital Audio 34 Connecting Speakers Using the Creative Sound Blaster X-Fi Sound Card 36 Connecting the speakers 36 Connecting the FlexiJack connector 37 Connecting the Television Signal and Video Cables 39 Using TV Cables 39 Audio and Video Cables 39 Connecting the TV Signal Source 41 Connecting a dual tuner 42 Connecting the Remote Sensor 43 Connecting...
Start Here Guide
Page 20
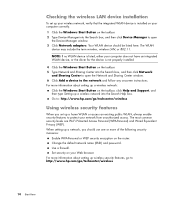
... Windows Start Button on the taskbar. 5 Type Network and Sharing Center into the Search box, and then click Device Manager to open the Network and Sharing Center window. 6 Click Add a device to the network and follow any onscreen instructions. The most common security levels are Wi-Fi Protected Access Personal (WPA-Personal) and Wired Equivalent Privacy (WEP). Use a firewall. Checking the wireless LAN device installation To set up wireless security features, go to: http://www.hp...
... Windows Start Button on the taskbar. 5 Type Network and Sharing Center into the Search box, and then click Device Manager to open the Network and Sharing Center window. 6 Click Add a device to the network and follow any onscreen instructions. The most common security levels are Wi-Fi Protected Access Personal (WPA-Personal) and Wired Equivalent Privacy (WEP). Use a firewall. Checking the wireless LAN device installation To set up wireless security features, go to: http://www.hp...
Start Here Guide
Page 26
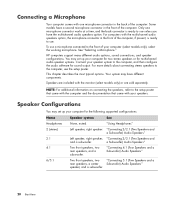
... then configure the audio software for sound output. NOTE: For additional information on connecting the speakers, refer to the setup poster that came with the computer and the documentation that came with the multichannel audio speakers option, the microphone connector in the front of your speaker system to use unless you have the multichannel audio speakers option. Speaker Configurations You may set up your speakers. a Subwoofer) Audio Speakers" Two front speakers, two rear speakers, and...
... then configure the audio software for sound output. NOTE: For additional information on connecting the speakers, refer to the setup poster that came with the computer and the documentation that came with the multichannel audio speakers option, the microphone connector in the front of your speaker system to use unless you have the multichannel audio speakers option. Speaker Configurations You may set up your speakers. a Subwoofer) Audio Speakers" Two front speakers, two rear speakers, and...
Start Here Guide
Page 42
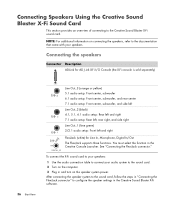
... sound card. You must select the function in the Creative Console Launcher. NOTE: For additional information on the speaker system power. Connecting the speakers Connector Description AD-Link for AD_Link X-Fi I/O Console (the X-Fi console is sold separately) 36 Start Here Line Out_3 (orange or yellow) 5.1 audio setup: Front center, subwoofer 6.1 audio setup: Front center, subwoofer, and rear center 7.1 audio setup: Front center, subwoofer, and side left Line Out_2 (black) 4.1, 5.1, 6.1 audio setup: Rear left...
... sound card. You must select the function in the Creative Console Launcher. NOTE: For additional information on the speaker system power. Connecting the speakers Connector Description AD-Link for AD_Link X-Fi I/O Console (the X-Fi console is sold separately) 36 Start Here Line Out_3 (orange or yellow) 5.1 audio setup: Front center, subwoofer 6.1 audio setup: Front center, subwoofer, and rear center 7.1 audio setup: Front center, subwoofer, and side left Line Out_2 (black) 4.1, 5.1, 6.1 audio setup: Rear left...
Getting Started Guide
Page 17
..., or Internet access, you cannot access Setup Utility. Password Windows Vista Administrator password Windows Vista User password Function Protects administrator-level access to a Windows Vista user account and the computer contents. To open and access Norton Internet Security: 1 Click the Windows Start Button on how to computer viruses. Write down your Administrator password, you expose it to set by purchasing extended update service. Do not store passwords in the Help and Support Center. For additional information on Windows Vista passwords, such as screen saver passwords, type...
..., or Internet access, you cannot access Setup Utility. Password Windows Vista Administrator password Windows Vista User password Function Protects administrator-level access to a Windows Vista user account and the computer contents. To open and access Norton Internet Security: 1 Click the Windows Start Button on how to computer viruses. Write down your Administrator password, you expose it to set by purchasing extended update service. Do not store passwords in the Help and Support Center. For additional information on Windows Vista passwords, such as screen saver passwords, type...
Getting Started Guide
Page 35
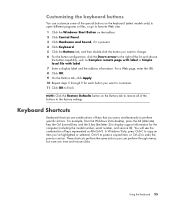
...+S. For example, from the Windows Vista desktop, press the Alt (alternate) key, the Ctrl (control) key, and the S key (the letter S) to perform specific actions. Using the Keyboard 25 NOTE: Click the Restore Defaults button on the taskbar. 2 Click Control Panel. 3 Click Hardware and Sound, if it is present. 4 Click Keyboard. 5 Click the Buttons tab, and then double-click the button you want to change. 6 For the button configuration, click the Down arrow...
...+S. For example, from the Windows Vista desktop, press the Alt (alternate) key, the Ctrl (control) key, and the S key (the letter S) to perform specific actions. Using the Keyboard 25 NOTE: Click the Restore Defaults button on the taskbar. 2 Click Control Panel. 3 Click Hardware and Sound, if it is present. 4 Click Keyboard. 5 Click the Buttons tab, and then double-click the button you want to change. 6 For the button configuration, click the Down arrow...
Getting Started Guide
Page 188
... 172 Start menu Media Center 78 Support messages 2 SVCD 150 switching mouse button functions 29 T Television Program Guide no data available 159 recording TV programs 165 searching for TV programs 163 setting up a download method 160 using the More information button 159 viewing 159 troubleshooting remote sensor 35 turning off PC 10 TV adding missing channels to the guide 162 advanced recording options 165 editing channels in the guide 162 manually downloading the guide...
... 172 Start menu Media Center 78 Support messages 2 SVCD 150 switching mouse button functions 29 T Television Program Guide no data available 159 recording TV programs 165 searching for TV programs 163 setting up a download method 160 using the More information button 159 viewing 159 troubleshooting remote sensor 35 turning off PC 10 TV adding missing channels to the guide 162 advanced recording options 165 editing channels in the guide 162 manually downloading the guide...
Upgrading and Servicing Guide
Page 12
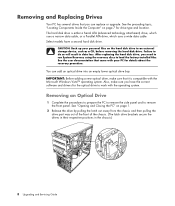
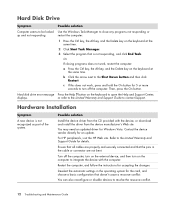
Failure to an external storage device, such as a CD, before removing the hard disk drive. You can replace or upgrade. The hard disk drive is compatible with the Microsoft Windows Vista™ operating system. CAUTION: Back up your PC for the optical drive to remove the front panel. See "Opening and Closing the PC" on page 7 for drive type and location. Select models have the correct software and drivers for details about the recovery procedure. Also, make sure that it is...
Failure to an external storage device, such as a CD, before removing the hard disk drive. You can replace or upgrade. The hard disk drive is compatible with the Microsoft Windows Vista™ operating system. CAUTION: Back up your PC for the optical drive to remove the front panel. See "Opening and Closing the PC" on page 7 for drive type and location. Select models have the correct software and drivers for details about the recovery procedure. Also, make sure that it is...
Upgrading and Servicing Guide
Page 18
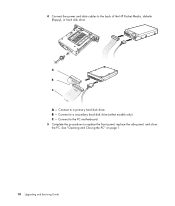
Connect to replace the front panel, replace the side panel, and close the PC. Connect to the PC motherboard. 5 Complete the procedures to a secondary hard disk drive (select models only). See "Opening and Closing the PC" on page 1. 14 Upgrading and Servicing Guide C - B - 4 Connect the power and data cables to a primary hard disk drive. A B MASTER C SLAVE To CPU A - Connect to the back of the HP Pocket Media, diskette (floppy), or hard disk drive.
Connect to replace the front panel, replace the side panel, and close the PC. Connect to the PC motherboard. 5 Complete the procedures to a secondary hard disk drive (select models only). See "Opening and Closing the PC" on page 1. 14 Upgrading and Servicing Guide C - B - 4 Connect the power and data cables to a primary hard disk drive. A B MASTER C SLAVE To CPU A - Connect to the back of the HP Pocket Media, diskette (floppy), or hard disk drive.
Upgrading and Servicing Guide
Page 31
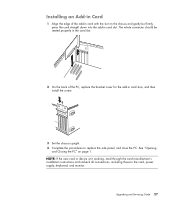
Installing an Add-in Card 1 Align the edge of the PC, replace the bracket cover for the add-in card slot. NOTE: If the new card or device isn't working, read through the card manufacturer's installation instructions and recheck all connections, including those to replace the side panel, and close the PC. Upgrading and Servicing Guide 27 The whole connector should be seated properly in the card slot. 2 On the back of the add-in card with the slot on...
Installing an Add-in Card 1 Align the edge of the PC, replace the bracket cover for the add-in card slot. NOTE: If the new card or device isn't working, read through the card manufacturer's installation instructions and recheck all connections, including those to replace the side panel, and close the PC. Upgrading and Servicing Guide 27 The whole connector should be seated properly in the card slot. 2 On the back of the add-in card with the slot on...
Troubleshooting and Maintenance Guide
Page 6
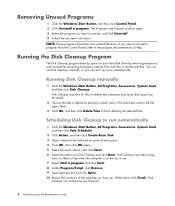
... can run Disk Cleanup manually, or you can be saved. 2 Choose the files to run Disk Cleanup and click Next. NOTE: Some programs have set . 2 Troubleshooting and Maintenance Guide Running the Disk Cleanup Program The Disk Cleanup program frees up to delete by removing temporary and unused files (including Temporary Internet Files and files in the Recycle Bin). Removing Unused Programs 1 Click the Windows Start Button, and then click Control Panel...
... can run Disk Cleanup manually, or you can be saved. 2 Choose the files to run Disk Cleanup and click Next. NOTE: Some programs have set . 2 Troubleshooting and Maintenance Guide Running the Disk Cleanup Program The Disk Cleanup program frees up to delete by removing temporary and unused files (including Temporary Internet Files and files in the Recycle Bin). Removing Unused Programs 1 Click the Windows Start Button, and then click Control Panel...
Troubleshooting and Maintenance Guide
Page 15
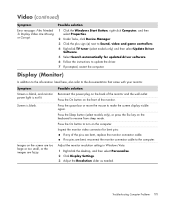
... solution 1 Click the Windows Start Button, right-click Computer, and then select Properties. 2 Under Tasks, click Device Manager. 3 Click the plus sign (+) next to Sound, video and game controllers. 4 Right-click TV tuner (select models only) and then select Update Driver Software. 5 Select Search automatically for bent pins: If any of the monitor. Troubleshooting Computer Problems 11 Video (continued) Symptom Error message: Files Needed To Display Video Are Missing or Corrupt...
... solution 1 Click the Windows Start Button, right-click Computer, and then select Properties. 2 Under Tasks, click Device Manager. 3 Click the plus sign (+) next to Sound, video and game controllers. 4 Right-click TV tuner (select models only) and then select Update Driver Software. 5 Select Search automatically for bent pins: If any of the monitor. Troubleshooting Computer Problems 11 Video (continued) Symptom Error message: Files Needed To Display Video Are Missing or Corrupt...
Troubleshooting and Maintenance Guide
Page 16
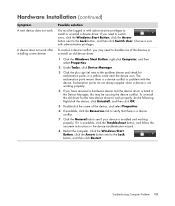
... the On button for details. Hard disk drive error message Press the Help ? Ensure that the pins in the operating system for Windows Vista. Deselect the automatic settings in the cable or connector are properly and securely connected and that all cables are not bent. button on the keyboard at the same time. 2 Click Start Task Manager. 3 Select the program that doesn't cause a resource conflict. A Hardware Installation Symptom A new device is not...
... the On button for details. Hard disk drive error message Press the Help ? Ensure that the pins in the operating system for Windows Vista. Deselect the automatic settings in the cable or connector are properly and securely connected and that all cables are not bent. button on the keyboard at the same time. 2 Click Start Task Manager. 3 Select the program that doesn't cause a resource conflict. A Hardware Installation Symptom A new device is not...
Troubleshooting and Maintenance Guide
Page 17
... work after installing a new device. Exclamation points do the following: Right-click the device, click Uninstall, and then click OK. 5 Double-click the name of the devices or uninstall an old device driver: 1 Click the Windows Start Button, right-click Computer, and then select Properties. 2 Under Tasks, click Device Manager. 3 Click the plus sign (+) next to the Lock button, and then click Restart. Troubleshooting Computer Problems...
... work after installing a new device. Exclamation points do the following: Right-click the device, click Uninstall, and then click OK. 5 Double-click the name of the devices or uninstall an old device driver: 1 Click the Windows Start Button, right-click Computer, and then select Properties. 2 Under Tasks, click Device Manager. 3 Click the plus sign (+) next to the Lock button, and then click Restart. Troubleshooting Computer Problems...

Troubleshooting and Maintenance Guide
Page 18
... to open the Help and Support Center. when it is a high demand for assistance. Verify that you are selected: 1 Click the Windows Start Button, and then click Control Panel. 2 Click Hardware and Sound. 3 Double-click Phone and Modem Options. 4 Select the Modems tab, and then click the Properties button. 5 In the Device status area, verify the modem is installed and set up connection. A NIC uses a network cable to connect to...
... to open the Help and Support Center. when it is a high demand for assistance. Verify that you are selected: 1 Click the Windows Start Button, and then click Control Panel. 2 Click Hardware and Sound. 3 Double-click Phone and Modem Options. 4 Select the Modems tab, and then click the Properties button. 5 In the Device status area, verify the modem is installed and set up connection. A NIC uses a network cable to connect to...

Troubleshooting and Maintenance Guide
Page 25
.... Plug in other USB devices, leave the remote sensor plugged in the Device Manager window. Troubleshooting Computer Problems 21 If prompted to restart, click Yes and allow the computer to restart. Performance (continued) Symptom Applications and files take longer to open or respond. (continued) Possible solution Check for hard disk drive errors: 1 Close all open programs and windows. 2 Click the Windows Start Button, and then click Computer. 3 Right-click the hard disk drive...
.... Plug in other USB devices, leave the remote sensor plugged in the Device Manager window. Troubleshooting Computer Problems 21 If prompted to restart, click Yes and allow the computer to restart. Performance (continued) Symptom Applications and files take longer to open or respond. (continued) Possible solution Check for hard disk drive errors: 1 Close all open programs and windows. 2 Click the Windows Start Button, and then click Computer. 3 Right-click the hard disk drive...


