
End User License Agreement
Page 2
... also terminate upon conditions set forth elsewhere in this EULA. 7. b. You may collect and use the Software Product for your HP Product, whether in this limitation or it is effective unless terminated or rejected. LIMITATION ON REVERSE ENGINEERING. The use . PROPRIETARY ... operating system software contained in relation to support services related to the You shall not remove any term or condition of a hard disk drive-based solution, an external media-based recovery solution (e.g. f. ADDITIONAL SOFTWARE. Third Party. Any software recovery solution provided with /for...
... also terminate upon conditions set forth elsewhere in this EULA. 7. b. You may collect and use the Software Product for your HP Product, whether in this limitation or it is effective unless terminated or rejected. LIMITATION ON REVERSE ENGINEERING. The use . PROPRIETARY ... operating system software contained in relation to support services related to the You shall not remove any term or condition of a hard disk drive-based solution, an external media-based recovery solution (e.g. f. ADDITIONAL SOFTWARE. Third Party. Any software recovery solution provided with /for...

Safety and Regulatory Information Desktops, Thin Clients, and Personal Workstations
Page 29
...Cd) Hexavalent Chromium (Cr(VI)) Memory X O O O I/O PCAs X O O O Power supply X O O O Keyboard X O O O Mouse X O O O Chassis/Other X O O O Fans X O O O Internal/External Media Reading X O O O Devices External Control Devices X O O O Cable X O O O Hard Disk Drive X O O O Display X X O O Polybrominated biphenyls (PBB) Polybrominated diphenyl ethers (PBDE) O O O O O O O O O O O O O O O O O O O O O O O O O: Indicates that this toxic or hazardous substance contained in at least one of the homogeneous materials...
...Cd) Hexavalent Chromium (Cr(VI)) Memory X O O O I/O PCAs X O O O Power supply X O O O Keyboard X O O O Mouse X O O O Chassis/Other X O O O Fans X O O O Internal/External Media Reading X O O O Devices External Control Devices X O O O Cable X O O O Hard Disk Drive X O O O Display X X O O Polybrominated biphenyls (PBB) Polybrominated diphenyl ethers (PBDE) O O O O O O O O O O O O O O O O O O O O O O O O O: Indicates that this toxic or hazardous substance contained in at least one of the homogeneous materials...
Warranty
Page 7
... to follow the instructions intended for the HP Hardware Product. HP IS NOT RESPONSIBLE FOR DAMAGE TO OR LOSS OF ANY PROGRAMS, DATA, OR REMOVABLE STORAGE MEDIA. UNITS SENT IN FOR SERVICE MAY HAVE THE DATA ERASED FROM THE HARD DRIVE AND THE PROGRAMS RESTORED TO THEIR ORIGINAL STATE.... Exclusive Remedy TO THE EXTENT ALLOWED BY APPLICABLE LOCAL LAW, THESE TERMS AND CONDITIONS CONSTITUTE THE COMPLETE AND EXCLUSIVE WARRANTY AGREEMENT BETWEEN YOU AND HP REGARDING THE HP HARDWARE PRODUCT YOU HAVE PURCHASED ...
... to follow the instructions intended for the HP Hardware Product. HP IS NOT RESPONSIBLE FOR DAMAGE TO OR LOSS OF ANY PROGRAMS, DATA, OR REMOVABLE STORAGE MEDIA. UNITS SENT IN FOR SERVICE MAY HAVE THE DATA ERASED FROM THE HARD DRIVE AND THE PROGRAMS RESTORED TO THEIR ORIGINAL STATE.... Exclusive Remedy TO THE EXTENT ALLOWED BY APPLICABLE LOCAL LAW, THESE TERMS AND CONDITIONS CONSTITUTE THE COMPLETE AND EXCLUSIVE WARRANTY AGREEMENT BETWEEN YOU AND HP REGARDING THE HP HARDWARE PRODUCT YOU HAVE PURCHASED ...
Warranty
Page 12
... any Software Product, installed on or made available by HP for use with your HP Product, whether in its suppliers reserve all terms and conditions of any other form, may load the Software Product into the local memory or storage device of a hard disk drive-based solution, an external media-based recovery solution (e.g. GRANT...
... any Software Product, installed on or made available by HP for use with your HP Product, whether in its suppliers reserve all terms and conditions of any other form, may load the Software Product into the local memory or storage device of a hard disk drive-based solution, an external media-based recovery solution (e.g. GRANT...
Warranty
Page 27
...on the outcome of the hard disk drive is equal to provide you to an HP support representative. Allow HP Total Care to 1,073,741,824 bytes. www.hp.com/support/consumer-forum (US and Canada) Understanding Hard Disk Drive Space The hard disk drive on the hard disk drive at a time. One ...of your investment by purchasing an HP Total Care Extended Service...
...on the outcome of the hard disk drive is equal to provide you to an HP support representative. Allow HP Total Care to 1,073,741,824 bytes. www.hp.com/support/consumer-forum (US and Canada) Understanding Hard Disk Drive Space The hard disk drive on the hard disk drive at a time. One ...of your investment by purchasing an HP Total Care Extended Service...
Limited Warranty and Support Guide (Refurbished Desktops)
Page 3
...OR MADE BY YOU FOR A THIRD PARTY. 3 UNITS SENT IN FOR SERVICE MAY HAVE THE DATA ERASED FROM THE HARD DRIVE AND THE PROGRAMS RESTORED TO THEIR ORIGINAL STATE. HP IS NOT RESPONSIBLE FOR DAMAGE TO OR LOSS OF ANY PROGRAMS, DATA, OR REMOVABLE STORAGE MEDIA. EXCEPT AS INDICATED ABOVE,... FOR DAMAGE THAT OCCURS AS A RESULT OF YOUR FAILURE TO FOLLOW THE INSTRUCTIONS INTENDED FOR THE HP HARDWARE PRODUCT. YOU SHOULD MAKE PERIODIC BACKUP COPIES OF THE DATA STORED ON YOUR HARD DRIVE OR OTHER STORAGE DEVICES AS A PRECAUTION AGAINST POSSIBLE FAILURES, ALTERATION, OR LOSS OF THE DATA....
...OR MADE BY YOU FOR A THIRD PARTY. 3 UNITS SENT IN FOR SERVICE MAY HAVE THE DATA ERASED FROM THE HARD DRIVE AND THE PROGRAMS RESTORED TO THEIR ORIGINAL STATE. HP IS NOT RESPONSIBLE FOR DAMAGE TO OR LOSS OF ANY PROGRAMS, DATA, OR REMOVABLE STORAGE MEDIA. EXCEPT AS INDICATED ABOVE,... FOR DAMAGE THAT OCCURS AS A RESULT OF YOUR FAILURE TO FOLLOW THE INSTRUCTIONS INTENDED FOR THE HP HARDWARE PRODUCT. YOU SHOULD MAKE PERIODIC BACKUP COPIES OF THE DATA STORED ON YOUR HARD DRIVE OR OTHER STORAGE DEVICES AS A PRECAUTION AGAINST POSSIBLE FAILURES, ALTERATION, OR LOSS OF THE DATA....
Limited Warranty and Support Guide (Refurbished Desktops)
Page 7
... Rights. b. d. Any software recovery solution provided with/for your HP Product, whether in any other terms will prevail. 4. floppy disk, CD or DVD) or an equivalent solution delivered in the form of a hard disk drive-based solution, an external media-based recovery solution (e.g. To use... a Software Product identified as an upgrade, you must first be licensed for which constitutes non-proprietary HP software or software provided under public license by...
... Rights. b. d. Any software recovery solution provided with/for your HP Product, whether in any other terms will prevail. 4. floppy disk, CD or DVD) or an equivalent solution delivered in the form of a hard disk drive-based solution, an external media-based recovery solution (e.g. To use... a Software Product identified as an upgrade, you must first be licensed for which constitutes non-proprietary HP software or software provided under public license by...
Upgrading and Servicing Guide
Page 3
... the PC 1 Preparing the PC 2 Before Opening the PC 2 After Closing the PC 3 Removing the Side Panel 3 Replacing the Side Panel 4 Removing the Front Panel 5 Replacing the Front Panel 6 Locating Components Inside the Computer 7 Removing and Replacing Drives 8 Removing an Optical Drive 8 Adding or Replacing an Optical Drive 9 Removing the HP Pocket Media or Diskette or Hard Disk Drive 11...
... the PC 1 Preparing the PC 2 Before Opening the PC 2 After Closing the PC 3 Removing the Side Panel 3 Replacing the Side Panel 4 Removing the Front Panel 5 Replacing the Front Panel 6 Locating Components Inside the Computer 7 Removing and Replacing Drives 8 Removing an Optical Drive 8 Adding or Replacing an Optical Drive 9 Removing the HP Pocket Media or Diskette or Hard Disk Drive 11...

Upgrading and Servicing Guide
Page 9
Removing the Front Panel This procedure is necessary only when removing or replacing an optical drive, memory card reader, an HP Pocket Media Drive, diskette drive, or the hard disk drive. 1 Pull the three tabs (B) away from the chassis toward the left to remove it. B 2 Swing the front panel away from the outside edge of the chassis. Upgrading and Servicing Guide 5
Removing the Front Panel This procedure is necessary only when removing or replacing an optical drive, memory card reader, an HP Pocket Media Drive, diskette drive, or the hard disk drive. 1 Pull the three tabs (B) away from the chassis toward the left to remove it. B 2 Swing the front panel away from the outside edge of the chassis. Upgrading and Servicing Guide 5

Upgrading and Servicing Guide
Page 11
... plate) or a CD-ROM, CD-RW, DVD-ROM, DVD+RW/+R, combination drive, or HP Personal Media Drive bay (select models) D HP Pocket Media Drive bay, a hard disk drive, or a diskette (floppy) drive (select models) E Front connector panel (no replacement instructions) F Hard disk drive and space for a second hard disk drive (located inside the chassis) (select models) NOTE: The connectors and components of...
... plate) or a CD-ROM, CD-RW, DVD-ROM, DVD+RW/+R, combination drive, or HP Personal Media Drive bay (select models) D HP Pocket Media Drive bay, a hard disk drive, or a diskette (floppy) drive (select models) E Front connector panel (no replacement instructions) F Hard disk drive and space for a second hard disk drive (located inside the chassis) (select models) NOTE: The connectors and components of...
Upgrading and Servicing Guide
Page 12
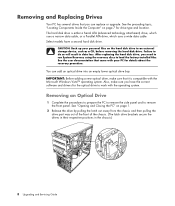
... a CD, before removing the hard disk drive. The hard disk drive is compatible with the operating system. See "Opening and Closing the PC" on page 7 for details about the recovery procedure. CAUTION: Back up your PC for drive type and location. You can replace or upgrade. Removing and Replacing Drives Your PC has several drives that you need to run...
... a CD, before removing the hard disk drive. The hard disk drive is compatible with the operating system. See "Opening and Closing the PC" on page 7 for details about the recovery procedure. CAUTION: Back up your PC for drive type and location. You can replace or upgrade. Removing and Replacing Drives Your PC has several drives that you need to run...

Upgrading and Servicing Guide
Page 13
For Serial ATA hard disk drive cables, press the latch (select models only) in the center of each plug, and pull the plug from the back of the optical drive you must remove the knockout plate from the bay. To do so, insert a flat screwdriver into the knockout plate slot (A) ... rocking motion to break the knockout plate out of the front cover. Discard the knockout plate. Adding or Replacing an Optical Drive 1 If necessary, remove the existing drive. See "Removing an Optical Drive" on the front cover. A B Upgrading and Servicing Guide 9 3 Disconnect the power, data, and the sound cable, ...
For Serial ATA hard disk drive cables, press the latch (select models only) in the center of each plug, and pull the plug from the back of the optical drive you must remove the knockout plate from the bay. To do so, insert a flat screwdriver into the knockout plate slot (A) ... rocking motion to break the knockout plate out of the front cover. Discard the knockout plate. Adding or Replacing an Optical Drive 1 If necessary, remove the existing drive. See "Removing an Optical Drive" on the front cover. A B Upgrading and Servicing Guide 9 3 Disconnect the power, data, and the sound cable, ...
Upgrading and Servicing Guide
Page 14
Your drive may vary from the chassis and then sliding the drive part way into the front of the chassis. (The latch drive brackets secure the drives in their respective positions in the CS (Cable Select) position. The Serial ATA hard disk drive does not use Cable Select. 4 Make sure the jumper on the new optical drive or new Parallel ATA hard disk drive is in the chassis.) 10 Upgrading and Servicing Guide CS SL MA Cable Select jumper 5 Release the drive bay by pulling the latch out away from the illustration.
Your drive may vary from the chassis and then sliding the drive part way into the front of the chassis. (The latch drive brackets secure the drives in their respective positions in the CS (Cable Select) position. The Serial ATA hard disk drive does not use Cable Select. 4 Make sure the jumper on the new optical drive or new Parallel ATA hard disk drive is in the chassis.) 10 Upgrading and Servicing Guide CS SL MA Cable Select jumper 5 Release the drive bay by pulling the latch out away from the illustration.
Upgrading and Servicing Guide
Page 15
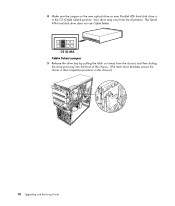
... remove the front panel. Removing the HP Pocket Media or Diskette or Hard Disk Drive 1 Complete the procedures to prepare the PC to remove the side panel and to the secondary hard disk drive. See "Opening and Closing the PC" on page 1. 2 Release the HP Pocket Media or diskette (floppy), or hard disk drive, by removing the two screws on...
... remove the front panel. Removing the HP Pocket Media or Diskette or Hard Disk Drive 1 Complete the procedures to prepare the PC to remove the side panel and to the secondary hard disk drive. See "Opening and Closing the PC" on page 1. 2 Release the HP Pocket Media or diskette (floppy), or hard disk drive, by removing the two screws on...

Upgrading and Servicing Guide
Page 17
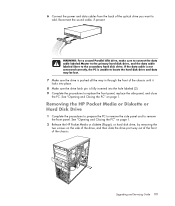
... sure to insert the screw into the holes labeled HDD. See "Removing the HP Pocket Media or Diskette or Hard Disk Drive" on page 11. 2 Slide the HP Pocket Media, diskette (floppy), or hard disk drive into the front of the chassis until it locks into place. 3 Align the two screw holes on the chassis with...
... sure to insert the screw into the holes labeled HDD. See "Removing the HP Pocket Media or Diskette or Hard Disk Drive" on page 11. 2 Slide the HP Pocket Media, diskette (floppy), or hard disk drive into the front of the chassis until it locks into place. 3 Align the two screw holes on the chassis with...
Upgrading and Servicing Guide
Page 18
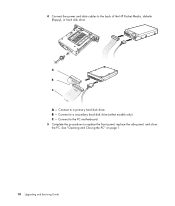
4 Connect the power and data cables to a secondary hard disk drive (select models only). Connect to the back of the HP Pocket Media, diskette (floppy), or hard disk drive. Connect to replace the front panel, replace the side panel, and close the PC. C - See "Opening and Closing the PC" on page 1. 14 Upgrading and Servicing Guide Connect to the PC motherboard. 5 Complete the procedures to a primary hard disk drive. A B MASTER C SLAVE To CPU A - B -
4 Connect the power and data cables to a secondary hard disk drive (select models only). Connect to the back of the HP Pocket Media, diskette (floppy), or hard disk drive. Connect to replace the front panel, replace the side panel, and close the PC. C - See "Opening and Closing the PC" on page 1. 14 Upgrading and Servicing Guide Connect to the PC motherboard. 5 Complete the procedures to a primary hard disk drive. A B MASTER C SLAVE To CPU A - B -
Upgrading and Servicing Guide
Page 21
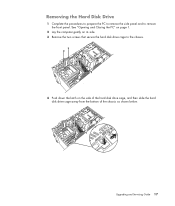
Removing the Hard Disk Drive 1 Complete the procedures to prepare the PC to remove the side panel and to the chassis. 4 Push down the latch on the side of the hard disk drive cage, and then slide the hard disk drive cage away from the bottom of the chassis as shown below. Upgrading and Servicing Guide 17 See "Opening and Closing the PC" on page 1. 2 Lay the computer gently on its side. 3 Remove the two screws that secure the hard disk drive cage to remove the front panel.
Removing the Hard Disk Drive 1 Complete the procedures to prepare the PC to remove the side panel and to the chassis. 4 Push down the latch on the side of the hard disk drive cage, and then slide the hard disk drive cage away from the bottom of the chassis as shown below. Upgrading and Servicing Guide 17 See "Opening and Closing the PC" on page 1. 2 Lay the computer gently on its side. 3 Remove the two screws that secure the hard disk drive cage to remove the front panel.
Upgrading and Servicing Guide
Page 22
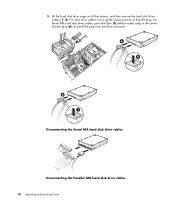
5 Lift the hard disk drive cage out of each plug (6), and pull the plug from the drive connector. 6 5 2 1 Disconnecting the Serial ATA hard disk drive cables MASTER SLAVE To CPU Disconnecting the Parallel ATA hard disk drive cables 18 Upgrading and Servicing Guide For most drive cables, use a gentle rocking motion to free the plug. For Serial ATA hard disk drive cables, press the latch (5) (select models only) in the center of the chassis, and then remove the hard disk drive cables (1, 2).
5 Lift the hard disk drive cage out of each plug (6), and pull the plug from the drive connector. 6 5 2 1 Disconnecting the Serial ATA hard disk drive cables MASTER SLAVE To CPU Disconnecting the Parallel ATA hard disk drive cables 18 Upgrading and Servicing Guide For most drive cables, use a gentle rocking motion to free the plug. For Serial ATA hard disk drive cables, press the latch (5) (select models only) in the center of the chassis, and then remove the hard disk drive cables (1, 2).
Important FreeDOS Operating System Information
Page 1
...safety information. Software Restore and Recovery If you start your computer with a Microsoft® Windows™ operating system. HP shall not be viewed by PC-Doctor either runs automatically when you need to learn about the hardware, as well as a compatible version of the ...computer has the FreeDOS operating system preinstalled, which provides only limited DOS-based functionality until another operating system is subject to your hard drive after you install. Hardware Diagnostic Tools powered by entering on the command line: c:\fdos\source\freecom\license Visit http://www....
...safety information. Software Restore and Recovery If you start your computer with a Microsoft® Windows™ operating system. HP shall not be viewed by PC-Doctor either runs automatically when you need to learn about the hardware, as well as a compatible version of the ...computer has the FreeDOS operating system preinstalled, which provides only limited DOS-based functionality until another operating system is subject to your hard drive after you install. Hardware Diagnostic Tools powered by entering on the command line: c:\fdos\source\freecom\license Visit http://www....
Limited Warranty and Support Guide
Page 3
...Limited Warranty Period, HP will be uninterrupted or error-free. This is longer. This Limited Warranty does not apply to expendable or consumable parts and does not extend to any defective component. YOU SHOULD MAKE PERIODIC BACKUP COPIES OF THE DATA STORED ON YOUR HARD DRIVE OR OTHER STORAGE DEVICES...A PRECAUTION AGAINST POSSIBLE FAILURES, ALTERATION, OR LOSS OF THE DATA. UNITS SENT IN FOR SERVICE MAY HAVE THE DATA ERASED FROM THE HARD DRIVE AND THE PROGRAMS RESTORED TO THEIR ORIGINAL STATE. No change to follow the instructions intended for damage that has been discontinued. In the ...
...Limited Warranty Period, HP will be uninterrupted or error-free. This is longer. This Limited Warranty does not apply to expendable or consumable parts and does not extend to any defective component. YOU SHOULD MAKE PERIODIC BACKUP COPIES OF THE DATA STORED ON YOUR HARD DRIVE OR OTHER STORAGE DEVICES...A PRECAUTION AGAINST POSSIBLE FAILURES, ALTERATION, OR LOSS OF THE DATA. UNITS SENT IN FOR SERVICE MAY HAVE THE DATA ERASED FROM THE HARD DRIVE AND THE PROGRAMS RESTORED TO THEIR ORIGINAL STATE. No change to follow the instructions intended for damage that has been discontinued. In the ...


