
End User License Agreement
Page 2
... transfer, such as a consignment. Restrictions. All intellectual property rights in the form of such license. You shall not remove any term or condition of the HP Product with the update or supplement. CONSENT TO USE OF DATA. floppy disk, CD or DVD) or an equivalent ...solution shall be licensed for the original Software Product identified by the terms and conditions of a hard disk drive-based solution, an external media-based recovery solution (e.g. a. TERM. entirely by HP as eligible for the upgrade. The use the original Software Product that the right to do ...
... transfer, such as a consignment. Restrictions. All intellectual property rights in the form of such license. You shall not remove any term or condition of the HP Product with the update or supplement. CONSENT TO USE OF DATA. floppy disk, CD or DVD) or an equivalent ...solution shall be licensed for the original Software Product identified by the terms and conditions of a hard disk drive-based solution, an external media-based recovery solution (e.g. a. TERM. entirely by HP as eligible for the upgrade. The use the original Software Product that the right to do ...
Warranty
Page 7
...FOR DAMAGE TO OR LOSS OF ANY PROGRAMS, DATA, OR REMOVABLE STORAGE MEDIA. No change to follow the instructions intended for the HP Hardware Product. YOU SHOULD MAKE PERIODIC BACKUP COPIES OF THE DATA STORED ON YOUR HARD DRIVE OR OTHER STORAGE DEVICES AS A PRECAUTION AGAINST POSSIBLE FAILURES, ...ALTERATION, OR LOSS OF THE DATA. BEFORE RETURNING ANY UNIT FOR SERVICE, BE SURE TO BACK UP DATA AND REMOVE ANY CONFIDENTIAL, PROPRIETARY, OR PERSONAL INFORMATION. HP IS NOT RESPONSIBLE FOR THE...
...FOR DAMAGE TO OR LOSS OF ANY PROGRAMS, DATA, OR REMOVABLE STORAGE MEDIA. No change to follow the instructions intended for the HP Hardware Product. YOU SHOULD MAKE PERIODIC BACKUP COPIES OF THE DATA STORED ON YOUR HARD DRIVE OR OTHER STORAGE DEVICES AS A PRECAUTION AGAINST POSSIBLE FAILURES, ...ALTERATION, OR LOSS OF THE DATA. BEFORE RETURNING ANY UNIT FOR SERVICE, BE SURE TO BACK UP DATA AND REMOVE ANY CONFIDENTIAL, PROPRIETARY, OR PERSONAL INFORMATION. HP IS NOT RESPONSIBLE FOR THE...
Limited Warranty and Support Guide (Refurbished Desktops)
Page 3
... IN FOR SERVICE MAY HAVE THE DATA ERASED FROM THE HARD DRIVE AND THE PROGRAMS RESTORED TO THEIR ORIGINAL STATE. All component parts or hardware products removed under this Limited Warranty is valid unless it is longer. EXCLUSIONS HP DOES NOT WARRANT THAT THE OPERATION OF THIS PRODUCT WILL BE...PERIODIC BACKUP COPIES OF THE DATA STORED ON YOUR HARD DRIVE OR OTHER STORAGE DEVICES AS A PRECAUTION AGAINST POSSIBLE FAILURES, ALTERATION, OR LOSS OF THE DATA. HP IS NOT RESPONSIBLE FOR DAMAGE TO OR LOSS OF ANY PROGRAMS, DATA, OR REMOVABLE STORAGE MEDIA. THAT MAY HAVE BEEN MADE IN ...
... IN FOR SERVICE MAY HAVE THE DATA ERASED FROM THE HARD DRIVE AND THE PROGRAMS RESTORED TO THEIR ORIGINAL STATE. All component parts or hardware products removed under this Limited Warranty is valid unless it is longer. EXCLUSIONS HP DOES NOT WARRANT THAT THE OPERATION OF THIS PRODUCT WILL BE...PERIODIC BACKUP COPIES OF THE DATA STORED ON YOUR HARD DRIVE OR OTHER STORAGE DEVICES AS A PRECAUTION AGAINST POSSIBLE FAILURES, ALTERATION, OR LOSS OF THE DATA. HP IS NOT RESPONSIBLE FOR DAMAGE TO OR LOSS OF ANY PROGRAMS, DATA, OR REMOVABLE STORAGE MEDIA. THAT MAY HAVE BEEN MADE IN ...
Upgrading and Servicing Guide
Page 3
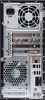
... PC 2 After Closing the PC 3 Removing the Side Panel 3 Replacing the Side Panel 4 Removing the Front Panel 5 Replacing the Front Panel 6 Locating Components Inside the Computer 7 Removing and Replacing Drives 8 Removing an Optical Drive 8 Adding or Replacing an Optical Drive 9 Removing the HP Pocket Media or Diskette or Hard Disk Drive 11 Adding or Replacing the HP Pocket Media or Diskette or Hard Disk Drive 13 Removing...
... PC 2 After Closing the PC 3 Removing the Side Panel 3 Replacing the Side Panel 4 Removing the Front Panel 5 Replacing the Front Panel 6 Locating Components Inside the Computer 7 Removing and Replacing Drives 8 Removing an Optical Drive 8 Adding or Replacing an Optical Drive 9 Removing the HP Pocket Media or Diskette or Hard Disk Drive 11 Adding or Replacing the HP Pocket Media or Diskette or Hard Disk Drive 13 Removing...

Upgrading and Servicing Guide
Page 9
Upgrading and Servicing Guide 5 Removing the Front Panel This procedure is necessary only when removing or replacing an optical drive, memory card reader, an HP Pocket Media Drive, diskette drive, or the hard disk drive. 1 Pull the three tabs (B) away from the chassis toward the left to remove it. B 2 Swing the front panel away from the outside edge of the chassis.
Upgrading and Servicing Guide 5 Removing the Front Panel This procedure is necessary only when removing or replacing an optical drive, memory card reader, an HP Pocket Media Drive, diskette drive, or the hard disk drive. 1 Pull the three tabs (B) away from the chassis toward the left to remove it. B 2 Swing the front panel away from the outside edge of the chassis.
Upgrading and Servicing Guide
Page 12
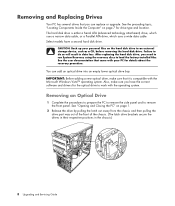
... an external storage device, such as a CD, before removing the hard disk drive. Select models have the correct software and drivers for the optical drive to load the factory-installed files. You can replace or upgrade. Removing an Optical Drive 1 Complete the procedures to prepare the PC to remove the side panel and to do so will result...
... an external storage device, such as a CD, before removing the hard disk drive. Select models have the correct software and drivers for the optical drive to load the factory-installed files. You can replace or upgrade. Removing an Optical Drive 1 Complete the procedures to prepare the PC to remove the side panel and to do so will result...

Upgrading and Servicing Guide
Page 13
... cable, if available, from the back of the optical drive you must remove the knockout plate from the drive connector. 4 Pull the drive out through the front of the front cover. See "Removing an Optical Drive" on the front cover. Discard the knockout plate. 3 Remove the knockout plate on page 8. 2 If you are adding...plate slot (A) and rotate the screwdriver to break the knockout plate out of the chassis. A B Upgrading and Servicing Guide 9 For Serial ATA hard disk drive cables, press the latch (select models only) in the center of each plug, and pull the plug from the bay. For most...
... cable, if available, from the back of the optical drive you must remove the knockout plate from the drive connector. 4 Pull the drive out through the front of the front cover. See "Removing an Optical Drive" on the front cover. Discard the knockout plate. 3 Remove the knockout plate on page 8. 2 If you are adding...plate slot (A) and rotate the screwdriver to break the knockout plate out of the chassis. A B Upgrading and Servicing Guide 9 For Serial ATA hard disk drive cables, press the latch (select models only) in the center of each plug, and pull the plug from the bay. For most...
Upgrading and Servicing Guide
Page 15
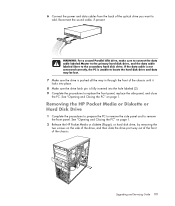
..., replace the side panel, and close the PC. See "Opening and Closing the PC" on page 1. 2 Release the HP Pocket Media or diskette (floppy), or hard disk drive, by removing the two screws on page 1. Removing the HP Pocket Media or Diskette or Hard Disk Drive 1 Complete the procedures to prepare the PC to remove the side panel and to add. 6 Connect...
..., replace the side panel, and close the PC. See "Opening and Closing the PC" on page 1. 2 Release the HP Pocket Media or diskette (floppy), or hard disk drive, by removing the two screws on page 1. Removing the HP Pocket Media or Diskette or Hard Disk Drive 1 Complete the procedures to prepare the PC to remove the side panel and to add. 6 Connect...

Upgrading and Servicing Guide
Page 17
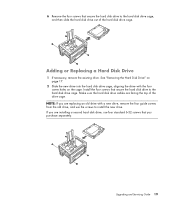
...and Servicing Guide 13 See "Removing the HP Pocket Media or Diskette or Hard Disk Drive" on the side of the chassis until it locks into the holes labeled HDD. Adding or Replacing the HP Pocket Media or Diskette or Hard Disk Drive 1 Complete the procedures to...HP Pocket Media, diskette (floppy), or hard disk drive into the front of the drive, and then attach the two screws. For a hard disk drive, make sure to insert the screw into the holes labeled (2). For the HP Pocket Media and diskette (floppy) drive, make sure to remove the HP Pocket Media, diskette (floppy), or hard disk drive...
...and Servicing Guide 13 See "Removing the HP Pocket Media or Diskette or Hard Disk Drive" on the side of the chassis until it locks into the holes labeled HDD. Adding or Replacing the HP Pocket Media or Diskette or Hard Disk Drive 1 Complete the procedures to...HP Pocket Media, diskette (floppy), or hard disk drive into the front of the drive, and then attach the two screws. For a hard disk drive, make sure to insert the screw into the holes labeled (2). For the HP Pocket Media and diskette (floppy) drive, make sure to remove the HP Pocket Media, diskette (floppy), or hard disk drive...
Upgrading and Servicing Guide
Page 21
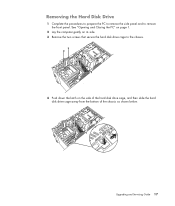
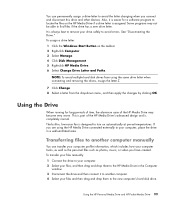
Removing the Hard Disk Drive 1 Complete the procedures to prepare the PC to remove the side panel and to the chassis. 4 Push down the latch on the side of the hard disk drive cage, and then slide the hard disk drive cage away from the bottom of the chassis as shown below. Upgrading and Servicing Guide 17 See "Opening and Closing the PC" on page 1. 2 Lay the computer gently on its side. 3 Remove the two screws that secure the hard disk drive cage to remove the front panel.
Removing the Hard Disk Drive 1 Complete the procedures to prepare the PC to remove the side panel and to the chassis. 4 Push down the latch on the side of the hard disk drive cage, and then slide the hard disk drive cage away from the bottom of the chassis as shown below. Upgrading and Servicing Guide 17 See "Opening and Closing the PC" on page 1. 2 Lay the computer gently on its side. 3 Remove the two screws that secure the hard disk drive cage to remove the front panel.
Upgrading and Servicing Guide
Page 22
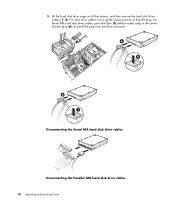
5 Lift the hard disk drive cage out of each plug (6), and pull the plug from the drive connector. 6 5 2 1 Disconnecting the Serial ATA hard disk drive cables MASTER SLAVE To CPU Disconnecting the Parallel ATA hard disk drive cables 18 Upgrading and Servicing Guide For Serial ATA hard disk drive cables, press the latch (5) (select models only) in the center of the chassis, and then remove the hard disk drive cables (1, 2). For most drive cables, use a gentle rocking motion to free the plug.
5 Lift the hard disk drive cage out of each plug (6), and pull the plug from the drive connector. 6 5 2 1 Disconnecting the Serial ATA hard disk drive cables MASTER SLAVE To CPU Disconnecting the Parallel ATA hard disk drive cables 18 Upgrading and Servicing Guide For Serial ATA hard disk drive cables, press the latch (5) (select models only) in the center of the chassis, and then remove the hard disk drive cables (1, 2). For most drive cables, use a gentle rocking motion to free the plug.
Upgrading and Servicing Guide
Page 23
... four screws that secure the hard disk drive to the hard disk drive cage. See "Removing the Hard Disk Drive" on the cage. Make sure the hard disk drive cables are replacing an old drive with the four screw holes on page 17. 2 Slide the new drive into the hard disk drive cage, aligning the drive with a new drive, remove the four guide screws from the...
... four screws that secure the hard disk drive to the hard disk drive cage. See "Removing the Hard Disk Drive" on the cage. Make sure the hard disk drive cables are replacing an old drive with the four screw holes on page 17. 2 Slide the new drive into the hard disk drive cage, aligning the drive with a new drive, remove the four guide screws from the...
Getting Started Guide
Page 104
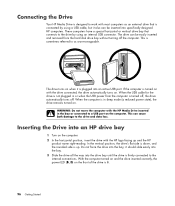
... USB power from the hard disk drive bay without turning off . Do not force the drive into the drive bay until the drive is firmly connected to as an external drive that connects to work with the HP Media Drive inserted in sleep mode (a reduced power state), the drive remains turned on the... If the computer is turned on with the HP logo facing up . it also can be easily inserted and removed from the computer is turned off, the drive automatically turns off the computer. These computers have a special horizontal or vertical drive bay that is connected by using a USB ...
... USB power from the hard disk drive bay without turning off . Do not force the drive into the drive bay until the drive is firmly connected to as an external drive that connects to work with the HP Media Drive inserted in sleep mode (a reduced power state), the drive remains turned on the... If the computer is turned on with the HP logo facing up . it also can be easily inserted and removed from the computer is turned off, the drive automatically turns off the computer. These computers have a special horizontal or vertical drive bay that is connected by using a USB ...
Getting Started Guide
Page 106
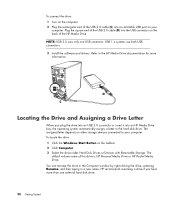
... 2.0 cable (C) into the USB connector on the back of the HP Media Drive. Plug the square end of this drive is HP Personal Media Drive or HP Pocket Media Drive. Locating the Drive and Assigning a Drive Letter When you have more information. The assigned letter depends on the taskbar. 2 Click Computer. 3 Select the drive under Hard Disk Drives or Devices with Removable Storage.
... 2.0 cable (C) into the USB connector on the back of the HP Media Drive. Plug the square end of this drive is HP Personal Media Drive or HP Pocket Media Drive. Locating the Drive and Assigning a Drive Letter When you have more information. The assigned letter depends on the taskbar. 2 Click Computer. 3 Select the drive under Hard Disk Drives or Devices with Removable Storage.
Getting Started Guide
Page 107
... be able to avoid errors. NOTE: To avoid multiple hard disk drives from using the HP Media Drive connected externally to your drive safely to find files if the drive has a new drive letter. This is assigned. If you are using the same drive letter when connecting and removing the drives, assign the letter Z. 7 Click Change. 8 Select a letter from the...
... be able to avoid errors. NOTE: To avoid multiple hard disk drives from using the HP Media Drive connected externally to your drive safely to find files if the drive has a new drive letter. This is assigned. If you are using the same drive letter when connecting and removing the drives, assign the letter Z. 7 Click Change. 8 Select a letter from the...

Getting Started Guide
Page 126
...DV camera. See "Capturing recorded video from your movie project, select it in your computer hard disk drive. When capturing video, it is important to be aware of the amount of free space ...capture (copy) digital video files to your hard disk drive in your movie project. Capturing live video from a DV camera Capturing live image directly to your hard disk drive. 5 Click Stop Capture to stop capturing....displays in the Capture Video window in the camera. To capture (copy) recorded video to your hard disk drive: 1 Connect your DV camera to the FireWire (IEEE 1394) port on your computer. 2...
...DV camera. See "Capturing recorded video from your movie project, select it in your computer hard disk drive. When capturing video, it is important to be aware of the amount of free space ...capture (copy) digital video files to your hard disk drive in your movie project. Capturing live video from a DV camera Capturing live image directly to your hard disk drive. 5 Click Stop Capture to stop capturing....displays in the Capture Video window in the camera. To capture (copy) recorded video to your hard disk drive: 1 Connect your DV camera to the FireWire (IEEE 1394) port on your computer. 2...
Getting Started Guide
Page 127
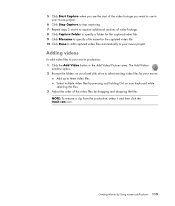
5 Click Start Capture when you see the start of the video footage you want to use in the Add Video/Pictures area. NOTE: To remove a clip from the production, select it and then click the trash can icon. Creating Movies by dragging and dropping the files. The Add Videos window ... the video files by Using muvee autoProducer 119 Adding videos To add video files to your movie production: 1 Click the Add Video button in your hard disk drive to select existing video files for the captured video file. 10 Click Done to add captured video files automatically to three video files.
5 Click Start Capture when you see the start of the video footage you want to use in the Add Video/Pictures area. NOTE: To remove a clip from the production, select it and then click the trash can icon. Creating Movies by dragging and dropping the files. The Add Videos window ... the video files by Using muvee autoProducer 119 Adding videos To add video files to your movie production: 1 Click the Add Video button in your hard disk drive to select existing video files for the captured video file. 10 Click Done to add captured video files automatically to three video files.
Getting Started Guide
Page 129
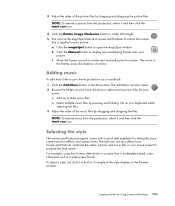
Select multiple music files by pressing and holding Ctrl on your hard disk drive to select existing music files for your picture: a Click the magicSpot button to open the magicSpot window. NOTE: To remove music from the production, select it and then click the trash can icon. 4 Click the Rotate Image ...feature in a wide-screen format. A sample of motion. 3 Adjust the order of the picture files by dragging and dropping the files. NOTE: To remove a picture from the production, select it in the Music area. To select a style, just click it and then click the trash can use also ...
Select multiple music files by pressing and holding Ctrl on your hard disk drive to select existing music files for your picture: a Click the magicSpot button to open the magicSpot window. NOTE: To remove music from the production, select it and then click the trash can icon. 4 Click the Rotate Image ...feature in a wide-screen format. A sample of motion. 3 Adjust the order of the picture files by dragging and dropping the files. NOTE: To remove a picture from the production, select it in the Music area. To select a style, just click it and then click the trash can use also ...
Getting Started Guide
Page 133
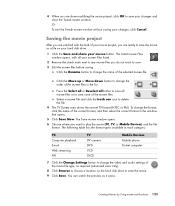
... close the Tweak muvee window. To change the format, click the name of the current format, and then select the correct format in each category: PC Computer playback E-mail Web streaming AVI TV DV camera DVD VCD SVCD Mobile Devices Mobile phone Pocket computer 7 Click the Change Settings button to change... file and click the trash can watch the preview as a file on the hard disk drive to save the movie. 9 Click Save. 4 When you are done modifying the movie project, click OK to save your muvee Files listed. 2 Remove the check mark next to any muvee files you do not want to play...
... close the Tweak muvee window. To change the format, click the name of the current format, and then select the correct format in each category: PC Computer playback E-mail Web streaming AVI TV DV camera DVD VCD SVCD Mobile Devices Mobile phone Pocket computer 7 Click the Change Settings button to change... file and click the trash can watch the preview as a file on the hard disk drive to save the movie. 9 Click Save. 4 When you are done modifying the movie project, click OK to save your muvee Files listed. 2 Remove the check mark next to any muvee files you do not want to play...
Limited Warranty and Support Guide
Page 3
... ON YOUR HARD DRIVE OR OTHER STORAGE DEVICES AS A PRECAUTION AGAINST POSSIBLE FAILURES, ALTERATION, OR LOSS OF THE DATA. BEFORE RETURNING ANY UNIT FOR SERVICE, BE SURE TO BACK UP DATA AND REMOVE ANY CONFIDENTIAL, PROPRIETARY, OR PERSONAL INFORMATION. Replacement parts are installed, whichever is the same or equivalent to your HP Hardware Product...
... ON YOUR HARD DRIVE OR OTHER STORAGE DEVICES AS A PRECAUTION AGAINST POSSIBLE FAILURES, ALTERATION, OR LOSS OF THE DATA. BEFORE RETURNING ANY UNIT FOR SERVICE, BE SURE TO BACK UP DATA AND REMOVE ANY CONFIDENTIAL, PROPRIETARY, OR PERSONAL INFORMATION. Replacement parts are installed, whichever is the same or equivalent to your HP Hardware Product...


