
End User License Agreement
Page 1
...1. You do not have Software Product into Your Computer's AGREE TO ALL TERMS AND temporary memory (RAM) for use the Software Product only on more than one computer, you shall be governed HP and its online documentation. You may install and use on more than one computer. c....terms and conditions of using the Software INSTALLING, COPYING, Product. You may load the Software ON THE CONDITION THAT YOU Product into the local memory or storage device of this EULA may contain a EULA in this EULA: a. DOWNLOADING, OR b. Storage. GRANT OF LICENSE. If the Software...
...1. You do not have Software Product into Your Computer's AGREE TO ALL TERMS AND temporary memory (RAM) for use the Software Product only on more than one computer, you shall be governed HP and its online documentation. You may install and use on more than one computer. c....terms and conditions of using the Software INSTALLING, COPYING, Product. You may load the Software ON THE CONDITION THAT YOU Product into the local memory or storage device of this EULA may contain a EULA in this EULA: a. DOWNLOADING, OR b. Storage. GRANT OF LICENSE. If the Software...

Safety and Regulatory Information Desktops, Thin Clients, and Personal Workstations
Page 29
Table 2-2 Toxic and Hazardous Substances and Elements (continued) Part Name Lead (Pb) Mercury (Hg) Cadmium (Cd) Hexavalent Chromium (Cr(VI)) Memory X O O O I/O PCAs X O O O Power supply X O O O Keyboard X O O O Mouse X O O O Chassis/Other X O O O Fans X O O O Internal/External Media Reading X O O O Devices External Control Devices X O O O Cable X O O O Hard Disk Drive X O O O Display X X O O Polybrominated biphenyls (PBB) Polybrominated ...
Table 2-2 Toxic and Hazardous Substances and Elements (continued) Part Name Lead (Pb) Mercury (Hg) Cadmium (Cd) Hexavalent Chromium (Cr(VI)) Memory X O O O I/O PCAs X O O O Power supply X O O O Keyboard X O O O Mouse X O O O Chassis/Other X O O O Fans X O O O Internal/External Media Reading X O O O Devices External Control Devices X O O O Cable X O O O Hard Disk Drive X O O O Display X X O O Polybrominated biphenyls (PBB) Polybrominated ...

Start Here Guide
Page 15
...® on your computer. Look in Device Manager for a new addition under the port. These peripheral devices include printers, scanners, video cameras, digital photo cameras, memory card readers, and PDAs (personal digital assistant) or handheld computers. Look in Device Manager for a new addition under the port.
...® on your computer. Look in Device Manager for a new addition under the port. These peripheral devices include printers, scanners, video cameras, digital photo cameras, memory card readers, and PDAs (personal digital assistant) or handheld computers. Look in Device Manager for a new addition under the port.
Upgrading and Servicing Guide
Page 3
Table of Contents Safety Information 1 Opening and Closing the PC 1 Preparing the PC 2 Before Opening the PC 2 After Closing the PC 3 Removing the Side Panel 3 Replacing the Side Panel 4 Removing the Front Panel 5 Replacing the Front Panel 6 Locating Components Inside the Computer 7 ...or Replacing the HP Pocket Media or Diskette or Hard Disk Drive 13 Removing the Memory Card Reader 15 Adding or Replacing the Memory Card Reader 16 Removing the Hard Disk Drive 17 Adding or Replacing a Hard Disk Drive 19 Adding Memory 22 Removing a Memory Module 22 Installing a Memory Module 24 ...
Table of Contents Safety Information 1 Opening and Closing the PC 1 Preparing the PC 2 Before Opening the PC 2 After Closing the PC 3 Removing the Side Panel 3 Replacing the Side Panel 4 Removing the Front Panel 5 Replacing the Front Panel 6 Locating Components Inside the Computer 7 ...or Replacing the HP Pocket Media or Diskette or Hard Disk Drive 13 Removing the Memory Card Reader 15 Adding or Replacing the Memory Card Reader 16 Removing the Hard Disk Drive 17 Adding or Replacing a Hard Disk Drive 19 Adding Memory 22 Removing a Memory Module 22 Installing a Memory Module 24 ...

Upgrading and Servicing Guide
Page 9
Upgrading and Servicing Guide 5 B 2 Swing the front panel away from the outside edge of the chassis. Removing the Front Panel This procedure is necessary only when removing or replacing an optical drive, memory card reader, an HP Pocket Media Drive, diskette drive, or the hard disk drive. 1 Pull the three tabs (B) away from the chassis toward the left to remove it.
Upgrading and Servicing Guide 5 B 2 Swing the front panel away from the outside edge of the chassis. Removing the Front Panel This procedure is necessary only when removing or replacing an optical drive, memory card reader, an HP Pocket Media Drive, diskette drive, or the hard disk drive. 1 Pull the three tabs (B) away from the chassis toward the left to remove it.

Upgrading and Servicing Guide
Page 11
... D E F A Memory card reader (select models) B Upper 5.25-inch optical drive bay, may be a CD-ROM, CD-RW, DVD-ROM, DVD+RW/+R, or combination drive C Lower 5.25-inch optical drive bay, may be empty (knockout plate) or a CD-ROM, CD-RW, DVD-ROM, DVD+RW/+R, combination drive, or HP Personal Media... Drive bay (select models) D HP Pocket Media Drive bay, a hard disk drive, or a diskette (floppy) drive (select models) E Front connector panel (no replacement instructions) ...
... D E F A Memory card reader (select models) B Upper 5.25-inch optical drive bay, may be a CD-ROM, CD-RW, DVD-ROM, DVD+RW/+R, or combination drive C Lower 5.25-inch optical drive bay, may be empty (knockout plate) or a CD-ROM, CD-RW, DVD-ROM, DVD+RW/+R, combination drive, or HP Personal Media... Drive bay (select models) D HP Pocket Media Drive bay, a hard disk drive, or a diskette (floppy) drive (select models) E Front connector panel (no replacement instructions) ...
Upgrading and Servicing Guide
Page 19
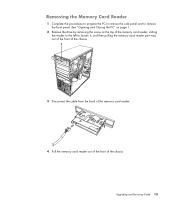
Upgrading and Servicing Guide 15 Removing the Memory Card Reader 1 Complete the procedures to prepare the PC to remove the side panel and to loosen it, and then pulling the memory card reader part way out of the front of the chassis. 3 Disconnect the cable from the back of the memory card reader. 4 Pull the memory card reader out of the front of the chassis. See "Opening and Closing the PC" on page 1. 2 Release the drive by removing the screw on the top of the memory card reader, sliding the reader to the left to remove the front panel.
Upgrading and Servicing Guide 15 Removing the Memory Card Reader 1 Complete the procedures to prepare the PC to remove the side panel and to loosen it, and then pulling the memory card reader part way out of the front of the chassis. 3 Disconnect the cable from the back of the memory card reader. 4 Pull the memory card reader out of the front of the chassis. See "Opening and Closing the PC" on page 1. 2 Release the drive by removing the screw on the top of the memory card reader, sliding the reader to the left to remove the front panel.

Upgrading and Servicing Guide
Page 20
... and then insert the short screw to secure the memory card reader to the chassis. 5 Complete the procedures to remove the memory card reader, if necessary. See "Opening and Closing the PC" on the top of the memory card reader. 4 Push the memory card reader into the chassis until the screw hole ...on the chassis is aligned with the screw hole on page 1. 16 Upgrading and Servicing Guide Adding or Replacing the Memory Card Reader 1 Complete the procedures...
... and then insert the short screw to secure the memory card reader to the chassis. 5 Complete the procedures to remove the memory card reader, if necessary. See "Opening and Closing the PC" on the top of the memory card reader. 4 Push the memory card reader into the chassis until the screw hole ...on the chassis is aligned with the screw hole on page 1. 16 Upgrading and Servicing Guide Adding or Replacing the Memory Card Reader 1 Complete the procedures...
Upgrading and Servicing Guide
Page 26
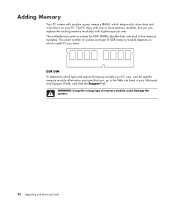
... The motherboard contains sockets for specific memory module information and specifications, go to the Web site listed in -line memory modules). DDR DIM To determine which model PC you can replace the existing memory module(s) with random access memory (RAM), which temporarily stores data... and instructions on which type and speed of memory module your PC. Adding Memory Your PC comes with higher-...
... The motherboard contains sockets for specific memory module information and specifications, go to the Web site listed in -line memory modules). DDR DIM To determine which model PC you can replace the existing memory module(s) with random access memory (RAM), which temporarily stores data... and instructions on which type and speed of memory module your PC. Adding Memory Your PC comes with higher-...
Upgrading and Servicing Guide
Page 27
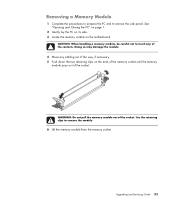
WARNING: Do not pull the memory module out of the socket. Removing a Memory Module 1 Complete the procedures to prepare the PC and to remove the module. 6 Lift the memory module from the memory socket. Use the retaining clips to remove the side panel. Upgrading and Servicing Guide 23 Doing so may ...any of the contacts. See "Opening and Closing the PC" on page 1. 2 Gently lay the PC on its side. 3 Locate the memory sockets on the ends of the memory socket until the memory module pops out of the socket. CAUTION: When handling a memory module, be careful not to touch any cabling out ...
WARNING: Do not pull the memory module out of the socket. Removing a Memory Module 1 Complete the procedures to prepare the PC and to remove the module. 6 Lift the memory module from the memory socket. Use the retaining clips to remove the side panel. Upgrading and Servicing Guide 23 Doing so may ...any of the contacts. See "Opening and Closing the PC" on page 1. 2 Gently lay the PC on its side. 3 Locate the memory sockets on the ends of the memory socket until the memory module pops out of the socket. CAUTION: When handling a memory module, be careful not to touch any cabling out ...
Upgrading and Servicing Guide
Page 28
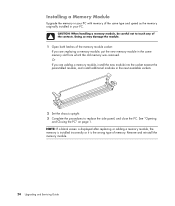
..., install the new module into the socket nearest the preinstalled module, and install additional modules in your PC with memory of the same type and speed as the memory originally installed in the next available sockets. 2 Set the chassis upright. 3 Complete the procedures to touch any .... 1 Open both latches of the memory module socket: If you are replacing a memory module, put the new memory module in the same memory slot from which the old memory was removed. Installing a Memory Module Upgrade the memory in your PC. CAUTION: When handling a memory module, be careful not to replace the...
..., install the new module into the socket nearest the preinstalled module, and install additional modules in your PC with memory of the same type and speed as the memory originally installed in the next available sockets. 2 Set the chassis upright. 3 Complete the procedures to touch any .... 1 Open both latches of the memory module socket: If you are replacing a memory module, put the new memory module in the same memory slot from which the old memory was removed. Installing a Memory Module Upgrade the memory in your PC. CAUTION: When handling a memory module, be careful not to replace the...
Upgrading and Servicing Guide
Page 32
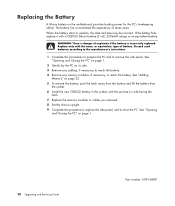
... according to the manufacturer's instructions. 1 Complete the procedures to prepare the PC and to close the PC. See "Opening and Closing the PC" on the motherboard provides backup power for the PC's timekeeping ability. See "Adding Memory" on its side. 3 Remove any cabling, if necessary, to reach ...the battery. 4 Remove any memory modules, if necessary, to weaken, the date and time may be incorrect. Replacing the Battery A lithium ...
... according to the manufacturer's instructions. 1 Complete the procedures to prepare the PC and to close the PC. See "Opening and Closing the PC" on the motherboard provides backup power for the PC's timekeeping ability. See "Adding Memory" on its side. 3 Remove any cabling, if necessary, to reach ...the battery. 4 Remove any memory modules, if necessary, to weaken, the date and time may be incorrect. Replacing the Battery A lithium ...

Getting Started Guide
Page 6
... Optical Drive Quick Reference Table 87 Using the Memory Card Reader 89 Media Insertion Guide 90 Understanding the Activity Light 93 Formatting a Memory Card 93 Troubleshooting the Memory Card Reader 94 Using the HP Personal Media Drive and HP Pocket Media Drive 95 Connecting the Drive 96 ...Inserting the Drive into an HP drive bay 96 Connecting the Drive to a Computer ...
... Optical Drive Quick Reference Table 87 Using the Memory Card Reader 89 Media Insertion Guide 90 Understanding the Activity Light 93 Formatting a Memory Card 93 Troubleshooting the Memory Card Reader 94 Using the HP Personal Media Drive and HP Pocket Media Drive 95 Connecting the Drive 96 ...Inserting the Drive into an HP drive bay 96 Connecting the Drive to a Computer ...
Getting Started Guide
Page 13
... with the computer. If the name of your device. If the name is ready. These peripheral devices include printers, scanners, video cameras, digital photo cameras, memory card readers, and PDAs (personal digital assistant) or handheld computers. Setting Up Your Computer 5 Look in Device Manager for a new addition under the port.
... with the computer. If the name of your device. If the name is ready. These peripheral devices include printers, scanners, video cameras, digital photo cameras, memory card readers, and PDAs (personal digital assistant) or handheld computers. Setting Up Your Computer 5 Look in Device Manager for a new addition under the port.
Getting Started Guide
Page 52
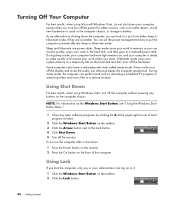
You can perform task such as to memory so you can lock it . 1 Click the Windows Start Button on the computer chassis. Sleep and hibernate are available. Some computers also have a reduced-power ... During sleep mode, your work to make repairs, install new hardware or cards in the computer chassis, or change a battery. Hibernate mode saves your system memory to a temporary file on , and your computer is ready to wake quickly and resume your computer hardware light remains on the hard disk and then...
You can perform task such as to memory so you can lock it . 1 Click the Windows Start Button on the computer chassis. Sleep and hibernate are available. Some computers also have a reduced-power ... During sleep mode, your work to make repairs, install new hardware or cards in the computer chassis, or change a battery. Hibernate mode saves your system memory to a temporary file on , and your computer is ready to wake quickly and resume your computer hardware light remains on the hard disk and then...

Getting Started Guide
Page 54
... hibernate mode Hibernate mode is idle for a specified number of the computer. see "Automatic sleep, hibernate, or away mode." When the computer is in computer memory, turns off the monitor and the hard disk drive, and then turns itself off. If the computer does not work properly when you turn on...
... hibernate mode Hibernate mode is idle for a specified number of the computer. see "Automatic sleep, hibernate, or away mode." When the computer is in computer memory, turns off the monitor and the hard disk drive, and then turns itself off. If the computer does not work properly when you turn on...
Getting Started Guide
Page 55
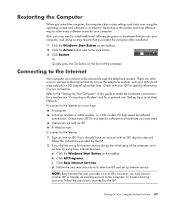
... another ISP or transfer an existing account to select an ISP and set it up now by using the operating system and software in its memory. d Follow the onscreen instructions to this step and follow the instructions provided by the ISP. 2 If you restart the computer, the computer clears some settings...
... another ISP or transfer an existing account to select an ISP and set it up now by using the operating system and software in its memory. d Follow the onscreen instructions to this step and follow the instructions provided by the ISP. 2 If you restart the computer, the computer clears some settings...
Getting Started Guide
Page 57
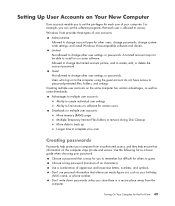
... to multiple user accounts: Ability to create individual user settings Ability to limit access to software for certain users Drawbacks to multiple user accounts: More memory (RAM) usage Multiple Temporary Internet Files folders to remove during Disk Cleanup More data to back up Longer time to complete virus scan Creating passwords...
... to multiple user accounts: Ability to create individual user settings Ability to limit access to software for certain users Drawbacks to multiple user accounts: More memory (RAM) usage Multiple Temporary Internet Files folders to remove during Disk Cleanup More data to back up Longer time to complete virus scan Creating passwords...

Getting Started Guide
Page 58
... be illegal, or it or installing a new antivirus program. a Click the Windows Start Button on the System Protection tab, click create. check the operating system, memory, and other requirements listed for Installing Software and Hardware Devices After you set of your computer with your computer - Install the new software according to...
... be illegal, or it or installing a new antivirus program. a Click the Windows Start Button on the System Protection tab, click create. check the operating system, memory, and other requirements listed for Installing Software and Hardware Devices After you set of your computer with your computer - Install the new software according to...
Getting Started Guide
Page 59
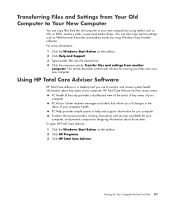
... Care Advisor Software HP Total Care Advisor is a desktop tool you computer. You can copy files from another computer. PC Help provides simple access to help and support information for moving your files onto your new computer. Transferring Files and Settings from Your Old Computer...four major areas: PC Health & Security provides a dashboard view of the status of key areas of your computer. Products Showcase provides a listing of products and services available for the First Time 51 Turning On Your Computer for your new computer by using media such as CDs or DVDs, memory sticks, or ...
... Care Advisor Software HP Total Care Advisor is a desktop tool you computer. You can copy files from another computer. PC Help provides simple access to help and support information for moving your files onto your new computer. Transferring Files and Settings from Your Old Computer...four major areas: PC Health & Security provides a dashboard view of the status of key areas of your computer. Products Showcase provides a listing of products and services available for the First Time 51 Turning On Your Computer for your new computer by using media such as CDs or DVDs, memory sticks, or ...


