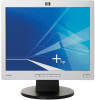

User Manual
Page 3
... 2-3 Shipping the Monitor 2-3 3 Setting Up the Monitor Installing the Monitor Pedestal 3-1 Connecting the Monitor 3-3 Removing the Monitor Base 3-6 Mounting the Monitor 3-7 Locating the Rating Labels 3-8 4 Operating the Monitor Software and Utilities 4-1 The Information File 4-1 The Image Color Matching File 4-2 Installing the .INF and .ICM Files 4-2 Installing from the CD 4-2 Downloading from...
... 2-3 Shipping the Monitor 2-3 3 Setting Up the Monitor Installing the Monitor Pedestal 3-1 Connecting the Monitor 3-3 Removing the Monitor Base 3-6 Mounting the Monitor 3-7 Locating the Rating Labels 3-8 4 Operating the Monitor Software and Utilities 4-1 The Information File 4-1 The Image Color Matching File 4-2 Installing the .INF and .ICM Files 4-2 Installing from the CD 4-2 Downloading from...
User Manual
Page 11
When you plug the power cord into is used, use with your equipment, do not disable the power cord grounding feature. User Guide 2-1 The grounding plug is an important safety feature. Å WARNING: For your safety, be connected to a grounded (earthed) power outlet that the power outlet you ... shock or damage to your monitor. For information on the cord. 2 Safety and Maintenance Guidelines Important Safety Information A power cord is easily accessible to the operator.
When you plug the power cord into is used, use with your equipment, do not disable the power cord grounding feature. User Guide 2-1 The grounding plug is an important safety feature. Å WARNING: For your safety, be connected to a grounded (earthed) power outlet that the power outlet you ... shock or damage to your monitor. For information on the cord. 2 Safety and Maintenance Guidelines Important Safety Information A power cord is easily accessible to the operator.
User Manual
Page 12
...use . Disconnect the monitor by pulling the cord. ■� Turn your monitor off the monitor when not in use . 2-2 User Guide You can substantially increase the life expectancy of surge protection device such as a power strip or Uninterruptible Power Supply (UPS). Use a power ...or A) for this monitor, as indicated on the power label to service this ability. If your monitor is not operating properly or has been dropped or damaged, contact your HP authorized dealer, reseller, or service provider. ■� Use only a power source and connection appropriate for each ...
...use . Disconnect the monitor by pulling the cord. ■� Turn your monitor off the monitor when not in use . 2-2 User Guide You can substantially increase the life expectancy of surge protection device such as a power strip or Uninterruptible Power Supply (UPS). Use a power ...or A) for this monitor, as indicated on the power label to service this ability. If your monitor is not operating properly or has been dropped or damaged, contact your HP authorized dealer, reseller, or service provider. ■� Use only a power source and connection appropriate for each ...
User Manual
Page 23
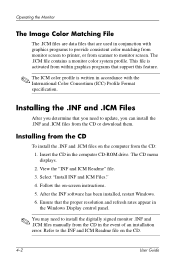
...separate BNC type connectors or through distribution buffers/boxes. See "Downloading from the HP monitors support Web site. You may need to ensure monitor compatibility with the computer's graphics adapter. User Guide 4-1 Plug and Play does not work correctly without installing the .INF file.... Web" in this chapter. 4 Operating the Monitor Software and Utilities The monitor includes a CD that the monitor connects directly to the graphics card. The Information File The .INF file defines monitor resources used by Microsoft Windows operating systems to install the .INF file...
...separate BNC type connectors or through distribution buffers/boxes. See "Downloading from the HP monitors support Web site. You may need to ensure monitor compatibility with the computer's graphics adapter. User Guide 4-1 Plug and Play does not work correctly without installing the .INF file.... Web" in this chapter. 4 Operating the Monitor Software and Utilities The monitor includes a CD that the monitor connects directly to the graphics card. The Information File The .INF file defines monitor resources used by Microsoft Windows operating systems to install the .INF file...
User Manual
Page 24
... and .ICM files on the computer from scanner to install the digitally signed monitor .INF and .ICM files manually from the CD or download them. Operating the Monitor The Image Color Matching File The .ICM files are data files that are used in conjunction with the International Color Consortium (ICC) Profile... from within graphics programs that the proper resolution and refresh rates appear in the event of an installation error. Follow the on the CD. 4-2 User Guide
... and .ICM files on the computer from scanner to install the digitally signed monitor .INF and .ICM files manually from the CD or download them. Operating the Monitor The Image Color Matching File The .ICM files are data files that are used in conjunction with the International Color Consortium (ICC) Profile... from within graphics programs that the proper resolution and refresh rates appear in the event of an installation error. Follow the on the CD. 4-2 User Guide

User Manual
Page 25
Operating the Monitor Downloading from the Worldwide Web To download the latest version of .INF and .ICM files from the HP monitors support Web site: 1. Ensure your country region. 2. User Guide 4-3 Refer to the support page and download page. 3. Download the software by following the instructions. Follow the links for your monitor to http://www.hp.com/support and select your system meets the requirements. 4.
Operating the Monitor Downloading from the Worldwide Web To download the latest version of .INF and .ICM files from the HP monitors support Web site: 1. Ensure your country region. 2. User Guide 4-3 Refer to the support page and download page. 3. Download the software by following the instructions. Follow the links for your monitor to http://www.hp.com/support and select your system meets the requirements. 4.

User Manual
Page 26
Sleep mode = Amber. Turns the monitor on or off. 4-4 User Guide Fully powered = Green. Navigates forward through the OSD menu and decreases adjustment levels. • If the OSD menu is inactive, activates the auto adjustment feature to optimize the screen image. Operating the Monitor Front Panel Controls ' Control 1 Menu 2 - (Minus button) 3 + (Plus button) 4 Power LED 5 Power Function Opens, selects or exits the OSD menu. • Navigates backward through the OSD menu and increases adjustment levels. Sleep Timer mode = Flashing Amber.
Sleep mode = Amber. Turns the monitor on or off. 4-4 User Guide Fully powered = Green. Navigates forward through the OSD menu and decreases adjustment levels. • If the OSD menu is inactive, activates the auto adjustment feature to optimize the screen image. Operating the Monitor Front Panel Controls ' Control 1 Menu 2 - (Minus button) 3 + (Plus button) 4 Power LED 5 Power Function Opens, selects or exits the OSD menu. • Navigates backward through the OSD menu and increases adjustment levels. Sleep Timer mode = Flashing Amber.

User Manual
Page 27
If the monitor is not already on, press the Power switch to turn on the front panel to adjust the scale. User Guide 4-5 buttons on the monitor. 2. To navigate through the OSD Menu, press the + (Plus) button on your selection, then press the Menu button to select that ...function. 5. buttons to scroll to and highlight your viewing preferences. To select an item from the OSD Menu, use the + or - Operating the Monitor Adjusting Monitor Settings Use the On-Screen Display (OSD) to adjust the screen image based on the monitor's front panel to scroll up...
If the monitor is not already on, press the Power switch to turn on the front panel to adjust the scale. User Guide 4-5 buttons on the monitor. 2. To navigate through the OSD Menu, press the + (Plus) button on your selection, then press the Menu button to select that ...function. 5. buttons to scroll to and highlight your viewing preferences. To select an item from the OSD Menu, use the + or - Operating the Monitor Adjusting Monitor Settings Use the On-Screen Display (OSD) to adjust the screen image based on the monitor's front panel to scroll up...
User Manual
Page 28
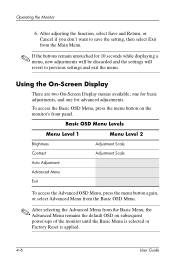
... OSD Menu, press the menu button on subsequent power-ups of the monitor until the Basic Menu is selected or Factory Reset is applied. 4-6 User Guide Basic OSD Menu Levels Menu Level 1 Menu Level 2 Brightness Adjustment Scale Contrast Adjustment Scale Auto Adjustment Advanced Menu Exit To access the Advanced OSD Menu... untouched for advanced adjustments. After adjusting the function, select Save and Return, or Cancel if you don't want to previous settings and exit the menu. Operating the Monitor 6.
... OSD Menu, press the menu button on subsequent power-ups of the monitor until the Basic Menu is selected or Factory Reset is applied. 4-6 User Guide Basic OSD Menu Levels Menu Level 1 Menu Level 2 Brightness Adjustment Scale Contrast Adjustment Scale Auto Adjustment Advanced Menu Exit To access the Advanced OSD Menu... untouched for advanced adjustments. After adjusting the function, select Save and Return, or Cancel if you don't want to previous settings and exit the menu. Operating the Monitor 6.

User Manual
Page 29
... Power On Recall "Adjusting" Message Adjustment Scale Adjustment Scale Adjustment Scale Adjustment Scale Custom Color Adjustment On / Off Selection On / Off Selection Factory Preset Y Y Y Y Y Y Y Y N N N User Guide 4-7 Operating the Monitor The Advanced OSD Menu has up to three sublevels and can be viewed in one of six available languages.
... Power On Recall "Adjusting" Message Adjustment Scale Adjustment Scale Adjustment Scale Adjustment Scale Custom Color Adjustment On / Off Selection On / Off Selection Factory Preset Y Y Y Y Y Y Y Y N N N User Guide 4-7 Operating the Monitor The Advanced OSD Menu has up to three sublevels and can be viewed in one of six available languages.

User Manual
Page 30
... - (Minus) button on the monitor front panel to warm up for 20 minutes before performing the following procedures. If additional image quality improvement is displayed. Operating the Monitor Advanced OSD Menu Levels (Continued) Level 1 Level 2 Level 3 Factory Preset Mode Display On / Off Selection N Power-On Status On / Off Selection N Display Sleep... Scale N Cancel Save and Return Information Factory Reset Yes No Exit Adjusting Screen Quality Allow the monitor to manually activate the Auto-Adjustment function. 4-8 User Guide
... - (Minus) button on the monitor front panel to warm up for 20 minutes before performing the following procedures. If additional image quality improvement is displayed. Operating the Monitor Advanced OSD Menu Levels (Continued) Level 1 Level 2 Level 3 Factory Preset Mode Display On / Off Selection N Power-On Status On / Off Selection N Display Sleep... Scale N Cancel Save and Return Information Factory Reset Yes No Exit Adjusting Screen Quality Allow the monitor to manually activate the Auto-Adjustment function. 4-8 User Guide

User Manual
Page 31
User Guide 4-9 Operating the Monitor For more precise adjustments, run the Adjustment Pattern provided on -screen display can be set correctly since the Clock Phase settings are dependent ...
User Guide 4-9 Operating the Monitor For more precise adjustments, run the Adjustment Pattern provided on -screen display can be set correctly since the Clock Phase settings are dependent ...

User Manual
Page 32
Operating the Monitor Identifying Monitor Conditions Special messages will appear on the monitor screen when identifying the following monitor conditions: ■� Input Signal Out of .... This also extends the life of Range- The Sleep Timer has five settings: ■� Set Current Time ■� Set Sleep Time 4-10 User Guide For 17" and 19" monitors, set a time for the monitor to 1024 x 768 at the same time every day. Restart your computer for 10 seconds...
Operating the Monitor Identifying Monitor Conditions Special messages will appear on the monitor screen when identifying the following monitor conditions: ■� Input Signal Out of .... This also extends the life of Range- The Sleep Timer has five settings: ■� Set Current Time ■� Set Sleep Time 4-10 User Guide For 17" and 19" monitors, set a time for the monitor to 1024 x 768 at the same time every day. Restart your computer for 10 seconds...

User Manual
Page 33
... hours. Press the Menu button on the monitor front panel to select Management. 4. Note that the time is displayed in the time chosen. 10. User Guide 4-11 Operating the Monitor ■ Set On Time ■ Timer: On/Off ■ Sleep Now To set the current local time before you do not want...
... hours. Press the Menu button on the monitor front panel to select Management. 4. Note that the time is displayed in the time chosen. 10. User Guide 4-11 Operating the Monitor ■ Set On Time ■ Timer: On/Off ■ Sleep Now To set the current local time before you do not want...

User Manual
Page 34
... in sleep mode until the next On Time activates or a monitor button is a software application, available on the screen. HP Display LiteSaver (Available with Select Models) HP Display LiteSaver is pressed. Select "Install HP Display LiteSaver Software." 3. When you to place your monitor into its low power sleep mode at predefined times by... and Return to activate the Sleep Timer settings. 14. This helps protect the LCD panel against image retention. from the pop-up menu. 4-12 User Guide Insert the CD in the computer CD-ROM Drive. Operating the Monitor 13.
... in sleep mode until the next On Time activates or a monitor button is a software application, available on the screen. HP Display LiteSaver (Available with Select Models) HP Display LiteSaver is pressed. Select "Install HP Display LiteSaver Software." 3. When you to place your monitor into its low power sleep mode at predefined times by... and Return to activate the Sleep Timer settings. 14. This helps protect the LCD panel against image retention. from the pop-up menu. 4-12 User Guide Insert the CD in the computer CD-ROM Drive. Operating the Monitor 13.
User Manual
Page 35
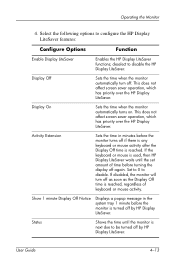
This does not affect screen saver operation, which has priority over the HP Display LiteSaver. User Guide 4-13 Operating the Monitor 4. deselect to configure the HP Display LiteSaver features: Configure Options Function Enable Display LiteSaver Enables the HP Display LiteSaver functions; If disabled, the monitor will turn off as soon as the Display Off time is next...
This does not affect screen saver operation, which has priority over the HP Display LiteSaver. User Guide 4-13 Operating the Monitor 4. deselect to configure the HP Display LiteSaver features: Configure Options Function Enable Display LiteSaver Enables the HP Display LiteSaver functions; If disabled, the monitor will turn off as soon as the Display Off time is next...
User Manual
Page 36
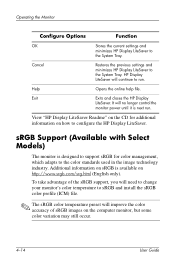
... and closes the HP Display LiteSaver. Help Opens the online help file. It will no longer control the monitor power until it is designed to support sRGB for additional information on the computer monitor, but some color variation may still occur. 4-14 User Guide To take advantage ...of sRGB images on how to the System Tray. Operating the Monitor Configure Options Function OK Stores the current settings and minimizes HP Display LiteSaver to sRGB and install the sRGB color profile (ICM)...
... and closes the HP Display LiteSaver. Help Opens the online help file. It will no longer control the monitor power until it is designed to support sRGB for additional information on the computer monitor, but some color variation may still occur. 4-14 User Guide To take advantage ...of sRGB images on how to the System Tray. Operating the Monitor Configure Options Function OK Stores the current settings and minimizes HP Display LiteSaver to sRGB and install the sRGB color profile (ICM)...

User Manual
Page 37
...Main Menu of the administrator's group. Select sRGB. 5. Select the "sRGB Color Space Profile.icm" file, then click the Add button User Guide 4-15 Operating the Monitor Changing the Color Temperature 1. Press the Menu button on the front panel of the monitor to access all options in as an ... XP ✎ To complete the following procedure, you from completing this procedure. The sRGB ICM file does not support Windows 95 and Windows NT operating systems 1. Select the Color Management tab, then click the Add button to display the Color Temperature menu. 4. Select Color to open the Add...
...Main Menu of the administrator's group. Select sRGB. 5. Select the "sRGB Color Space Profile.icm" file, then click the Add button User Guide 4-15 Operating the Monitor Changing the Color Temperature 1. Press the Menu button on the front panel of the monitor to access all options in as an ... XP ✎ To complete the following procedure, you from completing this procedure. The sRGB ICM file does not support Windows 95 and Windows NT operating systems 1. Select the Color Management tab, then click the Add button to display the Color Temperature menu. 4. Select Color to open the Add...

User Manual
Page 38
Click Apply or OK. 4-16 User Guide Select "sRGB Color Space Profile," then click Set as the Default Monitor Profile. Operating the Monitor 5. To activate a color profile for your monitor, you must set it as Default button. 6.
Click Apply or OK. 4-16 User Guide Select "sRGB Color Space Profile," then click Set as the Default Monitor Profile. Operating the Monitor 5. To activate a color profile for your monitor, you must set it as Default button. 6.

User Manual
Page 46
Technical Specifications 1506 Flat Panel Monitor (Continued) Vertical Refresh Rate 50 to 76 Hz Environmental Requirements Temperature: Operating Temperature Non-operating Temperature 41 to 95o F -4 to 140o F 5 to 35o C --20 to +60o C Relative Humidity 20 to 80% Power Source 100 - 240 VAC, 50 - 60 Hz Altitude: Operating Non-operating 0 to 12,000 feet 0 to 40,000 feet 0 to 3657.6 m 0 to12192 m Power Consumption
Technical Specifications 1506 Flat Panel Monitor (Continued) Vertical Refresh Rate 50 to 76 Hz Environmental Requirements Temperature: Operating Temperature Non-operating Temperature 41 to 95o F -4 to 140o F 5 to 35o C --20 to +60o C Relative Humidity 20 to 80% Power Source 100 - 240 VAC, 50 - 60 Hz Altitude: Operating Non-operating 0 to 12,000 feet 0 to 40,000 feet 0 to 3657.6 m 0 to12192 m Power Consumption


