
HP LaserJet P2050 Series - User Guide
Page 8
... network product ...77 Embedded Web server ...77 Open the embedded Web server 77 Status tab ...77 Settings tab ...78 Networking tab 78 Links ...78 Use HP Web Jetadmin software 78 Use security features ...78 Secure the embedded Web server 78 Lock the product ...79 Manage supplies ...80 Supplies life ...80 Manage... 88 Enable memory for Windows 89 Clean the product ...90 Clean the print-cartridge area 90 Clean the paper path ...91 Clean the Tray 1 pickup roller 92 Clean the Tray 2 pickup roller 95 10 Solve problems Solve general problems ...100 Troubleshooting checklist 100 vi ENWW
... network product ...77 Embedded Web server ...77 Open the embedded Web server 77 Status tab ...77 Settings tab ...78 Networking tab 78 Links ...78 Use HP Web Jetadmin software 78 Use security features ...78 Secure the embedded Web server 78 Lock the product ...79 Manage supplies ...80 Supplies life ...80 Manage... 88 Enable memory for Windows 89 Clean the product ...90 Clean the print-cartridge area 90 Clean the paper path ...91 Clean the Tray 1 pickup roller 92 Clean the Tray 2 pickup roller 95 10 Solve problems Solve general problems ...100 Troubleshooting checklist 100 vi ENWW
HP LaserJet P2050 Series - User Guide
Page 104
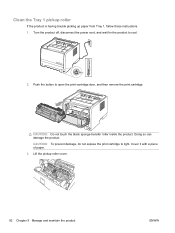
.... 3. Push the button to cool. Doing so can damage the product. CAUTION: To prevent damage, do not expose the print cartridge to light. Lift the pickup roller cover. 92 Chapter 9 Manage and maintain the product ENWW Celcius 100 90 80 70 60 50 40 30 20 10 0 -10 °C 2. Clean the Tray...
.... 3. Push the button to cool. Doing so can damage the product. CAUTION: To prevent damage, do not expose the print cartridge to light. Lift the pickup roller cover. 92 Chapter 9 Manage and maintain the product ENWW Celcius 100 90 80 70 60 50 40 30 20 10 0 -10 °C 2. Clean the Tray...
HP LaserJet P2050 Series - User Guide
Page 105
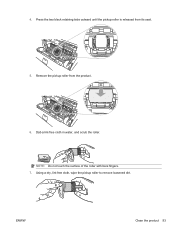
4. NOTE: Do not touch the surface of the roller with bare fingers. 7. Press the two black retaining tabs outward until the pickup roller is released from the product. 6. Dab a lint-free cloth in water, and scrub the roller. ENWW Clean the product 93 Using a dry, lint-free cloth, wipe the pickup roller to remove loosened dirt. Remove the pickup roller from its seat. 5.
4. NOTE: Do not touch the surface of the roller with bare fingers. 7. Press the two black retaining tabs outward until the pickup roller is released from the product. 6. Dab a lint-free cloth in water, and scrub the roller. ENWW Clean the product 93 Using a dry, lint-free cloth, wipe the pickup roller to remove loosened dirt. Remove the pickup roller from its seat. 5.
HP LaserJet P2050 Series - User Guide
Page 106
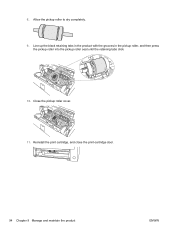
Close the pickup roller cover. 11. 8. Line up the black retaining tabs in the product with the grooves in the pickup roller, and then press the pickup roller into the pickup roller seat until the retaining tabs click. 10. Reinstall the print cartridge, and close the print-cartridge door. 94 Chapter 9 Manage and maintain the product ENWW Allow the pickup roller to dry completely. 9.
Close the pickup roller cover. 11. 8. Line up the black retaining tabs in the product with the grooves in the pickup roller, and then press the pickup roller into the pickup roller seat until the retaining tabs click. 10. Reinstall the print cartridge, and close the print-cartridge door. 94 Chapter 9 Manage and maintain the product ENWW Allow the pickup roller to dry completely. 9.
HP LaserJet P2050 Series - User Guide
Page 107
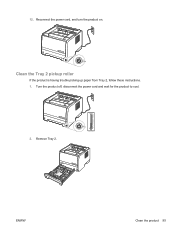
Remove Tray 2. Celcius 100 90 80 70 60 50 40 30 20 10 0 -10 °C ENWW Clean the product 95 Clean the Tray 2 pickup roller If the product is having trouble picking up paper from Tray 2, follow these instructions. 1. Reconnect the power cord, and turn the product on. Turn the product off, disconnect the power cord and wait for the product to cool. 2. 12.
Remove Tray 2. Celcius 100 90 80 70 60 50 40 30 20 10 0 -10 °C ENWW Clean the product 95 Clean the Tray 2 pickup roller If the product is having trouble picking up paper from Tray 2, follow these instructions. 1. Reconnect the power cord, and turn the product on. Turn the product off, disconnect the power cord and wait for the product to cool. 2. 12.
HP LaserJet P2050 Series - User Guide
Page 108
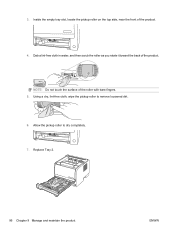
Using a dry, lint-free cloth, wipe the pickup roller to dry completely. 7. Allow the pickup roller to remove loosened dirt. 6. Inside the empty tray slot, locate the pickup roller on the top side, near the front of the product. Dab a lint-free cloth in water, and then scrub the roller as you rotate it toward the back of the product. 4. Replace Tray 2. 96 Chapter 9 Manage and maintain the product ENWW 3. NOTE: Do not touch the surface of the roller with bare fingers. 5.
Using a dry, lint-free cloth, wipe the pickup roller to dry completely. 7. Allow the pickup roller to remove loosened dirt. 6. Inside the empty tray slot, locate the pickup roller on the top side, near the front of the product. Dab a lint-free cloth in water, and then scrub the roller as you rotate it toward the back of the product. 4. Replace Tray 2. 96 Chapter 9 Manage and maintain the product ENWW 3. NOTE: Do not touch the surface of the roller with bare fingers. 5.
HP LaserJet P2050 Series - User Guide
Page 169
...3 ordering 132 part numbers 133 acoustic specifications 146 advanced printing options Windows 67 alerts setting up 72 viewing with HP ToolboxFX 73 Alerts tab, HP ToolboxFX 73 alternative letterhead mode 67 anticounterfeit supplies 80 archive setting 15 automatic crossover, setting 16 B batteries included... 80 status messages 10 status, viewing with HP ToolboxFX 72 storage 80 supplies status page 12 warranty 137 cartridges, print Macintosh status 33 cleaning pickup roller (Tray 1) 92 pickup roller (Tray 2) 95 print-cartridge area 90 printer 90 clearing jams duplex paper path 109 locations...
...3 ordering 132 part numbers 133 acoustic specifications 146 advanced printing options Windows 67 alerts setting up 72 viewing with HP ToolboxFX 73 Alerts tab, HP ToolboxFX 73 alternative letterhead mode 67 anticounterfeit supplies 80 archive setting 15 automatic crossover, setting 16 B batteries included... 80 status messages 10 status, viewing with HP ToolboxFX 72 storage 80 supplies status page 12 warranty 137 cartridges, print Macintosh status 33 cleaning pickup roller (Tray 1) 92 pickup roller (Tray 2) 95 print-cartridge area 90 printer 90 clearing jams duplex paper path 109 locations...
HP LaserJet P2050 Series - User Guide
Page 172
... 62 PCL drivers universal 21 PCL font list 12 PCL settings, HP ToolboxFX 75 permanent resources 88 physical specifications 146 pickup roller Tray 1 92 Tray 2 95 portrait orientation setting, Windows 65 ports problem-solving Macintosh 128 supported 3 USB 36 postcards output bin, selecting 56 PostScript Printer Description (PPD) files problem-solving 127 PostScript settings...
... 62 PCL drivers universal 21 PCL font list 12 PCL settings, HP ToolboxFX 75 permanent resources 88 physical specifications 146 pickup roller Tray 1 92 Tray 2 95 portrait orientation setting, Windows 65 ports problem-solving Macintosh 128 supported 3 USB 36 postcards output bin, selecting 56 PostScript Printer Description (PPD) files problem-solving 127 PostScript settings...


