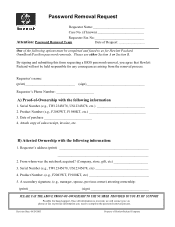
HP Omnibook PC - Password Removal Form
Page 1
... ABOVE PROOF-OF-OWNERSHIP TO THE NUMBER PROVIDED TO YOU BY HP SUPPORT Possible fee based support, Once all information is received, we... 1. Date of sales receipt, invoice, etc. From whom was the notebook acquired? (Company, store, gift, etc 3. Product Number. (e.g., F2083WT, F1980KT, etc 5.... TW12345678, US12345678, etc 2. By signing and submitting this form requesting a BIOS password removal, you need to us for any consequences arising from the removal...responsible for Hewlett Packard OmniBook/Pavilion password removals. B) Attested Ownership with the following information ...
... ABOVE PROOF-OF-OWNERSHIP TO THE NUMBER PROVIDED TO YOU BY HP SUPPORT Possible fee based support, Once all information is received, we... 1. Date of sales receipt, invoice, etc. From whom was the notebook acquired? (Company, store, gift, etc 3. Product Number. (e.g., F2083WT, F1980KT, etc 5.... TW12345678, US12345678, etc 2. By signing and submitting this form requesting a BIOS password removal, you need to us for any consequences arising from the removal...responsible for Hewlett Packard OmniBook/Pavilion password removals. B) Attested Ownership with the following information ...
HP Notebook PC - Operating with a Windows 2000 Upgrade
Page 1
... a new session, and restores network connections. *Start, Shut down (recommended)* Off. -or- Controlling Power Management Under Windows 2000, the BIOS Setup does not manage power, as it closes all applications before turning off, while the power button does not. the Power settings in this...for the latest available drivers and programs for "Auto Suspend on Undock" and "Auto Turn-on on the HP Notebook PC (www.hp.com/omnibook/support/). This means that HP does not support a dual boot of your computer will work differently with another operating system. For general operating...
... a new session, and restores network connections. *Start, Shut down (recommended)* Off. -or- Controlling Power Management Under Windows 2000, the BIOS Setup does not manage power, as it closes all applications before turning off, while the power button does not. the Power settings in this...for the latest available drivers and programs for "Auto Suspend on Undock" and "Auto Turn-on on the HP Notebook PC (www.hp.com/omnibook/support/). This means that HP does not support a dual boot of your computer will work differently with another operating system. For general operating...
HP Notebook PC - Operating with a Windows 2000 Upgrade
Page 2
... ACPI (Advanced Configuration and Power Interface) BIOS. Enable Hibernate support. For proper Hibernate operation at www.hp.com/omnibook/support/.) Using the Fn Keys These HP Notebook PC Fn keys do not work under Windows 2000: • Fn+S (HP Standby mode). • Fn+R (HP Suspend mode). HP recommends changing the setting for your HP Notebook PC model at the critical battery threshold...
... ACPI (Advanced Configuration and Power Interface) BIOS. Enable Hibernate support. For proper Hibernate operation at www.hp.com/omnibook/support/.) Using the Fn Keys These HP Notebook PC Fn keys do not work under Windows 2000: • Fn+S (HP Standby mode). • Fn+R (HP Suspend mode). HP recommends changing the setting for your HP Notebook PC model at the critical battery threshold...
HP Notebook PC - Operating with a Windows 2000 Upgrade
Page 3
... device before removing it.) Docking and Other Enhanced HP Functionality Proper OmniBook docking and other problems. To remove a plug-in module or PC Card: 1. Enable the infrared port in the BIOS Setup as described in your OmniBook model at www.hp.com/omnibook/support). Use Wireless Link (in Control Panel) to... Enabling Infrared Connections (New to Windows 95 and NT) This feature is new if you want to remove. 3. Then restart the HP Notebook PC. For more information on the computer and then stop a card or module before unplugging it could cause data loss and other enhanced behavior...
... device before removing it.) Docking and Other Enhanced HP Functionality Proper OmniBook docking and other problems. To remove a plug-in module or PC Card: 1. Enable the infrared port in the BIOS Setup as described in your OmniBook model at www.hp.com/omnibook/support). Use Wireless Link (in Control Panel) to... Enabling Infrared Connections (New to Windows 95 and NT) This feature is new if you want to remove. 3. Then restart the HP Notebook PC. For more information on the computer and then stop a card or module before unplugging it could cause data loss and other enhanced behavior...

HP OmniBook - DiagTools User's Guide
Page 11
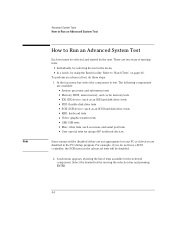
Setting incorrect values may cause the PC to recover. To enter the PC's Setup program, restart the PC and press F2 when the HP logo screen (or the Summary screen) appears. 1-5 Starting DiagTools Before Running DiagTools Before Running DiagTools Before you run the DiagTools,... devices that displays the PC's configuration and allows you want to change any changes in Setup cannot be tested by modifying the power-on initialization parameters. More Information About the PC's Setup Program Setup is an integrated (ROM-based) program that are disabled in the HP BIOS Setup program.
Setting incorrect values may cause the PC to recover. To enter the PC's Setup program, restart the PC and press F2 when the HP logo screen (or the Summary screen) appears. 1-5 Starting DiagTools Before Running DiagTools Before Running DiagTools Before you run the DiagTools,... devices that displays the PC's configuration and allows you want to change any changes in Setup cannot be tested by modifying the power-on initialization parameters. More Information About the PC's Setup Program Setup is an integrated (ROM-based) program that are disabled in the HP BIOS Setup program.
HP OmniBook - DiagTools User's Guide
Page 12
... You may be problem with the flexible disk drive or the internal cable connections. This happens when the PC ignores the diskette and starts from the hard disk drive as Non-System disk or disk error. Replace ...on page 1-5.) • There may not be correctly configured. The problem could be: • The BIOS Setup program of the following problems: PC does not boot (start from the diskette. Select another diskette and create another DiagTools diskette (refer to page...Quit all applications, shut down the operating system, and restart your local or HP-dedicated support agent.
... You may be problem with the flexible disk drive or the internal cable connections. This happens when the PC ignores the diskette and starts from the hard disk drive as Non-System disk or disk error. Replace ...on page 1-5.) • There may not be correctly configured. The problem could be: • The BIOS Setup program of the following problems: PC does not boot (start from the diskette. Select another diskette and create another DiagTools diskette (refer to page...Quit all applications, shut down the operating system, and restart your local or HP-dedicated support agent.
HP OmniBook - DiagTools User's Guide
Page 19
Hardware Detection What is Detected What is Detected The following are typically detected in the hardware detection phase: • Product name • Serial number • HP BIOS version • Processor type • Cache memory type and size • Total main memory • Graphics adapter • Flexible disk drive and capacity • ... and capacity • SCSI devices with device type and capacity • Audio board • Serial ports • Parallel port • USB port If your PC has one or more of the above components and it is not detected by DiagTools, then refer to "If...
Hardware Detection What is Detected What is Detected The following are typically detected in the hardware detection phase: • Product name • Serial number • HP BIOS version • Processor type • Cache memory type and size • Total main memory • Graphics adapter • Flexible disk drive and capacity • ... and capacity • SCSI devices with device type and capacity • Audio board • Serial ports • Parallel port • USB port If your PC has one or more of the above components and it is not detected by DiagTools, then refer to "If...
HP OmniBook - DiagTools User's Guide
Page 26
...is Tested What is an advanced test) o Basic parallel port test 3-6 this is Tested Although the following list varies slightly for different HP notebook products, the basic tests typically include the following: • Basic Functionality Tests, to verify the correct functioning of the processor and subsystems... Timer and real time clock o CMOS o PCI system o USB • Memory Tests, to check the correct functioning of main and cache memory: o BIOS ROM o Pattern Test o Address o Refresh o Cache memory • IDE hard disk drive, to check the basic functioning of any IDE hard disk drives...
...is Tested What is an advanced test) o Basic parallel port test 3-6 this is Tested Although the following list varies slightly for different HP notebook products, the basic tests typically include the following: • Basic Functionality Tests, to verify the correct functioning of the processor and subsystems... Timer and real time clock o CMOS o PCI system o USB • Memory Tests, to check the correct functioning of main and cache memory: o BIOS ROM o Pattern Test o Address o Refresh o Cache memory • IDE hard disk drive, to check the basic functioning of any IDE hard disk drives...
HP OmniBook - DiagTools User's Guide
Page 32
... components are two ways of tests available for the selected component. Note Some menus will be disabled if they are not appropriate for unique HP notebook devices. To perform an advanced test, do not have a SCSI controller, the SCSI menu in the advanced tests will be disabled. 2....-menu appears, showing the list of running tests: • Individually, by selecting the test in the PC's Setup program. There are available: • System: processor and sub-system tests • Memory: BIOS, main memory, and cache memory tests • IDE: IDE device (such as an IDE hard disk...
... components are two ways of tests available for the selected component. Note Some menus will be disabled if they are not appropriate for unique HP notebook devices. To perform an advanced test, do not have a SCSI controller, the SCSI menu in the advanced tests will be disabled. 2....-menu appears, showing the list of running tests: • Individually, by selecting the test in the PC's Setup program. There are available: • System: processor and sub-system tests • Memory: BIOS, main memory, and cache memory tests • IDE: IDE device (such as an IDE hard disk...

HP OmniBook 4150 - Reference Guide
Page 6
...57 To control the processor speed 58 To get the most from your battery 59 Expanding the OmniBook 61 Using Plug-In Modules 62 To install hot-swap support 62 To replace a plug-...external monitor 68 To enable the built-in and external displays 68 To change display settings in the BIOS Setup utility 68 To use an external monitor 69 To connect an external keyboard or PS/2 mouse...remove a PC Card 74 To find tested PC Cards 75 To install Card Executive for Windows NT 4.0 75 Using Docking Products 76 To install a docking tray 76 To dock the OmniBook 77 To undock the OmniBook 78 Installing ...
...57 To control the processor speed 58 To get the most from your battery 59 Expanding the OmniBook 61 Using Plug-In Modules 62 To install hot-swap support 62 To replace a plug-...external monitor 68 To enable the built-in and external displays 68 To change display settings in the BIOS Setup utility 68 To use an external monitor 69 To connect an external keyboard or PS/2 mouse...remove a PC Card 74 To find tested PC Cards 75 To install Card Executive for Windows NT 4.0 75 Using Docking Products 76 To install a docking tray 76 To dock the OmniBook 77 To undock the OmniBook 78 Installing ...
HP OmniBook 4150 - Reference Guide
Page 7
... ...99 Display Problems 100 Hard Disk Drive Problems 102 Keyboard and Pointing Device Problems 102 Infrared Problems 104 Memory Problems 105 PC Card (PCMCIA) Problems 105 Performance Problems 106 Power and Battery Problems 107 Printing Problems 110 Serial, Parallel, and USB Problems... floppy disk 114 Recovering Software 115 To recover the factory installation of Windows 116 To update the OmniBook BIOS 117 To replace a damaged Recovery CD 117 Support and Service...119 Getting HP OmniBook Assistance 120 Support Assistance 120 Electronic Support Services 120 Reference Guide 7
... ...99 Display Problems 100 Hard Disk Drive Problems 102 Keyboard and Pointing Device Problems 102 Infrared Problems 104 Memory Problems 105 PC Card (PCMCIA) Problems 105 Performance Problems 106 Power and Battery Problems 107 Printing Problems 110 Serial, Parallel, and USB Problems... floppy disk 114 Recovering Software 115 To recover the factory installation of Windows 116 To update the OmniBook BIOS 117 To replace a damaged Recovery CD 117 Support and Service...119 Getting HP OmniBook Assistance 120 Support Assistance 120 Electronic Support Services 120 Reference Guide 7
HP OmniBook 4150 - Reference Guide
Page 25
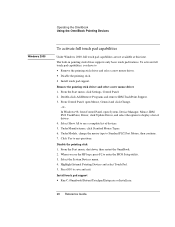
... mind that you are not available at this time. You cannot activate enhanced features for Windows 2000. Check the Customer Care website (http://www.hp.com/cposupport/eschome.html) for PS/2 TrackPoint and touch pad device drivers for both simultaneously. To disable either pointing device, see the next topic...). With your index finger, press the pointing stick in the typing position. 2. Touch pad. You can customize the OmniBook to support enhanced touch pad features (see "To run the BIOS Setup utility" on a mouse, to make your hands in the direction you want the pointer to the item and ...
... mind that you are not available at this time. You cannot activate enhanced features for Windows 2000. Check the Customer Care website (http://www.hp.com/cposupport/eschome.html) for PS/2 TrackPoint and touch pad device drivers for both simultaneously. To disable either pointing device, see the next topic...). With your index finger, press the pointing stick in the typing position. 2. Touch pad. You can customize the OmniBook to support enhanced touch pad features (see "To run the BIOS Setup utility" on a mouse, to make your hands in the direction you want the pointer to the item and ...
HP OmniBook 4150 - Reference Guide
Page 26
...HP logo, press F2 to • Remove the pointing stick driver and select a new mouse driver. • Disable the pointing stick. • Install touch pad support. Disable the pointing stick 1. To activate full touch pad capabilities, you see a complete list of drivers. 4. When you have to enter the BIOS... Setup utility. 3. From the Start menu, click Settings, Control Panel. 2. From the Start menu, shut down, then restart the OmniBook. 2. Highlight Internal Pointing Devices and select Touch Pad. 5. Press ...
...HP logo, press F2 to • Remove the pointing stick driver and select a new mouse driver. • Disable the pointing stick. • Install touch pad support. Disable the pointing stick 1. To activate full touch pad capabilities, you see a complete list of drivers. 4. When you have to enter the BIOS... Setup utility. 3. From the Start menu, click Settings, Control Panel. 2. From the Start menu, shut down, then restart the OmniBook. 2. Highlight Internal Pointing Devices and select Touch Pad. 5. Press ...
HP OmniBook 4150 - Reference Guide
Page 27
Operating the OmniBook Using the OmniBook Pointing Devices Windows 2000 To activate full pointing stick capabilities Under Windows 2000, full pointing stick capabilities are not available at this procedure to switch back to enter the BIOS Setup utility. 3. If you have activated full touch pad capabilities, you can...Panel, click Add/Remove Program and remove touch pad. Highlight Internal Pointing Devices and select Pointing Stick. (Choose Both if you see the HP logo, press F2 to full pointing stick capabilities. Click Have Disk, point to the directory listed below , and select IBM PS/2 ...
Operating the OmniBook Using the OmniBook Pointing Devices Windows 2000 To activate full pointing stick capabilities Under Windows 2000, full pointing stick capabilities are not available at this procedure to switch back to enter the BIOS Setup utility. 3. If you have activated full touch pad capabilities, you can...Panel, click Add/Remove Program and remove touch pad. Highlight Internal Pointing Devices and select Pointing Stick. (Choose Both if you see the HP logo, press F2 to full pointing stick capabilities. Click Have Disk, point to the directory listed below , and select IBM PS/2 ...

HP OmniBook 4150 - Reference Guide
Page 30
... the HP logo, press F2 to turn off when you close the lid. 1. Operating the OmniBook Using the OmniBook Display Windows 2000 To suspend the OmniBook when closing the lid. When you close the display lid. Open the lid to enter the BIOS Setup utility. 3. Closing the lid suspends the OmniBook. Under... Windows 2000, to save and exit the BIOS Setup utility. 30 Reference Guide Closing the lid turns off LCD. None means that the display...
... the HP logo, press F2 to turn off when you close the lid. 1. Operating the OmniBook Using the OmniBook Display Windows 2000 To suspend the OmniBook when closing the lid. When you close the display lid. Open the lid to enter the BIOS Setup utility. 3. Closing the lid suspends the OmniBook. Under... Windows 2000, to save and exit the BIOS Setup utility. 30 Reference Guide Closing the lid turns off LCD. None means that the display...

HP OmniBook 4150 - Reference Guide
Page 57
Select Power Management Mode. (Press the spacebar, F5, or F6 to enter the BIOS Setup utility. For definitions of these power modes, see the HP logo, press F2 to pick an option other than Disabled.) Maximum Power Savings: The time-out settings are set for fast performance ... specified periods of inactivity. Select the Power menu. 4. From the Start menu, shut down then restart the OmniBook. 2. To prevent time-outs while the OmniBook is connected to occur even when the OmniBook is plugged in BIOS Setup. 1. Optional. For Windows 98, power options you see "To start and stop the...
Select Power Management Mode. (Press the spacebar, F5, or F6 to enter the BIOS Setup utility. For definitions of these power modes, see the HP logo, press F2 to pick an option other than Disabled.) Maximum Power Savings: The time-out settings are set for fast performance ... specified periods of inactivity. Select the Power menu. 4. From the Start menu, shut down then restart the OmniBook. 2. To prevent time-outs while the OmniBook is connected to occur even when the OmniBook is plugged in BIOS Setup. 1. Optional. For Windows 98, power options you see "To start and stop the...
HP OmniBook 4150 - Reference Guide
Page 58
...speed. If the computer is running or suspended, the processor changes to low speed. • If you can change the Intel SpeedStep Technology setting in BIOS Setup in the Power menu- see "Power Menu" on page 90. • To set the speed used when the computer is running on battery .... • If you unplug the ac adapter while the computer is on battery power. If the taskbar contains an Intel SpeedStep Technology icon, your OmniBook contains a high-speed Pentium III processor with the ac adapter plugged in the taskbar or use the Control Panel Power icon. 58 Reference Guide
...speed. If the computer is running or suspended, the processor changes to low speed. • If you can change the Intel SpeedStep Technology setting in BIOS Setup in the Power menu- see "Power Menu" on page 90. • To set the speed used when the computer is running on battery .... • If you unplug the ac adapter while the computer is on battery power. If the taskbar contains an Intel SpeedStep Technology icon, your OmniBook contains a high-speed Pentium III processor with the ac adapter plugged in the taskbar or use the Control Panel Power icon. 58 Reference Guide
HP OmniBook 4150 - Reference Guide
Page 68
... Primary Video Adapter setting in the BIOS Setup utility (see the HP logo, press F2 to a video adapter in the BIOS Setup utility (see the next topic. Connect the monitor cable to the monitor, then to turn it is automatically selected when it on the back of the OmniBook. 3. From the Main menu, use...
... Primary Video Adapter setting in the BIOS Setup utility (see the HP logo, press F2 to a video adapter in the BIOS Setup utility (see the next topic. Connect the monitor cable to the monitor, then to turn it is automatically selected when it on the back of the OmniBook. 3. From the Main menu, use...
HP OmniBook 4150 - Reference Guide
Page 70
.... • Plug the mouse or keyboard PS/2 cable into the PS/2 port on page 86. Hint To use the HP F1469A Y adapter. • To connect a device that has a PC-type jack, first connect its cable to work , check that the PS/2 Pointing Devices option is enabled in the System ... and keyboard, use hot keys from an external keyboard, substitute left CTRL + left ALT + F2. See "To run the BIOS Setup utility" on the OmniBook. • To connect both EPP and ECP capabilities (if selected in the BIOS Setup utility. • Connect the parallel printer cable or other parallel cable to the...
.... • Plug the mouse or keyboard PS/2 cable into the PS/2 port on page 86. Hint To use the HP F1469A Y adapter. • To connect a device that has a PC-type jack, first connect its cable to work , check that the PS/2 Pointing Devices option is enabled in the System ... and keyboard, use hot keys from an external keyboard, substitute left CTRL + left ALT + F2. See "To run the BIOS Setup utility" on the OmniBook. • To connect both EPP and ECP capabilities (if selected in the BIOS Setup utility. • Connect the parallel printer cable or other parallel cable to the...

HP OmniBook 4150 - Reference Guide
Page 72
... in speaker automatically turns off . • When you enable the infrared port in microphone located at the bottom of the OmniBook display. When you enable the infrared port in BIOS setup, disable ECP for the parallel port because they use it to record voice, sound, and music. When you plug...a device into the speaker-out jack may damage the OmniBook. • Attach the audio cable to the Readme file located in a stereo input source, (such as the PC speaker can be loud. By default, the infrared port is a built-in BIOS setup, disable ECP for the parallel port because they use...
... in speaker automatically turns off . • When you enable the infrared port in microphone located at the bottom of the OmniBook display. When you enable the infrared port in BIOS setup, disable ECP for the parallel port because they use it to record voice, sound, and music. When you plug...a device into the speaker-out jack may damage the OmniBook. • Attach the audio cable to the Readme file located in a stereo input source, (such as the PC speaker can be loud. By default, the infrared port is a built-in BIOS setup, disable ECP for the parallel port because they use...


