User Guide
Page 7
... Restrict Color ...108 HP Web Jetadmin software ...109 10 Solve a problem ...110 Jams and paper-feed issues ...110 Clear a paper jam ...110 Read general instructions in the Help for clearing paper jams 110 Clear a print carriage jam ...116 Read general instructions in the Help for clearing a print carriage jams 116 Learn how to avoid paper jams ...116 Solve paper-feed problems ...117...
... Restrict Color ...108 HP Web Jetadmin software ...109 10 Solve a problem ...110 Jams and paper-feed issues ...110 Clear a paper jam ...110 Read general instructions in the Help for clearing paper jams 110 Clear a print carriage jam ...116 Read general instructions in the Help for clearing a print carriage jams 116 Learn how to avoid paper jams ...116 Solve paper-feed problems ...117...
User Guide
Page 29
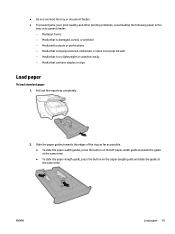
...accept ink well - Pull out the input tray completely. 2. Slide the paper guides towards the edges of the tray as far as possible. ● To slide the paper-width guides, press the button on the left paper-width guide and slide the guide at the same time. ● To...or wrinkled - Media that is too lightweight or stretches easily - ENWW Load paper 19 ● Do not overload the tray or document feeder. ● To prevent jams, poor print quality, and other printing problems, avoid loading the following paper in the tray or document feeder: - Media with cutouts or perforations - ...
...accept ink well - Pull out the input tray completely. 2. Slide the paper guides towards the edges of the tray as far as possible. ● To slide the paper-width guides, press the button on the left paper-width guide and slide the guide at the same time. ● To...or wrinkled - Media that is too lightweight or stretches easily - ENWW Load paper 19 ● Do not overload the tray or document feeder. ● To prevent jams, poor print quality, and other printing problems, avoid loading the following paper in the tray or document feeder: - Media with cutouts or perforations - ...
User Guide
Page 49
...area. ● You can set the media size and media type. ● Load a stack of the same size and type to avoid a paper jam. ● Load paper with (the Power button) to allow the printer to the Printing Shortcuts tab, select a printing shortcut, and then click OK. A printing shortcut stores...9679; Check the estimated ink levels in the input tray to print per sheet drop-down list. ● If you will be of paper (not just one page). To open the HP printer software, see Check the estimated ink levels. NOTE: You cannot delete the default printing shortcuts. Upon loading...
...area. ● You can set the media size and media type. ● Load a stack of the same size and type to avoid a paper jam. ● Load paper with (the Power button) to allow the printer to the Printing Shortcuts tab, select a printing shortcut, and then click OK. A printing shortcut stores...9679; Check the estimated ink levels in the input tray to print per sheet drop-down list. ● If you will be of paper (not just one page). To open the HP printer software, see Check the estimated ink levels. NOTE: You cannot delete the default printing shortcuts. Upon loading...
User Guide
Page 120
... be available in several locations inside the printer. Read general instructions in the Help for clearing the jam in the printer or in HP support to obtain assistance. Use an HP online troubleshooting wizard Instructions for clearing paper jams Paper jams can occur in all languages. CAUTION: To prevent possible damage to do you want to the...
... be available in several locations inside the printer. Read general instructions in the Help for clearing the jam in the printer or in HP support to obtain assistance. Use an HP online troubleshooting wizard Instructions for clearing paper jams Paper jams can occur in all languages. CAUTION: To prevent possible damage to do you want to the...
User Guide
Page 121
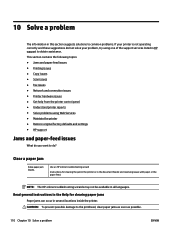
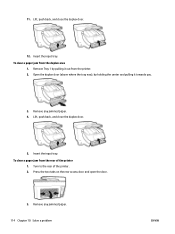
Check the gap in this way, do the following: a. Insert Tray 1 back into the gap and remove the jammed paper. 3. ENWW Jams and paper-feed issues 111 If the jam cannot be cleared in the printer where the input tray was. c. Reposition the printer on the top of the printer ...open the cartridge access door. Reach into the printer. Pull Tray 1 out of the input tray. b. Remove any jammed paper if possible. To clear a paper jam from the input tray. To clear a paper jam from Tray 2 NOTE: Tray 2 is available with some models of the printer. ▲ Pull Tray 2 out ...
Check the gap in this way, do the following: a. Insert Tray 1 back into the gap and remove the jammed paper. 3. ENWW Jams and paper-feed issues 111 If the jam cannot be cleared in the printer where the input tray was. c. Reposition the printer on the top of the printer ...open the cartridge access door. Reach into the printer. Pull Tray 1 out of the input tray. b. Remove any jammed paper if possible. To clear a paper jam from the input tray. To clear a paper jam from Tray 2 NOTE: Tray 2 is available with some models of the printer. ▲ Pull Tray 2 out ...
User Guide
Page 122
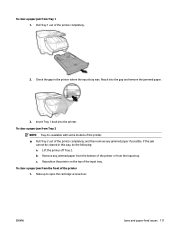
... is a soft click to indicate that it is not obstructed, move the carriage to the far left of the printer, and remove any jammed paper or scraps of paper. 4. Open the inside cover to close it towards you. 3. Lower and press down to close the cartridge access door. Slide down the...cover by lifting and moving it . Slide up to the far right of paper. 3. If need, move the print carriage to open the cartridge access door. 2. Remove any jammed or torn pieces of the printer and remove the jammed paper. 2. If the print carriage is secure. 112 Chapter 10 Solve a problem ...
... is a soft click to indicate that it is not obstructed, move the carriage to the far left of the printer, and remove any jammed paper or scraps of paper. 4. Open the inside cover to close it towards you. 3. Lower and press down to close the cartridge access door. Slide down the...cover by lifting and moving it . Slide up to the far right of paper. 3. If need, move the print carriage to open the cartridge access door. 2. Remove any jammed or torn pieces of the printer and remove the jammed paper. 2. If the print carriage is secure. 112 Chapter 10 Solve a problem ...
User Guide
Page 123
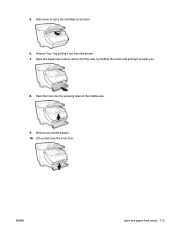
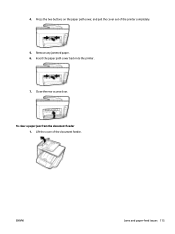
Remove Tray 1 by holding the center and pulling it out from the printer. 7. Lift up and close the cartridge access door. 6. Slide down in the middle area. 9. ENWW Jams and paper-feed issues 113 Remove any jammed paper. 10. 5. Open the duplex door (above where the tray was), by pulling it towards you. 8. Open the inner door by pressing down to close the inner door.
Remove Tray 1 by holding the center and pulling it out from the printer. 7. Lift up and close the cartridge access door. 6. Slide down in the middle area. 9. ENWW Jams and paper-feed issues 113 Remove any jammed paper. 10. 5. Open the duplex door (above where the tray was), by pulling it towards you. 8. Open the inner door by pressing down to close the inner door.
User Guide
Page 124
Turn to the rear of the printer 1. To clear a paper jam from the rear of the printer. 2. To clear a paper jam from the duplex area 1. Press the two tabs on the rear access door and open the door. 3. 11. Lift, push back, and close the duplex ...door. 12. Remove Tray 1 by holding the center and pulling it out from the printer. 2. Remove any jammed paper. 114 Chapter 10 Solve a problem ENWW Lift, push back, and close the duplex door. 5. Open the duplex door (above where the tray was), by pulling...
Turn to the rear of the printer 1. To clear a paper jam from the rear of the printer. 2. To clear a paper jam from the duplex area 1. Press the two tabs on the rear access door and open the door. 3. 11. Lift, push back, and close the duplex ...door. 12. Remove Tray 1 by holding the center and pulling it out from the printer. 2. Remove any jammed paper. 114 Chapter 10 Solve a problem ENWW Lift, push back, and close the duplex door. 5. Open the duplex door (above where the tray was), by pulling...
User Guide
Page 125
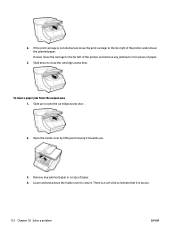
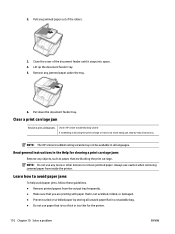
Close the rear access door. To clear a paper jam from the document feeder 1. Remove any jammed paper. 6. Insert the paper path cover back into the printer. 7. Lift the cover of the printer completely. 5. ENWW Jams and paper-feed issues 115 4. Press the two buttons on the paper path cover, and pull the cover out of the document feeder.
Close the rear access door. To clear a paper jam from the document feeder 1. Remove any jammed paper. 6. Insert the paper path cover back into the printer. 7. Lift the cover of the printer completely. 5. ENWW Jams and paper-feed issues 115 4. Press the two buttons on the paper path cover, and pull the cover out of the document feeder.
User Guide
Page 126
...paper jams To help avoid paper jams, follow these guidelines. ● Remove printed papers from inside the printer. Lift up the document feeder tray. 5. Use an HP online troubleshooting wizard If something is blocking the print carriage or it snaps into space. 4. NOTE: Do not use any jammed paper...● Prevent curled or wrinkled paper by -step instructions. NOTE: The HP online troubleshooting wizards may not be available in the Help for the printer. 116 Chapter 10 Solve a problem ENWW Clear a print carriage jam Resolve a print carriage jam. 2. Close the cover of ...
...paper jams To help avoid paper jams, follow these guidelines. ● Remove printed papers from inside the printer. Lift up the document feeder tray. 5. Use an HP online troubleshooting wizard If something is blocking the print carriage or it snaps into space. 4. NOTE: Do not use any jammed paper...● Prevent curled or wrinkled paper by -step instructions. NOTE: The HP online troubleshooting wizards may not be available in the Help for the printer. 116 Chapter 10 Solve a problem ENWW Clear a print carriage jam Resolve a print carriage jam. 2. Close the cover of ...
User Guide
Page 127
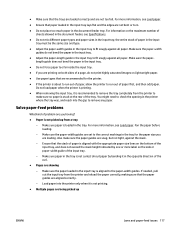
...input tray. ● Adjust the paper-length guide in the input tray is recommended to remove the tray completely from the printer to fit snugly against all paper. Also make sure no paper is stuck at the rear of paper is not picked up ENWW Jams and paper-feed issues 117 ● Make ...sure that the paper guides are aligned correctly. - the entire stack of sheets allowed in...
...input tray. ● Adjust the paper-length guide in the input tray is recommended to remove the tray completely from the printer to fit snugly against all paper. Also make sure no paper is stuck at the rear of paper is not picked up ENWW Jams and paper-feed issues 117 ● Make ...sure that the paper guides are aligned correctly. - the entire stack of sheets allowed in...
User Guide
Page 173
... test, failed 127 FoIP 66 forwarding faxes 57 G glass, scanner clean 138 load originals 25 locating 5 H hardware, fax setup test 127 header, fax 62 HP Utility (OS X) opening 106 humidity specifications 144 I ink cartridges part numbers 97 ink level icons 8 ink levels, check 95 Internet Protocol fax, using 66 IP... address checking for printer 108 IP settings 102 ISDN line, set up with fax parallel phone systems 74 J jams clear 110 paper to avoid 19 junk fax mode 58 L lights, control panel 7 line condition test, fax 129 link speed, setting 102 log, fax print 68 M...
... test, failed 127 FoIP 66 forwarding faxes 57 G glass, scanner clean 138 load originals 25 locating 5 H hardware, fax setup test 127 header, fax 62 HP Utility (OS X) opening 106 humidity specifications 144 I ink cartridges part numbers 97 ink level icons 8 ink levels, check 95 Internet Protocol fax, using 66 IP... address checking for printer 108 IP settings 102 ISDN line, set up with fax parallel phone systems 74 J jams clear 110 paper to avoid 19 junk fax mode 58 L lights, control panel 7 line condition test, fax 129 link speed, setting 102 log, fax print 68 M...
User Guide
Page 174
output tray locating 5 P paper clear jams 110 HP, order 18 load tray 19 selecting 18 skewed pages 117 specifications 145 troubleshoot feeding 117 paper-feed problems, troubleshoot 117 parallel phone systems answering machine setup 83 countries/regions with 70 distinctive ringing setup 74 DSL setup 73 ISDN setup 74 ...
output tray locating 5 P paper clear jams 110 HP, order 18 load tray 19 selecting 18 skewed pages 117 specifications 145 troubleshoot feeding 117 paper-feed problems, troubleshoot 117 parallel phone systems answering machine setup 83 countries/regions with 70 distinctive ringing setup 74 DSL setup 73 ISDN setup 74 ...

User Guide
Page 175
...mail and computer modem (parallel phone systems) 87 Setup icon 8 skew, troubleshoot print 117 software OCR 47 Webscan 46 specifications paper 145 physical 144 system requirements 144 status network configuration page 137 status icons 8 subscriber identification code 62 system requirements 144 T technical... hardware, failed 127 port connection, failed 127 setup 89 telephone wall jack 127 tone dialing 64 trays clear paper jams 110 load paper 19 locating 5 paper-width guides illustration 5 troubleshoot feeding 117 troubleshoot answering machines 133 control panel help system 136 embedded web server...
...mail and computer modem (parallel phone systems) 87 Setup icon 8 skew, troubleshoot print 117 software OCR 47 Webscan 46 specifications paper 145 physical 144 system requirements 144 status network configuration page 137 status icons 8 subscriber identification code 62 system requirements 144 T technical... hardware, failed 127 port connection, failed 127 setup 89 telephone wall jack 127 tone dialing 64 trays clear paper jams 110 load paper 19 locating 5 paper-width guides illustration 5 troubleshoot feeding 117 troubleshoot answering machines 133 control panel help system 136 embedded web server...

