Quick Setup Guide
Page 1
... herein is subject to change without notice. Nothing herein should be liable for HP products and services are set forth in the express warranty statements accompanying such products and services. First Edition: March 2019 RMN: HSD-0021-Q L57258-B21 7 6 3 2 1 HP shall not be construed as constituting an additional warranty. Optimum Resolution 62.23...
... herein is subject to change without notice. Nothing herein should be liable for HP products and services are set forth in the express warranty statements accompanying such products and services. First Edition: March 2019 RMN: HSD-0021-Q L57258-B21 7 6 3 2 1 HP shall not be construed as constituting an additional warranty. Optimum Resolution 62.23...

User Guide
Page 2
...models. Some features may not be construed as constituting an additional warranty. To access the latest user guide, go to http://www.hp.com/support, and follow the instructions to find your product. First Edition: April 2019 Document Part Number: L57259-001 The information .... Nothing herein should be available on your product. Product notice This guide describes features that are set forth in the United States and/or other countries. © Copyright 2019 HP Development Company, L.P. HP shall not be liable for HP products and services are common to change without notice.
...models. Some features may not be construed as constituting an additional warranty. To access the latest user guide, go to http://www.hp.com/support, and follow the instructions to find your product. First Edition: April 2019 Document Part Number: L57259-001 The information .... Nothing herein should be available on your product. Product notice This guide describes features that are set forth in the United States and/or other countries. © Copyright 2019 HP Development Company, L.P. HP shall not be liable for HP products and services are common to change without notice.

User Guide
Page 3
...! CAUTION: Indicates a hazardous situation that, if not avoided, could result in damage to complete a task. About This Guide This guide provides information about monitor features, setting up the monitor, using the software and technical specifications. Also contains essential information to explain a concept or to hardware or software. Indicates a hazardous situation that...
...! CAUTION: Indicates a hazardous situation that, if not avoided, could result in damage to complete a task. About This Guide This guide provides information about monitor features, setting up the monitor, using the software and technical specifications. Also contains essential information to explain a concept or to hardware or software. Indicates a hazardous situation that...
User Guide
Page 5
Table of contents 1 Getting started ...1 Important safety information ...1 Product features and components ...2 Features ...2 Rear components ...3 Setting up the monitor ...4 Removing the stand's hinge blocker 4 Connecting the cables ...5 Connecting USB devices ...7 Adjusting the monitor ...8 Installing a security ...-Off Timer ...16 Using the ambient light ...16 Selecting a faster response time for gaming ...17 Adjusting blue light output ...17 Using HP Enhance+ ...17 Using RGB Gain Control ...18 Viewing the Frame Rate ...18 Using Message Timers ...19 Using the Crosshair feature ...20 Using...
Table of contents 1 Getting started ...1 Important safety information ...1 Product features and components ...2 Features ...2 Rear components ...3 Setting up the monitor ...4 Removing the stand's hinge blocker 4 Connecting the cables ...5 Connecting USB devices ...7 Adjusting the monitor ...8 Installing a security ...-Off Timer ...16 Using the ambient light ...16 Selecting a faster response time for gaming ...17 Adjusting blue light output ...17 Using HP Enhance+ ...17 Using RGB Gain Control ...18 Viewing the Frame Rate ...18 Using Message Timers ...19 Using the Crosshair feature ...20 Using...
User Guide
Page 7
.... 1 Getting started Important safety information An AC adapter and power cord may fall over . For information about the correct AC power cord set to use only a power source and connection appropriate for the computer and its peripheral devices (such as a monitor, printer, scanner) to... that may cause disturbing reflections from the AC outlet. WARNING! Important safety information 1 NOTE: This product is easily accessible at http://www.hp.com/ergo. Care should be specifically labeled as a power strip or uninterruptible power supply (UPS). If another cord is also available on...
.... 1 Getting started Important safety information An AC adapter and power cord may fall over . For information about the correct AC power cord set to use only a power source and connection appropriate for the computer and its peripheral devices (such as a monitor, printer, scanner) to... that may cause disturbing reflections from the AC outlet. WARNING! Important safety information 1 NOTE: This product is easily accessible at http://www.hp.com/ergo. Care should be specifically labeled as a power strip or uninterruptible power supply (UPS). If another cord is also available on...
User Guide
Page 10
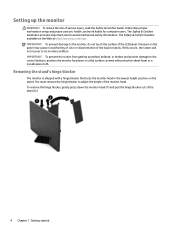
...from getting scratched, defaced, or broken and prevent damage to adjust the height of the monitor head. Pressure on the Web at http://www.hp.com/ergo. If this occurs, the screen will not recover to the monitor, do not touch the surface of the liquid crystals. IMPORTANT:... the panel may cause nonuniformity of color or disorientation of the LCD panel. To reduce the risk of the stand (2). 4 Chapter 1 Getting started Setting up the monitor WARNING! You must remove the hinge blocker to the control buttons, position the monitor facedown on a flat surface covered with a hinge...
...from getting scratched, defaced, or broken and prevent damage to adjust the height of the monitor head. Pressure on the Web at http://www.hp.com/ergo. If this occurs, the screen will not recover to the monitor, do not touch the surface of the liquid crystals. IMPORTANT:... the panel may cause nonuniformity of color or disorientation of the LCD panel. To reduce the risk of the stand (2). 4 Chapter 1 Getting started Setting up the monitor WARNING! You must remove the hinge blocker to the control buttons, position the monitor facedown on a flat surface covered with a hinge...

User Guide
Page 11
.... NOTE: DisplayPort is the preferred connection type for optimal performance. ● Connect one end of a DisplayPort cable to the DisplayPort connector on the source device. Setting up the monitor 5 The inputs can also be selected by pressing the center of the monitor and the other end to the DisplayPort connector on...
.... NOTE: DisplayPort is the preferred connection type for optimal performance. ● Connect one end of a DisplayPort cable to the DisplayPort connector on the source device. Setting up the monitor 5 The inputs can also be selected by pressing the center of the monitor and the other end to the DisplayPort connector on...

User Guide
Page 13
Connect one USB Type-B upstream port and two USB Type-A downstream ports. When unplugging the AC power cord from the AC outlet. Setting up the monitor 7 WARNING! The grounding plug is easily accessible at all times. For your safety, do not place anything on a cord or cable. Disconnect ...
Connect one USB Type-B upstream port and two USB Type-A downstream ports. When unplugging the AC power cord from the AC outlet. Setting up the monitor 7 WARNING! The grounding plug is easily accessible at all times. For your safety, do not place anything on a cord or cable. Disconnect ...
User Guide
Page 14
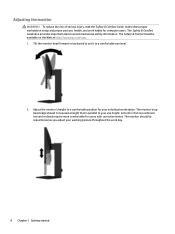
... bezel edge should be more comfortable for your working posture throughout the work habits for computer users. Tilt the monitor head forward or backward to set it to a comfortable position for users with corrective lenses. The Safety & Comfort Guide is positioned low and reclined may be repositioned as you adjust your... the risk of serious injury, read the Safety & Comfort Guide. The monitor should not exceed a height that is available on the Web at http://www.hp.com/ergo. 1. Adjusting the monitor WARNING!
... bezel edge should be more comfortable for your working posture throughout the work habits for computer users. Tilt the monitor head forward or backward to set it to a comfortable position for users with corrective lenses. The Safety & Comfort Guide is positioned low and reclined may be repositioned as you adjust your... the risk of serious injury, read the Safety & Comfort Guide. The monitor should not exceed a height that is available on the Web at http://www.hp.com/ergo. 1. Adjusting the monitor WARNING!

User Guide
Page 15
Use the key provided to a fixed object with an optional security cable available from HP. Storing headphones The monitor features a headphone hook at the top of the stand for convenient headphone storage. Setting up the monitor 9 Installing a security cable You can secure the monitor to attach and remove the lock.
Use the key provided to a fixed object with an optional security cable available from HP. Storing headphones The monitor features a headphone hook at the top of the stand for convenient headphone storage. Setting up the monitor 9 Installing a security cable You can secure the monitor to attach and remove the lock.

User Guide
Page 17
... other mounting device, insert four mounting screws through the holes on the mounting device and into the slot on page 10. 2. Remove the monitor stand. Setting up the monitor 11 To attach the monitor head to a swing arm or other mounting fixture. 1.
... other mounting device, insert four mounting screws through the holes on the mounting device and into the slot on page 10. 2. Remove the monitor stand. Setting up the monitor 11 To attach the monitor head to a swing arm or other mounting fixture. 1.

User Guide
Page 18
... static image on the screen for a prolonged period of the monitor to turn it on the rear of time. default is not covered under the HP warranty. When the monitor is the current active signal, the status of a no effect, the Power Button Lockout feature may occur on the monitor 1. The.... Press the center of nonuse. To avoid burn-in image damage may occur on monitors that may be in case of the auto-switch input setting (On or Off; Press the power button on . A burned-in the OSD menu. Select Power LED, and then select Off. To disable this feature, press...
... static image on the screen for a prolonged period of the monitor to turn it on the rear of time. default is not covered under the HP warranty. When the monitor is the current active signal, the status of a no effect, the Power Button Lockout feature may occur on the monitor 1. The.... Press the center of nonuse. To avoid burn-in image damage may occur on monitors that may be in case of the auto-switch input setting (On or Off; Press the power button on . A burned-in the OSD menu. Select Power LED, and then select Off. To disable this feature, press...
User Guide
Page 19
... the OSD menu to navigate menu choices. The following : 1. Adjusts the power settings. Downloading the monitor driver 13 You can download and install the monitor INF (Information) driver file from http://www.hp.com/support. 1. Table 2-1 OSD main menu options and their descriptions Main menu ... as Adaptive-Sync, response time, frame rate, message timers, crosshair, ambient lighting, and multi-monitor align. Returns all OSD menu settings to http://www.hp.com/support. 2. compliant and that the computer's graphics card is VESA DDC2- To access the OSD menu and make adjustments in ...
... the OSD menu to navigate menu choices. The following : 1. Adjusts the power settings. Downloading the monitor driver 13 You can download and install the monitor INF (Information) driver file from http://www.hp.com/support. 1. Table 2-1 OSD main menu options and their descriptions Main menu ... as Adaptive-Sync, response time, frame rate, message timers, crosshair, ambient lighting, and multi-monitor align. Returns all OSD menu settings to http://www.hp.com/support. 2. compliant and that the computer's graphics card is VESA DDC2- To access the OSD menu and make adjustments in ...

User Guide
Page 20
Modes of the OSD joystick to open the OSD. 2. NOTE: The Adaptive-Sync menu default setting is turned off, and the power light turns amber. Upon entering this reduced power state. The monitor wakes from sleep mode when the computer sends ...
Modes of the OSD joystick to open the OSD. 2. NOTE: The Adaptive-Sync menu default setting is turned off, and the power light turns amber. Upon entering this reduced power state. The monitor wakes from sleep mode when the computer sends ...

User Guide
Page 21
and then automatically wake from sleep mode. Set the times you can set the monitor to enter and exit the reduced power/sleep state at predetermined user-selectable times. NOTE: The Sleep Timer is disabled if the Power-...
and then automatically wake from sleep mode. Set the times you can set the monitor to enter and exit the reduced power/sleep state at predetermined user-selectable times. NOTE: The Sleep Timer is disabled if the Power-...
User Guide
Page 22
... light to open the OSD. 2. To turn on the monitor in and out from one color to another. ● Static Color: Sets ambient light colors to turn off. Select a setting: ● Off: Turns off the ambient lighting. ● Task Light: Emulates an adjustable white desk light for better reading or viewing... time you can adjust the color and brightness of the OSD joystick to On (Omen Red) by default. 16 Chapter 2 Using the monitor NOTE: Ambient lighting is set to open the OSD. 2. Select Power-Off Timer, and then select On. 4. Press the center of the ambient light or turn it off ...
... light to open the OSD. 2. To turn on the monitor in and out from one color to another. ● Static Color: Sets ambient light colors to turn off. Select a setting: ● Off: Turns off the ambient lighting. ● Task Light: Emulates an adjustable white desk light for better reading or viewing... time you can adjust the color and brightness of the OSD joystick to On (Omen Red) by default. 16 Chapter 2 Using the monitor NOTE: Ambient lighting is set to open the OSD. 2. Select Power-Off Timer, and then select On. 4. Press the center of the ambient light or turn it off ...
User Guide
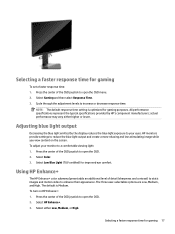
Page 23
... default is optimized for improved eye comfort. Select Gaming and then select Response Time. 3. To adjust your eyes. Using HP Enhance+ The HP Enhance+ color submenu/preset adds an additional level of the OSD joystick to open the OSD menu. 2. Press the center... enhance their appearance. Adjusting blue light output Decreasing the blue light emitted by HP's component manufacturers; HP monitors provide settings to increase or decrease response time. To turn on the screen. Select HP Enhance+. 3. Select either higher or lower. Selecting a faster response time for...
... default is optimized for improved eye comfort. Select Gaming and then select Response Time. 3. To adjust your eyes. Using HP Enhance+ The HP Enhance+ color submenu/preset adds an additional level of the OSD joystick to open the OSD menu. 2. Press the center... enhance their appearance. Adjusting blue light output Decreasing the blue light emitted by HP's component manufacturers; HP monitors provide settings to increase or decrease response time. To turn on the screen. Select HP Enhance+. 3. Select either higher or lower. Selecting a faster response time for...

User Guide
Page 24
...section on the screen. Press the center of the OSD joystick to open the OSD. 2. Select Gaming. 3. Set the color and location of any color preset, making all color presets adjustable user modes. Viewing the Frame Rate ... frames per second (FPS) in a number that will auto-save the RGB color settings. Select Frame Rate, and then select On. 4. NOTE: Frame Rate and Message Timer OSD functions share ...the same color and location settings. 18 Chapter 2 Using the monitor Select either Red Color ADJ SCALE GRAPHIC, Green Color ADJ ...
...section on the screen. Press the center of the OSD joystick to open the OSD. 2. Select Gaming. 3. Set the color and location of any color preset, making all color presets adjustable user modes. Viewing the Frame Rate ... frames per second (FPS) in a number that will auto-save the RGB color settings. Select Frame Rate, and then select On. 4. NOTE: Frame Rate and Message Timer OSD functions share ...the same color and location settings. 18 Chapter 2 Using the monitor Select either Red Color ADJ SCALE GRAPHIC, Green Color ADJ ...

User Guide
Page 25
... the center of the screen. Using Message Timers The Message Timers menu presents two types of timers that appears when the selected timer expires. To set the message timer as time progresses.
... the center of the screen. Using Message Timers The Message Timers menu presents two types of timers that appears when the selected timer expires. To set the message timer as time progresses.

User Guide
Page 26
... the OSD. 2. Selecting this option exits the OSD and displays the full screen alignment pattern. Press the center of the OSD joystick to run in setting up an on-screen crosshair/pointer by side. To use Multi-Monitor Align: 1. Configure the Crosshair using the submenus listed below. ● Configure: Select individual...
... the OSD. 2. Selecting this option exits the OSD and displays the full screen alignment pattern. Press the center of the OSD joystick to run in setting up an on-screen crosshair/pointer by side. To use Multi-Monitor Align: 1. Configure the Crosshair using the submenus listed below. ● Configure: Select individual...


