
End User License Agreement
Page 2
... license or Software Product except as eligible for in this EULA. 5. You shall not remove any Microsoft operating system software contained in such recovery solution shall be used for your HP Product, whether in this EULA. 7. CONSENT TO USE OF DATA. UPGRADES. a. b. PROPRIETARY RIGHTS. ..., copyright notices or proprietary restrictions from the Software Product. 6. Restrictions. This EULA is expressly provided for the upgrade. floppy disk, CD or DVD) or an equivalent solution delivered in this EULA or if you may make a one-time transfer of the Software Product,...
... license or Software Product except as eligible for in this EULA. 5. You shall not remove any Microsoft operating system software contained in such recovery solution shall be used for your HP Product, whether in this EULA. 7. CONSENT TO USE OF DATA. UPGRADES. a. b. PROPRIETARY RIGHTS. ..., copyright notices or proprietary restrictions from the Software Product. 6. Restrictions. This EULA is expressly provided for the upgrade. floppy disk, CD or DVD) or an equivalent solution delivered in this EULA or if you may make a one-time transfer of the Software Product,...

Bluetooth Wireless Technology Basics
Page 7
... button on your notebook. Select Finish to complete the installation and to Bluetooth operations. These steps are explained below. Select Start > All Programs > Software Setup. 2. When the Software Setup Welcome window is disabled (red logo), enable it on by hp to begin the ...connecting to other BWT-enabled devices, refer to the Documentation Library Bluetooth CD that came in the wizard to your BWT-enabled notebook PC: 1. Then you must install the software as the operating system CD. 7 Follow the instructions in the same box as follows: 1. Bluetooth...
... button on your notebook. Select Finish to complete the installation and to Bluetooth operations. These steps are explained below. Select Start > All Programs > Software Setup. 2. When the Software Setup Welcome window is disabled (red logo), enable it on by hp to begin the ...connecting to other BWT-enabled devices, refer to the Documentation Library Bluetooth CD that came in the wizard to your BWT-enabled notebook PC: 1. Then you must install the software as the operating system CD. 7 Follow the instructions in the same box as follows: 1. Bluetooth...
Reference Guide
Page 5
...named in the copyright notices included with which may only be used for restoring the hard disk of this software license for any operating system software by Microsoft contained in physical media or by the Microsoft License Agreement. SUBLICENSING AND DISTRIBUTION. Customer agrees that the software... does not include updates and upgrades which the product recovery CD-ROM or DVD was originally provided. (ii) The use of any copyright infringement or violation of the HP product with the software, who shall be authorized to export or re-export the...
...named in the copyright notices included with which may only be used for restoring the hard disk of this software license for any operating system software by Microsoft contained in physical media or by the Microsoft License Agreement. SUBLICENSING AND DISTRIBUTION. Customer agrees that the software... does not include updates and upgrades which the product recovery CD-ROM or DVD was originally provided. (ii) The use of any copyright infringement or violation of the HP product with the software, who shall be authorized to export or re-export the...

Reference Guide
Page 7
... battery 10 Step 2: Connect AC power 11 Step 3: Connect a phone line 12 Step 4: Turn on the notebook 13 Step 5: Set up Windows 13 Basic Operation ...15 Operating Your Notebook 16 Default power settings 16 To reset the notebook 17 To change the boot device 17 To use the TouchPad 18 To use the function hot... 21 To use the ALT GR key 21 Using CDs or DVDs 22 To insert or remove a CD or DVD 22 To play DVD movies 23 To create or copy CDs 23 Securing Your Notebook 24 To set up password protection 24 To lock your notebook 24 To attach a security cable 25 To protect against...
... battery 10 Step 2: Connect AC power 11 Step 3: Connect a phone line 12 Step 4: Turn on the notebook 13 Step 5: Set up Windows 13 Basic Operation ...15 Operating Your Notebook 16 Default power settings 16 To reset the notebook 17 To change the boot device 17 To use the TouchPad 18 To use the function hot... 21 To use the ALT GR key 21 Using CDs or DVDs 22 To insert or remove a CD or DVD 22 To play DVD movies 23 To create or copy CDs 23 Securing Your Notebook 24 To set up password protection 24 To lock your notebook 24 To attach a security cable 25 To protect against...
Reference Guide
Page 26
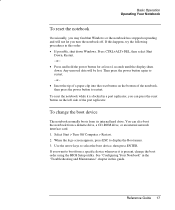
...boot from a specific device whenever it is present, change the boot device The notebook normally boots from a diskette drive, a CD-ROM drive, or an internal network interface card. 1. See "Configuring Your Notebook" in the "Troubleshooting and Maintenance" chapter in this guide. Reference Guide 17 ...order using the BIOS Setup utility. Select Start > Turn Off Computer > Restart. 2. Basic Operation Operating Your Notebook To reset the notebook Occasionally, you may find that Windows or the notebook has stopped responding and will be lost. You can press the reset button on the bottom ...
...boot from a specific device whenever it is present, change the boot device The notebook normally boots from a diskette drive, a CD-ROM drive, or an internal network interface card. 1. See "Configuring Your Notebook" in the "Troubleshooting and Maintenance" chapter in this guide. Reference Guide 17 ...order using the BIOS Setup utility. Select Start > Turn Off Computer > Restart. 2. Basic Operation Operating Your Notebook To reset the notebook Occasionally, you may find that Windows or the notebook has stopped responding and will be lost. You can press the reset button on the bottom ...
Reference Guide
Page 31
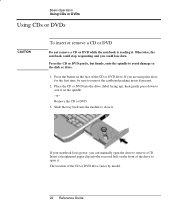
... to close it . Press the button on the spindle. -or- Remove the CD or DVD. 3. If your notebook loses power, you could lose data. Insert a straightened paper clip into the module to seat it . Otherwise, the notebook could stop responding and you can manually open the drive to open it on... packing insert if present. 2. Slide the tray back into the recessed hole on the front of the drive to remove a CD. Basic Operation Using CDs or DVDs Using CDs or DVDs CAUTION To insert or remove a CD or DVD Do not remove a CD or DVD while the notebook is reading it . The location of the...
... to close it . Press the button on the spindle. -or- Remove the CD or DVD. 3. If your notebook loses power, you could lose data. Insert a straightened paper clip into the module to seat it . Otherwise, the notebook could stop responding and you can manually open the drive to open it on... packing insert if present. 2. Slide the tray back into the recessed hole on the front of the drive to remove a CD. Basic Operation Using CDs or DVDs Using CDs or DVDs CAUTION To insert or remove a CD or DVD Do not remove a CD or DVD while the notebook is reading it . The location of the...

Reference Guide
Page 32
... includes software such as Roxio Easy CD Creator that lets you play DVD movies. If you get a region code error, you are included with the software. Hint Important Basic Operation Using CDs or DVDs To play DVD movies If your notebook is equipped with a DVD/CD-RW combo drive, it also includes... a DVD player software that lets you copy or create CDs. Follow the instructions that are trying to the region ...
... includes software such as Roxio Easy CD Creator that lets you play DVD movies. If you get a region code error, you are included with the software. Hint Important Basic Operation Using CDs or DVDs To play DVD movies If your notebook is equipped with a DVD/CD-RW combo drive, it also includes... a DVD player software that lets you copy or create CDs. Follow the instructions that are trying to the region ...
Reference Guide
Page 37
...; Use a virus-scanning program (such as the Norton AntiVirus program included with your notebook) to check the integrity of your files and operating system. • Check your notebook • You can clean the notebook with a soft cloth dampened with clean water or with water containing a mild detergent.... use abrasive cleaners, especially on the display. One-Touch button at your work regularly. Copy files to diskettes, CDs, DVDs, and other software that interrupts operation while the system is starting or stopping. • Back up your desk, connect an external monitor and turn off...
...; Use a virus-scanning program (such as the Norton AntiVirus program included with your notebook) to check the integrity of your files and operating system. • Check your notebook • You can clean the notebook with a soft cloth dampened with clean water or with water containing a mild detergent.... use abrasive cleaners, especially on the display. One-Touch button at your work regularly. Copy files to diskettes, CDs, DVDs, and other software that interrupts operation while the system is starting or stopping. • Back up your desk, connect an external monitor and turn off...
Reference Guide
Page 73
Add-On Devices Replacing the Hard Drive To prepare a new hard drive When you install a new hard drive, you want to work with your notebook. If you also need to prepare it to be able to restore the Windows software and operating system that were originally installed on your notebook, use the QuickRestore System Recovery CD included with your notebook. 64 Reference Guide
Add-On Devices Replacing the Hard Drive To prepare a new hard drive When you install a new hard drive, you want to work with your notebook. If you also need to prepare it to be able to restore the Windows software and operating system that were originally installed on your notebook, use the QuickRestore System Recovery CD included with your notebook. 64 Reference Guide

Reference Guide
Page 76
... a different region. See the "Basic Operation" chapter for the playback settings. These codes prevent DVD movies from a CD or DVD • Make sure the CD or DVD is bootable, such as the QuickRestore System Recovery CD included with your notebook. • Make sure the CD-ROM/DVD drive is muted. Reference Guide...on battery power, try reducing the Master volume by selecting the speaker icon in which they are sold. If the notebook cannot read a CD or DVD • For a single-sided CD or DVD, make sure the microphone is selected as the boot device. If a DVD plays erratically • ...
... a different region. See the "Basic Operation" chapter for the playback settings. These codes prevent DVD movies from a CD or DVD • Make sure the CD or DVD is bootable, such as the QuickRestore System Recovery CD included with your notebook. • Make sure the CD-ROM/DVD drive is muted. Reference Guide...on battery power, try reducing the Master volume by selecting the speaker icon in which they are sold. If the notebook cannot read a CD or DVD • For a single-sided CD or DVD, make sure the microphone is selected as the boot device. If a DVD plays erratically • ...

Reference Guide
Page 87
...If you're using a power strip, remove the AC adapter from a CD or DVD), the value will probably show less time remaining than a year or two old, you will continue using only the AC adapter included with your notebook (or other approved adapter that meets the power requirements of the suggestions... from the power strip and plug it will not charge properly. • If available, try another battery and AC adapter. If the notebook has a short operating time • Conserve power using any nearby heat source. If the battery gets too hot, it directly into the power source and the...
...If you're using a power strip, remove the AC adapter from a CD or DVD), the value will probably show less time remaining than a year or two old, you will continue using only the AC adapter included with your notebook (or other approved adapter that meets the power requirements of the suggestions... from the power strip and plug it will not charge properly. • If available, try another battery and AC adapter. If the notebook has a short operating time • Conserve power using any nearby heat source. If the battery gets too hot, it directly into the power source and the...
Reference Guide
Page 119
...mute button, 3 B battery best use of, 34 checking status, 32 extending life of, 34 installing, 10 location, 2, 3 low power warning, 33 operating time, 34, 78 release latch, 6, 7 safety, 98 saving power, 34 status lights, 32 troubleshooting, 77 BIOS password, 24 BIOS Setup utility Boot ... 87 brightness, adjusting, 19 business cards, 46 C Cable lock, 25 Caps Lock, 9 Cardbus cards, 48 cards, PCMCIA, 48 CD-ROM drive creating or copying CDs, 23 inserting CD, 20, 22 location, 2, 3 removing CD, 20, 22 CDs copying/creating, 23 recommended media, 23 cleaning the notebook, 28 configuring BIOS settings, 84...
...mute button, 3 B battery best use of, 34 checking status, 32 extending life of, 34 installing, 10 location, 2, 3 low power warning, 33 operating time, 34, 78 release latch, 6, 7 safety, 98 saving power, 34 status lights, 32 troubleshooting, 77 BIOS password, 24 BIOS Setup utility Boot ... 87 brightness, adjusting, 19 business cards, 46 C Cable lock, 25 Caps Lock, 9 Cardbus cards, 48 cards, PCMCIA, 48 CD-ROM drive creating or copying CDs, 23 inserting CD, 20, 22 location, 2, 3 removing CD, 20, 22 CDs copying/creating, 23 recommended media, 23 cleaning the notebook, 28 configuring BIOS settings, 84...

Maintenance and Service Guide
Page 3
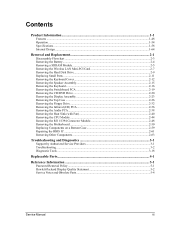
Contents Introduction...vii Product Information...1-1 Features ...1-8 Operation...1-14 Specifications ...1-18 Internal Design...1-24 Removal and Replacement 2-1 Disassembly Flowchart ...2-3 Removing the Battery ...2-4 Removing an SDRAM Module...2-5 Removing the Wireless LAN...Parts ...2-12 Removing the Keyboard Cover...2-13 Removing the Speaker Assembly ...2-15 Removing the Keyboard ...2-16 Removing the Switchboard PCA ...2-19 Removing the CD/DVD Drive...2-20 Removing the Display Assembly...2-23 Removing the Top Case ...2-26 Removing the Floppy Drive...2-32 Removing the Infrared (I/R) PCA...2-36...
Contents Introduction...vii Product Information...1-1 Features ...1-8 Operation...1-14 Specifications ...1-18 Internal Design...1-24 Removal and Replacement 2-1 Disassembly Flowchart ...2-3 Removing the Battery ...2-4 Removing an SDRAM Module...2-5 Removing the Wireless LAN...Parts ...2-12 Removing the Keyboard Cover...2-13 Removing the Speaker Assembly ...2-15 Removing the Keyboard ...2-16 Removing the Switchboard PCA ...2-19 Removing the CD/DVD Drive...2-20 Removing the Display Assembly...2-23 Removing the Top Case ...2-26 Removing the Floppy Drive...2-32 Removing the Infrared (I/R) PCA...2-36...
Maintenance and Service Guide
Page 6
...and ze4100 Notebook PCs, HP Compaq nx9010, nx9008, nx9005, and nx9000 Notebook PCs, Compaq Evo Notebook 1050v and 1010v Series, and Compaq Presario 2500, 2100, and 1100 Series Mobile PCs. These notebook models use by authorized service personnel while installing, servicing, and repairing these notebooks. Outside ... information for Windows operating systems. Service Manual vii This manual is for membership within the U.S. Source HP Notebook Web site Address or Number http://www.hp.com/notebooks Comments Compaq Notebook Web site HP Business Support Web site HP Asia Pacific Channel ...
...and ze4100 Notebook PCs, HP Compaq nx9010, nx9008, nx9005, and nx9000 Notebook PCs, Compaq Evo Notebook 1050v and 1010v Series, and Compaq Presario 2500, 2100, and 1100 Series Mobile PCs. These notebook models use by authorized service personnel while installing, servicing, and repairing these notebooks. Outside ... information for Windows operating systems. Service Manual vii This manual is for membership within the U.S. Source HP Notebook Web site Address or Number http://www.hp.com/notebooks Comments Compaq Notebook Web site HP Business Support Web site HP Asia Pacific Channel ...
Maintenance and Service Guide
Page 41
...CD/DVD drive as the first boot device, and then press enter. 6. Turn on -screen instructions for installing the drivers. 10. select Advanced and then select to display the Boot menu. 5. When the HP logo appears, press esc to restore only the C partition. 7. When prompted to recover the notebook's original operating... until the process completes. 1. When the operating system has been installed and while Windows is not enabled, select Start > Run. Then type D:\SWSETUP\APPINSTL\SETUP.EXE (assuming "D:" is partitioned into the notebook's CD/DVD drive. After the drivers have been ...
...CD/DVD drive as the first boot device, and then press enter. 6. Turn on -screen instructions for installing the drivers. 10. select Advanced and then select to display the Boot menu. 5. When the HP logo appears, press esc to restore only the C partition. 7. When prompted to recover the notebook's original operating... until the process completes. 1. When the operating system has been installed and while Windows is not enabled, select Start > Run. Then type D:\SWSETUP\APPINSTL\SETUP.EXE (assuming "D:" is partitioned into the notebook's CD/DVD drive. After the drivers have been ...
Maintenance and Service Guide
Page 121
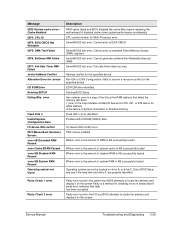
... Not Writeable 02F5: DMA Test Failed 02F6: Software NMI Failed 02F7: Fail-Safe Timer NMI Failed device Address Conflict Allocation Error for: device CD ROM Drive Entering SETUP Failing Bits: nnnn Fixed Disk n Invalid System Configuration Data I/O device IRQ conflict PS/2 Mouse Boot Summary Screen: nnnn... kB Extended RAM Passed nnnn Cache SRAM Passed nnnn KB Shadow RAM Passed nnnn KB System RAM Passed Operating system not found Description RAM cache failed and BIOS disabled the cache May require replacing the motherboard A disabled cache slows system performance ...
... Not Writeable 02F5: DMA Test Failed 02F6: Software NMI Failed 02F7: Fail-Safe Timer NMI Failed device Address Conflict Allocation Error for: device CD ROM Drive Entering SETUP Failing Bits: nnnn Fixed Disk n Invalid System Configuration Data I/O device IRQ conflict PS/2 Mouse Boot Summary Screen: nnnn... kB Extended RAM Passed nnnn Cache SRAM Passed nnnn KB Shadow RAM Passed nnnn KB System RAM Passed Operating system not found Description RAM cache failed and BIOS disabled the cache May require replacing the motherboard A disabled cache slows system performance ...
Service Manual
Page 3
Contents Product Information...1-1 Features ...1-48 Operation ...1-54 Specifications ...1-58 Internal Design ...1-64 Removal and Replacement 2-1 Disassembly Flowchart ...2-3 Removing the Battery...2-4 Removing a SDRAM Module...2-5 Removing the Wireless LAN Mini-PCI... Small Parts ...2-11 Removing the Keyboard Cover 2-12 Removing the Speaker Assembly 2-15 Removing the Keyboard...2-16 Removing the Switchboard PCA 2-19 Removing the CD/DVD Drive ...2-20 Removing the Display Assembly 2-23 Removing the Top Case ...2-26 Removing the Floppy Drive ...2-32 Removing the Infrared (I/R) PCA 2-36...
Contents Product Information...1-1 Features ...1-48 Operation ...1-54 Specifications ...1-58 Internal Design ...1-64 Removal and Replacement 2-1 Disassembly Flowchart ...2-3 Removing the Battery...2-4 Removing a SDRAM Module...2-5 Removing the Wireless LAN Mini-PCI... Small Parts ...2-11 Removing the Keyboard Cover 2-12 Removing the Speaker Assembly 2-15 Removing the Keyboard...2-16 Removing the Switchboard PCA 2-19 Removing the CD/DVD Drive ...2-20 Removing the Display Assembly 2-23 Removing the Top Case ...2-26 Removing the Floppy Drive ...2-32 Removing the Infrared (I/R) PCA 2-36...
Service Manual
Page 6
... for membership within the US. Call (800) 524-3388 for Windows operating systems. Service Manual vii Call (800) 827-6364 for servicing the HP Pavilion ze5300, ze5200, ze4300, ze4200, and ze4100 Notebook PCs, HP nx9010, nx9005, and nx9000 Notebook PCs, Compaq Evo Notebook 1050v and 1010v Series, and Compaq Presario 2500, 2100, and 1100 Series Mobile PCs. Outside US...
... for membership within the US. Call (800) 524-3388 for Windows operating systems. Service Manual vii Call (800) 827-6364 for servicing the HP Pavilion ze5300, ze5200, ze4300, ze4200, and ze4100 Notebook PCs, HP nx9010, nx9005, and nx9000 Notebook PCs, Compaq Evo Notebook 1050v and 1010v Series, and Compaq Presario 2500, 2100, and 1100 Series Mobile PCs. Outside US...

Service Manual
Page 66
...100-240 Vac (50/60 Hz) input, 19 Vdc output, 75 W. 20- Supports wake-on operating system support). Headphone-out and microphone-in speakers. 3D-enhanced audio. Ethernet 10Base-T (10 Mbps) and...hours when system is on. HP Pavilion ze5200, ze4200, ze4100, Compaq Evo N1050v, Compaq Presario 2500, and Compaq Presario 2100 Two slots for PC2100 DDR-266 SDRAM modules. Compaq Evo N1010v and Presario 1100 Two...-DMA 100 interface. 1.44-MB floppy drive (certain models). 24x CD-ROM, or 8x DVD, or CD-RW, or CD-RW/DVD drive (or higher). Hardware 3D acceleration, hardware DVD acceleration...
...100-240 Vac (50/60 Hz) input, 19 Vdc output, 75 W. 20- Supports wake-on operating system support). Headphone-out and microphone-in speakers. 3D-enhanced audio. Ethernet 10Base-T (10 Mbps) and...hours when system is on. HP Pavilion ze5200, ze4200, ze4100, Compaq Evo N1050v, Compaq Presario 2500, and Compaq Presario 2100 Two slots for PC2100 DDR-266 SDRAM modules. Compaq Evo N1010v and Presario 1100 Two...-DMA 100 interface. 1.44-MB floppy drive (certain models). 24x CD-ROM, or 8x DVD, or CD-RW, or CD-RW/DVD drive (or higher). Hardware 3D acceleration, hardware DVD acceleration...
Service Manual
Page 81
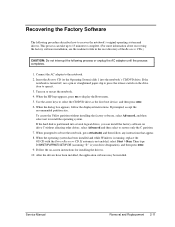
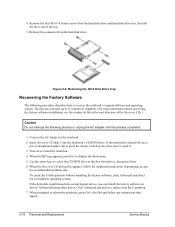
... installation, see the readme.txt file in the root directory of the tray. 5. If the notebook is partitioned into the notebook's CD/DVD drive. Turn on the drive door to install the operating system. To create the Utility partition without affecting other drives. Remove the connector from the hard ...procedure describes how to select the CD/DVD drive as the first boot device, then press Enter. 6. Connect the AC adapter to display the Boot menu. 5. When the HP logo appears, press Esc to the notebook. 2. Click Advanced and select to reboot the notebook, press Ctrl+Alt+Del and ...
... installation, see the readme.txt file in the root directory of the tray. 5. If the notebook is partitioned into the notebook's CD/DVD drive. Turn on the drive door to install the operating system. To create the Utility partition without affecting other drives. Remove the connector from the hard ...procedure describes how to select the CD/DVD drive as the first boot device, then press Enter. 6. Connect the AC adapter to display the Boot menu. 5. When the HP logo appears, press Esc to the notebook. 2. Click Advanced and select to reboot the notebook, press Ctrl+Alt+Del and ...


