Getting Started - Windows 7
Page 6
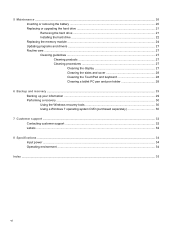
5 Maintenance ...20 Inserting or removing the battery ...20 Replacing or upgrading the hard drive 21 Removing the hard drive ...21 Installing the hard drive ...22 Replacing the memory module ...24 Updating programs and drivers ...27 Routine care ...27 Cleaning guidelines ...27 Cleaning products 27 Cleaning procedures 27 Cleaning the display 27 Cleaning the...
5 Maintenance ...20 Inserting or removing the battery ...20 Replacing or upgrading the hard drive 21 Removing the hard drive ...21 Installing the hard drive ...22 Replacing the memory module ...24 Updating programs and drivers ...27 Routine care ...27 Cleaning guidelines ...27 Cleaning products 27 Cleaning procedures 27 Cleaning the display 27 Cleaning the...
Getting Started - Windows 7
Page 26
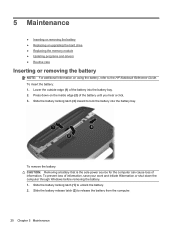
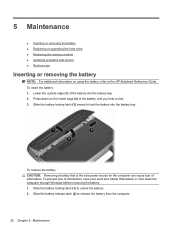
...battery locking latch (1) to release the battery from the computer. 20 Chapter 5 Maintenance Slide the battery locking latch (3) inward to the HP Notebook Reference Guide. Slide the battery release latch (2) to unlock the battery. 2. Press down the computer through Windows before removing the...the battery into the battery bay. 2. 5 Maintenance ● Inserting or removing the battery ● Replacing or upgrading the hard drive ● Replacing the memory module ● Updating programs and drivers ● Routine care Inserting or removing the battery NOTE: For additional information...
...battery locking latch (1) to release the battery from the computer. 20 Chapter 5 Maintenance Slide the battery locking latch (3) inward to the HP Notebook Reference Guide. Slide the battery release latch (2) to unlock the battery. 2. Press down the computer through Windows before removing the...the battery into the battery bay. 2. 5 Maintenance ● Inserting or removing the battery ● Replacing or upgrading the hard drive ● Replacing the memory module ● Updating programs and drivers ● Routine care Inserting or removing the battery NOTE: For additional information...
Getting Started - Windows 7
Page 30
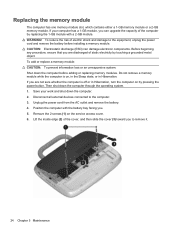
...the battery bay facing you can damage electronic components. CAUTION: Electrostatic discharge (ESD) can upgrade the capacity of static electricity by pressing the power button. Do not remove a memory module while the computer is off or in Hibernation. Disconnect all external devices connected to...information loss or an unresponsive system: Shut down the computer through the operating system. 1. Then shut down the computer before installing a memory module. Unplug the power cord from the AC outlet and remove the battery. 4. Before beginning any procedure, ensure that you to the...
...the battery bay facing you can damage electronic components. CAUTION: Electrostatic discharge (ESD) can upgrade the capacity of static electricity by pressing the power button. Do not remove a memory module while the computer is off or in Hibernation. Disconnect all external devices connected to...information loss or an unresponsive system: Shut down the computer through the operating system. 1. Then shut down the computer before installing a memory module. Unplug the power cord from the AC outlet and remove the battery. 4. Before beginning any procedure, ensure that you to the...
HP Mini 100e Education Edition - Maintenance and Service Guide
Page 9
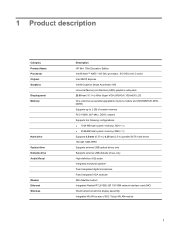
... HP Mini 100e Education Edition Intel® Atom™ N455 1.66-GHz processor, 512-KB Level 2 cache Intel NM10 Express Intel® Graphics Media Accelerator 950 Universal Memory Architecture (UMA) graphics subsystem 25.65-cm (10.1-in) Wide Super VGA (WSVGA) 1024x600 LCD One customer-accessible/upgradable memory ...module slot (SODIMM 667-MHz, DDR3) Supports up to 2 GB of system memory PC3-10600, 667-MHz, DDR3...
... HP Mini 100e Education Edition Intel® Atom™ N455 1.66-GHz processor, 512-KB Level 2 cache Intel NM10 Express Intel® Graphics Media Accelerator 950 Universal Memory Architecture (UMA) graphics subsystem 25.65-cm (10.1-in) Wide Super VGA (WSVGA) 1024x600 LCD One customer-accessible/upgradable memory ...module slot (SODIMM 667-MHz, DDR3) Supports up to 2 GB of system memory PC3-10600, 667-MHz, DDR3...
HP Mini 100e Education Edition - Maintenance and Service Guide
Page 40
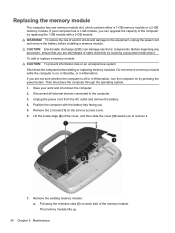
... is off or in Hibernation, turn the computer on, and then shut it by the edges only. If you can upgrade the capacity of the memory module to release the memory module. (The memory module tilts up.) CAUTION: To prevent damage to the computer. 3. Battery (see Service access cover on page 30) ...b. Service access cover (see Battery on page 31) Remove the memory module: 1. Do not touch the components on each side of the computer by first unplugging the power cord from the AC outlet and then unplugging...
... is off or in Hibernation, turn the computer on, and then shut it by the edges only. If you can upgrade the capacity of the memory module to release the memory module. (The memory module tilts up.) CAUTION: To prevent damage to the computer. 3. Battery (see Service access cover on page 30) ...b. Service access cover (see Battery on page 31) Remove the memory module: 1. Do not touch the components on each side of the computer by first unplugging the power cord from the AC outlet and then unplugging...

HP Mini User Guide - SuSE Linux
Page 7
Testing an AC adapter ...34 7 Drives ...35 Handling drives ...35 Replacing or upgrading the hard drive 36 Removing the hard drive ...36 Installing the hard drive ...37 8 External cards and devices ...39 Using the SD Card Reader ...39 ... ...39 Using a USB device ...40 Connecting a USB device 41 Removing a USB device ...41 Using optional external devices ...41 Using optional external drives 42 9 Memory module ...43 Replacing the memory module ...43 10 Security ...48 Protecting the computer ...48 Using passwords ...48 Setting passwords in the operating system 49 Setting passwords in Setup...
Testing an AC adapter ...34 7 Drives ...35 Handling drives ...35 Replacing or upgrading the hard drive 36 Removing the hard drive ...36 Installing the hard drive ...37 8 External cards and devices ...39 Using the SD Card Reader ...39 ... ...39 Using a USB device ...40 Connecting a USB device 41 Removing a USB device ...41 Using optional external devices ...41 Using optional external drives 42 9 Memory module ...43 Replacing the memory module ...43 10 Security ...48 Protecting the computer ...48 Using passwords ...48 Setting passwords in the operating system 49 Setting passwords in Setup...

HP Mini User Guide - SuSE Linux
Page 51
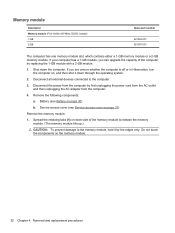
... The computer has one memory module slot, which contains either a 1-GB memory module or a 2-GB memory module. WARNING! CAUTION: Electrostatic discharge (ESD) can upgrade the capacity of static electricity by pressing the power button. If you are not sure whether the computer is on,... with the battery bay facing you can damage electronic components. To add or replace a memory module: CAUTION: To prevent information loss or an unresponsive system: Shut down the computer. 2. Replacing the memory module 43 Unplug the power cord from the AC outlet and remove the battery. 4. Remove...
... The computer has one memory module slot, which contains either a 1-GB memory module or a 2-GB memory module. WARNING! CAUTION: Electrostatic discharge (ESD) can upgrade the capacity of static electricity by pressing the power button. If you are not sure whether the computer is on,... with the battery bay facing you can damage electronic components. To add or replace a memory module: CAUTION: To prevent information loss or an unresponsive system: Shut down the computer. 2. Replacing the memory module 43 Unplug the power cord from the AC outlet and remove the battery. 4. Remove...

Getting Started - Windows XP
Page 6
5 Maintenance ...20 Inserting or removing the battery ...20 Replacing or upgrading the hard drive 21 Removing the hard drive ...21 Installing the hard drive ...22 Replacing the memory module ...24 Updating programs and drivers ...27 Routine care ...27 Cleaning the display ...27 Cleaning the TouchPad and keyboard 27 6 Backup and recovery ...28 Backing...
5 Maintenance ...20 Inserting or removing the battery ...20 Replacing or upgrading the hard drive 21 Removing the hard drive ...21 Installing the hard drive ...22 Replacing the memory module ...24 Updating programs and drivers ...27 Routine care ...27 Cleaning the display ...27 Cleaning the TouchPad and keyboard 27 6 Backup and recovery ...28 Backing...
Getting Started - Windows XP
Page 26
... the battery into the battery bay. 2. 5 Maintenance ● Inserting or removing the battery ● Replacing or upgrading the hard drive ● Replacing the memory module ● Updating programs and drivers ● Routine care Inserting or removing the battery NOTE: For additional information ...on the inside edge (2) of the battery until you hear a click. 3. Slide the battery release latch (2) to the HP Notebook Reference Guide...
... the battery into the battery bay. 2. 5 Maintenance ● Inserting or removing the battery ● Replacing or upgrading the hard drive ● Replacing the memory module ● Updating programs and drivers ● Routine care Inserting or removing the battery NOTE: For additional information ...on the inside edge (2) of the battery until you hear a click. 3. Slide the battery release latch (2) to the HP Notebook Reference Guide...
Getting Started - Windows XP
Page 30
...unresponsive system: Shut down the computer before installing a memory module. Do not remove a memory module while the computer is off or in Hibernation. Disconnect all external devices connected to remove it. 7. CAUTION: Electrostatic discharge (ESD) can upgrade the capacity of the cover, and then slide ...the cover (3) toward you are discharged of the memory module. To reduce the risk of electric shock and damage to the equipment, unplug ...
...unresponsive system: Shut down the computer before installing a memory module. Do not remove a memory module while the computer is off or in Hibernation. Disconnect all external devices connected to remove it. 7. CAUTION: Electrostatic discharge (ESD) can upgrade the capacity of the cover, and then slide ...the cover (3) toward you are discharged of the memory module. To reduce the risk of electric shock and damage to the equipment, unplug ...

