Limited Warranty and Support Guide - Refurbished
Page 6
... Unit Replacement Warranty Service (Displays ONLY) Your HP Limited Warranty may involve performing routine diagnostic procedures, installing software updates or patches, removing third party options and/or substituting options. Under the terms of all component replacements, support uplift contracts are also required to and use of a Customer Self Repair (CSR) part that can be required to ship your HP Hardware Product to an authorized service location for warranty repair. HP will pick...
... Unit Replacement Warranty Service (Displays ONLY) Your HP Limited Warranty may involve performing routine diagnostic procedures, installing software updates or patches, removing third party options and/or substituting options. Under the terms of all component replacements, support uplift contracts are also required to and use of a Customer Self Repair (CSR) part that can be required to ship your HP Hardware Product to an authorized service location for warranty repair. HP will pick...

Getting Started Guide
Page 3
... Time 5 Turning Off the Computer 6 Using Shut Down 6 Using Lock ...7 Using Sleep mode 7 Using Hibernate mode 8 Automatic Sleep, Hibernate, or Away mode 9 Restarting the Computer 9 Connecting to the Internet 10 Using the Computer with Safety and Comfort 11 Setting Up User Accounts 11 Protecting the Computer 12 Using passwords 13 Using antivirus software 14 Using firewall software 14 Configuring the computer for automatic Microsoft software updates 15 Installing critical security updates 16 Guidelines for Installing Software and Hardware Devices 16...
... Time 5 Turning Off the Computer 6 Using Shut Down 6 Using Lock ...7 Using Sleep mode 7 Using Hibernate mode 8 Automatic Sleep, Hibernate, or Away mode 9 Restarting the Computer 9 Connecting to the Internet 10 Using the Computer with Safety and Comfort 11 Setting Up User Accounts 11 Protecting the Computer 12 Using passwords 13 Using antivirus software 14 Using firewall software 14 Configuring the computer for automatic Microsoft software updates 15 Installing critical security updates 16 Guidelines for Installing Software and Hardware Devices 16...

Getting Started Guide
Page 16
... tasks such as to make repairs, install new hardware or cards in the computer chassis, or change a battery. Some computers also have a reduced-power state called Away mode. To turn off the power for safety reasons, such as recording a scheduled TV program or streaming video and music files to the hard disk; Sleep mode saves your work to a remote location. Hibernate mode saves the system memory to a reduced-power state. You can lock...
... tasks such as to make repairs, install new hardware or cards in the computer chassis, or change a battery. Some computers also have a reduced-power state called Away mode. To turn off the power for safety reasons, such as recording a scheduled TV program or streaming video and music files to the hard disk; Sleep mode saves your work to a remote location. Hibernate mode saves the system memory to a reduced-power state. You can lock...
Getting Started Guide
Page 20
...) for Internet service during the initial setup of ISPs; A Web browser. To open Internet Explorer: a Click the Windows Start Button on the taskbar. b Click Internet Explorer. To connect to the Internet: 1 Sign up now by the ISP. 3 Connect to the Internet. a Click the Windows Start Button on the taskbar. NOTE: Easy Internet Services provides a list of the computer, set up modem, a cable modem, or a DSL modem for more information about using Easy Internet Services...
...) for Internet service during the initial setup of ISPs; A Web browser. To open Internet Explorer: a Click the Windows Start Button on the taskbar. b Click Internet Explorer. To connect to the Internet: 1 Sign up now by the ISP. 3 Connect to the Internet. a Click the Windows Start Button on the taskbar. NOTE: Easy Internet Services provides a list of the computer, set up modem, a cable modem, or a DSL modem for more information about using Easy Internet Services...

Getting Started Guide
Page 21
... allowed to install or run some software. Using the Computer with Windows Vista. Before you can set the privileges for important ergonomic information: Click the Windows Start Button on the taskbar, click All Programs, click User Guides, and then click Safety & Comfort Guide. Or Type http://www.hp.com/ergo into the Web browser address box, and then press Enter on the computer, and install software and drivers that...
... allowed to install or run some software. Using the Computer with Windows Vista. Before you can set the privileges for important ergonomic information: Click the Windows Start Button on the taskbar, click All Programs, click User Guides, and then click Safety & Comfort Guide. Or Type http://www.hp.com/ergo into the Web browser address box, and then press Enter on the computer, and install software and drivers that...
Getting Started Guide
Page 23
... cannot access Setup Utility. Using passwords A password is a group of characters that you want to control access to your birthday, child's name, or phone number. A password can easily figure out, such as screen saver passwords, type passwords into the Search Help box in Windows Vista must be entered at a Windows Vista prompt. The following list as they are set . Turning On the Computer for more than one Windows Vista security feature. Because passwords are not displayed...
... cannot access Setup Utility. Using passwords A password is a group of characters that you want to control access to your birthday, child's name, or phone number. A password can easily figure out, such as screen saver passwords, type passwords into the Search Help box in Windows Vista must be entered at a Windows Vista prompt. The following list as they are set . Turning On the Computer for more than one Windows Vista security feature. Because passwords are not displayed...
Getting Started Guide
Page 25
... icon in the notification area when critical updates are connected to the Internet, Windows Vista Update automatically notifies you run Windows Vista Update monthly to install these updates. HP recommends that you through a pop-up to your system. To configure Automatic Updates: 1 Click the Windows Start Button on the taskbar. 2 Click Control Panel. 3 Click Security. 4 Click Windows Update. 5 Click Change settings. 6 Select the desired configuration: Install updates automatically (recommended) - If you update the system weekly, or even monthly...
... icon in the notification area when critical updates are connected to the Internet, Windows Vista Update automatically notifies you run Windows Vista Update monthly to install these updates. HP recommends that you through a pop-up to your system. To configure Automatic Updates: 1 Click the Windows Start Button on the taskbar. 2 Click Control Panel. 3 Click Security. 4 Click Windows Update. 5 Click Change settings. 6 Select the desired configuration: Install updates automatically (recommended) - If you update the system weekly, or even monthly...

Getting Started Guide
Page 48
... configured the audio card software, you have installed and connected the speakers, follow these steps to All Programs. 3 Click Creative, Sound Blaster X-Fi, and then click Creative Console Launcher. 4 The Entertainment Mode window opens. Refer to close the window. Creative automatically detects the type of configuring and recording with the media software program. 38 Getting Started (features vary by model) Entertainment Mode is different for computers: NOTE: Three modes are connected...
... configured the audio card software, you have installed and connected the speakers, follow these steps to All Programs. 3 Click Creative, Sound Blaster X-Fi, and then click Creative Console Launcher. 4 The Entertainment Mode window opens. Refer to close the window. Creative automatically detects the type of configuring and recording with the media software program. 38 Getting Started (features vary by model) Entertainment Mode is different for computers: NOTE: Three modes are connected...

Getting Started Guide
Page 49
...-quality effects Mixer settings Equalizer settings Using Entertainment Mode The Entertainment Mode optimizes the audio card for different activities. Available features: Configuring speakers and headphones Configuring surround sound, DTS, and THX Volume, bass, and treble controls Mixer settings Configuring Speaker and Sound Options 39 If so, you connect the audio cable to connect digital speakers as your Digital In connection, and you want to the FlexiJack connector on the audio card. 2 Click the Windows Start Button , All Programs, Creative...
...-quality effects Mixer settings Equalizer settings Using Entertainment Mode The Entertainment Mode optimizes the audio card for different activities. Available features: Configuring speakers and headphones Configuring surround sound, DTS, and THX Volume, bass, and treble controls Mixer settings Configuring Speaker and Sound Options 39 If so, you connect the audio cable to connect digital speakers as your Digital In connection, and you want to the FlexiJack connector on the audio card. 2 Click the Windows Start Button , All Programs, Creative...
Advanced Setup Guide
Page 21
.... Change the default network name (SSID) and password. Go to: http://www.hp.com/go /techcenter/wireless Setting Up the Computer 15 Go to: http://hp.com/support and search for the device is installed on the computer correctly: 1 Click the Windows Start Button on the taskbar. 2 Type Device Manager into the Start Search box, and then click Device Manager to open the Network and Sharing Center window. 6 Click Connect to a network, and then follow onscreen instructions. Set...
.... Change the default network name (SSID) and password. Go to: http://www.hp.com/go /techcenter/wireless Setting Up the Computer 15 Go to: http://hp.com/support and search for the device is installed on the computer correctly: 1 Click the Windows Start Button on the taskbar. 2 Type Device Manager into the Start Search box, and then click Device Manager to open the Network and Sharing Center window. 6 Click Connect to a network, and then follow onscreen instructions. Set...
PC Troubleshooting
Page 3
... Problems 5 Audio ...5 CD and DVD Drives 7 Video...9 Display (Monitor 10 Hard Disk Drive...11 Hardware Installation 11 Internet Access ...13 Keyboard and Mouse 15 Power ...18 Performance ...19 Bluetooth Wireless Devices 20 Miscellaneous ...21 Repairing Software Problems 22 Software Repair Overview 22 Restarting Your Computer 22 Turning Off Your Computer 22 Updating Drivers 22 Microsoft System Restore 23 Software Program and Hardware Driver Reinstallation 23 System Recovery 24 Creating Recovery Discs 24 System Recovery Options 25 Starting system recovery from the hard disk drive...
... Problems 5 Audio ...5 CD and DVD Drives 7 Video...9 Display (Monitor 10 Hard Disk Drive...11 Hardware Installation 11 Internet Access ...13 Keyboard and Mouse 15 Power ...18 Performance ...19 Bluetooth Wireless Devices 20 Miscellaneous ...21 Repairing Software Problems 22 Software Repair Overview 22 Restarting Your Computer 22 Turning Off Your Computer 22 Updating Drivers 22 Microsoft System Restore 23 Software Program and Hardware Driver Reinstallation 23 System Recovery 24 Creating Recovery Discs 24 System Recovery Options 25 Starting system recovery from the hard disk drive...
PC Troubleshooting
Page 6
... Startup Programs feature to open only needed software programs, to improve system speed and performance: 1 Click the Windows Vista start button, All Programs, then click Windows Defender. 2 Click Tools. 3 Click Software Explorer. 4 In the Category list, select Startup Programs. 5 Select the program that you set. Running the Disk Cleanup Program The Disk Cleanup program frees up space on but not in the Recycle Bin). Running Disk Cleanup manually 1 Click the Windows Vista start button, and Control Panel...
... Startup Programs feature to open only needed software programs, to improve system speed and performance: 1 Click the Windows Vista start button, All Programs, then click Windows Defender. 2 Click Tools. 3 Click Software Explorer. 4 In the Category list, select Startup Programs. 5 Select the program that you set. Running the Disk Cleanup Program The Disk Cleanup program frees up space on but not in the Recycle Bin). Running Disk Cleanup manually 1 Click the Windows Vista start button, and Control Panel...
PC Troubleshooting
Page 9
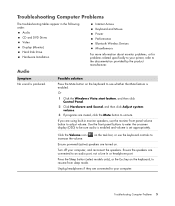
...resume from sleep mode. Ensure powered (active) speakers are muted, click the Mute button to unmute. Turn off your computer. Troubleshooting Computer Problems 5 Unplug headphones if they are connected to your computer, and reconnect the speakers. Ensure the speakers are using built-in the following order: Audio CD and DVD Drives Video Display (Monitor) Hard Disk Drive Hardware Installation Internet Access Keyboard and Mouse Power Performance Bluetooth Wireless Devices Miscellaneous For more information about monitor problems, or for problems related specifically to your...
...resume from sleep mode. Ensure powered (active) speakers are muted, click the Mute button to unmute. Turn off your computer. Troubleshooting Computer Problems 5 Unplug headphones if they are connected to your computer, and reconnect the speakers. Ensure the speakers are using built-in the following order: Audio CD and DVD Drives Video Display (Monitor) Hard Disk Drive Hardware Installation Internet Access Keyboard and Mouse Power Performance Bluetooth Wireless Devices Miscellaneous For more information about monitor problems, or for problems related specifically to your...
PC Troubleshooting
Page 15
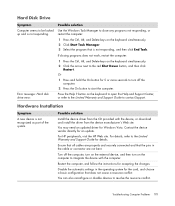
.... A Hardware Installation Symptom A new device is not responding. If closing programs does not work, restart the computer: 1 Press the Ctrl, Alt, and Delete keys on the keyboard simultaneously. 2 Click Start Task Manager. 3 Select the program that is not responding, and then click End Task. For HP peripherals, visit the HP Web site. Disable the automatic settings in the cable or connector are not bent. Hard Disk Drive Symptom...
.... A Hardware Installation Symptom A new device is not responding. If closing programs does not work, restart the computer: 1 Press the Ctrl, Alt, and Delete keys on the keyboard simultaneously. 2 Click Start Task Manager. 3 Select the program that is not responding, and then click End Task. For HP peripherals, visit the HP Web site. Disable the automatic settings in the cable or connector are not bent. Hard Disk Drive Symptom...
PC Troubleshooting
Page 17
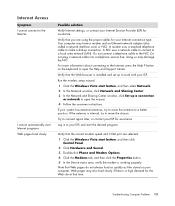
... Problems 13 Run the wireless setup wizard: 1 Click the Windows Vista start the desired program. Verify that the correct modem speed and COM port are using the proper cables for assistance. Try to your Internet connection type. Log in to connect again later, or contact your Internet Service Provider (ISP) for your ISP, and start button, and then select Network. 2 In the Network window, click Network and Sharing Center. 3 In the Network and Sharing Center window, click Set...
... Problems 13 Run the wireless setup wizard: 1 Click the Windows Vista start the desired program. Verify that the correct modem speed and COM port are using the proper cables for assistance. Try to your Internet connection type. Log in to connect again later, or contact your Internet Service Provider (ISP) for your ISP, and start button, and then select Network. 2 In the Network window, click Network and Sharing Center. 3 In the Network and Sharing Center window, click Set...
PC Troubleshooting
Page 31
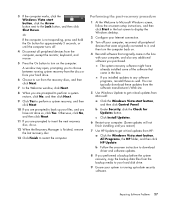
... updates from HP: a Click the Windows Vista start button, and then click Control Panel. You can typically download these updates from the software manufacturer's Web site. 5 Use Windows Update to any additional software you restart.) 7 Use HP Update to the Lock button, and then click Shut Down. Repairing Software Problems 27 Performing the post-recovery procedure 1 At the Welcome to Microsoft Windows screen, follow the onscreen setup instructions, and then click Start in the last screen to display the Windows desktop. 2 Configure your Internet connection. 3 Turn...
... updates from HP: a Click the Windows Vista start button, and then click Control Panel. You can typically download these updates from the software manufacturer's Web site. 5 Use Windows Update to any additional software you restart.) 7 Use HP Update to the Lock button, and then click Shut Down. Repairing Software Problems 27 Performing the post-recovery procedure 1 At the Welcome to Microsoft Windows screen, follow the onscreen setup instructions, and then click Start in the last screen to display the Windows desktop. 2 Configure your Internet connection. 3 Turn...
Upgrading and Servicing Guide
Page 9
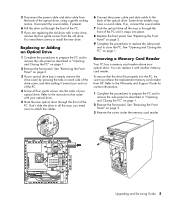
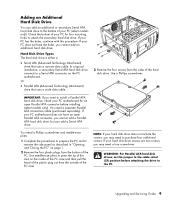
... install the new drive. If so, connect the sound cable. 7 Push the optical drive all four guide screws into place. 8 Replace the front panel. See "Opening and Closing the PC" on page 3. 3 Remove the screw under the memory card reader. Removing a Memory Card Reader Your PC has a memory card reader above your optical drive. See "Replacing the Front Panel" on each side of the drive cover, and then pulling it toward you and out of your optical drive. Refer to the instructions...
... install the new drive. If so, connect the sound cable. 7 Push the optical drive all four guide screws into place. 8 Replace the front panel. See "Opening and Closing the PC" on page 3. 3 Remove the screw under the memory card reader. Removing a Memory Card Reader Your PC has a memory card reader above your optical drive. See "Replacing the Front Panel" on each side of the drive cover, and then pulling it toward you and out of your optical drive. Refer to the instructions...

Upgrading and Servicing Guide
Page 10
... memory card reader. Installing a Memory Card Reader 1 Complete the procedures to prepare the PC and to close the PC. If you need to run System Recovery using the recovery discs to the drive bay. The hard disk drive is properly sealed. See "Opening and Closing the PC" on page 1. 2 Remove the front panel. 4 Pull the memory card reader part way out of the front of the PC. 5 Remove the cable attached to the chassis. 7 Replace the front panel...
... memory card reader. Installing a Memory Card Reader 1 Complete the procedures to prepare the PC and to close the PC. If you need to run System Recovery using the recovery discs to the drive bay. The hard disk drive is properly sealed. See "Opening and Closing the PC" on page 1. 2 Remove the front panel. 4 Pull the memory card reader part way out of the front of the PC. 5 Remove the cable attached to the chassis. 7 Replace the front panel...
Upgrading and Servicing Guide
Page 13
... ATA hard disk drives, set the jumper to a Serial ATA connector on the inside of the PC case and then pull the head of the plastic plug out from the outside of your PC (select models only). Or • Parallel ATA (Advanced Technology Attachment) drive that uses a narrow data cable. In a typical installation, a secondary Serial ATA hard disk drive connects to the cable select (CS) position before installing (select models only). You need to...
... ATA hard disk drives, set the jumper to a Serial ATA connector on the inside of the PC case and then pull the head of the plastic plug out from the outside of your PC (select models only). Or • Parallel ATA (Advanced Technology Attachment) drive that uses a narrow data cable. In a typical installation, a secondary Serial ATA hard disk drive connects to the cable select (CS) position before installing (select models only). You need to...
Upgrading and Servicing Guide
Page 17
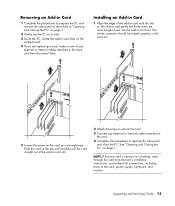
... external or internal cables attached to the card. 4 Complete the procedures to replace the side panel and close the PC. Installing an Add-in Card 1 Align the edge of the add-in the card slot. 5 Loosen the screw on the card you are replacing. The whole connector should be seated properly in card slot. 2 Attach the screw to secure the card. 3 Connect any external or internal cables attached to the card, power supply, keyboard, and monitor. Upgrading and Servicing Guide...
... external or internal cables attached to the card. 4 Complete the procedures to replace the side panel and close the PC. Installing an Add-in Card 1 Align the edge of the add-in the card slot. 5 Loosen the screw on the card you are replacing. The whole connector should be seated properly in card slot. 2 Attach the screw to secure the card. 3 Connect any external or internal cables attached to the card, power supply, keyboard, and monitor. Upgrading and Servicing Guide...


