Site Preparation Guide
Page 5
...electrical system used to use after a few simple installation procedures described in detail in the Assembly instructions. Documentation The following manuals are provided with all requirements for the equipment. See RIP workstation characteristics on page 6, Networking on page 6, and ... supplies. A well prepared site helps to ensure complete compliance with your equipment, and can be downloaded from http://www.hp.com/go/Latex300/manuals/. ● Introductory information ● Limited warranty ● Legal information ● Site preparation guide (this guide thoroughly ...
...electrical system used to use after a few simple installation procedures described in detail in the Assembly instructions. Documentation The following manuals are provided with all requirements for the equipment. See RIP workstation characteristics on page 6, Networking on page 6, and ... supplies. A well prepared site helps to ensure complete compliance with your equipment, and can be downloaded from http://www.hp.com/go/Latex300/manuals/. ● Introductory information ● Limited warranty ● Legal information ● Site preparation guide (this guide thoroughly ...
Installation step by step AMS Only
Page 1
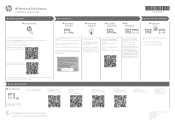
... 3. Installation Day 2 Assemble the cutter 3 Download software 4 P&C Integration C. The SAi card with Production Manager: http://www.hp.com/go /latex115printandcut/manuals/ 2. When finalized, two programs will now integrate the printer, cutter and RIP. HP Latex Printers Support: http://hp.com/supportvideos/ 2. Learn more about how to operate each product, and how to download the RIP...
... 3. Installation Day 2 Assemble the cutter 3 Download software 4 P&C Integration C. The SAi card with Production Manager: http://www.hp.com/go /latex115printandcut/manuals/ 2. When finalized, two programs will now integrate the printer, cutter and RIP. HP Latex Printers Support: http://hp.com/supportvideos/ 2. Learn more about how to operate each product, and how to download the RIP...
User Guide
Page 6
...to cut completely through some substrates ● Compatible with the cutter Optional accessories Consumables HP 54 Basic Cutter, HP Latex 54 Cutter, and HP Latex 64 Cutter HP standard blades (2) HP cut flexible substrates accurately. Welcome to your printer, you will need Raster Image Processor ... knife HP 3-in substrate flanges HP FlexiPrint and Cut RIP license HP Latex Cutter Extended Kit HP Latex 2-in the box is a drag-knife contour cutter designed to keep substrates on a separate computer. RIP software is available from http://www.hp.com/go/latex115printandcut/manuals/: ●...
...to cut completely through some substrates ● Compatible with the cutter Optional accessories Consumables HP 54 Basic Cutter, HP Latex 54 Cutter, and HP Latex 64 Cutter HP standard blades (2) HP cut flexible substrates accurately. Welcome to your printer, you will need Raster Image Processor ... knife HP 3-in substrate flanges HP FlexiPrint and Cut RIP license HP Latex Cutter Extended Kit HP Latex 2-in the box is a drag-knife contour cutter designed to keep substrates on a separate computer. RIP software is available from http://www.hp.com/go/latex115printandcut/manuals/: ●...
User Guide
Page 9
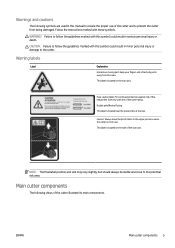
... should always be visible and close to follow the guidelines marked with these symbols. WARNING! Keep your fingers and other body parts away from this manual to ensure the proper use . Caution: Always leave the pinch rollers in the upper positions when the cutter is located near the power inlet, at...
... should always be visible and close to follow the guidelines marked with these symbols. WARNING! Keep your fingers and other body parts away from this manual to ensure the proper use . Caution: Always leave the pinch rollers in the upper positions when the cutter is located near the power inlet, at...
User Guide
Page 14
...the product). The RIP you are using, and its version number. - To reinstall: http://www.hp.com/go /latex115/manuals/. Registration and communication with HP: http://www.hp.com/communities/HPLatex/. The Quick Response (QR) code images found in some parts of this guide provide... number. User training (quick guide) is provided by telephone. When you can find detailed information about our HP Latex products and applications, and use the cutter: http://www.hp.com/supportvideos/ or http://www.youtube.com/ HPSupportAdvanced. If this guide. ● Review your software documentation,...
...the product). The RIP you are using, and its version number. - To reinstall: http://www.hp.com/go /latex115/manuals/. Registration and communication with HP: http://www.hp.com/communities/HPLatex/. The Quick Response (QR) code images found in some parts of this guide provide... number. User training (quick guide) is provided by telephone. When you can find detailed information about our HP Latex products and applications, and use the cutter: http://www.hp.com/supportvideos/ or http://www.youtube.com/ HPSupportAdvanced. If this guide. ● Review your software documentation,...
User Guide
Page 19
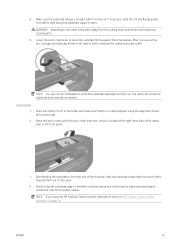
...body parts away from the cutting area, where there are not recommended to unroll the substrate manually from the roll. NOTE: You are hazardous moving parts. 9. Load a sheet 1. NOTE: If you have the HP 54 Basic Cutter, load the substrate as needed. Lower the pinch-roller lever to the... the drive sleeves. Make sure the substrate follows a straight path from the rear of the cutter. 4. Start feeding the substrate in HP 54 Basic Cutter loading positions on the leftmost drive sleeve and check that it is positioned over the long drive sleeve. ENWW 15 8.
...body parts away from the cutting area, where there are not recommended to unroll the substrate manually from the roll. NOTE: You are hazardous moving parts. 9. Load a sheet 1. NOTE: If you have the HP 54 Basic Cutter, load the substrate as needed. Lower the pinch-roller lever to the... the drive sleeves. Make sure the substrate follows a straight path from the rear of the cutter. 4. Start feeding the substrate in HP 54 Basic Cutter loading positions on the leftmost drive sleeve and check that it is positioned over the long drive sleeve. ENWW 15 8.
User Guide
Page 20
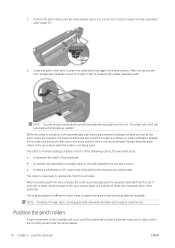
.... Position the pinch rollers Proper movement of longer signs can be guaranteed only when the full load procedure is now ready to unroll the substrate manually from the substrate's outer edges (1). 6. When receiving a job from the computer, the cutter automatically pulls the required substrate from right to left to press the...
.... Position the pinch rollers Proper movement of longer signs can be guaranteed only when the full load procedure is now ready to unroll the substrate manually from the substrate's outer edges (1). 6. When receiving a job from the computer, the cutter automatically pulls the required substrate from right to left to press the...
User Guide
Page 21
...a wide range of substrates. Be sure to the left or right. Make sure all the pinch rollers are raised during which will be moved manually to use . The pinch rollers must be used , by clicking Setup > Printer Cutter Calibration Chart in use the same ink that the sensor...will seriously degrade tracking performance and cutting quality. CAUTION: Always make sure that the pinch rollers are located at the factory to recognize the HP barcode and the markers. Do not reposition the pinch roller by means of the sleeve (area marked with greater reliability. When raised, ...
...a wide range of substrates. Be sure to the left or right. Make sure all the pinch rollers are raised during which will be moved manually to use . The pinch rollers must be used , by clicking Setup > Printer Cutter Calibration Chart in use the same ink that the sensor...will seriously degrade tracking performance and cutting quality. CAUTION: Always make sure that the pinch rollers are located at the factory to recognize the HP barcode and the markers. Do not reposition the pinch roller by means of the sleeve (area marked with greater reliability. When raised, ...

User Guide
Page 22
... calibrated and recorded, press and then . Press when finished. The cutter makes a circular movement while it again. TIP: Remember to its default setting of the manual alignment methods must be reset whenever a new substrate is loaded. Press to confirm. Use , , , and to maneuver the knife on The cutter allows you perform...
... calibrated and recorded, press and then . Press when finished. The cutter makes a circular movement while it again. TIP: Remember to its default setting of the manual alignment methods must be reset whenever a new substrate is loaded. Press to confirm. Use , , , and to maneuver the knife on The cutter allows you perform...
User Guide
Page 28
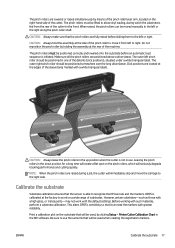
...from the computer. Therefore, you to set the tool above the first mark while loading the substrate. Using the arrows, place the carriage before the HP barcode. 24 Chapter 4 Cut the substrate ENWW It can be used. If OPOS origin is loaded. First make sure the substrate is set to... origin is set to identify the job and retrieve the cut out, the automatic tasks may also involve some manual manipulation. If the OPOS mode is the default setting. Read the HP barcode Some RIPs can then be used to either XY correction line or Center of substrate OPOS X Indicate mark...
...from the computer. Therefore, you to set the tool above the first mark while loading the substrate. Using the arrows, place the carriage before the HP barcode. 24 Chapter 4 Cut the substrate ENWW It can be used. If OPOS origin is loaded. First make sure the substrate is set to... origin is set to identify the job and retrieve the cut out, the automatic tasks may also involve some manual manipulation. If the OPOS mode is the default setting. Read the HP barcode Some RIPs can then be used to either XY correction line or Center of substrate OPOS X Indicate mark...
User Guide
Page 33
...7. The cutter reload the substrate to scroll through the menu until you reach Media alignment. ENWW Detailed OPOS operations 29 Change the OPOS settings manually 1. Turn on the cutter and load the substrate. 2. Press or to check that it reads the markers. If the software does not ...do this, initiate the loading sequence from the cutter's front panel. Register the markers manually 1. Press . Use , , , and to confirm. System setup appears on the screen. Then it is displayed: Markers could not be ...
...7. The cutter reload the substrate to scroll through the menu until you reach Media alignment. ENWW Detailed OPOS operations 29 Change the OPOS settings manually 1. Turn on the cutter and load the substrate. 2. Press or to check that it reads the markers. If the software does not ...do this, initiate the loading sequence from the cutter's front panel. Register the markers manually 1. Press . Use , , , and to confirm. System setup appears on the screen. Then it is displayed: Markers could not be ...

User Guide
Page 43
... 1, Printer uni (unidirectional), Printer bidi (bidirectional), USB port 2, USB port 3, or USB port 4. Other markers will load only two markers in Change the OPOS settings manually on for the first time to the computer, Windows starts a wizard to change the USB class. USB class USB class can be set to it...
... 1, Printer uni (unidirectional), Printer bidi (bidirectional), USB port 2, USB port 3, or USB port 4. Other markers will load only two markers in Change the OPOS settings manually on for the first time to the computer, Windows starts a wizard to change the USB class. USB class USB class can be set to it...

User Guide
Page 44
.... Skew errors occur when the graphic's X and Y axes are required. Xdistance and Y-distance parameters are not perpendicular. Press default alignment method is the most accurate manual alignment method. Use or to change the alignment method. This alignment method requires you to specify the origin and one point along the X axis. X alignment... while it is cutting as soon as created in graphic rotation, skew, and scale. Distance parameters are not required. They require you to register markers manually, using the cutter's front panel.
.... Skew errors occur when the graphic's X and Y axes are required. Xdistance and Y-distance parameters are not perpendicular. Press default alignment method is the most accurate manual alignment method. Use or to change the alignment method. This alignment method requires you to specify the origin and one point along the X axis. X alignment... while it is cutting as soon as created in graphic rotation, skew, and scale. Distance parameters are not required. They require you to register markers manually, using the cutter's front panel.
User Guide
Page 45
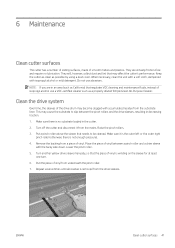
... sleeve for at least one turn. 6. Raise the pinch rollers. 3. Remove the backing from a piece of vinyl is no lubrication. Turn another yellow drive sleeve manually, so that may become clogged with isopropyl alcohol or mild detergent. When necessary, clean the unit with a soft cloth, dampened with accumulated residue from underneath...
... sleeve for at least one turn. 6. Raise the pinch rollers. 3. Remove the backing from a piece of vinyl is no lubrication. Turn another yellow drive sleeve manually, so that may become clogged with isopropyl alcohol or mild detergent. When necessary, clean the unit with a soft cloth, dampened with accumulated residue from underneath...

User Guide
Page 58
... 8 extended load 27 F firmware update 45 front panel 9 main menu 34 system setup menus 35 front view 6 fuse, change 45 H HP barcode 23 HP barcode automation 23 HP barcode, read 24 HP Customer Care 10 54 Index J job direct cut 26 print and cut 26 K kiss cut 28 knife depth 18 knife pressure... 18 knife replacement 43 L labels, warning 5 LAN connection 8 length calibration 20 links 10 M manuals 2 markers register 29 O offset 44 on/off 8 OPOS ...
... 8 extended load 27 F firmware update 45 front panel 9 main menu 34 system setup menus 35 front view 6 fuse, change 45 H HP barcode 23 HP barcode automation 23 HP barcode, read 24 HP Customer Care 10 54 Index J job direct cut 26 print and cut 26 K kiss cut 28 knife depth 18 knife pressure... 18 knife replacement 43 L labels, warning 5 LAN connection 8 length calibration 20 links 10 M manuals 2 markers register 29 O offset 44 on/off 8 OPOS ...
Installation step by step US Only
Page 1
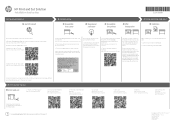
...Printer: Printhead Alignment-User Guide HP Latex 115 Print and Cut Solution 3. Direct Cut: http://www.hp.com/go/ latex300printandcut/video1 E-Learning: http://www.hp.com/go/ latex115printandcut/training User Guide and other Documents: http://www.hp.com/go /latex115/manuals/ 2. When finalized...3. Preparing Installation 1 Get informed B. Watch the assembly videos before arrival: Installation HP Latex 115 Printer* http://www.hp.com/go/latex115/video1 Installation HP Latex 54'' Basic Cutter http://www.hp.com/go / latex300printandcut/video4 5. Save it on top of the cutter to ...
...Printer: Printhead Alignment-User Guide HP Latex 115 Print and Cut Solution 3. Direct Cut: http://www.hp.com/go/ latex300printandcut/video1 E-Learning: http://www.hp.com/go/ latex115printandcut/training User Guide and other Documents: http://www.hp.com/go /latex115/manuals/ 2. When finalized...3. Preparing Installation 1 Get informed B. Watch the assembly videos before arrival: Installation HP Latex 115 Printer* http://www.hp.com/go/latex115/video1 Installation HP Latex 54'' Basic Cutter http://www.hp.com/go / latex300printandcut/video4 5. Save it on top of the cutter to ...
Installation step by step
Page 1
.../ latex115printandcut/training User Guide and other Documents: http://www.hp.com/go/ latex115/manuals/ You can use a USB cable for assembly: http://www.hp.com/go /latex115/video2 1. HP Print and Cut Solution Installation step by step A. There is in the box. HP Latex 115 Printer Support: http://hp.com/supportvideos/ 2. Cutter: Pressure Calibration-User Guide 2. Take...
.../ latex115printandcut/training User Guide and other Documents: http://www.hp.com/go/ latex115/manuals/ You can use a USB cable for assembly: http://www.hp.com/go /latex115/video2 1. HP Print and Cut Solution Installation step by step A. There is in the box. HP Latex 115 Printer Support: http://hp.com/supportvideos/ 2. Cutter: Pressure Calibration-User Guide 2. Take...
Introductory Information
Page 3
...from: ■ http://www.hp.com/go/ latex115printandcut/support ■ http://www.hp.com/go/ latex315printandcut/support ■ http://www.hp.com/go / latex300printandcut/training Legal notices © Copyright 2017 HP Development Company, L.P. Where is it? HP Latex Print and Cut Solution Introductory...the use the cutter can be downloaded from: ■ http://www.hp.com/go/ latex115printandcut/manuals ■ http://www.hp.com/go/ latex315printandcut/manuals ■ http://www.hp.com/go/ latex335printandcut/manuals Further information is a drag-knife contour cutter designed for cutting &#...
...from: ■ http://www.hp.com/go/ latex115printandcut/support ■ http://www.hp.com/go/ latex315printandcut/support ■ http://www.hp.com/go / latex300printandcut/training Legal notices © Copyright 2017 HP Development Company, L.P. Where is it? HP Latex Print and Cut Solution Introductory...the use the cutter can be downloaded from: ■ http://www.hp.com/go/ latex115printandcut/manuals ■ http://www.hp.com/go/ latex315printandcut/manuals ■ http://www.hp.com/go/ latex335printandcut/manuals Further information is a drag-knife contour cutter designed for cutting &#...
Introductory Information
Page 4
...and operating instructions to make sure you may request a printed copy from http://www.hp.com/go/latex115printandcut/manuals, http://www.hp.com/go/latex315printandcut/manuals, or http://www.hp.com/go/latex335printandcut/manuals. Turn off the cutter in locations where children are no operator-serviceable parts inside... technical or editorial errors or omissions contained herein. Unplug the power cord before servicing the cutter. Safety precautions Before using the HP Latex Print and Cut Solution, read the following cases: ● The power cord or plug is not suitable for your service ...
...and operating instructions to make sure you may request a printed copy from http://www.hp.com/go/latex115printandcut/manuals, http://www.hp.com/go/latex315printandcut/manuals, or http://www.hp.com/go/latex335printandcut/manuals. Turn off the cutter in locations where children are no operator-serviceable parts inside... technical or editorial errors or omissions contained herein. Unplug the power cord before servicing the cutter. Safety precautions Before using the HP Latex Print and Cut Solution, read the following cases: ● The power cord or plug is not suitable for your service ...

Introductory Information
Page 7
...OPOS does not sense markers, or senses values with which runs from the head to the PCB. 5. Check whether there is dust on the manual CD. 4. Check the flat cable going from the head to the PCB. 8. position). 4. Remove the crashed substrate and restart the machine... calibration OPOS to the required position. Check the machine with OPOS monitor. 7. If problems continue, call your HP representative. Action: 1. If problems continue, call your HP representative. Cause: The motor driving the machine head cannot move to default and run the OPOS test found on...
...OPOS does not sense markers, or senses values with which runs from the head to the PCB. 5. Check whether there is dust on the manual CD. 4. Check the flat cable going from the head to the PCB. 8. position). 4. Remove the crashed substrate and restart the machine... calibration OPOS to the required position. Check the machine with OPOS monitor. 7. If problems continue, call your HP representative. Action: 1. If problems continue, call your HP representative. Cause: The motor driving the machine head cannot move to default and run the OPOS test found on...


