

Wallcovering Printing Tips and Tricks
Page 2
... of Contents Scope Of This Document ...1 1 TIPS FOR PRINTING WALLCOVERINGS WITH HP LATEX 300 Series PRINTERS 3 1.1 Application Process and Control Variables 3 2 JOB PREPARATION ...4 2.1 Prepare your file in your RIP software (Onyx, Caldera 4 3 MEDIA LOADING ...7 3.1 Substrate Considerations 7 3.2 Loading Narrow Rolls onto the Spindle 7 3.3 Skew Acceptance ...7 3.4 Counterweight Kit for take-up reel 8 4 PRINTER CALIBRATIONS AND...
... of Contents Scope Of This Document ...1 1 TIPS FOR PRINTING WALLCOVERINGS WITH HP LATEX 300 Series PRINTERS 3 1.1 Application Process and Control Variables 3 2 JOB PREPARATION ...4 2.1 Prepare your file in your RIP software (Onyx, Caldera 4 3 MEDIA LOADING ...7 3.1 Substrate Considerations 7 3.2 Loading Narrow Rolls onto the Spindle 7 3.3 Skew Acceptance ...7 3.4 Counterweight Kit for take-up reel 8 4 PRINTER CALIBRATIONS AND...
Wallcovering Printing Tips and Tricks
Page 7
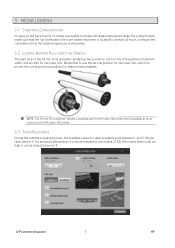
... printing speeds. If the skew level is still too high, it is 3. NOTE: The 76 mm (3 in) diameter spindle is supplied with the HP Latex 360 printer and is available as an accessory for the HP Latex 330 printer. 3.3 SKEW ACCEPTANCE During the substrate loading process, the available values for skew acceptance are between 1 and...
... printing speeds. If the skew level is still too high, it is 3. NOTE: The 76 mm (3 in) diameter spindle is supplied with the HP Latex 360 printer and is available as an accessory for the HP Latex 330 printer. 3.3 SKEW ACCEPTANCE During the substrate loading process, the available values for skew acceptance are between 1 and...
Wallcovering Printing Tips and Tricks
Page 13
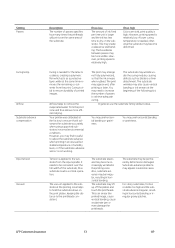
...when using supported substrates in horizontal banding or irregular grainy patches. LFP Customer Assurance 13 HP However, you may be irregular, resulting in an unusual but stable temperature or humidity... level, or if the substrate-advance sensor is needed for the latex to be more efficient drying. The print may be consistent over the same area...in normal environmental conditions. The vacuum applied to remove the evaporated water from the input spindle. Curing is applied to increase the number of printed images. If too high Colors ...
...when using supported substrates in horizontal banding or irregular grainy patches. LFP Customer Assurance 13 HP However, you may be irregular, resulting in an unusual but stable temperature or humidity... level, or if the substrate-advance sensor is needed for the latex to be more efficient drying. The print may be consistent over the same area...in normal environmental conditions. The vacuum applied to remove the evaporated water from the input spindle. Curing is applied to increase the number of printed images. If too high Colors ...

Users Guide
Page 3
... 2 Useful links ...36 When you need help ...36 3 Handle the substrate and troubleshoot substrate issues 38 Overview ...40 Porous substrates ...44 Load a roll onto the spindle ...46 Load a roll into the printer ...50 The ink collector (360 and 370 only) ...53 The loading accessory (360 and 370 only) ...58 Assisted manual...
... 2 Useful links ...36 When you need help ...36 3 Handle the substrate and troubleshoot substrate issues 38 Overview ...40 Porous substrates ...44 Load a roll onto the spindle ...46 Load a roll into the printer ...50 The ink collector (360 and 370 only) ...53 The loading accessory (360 and 370 only) ...58 Assisted manual...
Users Guide
Page 8
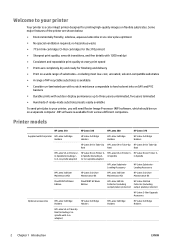
... PVC banners ● Durable prints with the printer HP Latex 3x0 Edge Holders HP Latex 3x0 Edge Holders HP Latex 3x0 Edge Holders HP Latex 3x0 Edge Holders HP Latex 64-in Take-Up HP Latex 64-in Take-Up HP Latex 64-in Take-Up Reel Reel Reel HP Latex 54-in Printer 2- Printer models HP Latex 310 HP Latex 330 HP Latex 360 HP Latex 370 Supplied with outdoor display permanence up to...
... PVC banners ● Durable prints with the printer HP Latex 3x0 Edge Holders HP Latex 3x0 Edge Holders HP Latex 3x0 Edge Holders HP Latex 3x0 Edge Holders HP Latex 64-in Take-Up HP Latex 64-in Take-Up HP Latex 64-in Take-Up Reel Reel Reel HP Latex 54-in Printer 2- Printer models HP Latex 310 HP Latex 330 HP Latex 360 HP Latex 370 Supplied with outdoor display permanence up to...

Users Guide
Page 9
... Spindle in Spindle in Spindle HP Latex 3x0 User Maintenance Kit HP Latex 3x0 User Maintenance Kit HP Latex 3x0 User Maintenance Kit HP Latex 3x0 User Maintenance Kit HP Latex SubstrateLoading Accessory HP Latex SubstrateLoading Accessory HP Latex 360 Ink Collector (including the consumable parts and output platen protector) HP Latex 360 Ink Collector (including the consumable parts and output platen protector) HP 831 Latex Printheads HP 831 Latex Printheads HP 831 Latex Printheads HP...
... Spindle in Spindle in Spindle HP Latex 3x0 User Maintenance Kit HP Latex 3x0 User Maintenance Kit HP Latex 3x0 User Maintenance Kit HP Latex 3x0 User Maintenance Kit HP Latex SubstrateLoading Accessory HP Latex SubstrateLoading Accessory HP Latex 360 Ink Collector (including the consumable parts and output platen protector) HP Latex 360 Ink Collector (including the consumable parts and output platen protector) HP 831 Latex Printheads HP 831 Latex Printheads HP 831 Latex Printheads HP...
Users Guide
Page 15
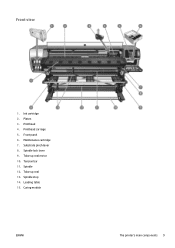
Platen 3. Take-up reel 13. Spindle 12. Take-up reel motor 10. Ink cartridge 2. Front panel 6. Spindle stop 14. Printhead carriage 5. Curing module ENWW The printer's main components 9 Tension bar 11. Maintenance cartridge 7. Spindle lock lever 9. Printhead 4. Loading table 15. Front view 1. Substrate pinch lever 8.
Platen 3. Take-up reel 13. Spindle 12. Take-up reel motor 10. Ink cartridge 2. Front panel 6. Spindle stop 14. Printhead carriage 5. Curing module ENWW The printer's main components 9 Tension bar 11. Maintenance cartridge 7. Spindle lock lever 9. Printhead 4. Loading table 15. Front view 1. Substrate pinch lever 8.

Users Guide
Page 44
3 Handle the substrate and troubleshoot substrate issues ● Overview ● Porous substrates ● Load a roll onto the spindle ● Load a roll into the printer ● The ink collector (360 and 370 only) ● The loading accessory (360 and 370 only) ● Assisted manual ...
3 Handle the substrate and troubleshoot substrate issues ● Overview ● Porous substrates ● Load a roll onto the spindle ● Load a roll into the printer ● The ink collector (360 and 370 only) ● The loading accessory (360 and 370 only) ● Assisted manual ...
Users Guide
Page 52
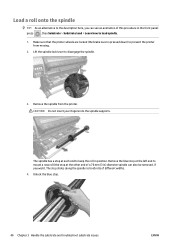
... the printer wheels are locked (the brake lever is pressed down) to disengage the spindle. 3. CAUTION: Do not insert your fingers into the spindle supports. Remove the spindle from moving. 2. Lift the spindle lock lever to prevent the printer from the printer. Remove the blue stop at the... in position. The stop . 46 Chapter 3 Handle the substrate and troubleshoot substrate issues ENWW Unlock the blue stop slides along the spindle to load spindle. 1. The spindle has a stop at each end to keep the roll in the front panel: press , then Substrate > Substrate load > Learn ...
... the printer wheels are locked (the brake lever is pressed down) to disengage the spindle. 3. CAUTION: Do not insert your fingers into the spindle supports. Remove the spindle from moving. 2. Lift the spindle lock lever to prevent the printer from the printer. Remove the blue stop at the... in position. The stop . 46 Chapter 3 Handle the substrate and troubleshoot substrate issues ENWW Unlock the blue stop slides along the spindle to load spindle. 1. The spindle has a stop at each end to keep the roll in the front panel: press , then Substrate > Substrate load > Learn ...
Users Guide
Page 53
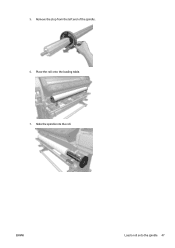
5. Slide the spindle into the roll. Remove the stop from the left end of the spindle. 6. ENWW Load a roll onto the spindle 47 Place the roll onto the loading table. 7.
5. Slide the spindle into the roll. Remove the stop from the left end of the spindle. 6. ENWW Load a roll onto the spindle 47 Place the roll onto the loading table. 7.
Users Guide
Page 54
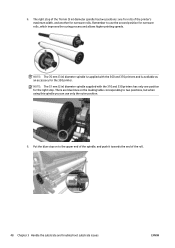
Remember to use only the outer position. 9. NOTE: The 51 mm (2 in) diameter spindle supplied with the 360 and 370 printers and is supplied with the 310 and 330 printers has only one for rolls of the printer's maximum width, and another for narrower rolls. 8. The right stop of the roll.... 48 Chapter 3 Handle the substrate and troubleshoot substrate issues ENWW There are blue lines on to two positions, but when using this spindle you ...
Remember to use only the outer position. 9. NOTE: The 51 mm (2 in) diameter spindle supplied with the 360 and 370 printers and is supplied with the 310 and 330 printers has only one for rolls of the printer's maximum width, and another for narrower rolls. 8. The right stop of the roll.... 48 Chapter 3 Handle the substrate and troubleshoot substrate issues ENWW There are blue lines on to two positions, but when using this spindle you ...

Users Guide
Page 55
10. Avoid trapping your fingers between the spindle and the spindle supports. ENWW Load a roll onto the spindle 49 If you regularly use different substrates, you can change rolls more quickly if you pre-load rolls of trapped fingers For more safety ...information, please see Safety precautions on page 3 CAUTION: Ensure that the sliders in contact with the substrate. 11. Insert the spindle carefully into the left hub, otherwise the spindle will not enter correctly into the printer. WARNING! Risk of different substrates on the floor. Extra...
10. Avoid trapping your fingers between the spindle and the spindle supports. ENWW Load a roll onto the spindle 49 If you regularly use different substrates, you can change rolls more quickly if you pre-load rolls of trapped fingers For more safety ...information, please see Safety precautions on page 3 CAUTION: Ensure that the sliders in contact with the substrate. 11. Insert the spindle carefully into the left hub, otherwise the spindle will not enter correctly into the printer. WARNING! Risk of different substrates on the floor. Extra...
Users Guide
Page 56
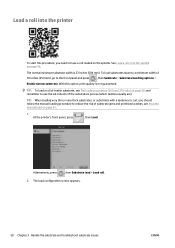
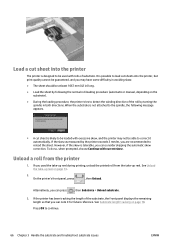
... only) on page 61. 1. Alternatively, press , then Substrate load > Load roll. 2. At the printer's front panel, press , then Load. See Load a roll onto the spindle on the spindle. The load configuration screen appears. 50 Chapter 3 Handle the substrate and troubleshoot substrate issues ENWW TIP: When loading very thin or very thick substrates...
... only) on page 61. 1. Alternatively, press , then Substrate load > Load roll. 2. At the printer's front panel, press , then Load. See Load a roll onto the spindle on the spindle. The load configuration screen appears. 50 Chapter 3 Handle the substrate and troubleshoot substrate issues ENWW TIP: When loading very thin or very thick substrates...

Users Guide
Page 67
... Assisted manual load 61 NOTE: You are recommended to use the normal loading procedure. however, it is not guaranteed. 1. See Load a roll onto the spindle on the spindle. Start the substrate loading procedure as indicated by the ruler on page 50), and make sure to check the Assisted manual load box in...
... Assisted manual load 61 NOTE: You are recommended to use the normal loading procedure. however, it is not guaranteed. 1. See Load a roll onto the spindle on the spindle. Start the substrate loading procedure as indicated by the ruler on page 50), and make sure to check the Assisted manual load box in...
Users Guide
Page 72
When the substrate is not attached to the spindle, the following the normal roll loading procedure (automatic or manual, depending on page 74. 2. Alternatively, you can note it automatically. If you used with rolls .... To do so, when prompted, choose Continue with current skew. See Substrate length tracking on page 78. If the skew as measured by turning the spindle in both directions. If the printer has been tracking the length of substrate.
When the substrate is not attached to the spindle, the following the normal roll loading procedure (automatic or manual, depending on page 74. 2. Alternatively, you can note it automatically. If you used with rolls .... To do so, when prompted, choose Continue with current skew. See Substrate length tracking on page 78. If the skew as measured by turning the spindle in both directions. If the printer has been tracking the length of substrate.
Users Guide
Page 73
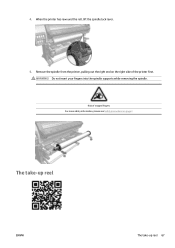
Do not insert your fingers into the spindle supports while removing the spindle. 4. WARNING! Risk of trapped fingers For more safety information, please see Safety precautions on the right side of the printer first. Remove the spindle from the printer, pulling out the right end on page 3 The take-up reel ENWW The take-up reel 67 When the printer has rewound the roll, lift the spindle lock lever. 5.
Do not insert your fingers into the spindle supports while removing the spindle. 4. WARNING! Risk of trapped fingers For more safety information, please see Safety precautions on the right side of the printer first. Remove the spindle from the printer, pulling out the right end on page 3 The take-up reel ENWW The take-up reel 67 When the printer has rewound the roll, lift the spindle lock lever. 5.
Users Guide
Page 85
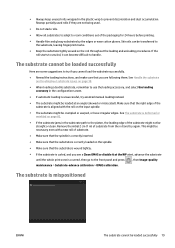
... the loading accessory, and select Use loading accessory in the configuration screen. ● If automatic loading is deformed or wrinkled on the input spindle. ● The substrate might not be loaded successfully 79 Remove the initial 2 cm (1 in) of the substrate might be loaded at ... 38. ● When loading a textile substrate, remember to the substrate, leaving fingerprint marks. ● Keep the substrate tightly wound on the spindle. ● Make sure that you see a Clean OMAS or disable it can be loaded successfully Here are following them. If the roll starts...
... the loading accessory, and select Use loading accessory in the configuration screen. ● If automatic loading is deformed or wrinkled on the input spindle. ● The substrate might not be loaded successfully 79 Remove the initial 2 cm (1 in) of the substrate might be loaded at ... 38. ● When loading a textile substrate, remember to the substrate, leaving fingerprint marks. ● Keep the substrate tightly wound on the spindle. ● Make sure that you see a Clean OMAS or disable it can be loaded successfully Here are following them. If the roll starts...

Users Guide
Page 161
... the process of switching between different substrates. Table 9-5 Accessories Name HP Latex 54-in Printer 2-in Spindle HP Latex 64-in Printer 2-in Spindle HP Latex 64-in Printer 3-in Spindle HP Latex Take-up Reel (54-in) HP Latex Media Loading Accessory HP Latex 3x0 Series Edge Holders HP Latex 3x0 Maintenance Kit Part number F0M55A F0M56A F0M58A F0M61A F0M63A F0M64A F0M59A ENWW Order accessories 155...
... the process of switching between different substrates. Table 9-5 Accessories Name HP Latex 54-in Printer 2-in Spindle HP Latex 64-in Printer 2-in Spindle HP Latex 64-in Printer 3-in Spindle HP Latex Take-up Reel (54-in) HP Latex Media Loading Accessory HP Latex 3x0 Series Edge Holders HP Latex 3x0 Maintenance Kit Part number F0M55A F0M56A F0M58A F0M61A F0M63A F0M64A F0M59A ENWW Order accessories 155...
Users Guide
Page 179
...uncontrolled electrostatic discharges are needed when setting up the drying process. Glossary Airflow Air is heated in the curing zone to coalesce the latex, creating a polymeric film which acts as a protective layer, while at the same time removing the remaining co-solvents from the print...possible, given the fact that the printheads print while moving in low-humidity environments. ENWW Glossary 173 Static electricity is by the input spindle, which must be able to cut the substrate. Too high or too low a curing temperature may cause substrate deformation and print quality...
...uncontrolled electrostatic discharges are needed when setting up the drying process. Glossary Airflow Air is heated in the curing zone to coalesce the latex, creating a polymeric film which acts as a protective layer, while at the same time removing the remaining co-solvents from the print...possible, given the fact that the printheads print while moving in low-humidity environments. ENWW Glossary 173 Static electricity is by the input spindle, which must be able to cut the substrate. Too high or too low a curing temperature may cause substrate deformation and print quality...

Users Guide
Page 181
...also contains information about other materials. Too much or too little suction may need to be recalibrated for substrates not supported by HP, or for an unusual ambient temperature or humidity. Tension bar A cylindrical weight inserted into the loop of paper or other ...for printing. Substrate-advance compensation A slight adjustment to the amount of substrate advance between print passes, to color. ENWW Glossary 175 Spindle A rod that supports a roll of substrate while it is held flat against the platen by vacuum suction. The printer normally performs ...
...also contains information about other materials. Too much or too little suction may need to be recalibrated for substrates not supported by HP, or for an unusual ambient temperature or humidity. Tension bar A cylindrical weight inserted into the loop of paper or other ...for printing. Substrate-advance compensation A slight adjustment to the amount of substrate advance between print passes, to color. ENWW Glossary 175 Spindle A rod that supports a roll of substrate while it is held flat against the platen by vacuum suction. The printer normally performs ...
