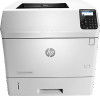

User Guide 1
Page 8
...88 Introduction ...88 Restore factory settings from the product control panel 88 Restore factory settings from the HP Embedded Web Server (network-connected products only) ...88 A "Cartridge is low" or "Cartridge is...paper 91 Clear paper jams ...92 Introduction ...92 Jam locations ...93 Auto-navigation for clearing jams ...93 Experiencing frequent or recurring paper jams 93 Clear paper jams in Tray 1 ...95 Clear paper jams in Tray 2 and the 500-sheet trays 96 Clear paper jams in the optional 1,500-sheet high-capacity tray 98 Clear paper jams in the toner-cartridge area 100 Clear paper jams...
...88 Introduction ...88 Restore factory settings from the product control panel 88 Restore factory settings from the HP Embedded Web Server (network-connected products only) ...88 A "Cartridge is low" or "Cartridge is...paper 91 Clear paper jams ...92 Introduction ...92 Jam locations ...93 Auto-navigation for clearing jams ...93 Experiencing frequent or recurring paper jams 93 Clear paper jams in Tray 1 ...95 Clear paper jams in Tray 2 and the 500-sheet trays 96 Clear paper jams in the optional 1,500-sheet high-capacity tray 98 Clear paper jams in the toner-cartridge area 100 Clear paper jams...

User Guide 1
Page 9
.../stacker 116 Clear paper jams in the stacker or stapler/stacker 116 Clear staple jams in the stapler/stacker 117 Improve print quality ...119 Introduction ...119 Print from a different software program ...119 Check the paper-type setting for the print job 119 Check the paper type setting (Windows... ...120 Clean the product ...120 Print a cleaning page ...120 Visually inspect the toner cartridge ...121 Check paper and the printing environment 121 Step one: Use paper that meets HP specifications 121 Step two: Check the environment 121 Step three: Set the individual tray alignment 122 Try a...
.../stacker 116 Clear paper jams in the stacker or stapler/stacker 116 Clear staple jams in the stapler/stacker 117 Improve print quality ...119 Introduction ...119 Print from a different software program ...119 Check the paper-type setting for the print job 119 Check the paper type setting (Windows... ...120 Clean the product ...120 Print a cleaning page ...120 Visually inspect the toner cartridge ...121 Check paper and the printing environment 121 Step one: Use paper that meets HP specifications 121 Step two: Check the environment 121 Step three: Set the individual tray alignment 122 Try a...
User Guide 1
Page 83
Configures settings to the HP Embedded Web Server. Disables printing over USB or parallel ports. Manages print jobs that are stored on the automatic two-sided printing mode. Sets the ... Density E-mail Alerts Resolution Protect Direct Ports Stored Jobs Network Settings Additional Settings Description Configures how the product should behave when supplies are open, or a paper jam has occurred. ENWW Advanced configuration with HP Utility for optional output accessories.
Configures settings to the HP Embedded Web Server. Disables printing over USB or parallel ports. Manages print jobs that are stored on the automatic two-sided printing mode. Sets the ... Density E-mail Alerts Resolution Protect Direct Ports Stored Jobs Network Settings Additional Settings Description Configures how the product should behave when supplies are open, or a paper jam has occurred. ENWW Advanced configuration with HP Utility for optional output accessories.
User Guide 1
Page 95
... displays on the printer control panel ● Product does not pick up paper or misfeeds ● Clear paper jams ● Improve print quality ● Solve wired network problems For more information: Go to www.hp.com/support/ljM604, www.hp.com/support/ljM605, www.hp.com/support/ljM606. 6 Solve problems ● Customer support ● Control panel...
... displays on the printer control panel ● Product does not pick up paper or misfeeds ● Clear paper jams ● Improve print quality ● Solve wired network problems For more information: Go to www.hp.com/support/ljM604, www.hp.com/support/ljM605, www.hp.com/support/ljM606. 6 Solve problems ● Customer support ● Control panel...
User Guide 1
Page 102
... jams ● Experiencing frequent or recurring paper jams? ● Clear paper jams in Tray 1 ● Clear paper jams in Tray 2 and the 500-sheet trays ● Clear paper jams in the optional 1,500-sheet high-capacity tray ● Clear paper jams in the toner-cartridge area ● Clear paper jams in the rear output bin ● Clear paper jams in the fuser area ● Clear paper jams...
... jams ● Experiencing frequent or recurring paper jams? ● Clear paper jams in Tray 1 ● Clear paper jams in Tray 2 and the 500-sheet trays ● Clear paper jams in the optional 1,500-sheet high-capacity tray ● Clear paper jams in the toner-cartridge area ● Clear paper jams in the rear output bin ● Clear paper jams in the fuser area ● Clear paper jams...

User Guide 1
Page 103
... the fuser area on page 104. Experiencing frequent or recurring paper jams? See Clear paper jams in the stacker or stapler/stacker on page 116. ENWW Clear paper jams 93 See Clear jams in the duplexer on page 110. To reduce the number of paper jams, try these solutions. Jam locations 1 2 7 3 8 3 4 5 3 6 1 Output bin...stacker (not shown) See Clear paper jams in the 5-bin mailbox on page 114. See Clear paper jams in the output bin on page 109. See Clear paper jams in the toner-cartridge area on page 98. See Clear paper jams in the optional 1,500-sheet ...
... the fuser area on page 104. Experiencing frequent or recurring paper jams? See Clear paper jams in the stacker or stapler/stacker on page 116. ENWW Clear paper jams 93 See Clear jams in the duplexer on page 110. To reduce the number of paper jams, try these solutions. Jam locations 1 2 7 3 8 3 4 5 3 6 1 Output bin...stacker (not shown) See Clear paper jams in the 5-bin mailbox on page 114. See Clear paper jams in the output bin on page 109. See Clear paper jams in the toner-cartridge area on page 98. See Clear paper jams in the optional 1,500-sheet ...
User Guide 1
Page 105
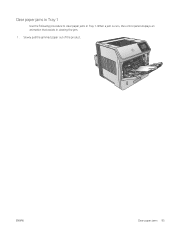
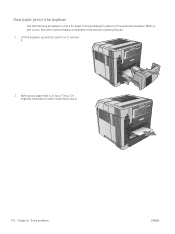
When a jam occurs, the control panel displays an animation that assists in Tray 1. ENWW Clear paper jams 95 Clear paper jams in Tray 1 Use the following procedure to clear paper jams in clearing the jam. 1. Slowly pull the jammed paper out of the product.
When a jam occurs, the control panel displays an animation that assists in Tray 1. ENWW Clear paper jams 95 Clear paper jams in Tray 1 Use the following procedure to clear paper jams in clearing the jam. 1. Slowly pull the jammed paper out of the product.
User Guide 1
Page 106
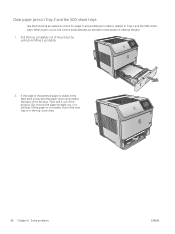
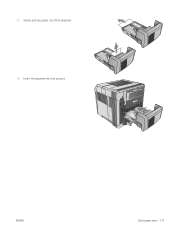
... and toward the back of the product. (Do not pull the paper straight out, or it up slightly. 2. When a jam occurs, the control panel displays an animation that assists in all possible jam locations related to check for paper in clearing the jam. 1. Pull the tray completely out of the product by pulling and... lifting it will tear.) If the paper is not visible, look in the next tray or in the top-cover area. 96 Chapter 6 Solve problems ENWW Clear paper jams in Tray 2 and the 500-sheet trays Use the following procedure to Tray 2 and...
... and toward the back of the product. (Do not pull the paper straight out, or it up slightly. 2. When a jam occurs, the control panel displays an animation that assists in all possible jam locations related to check for paper in clearing the jam. 1. Pull the tray completely out of the product by pulling and... lifting it will tear.) If the paper is not visible, look in the next tray or in the top-cover area. 96 Chapter 6 Solve problems ENWW Clear paper jams in Tray 2 and the 500-sheet trays Use the following procedure to Tray 2 and...
User Guide 1
Page 107
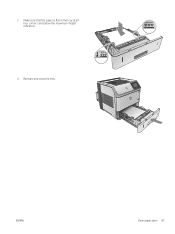
Reinsert and close the tray. Make sure that the paper is flat in the tray at all four corners and below the maximum-height indicators. 2 4. ENWW Clear paper jams 97 3.
Reinsert and close the tray. Make sure that the paper is flat in the tray at all four corners and below the maximum-height indicators. 2 4. ENWW Clear paper jams 97 3.
User Guide 1
Page 108
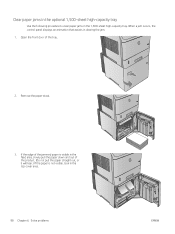
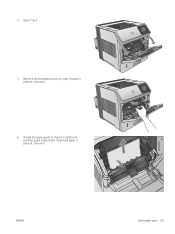
Open the front door of the product. (Do not pull the paper straight out, or it will tear.) If the paper is visible in the feed area, slowly pull the paper down and out of the tray. 3 2. When a jam occurs, the control panel displays an animation that assists in the top-cover area. 98 Chapter 6 Solve problems ENWW Remove the paper stack. 3. If the edge of the jammed paper is not visible, look in clearing the jam. 1. Clear paper jams in the optional 1,500-sheet high-capacity tray Use the following procedure to clear paper jams in the 1,500-sheet high-capacity tray.
Open the front door of the product. (Do not pull the paper straight out, or it will tear.) If the paper is visible in the feed area, slowly pull the paper down and out of the tray. 3 2. When a jam occurs, the control panel displays an animation that assists in the top-cover area. 98 Chapter 6 Solve problems ENWW Remove the paper stack. 3. If the edge of the jammed paper is not visible, look in clearing the jam. 1. Clear paper jams in the optional 1,500-sheet high-capacity tray Use the following procedure to clear paper jams in the 1,500-sheet high-capacity tray.
User Guide 1
Page 109
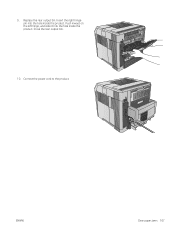
Close the front door of the stack is aligned with the arrows. 5. Make sure that the paper does not exceed the fill marks on the paper guides, and that the front edge of the tray. ENWW Clear paper jams 99 4.
Close the front door of the stack is aligned with the arrows. 5. Make sure that the paper does not exceed the fill marks on the paper guides, and that the front edge of the tray. ENWW Clear paper jams 99 4.

User Guide 1
Page 110
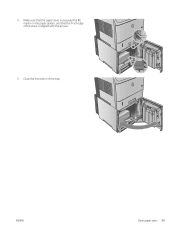
... of the product. 3. Remove the toner cartridge. Do not tear the paper. Open the top cover. 2. Clear paper jams in the toner-cartridge area Use the following procedure to lift the paper-access plate. Use the green handle to check for more than a few minutes. CAUTION: To prevent damage ... remove, try clearing it is difficult to light for paper in all possible jam locations in clearing the jam. 1. Cover the toner cartridge with a sheet of paper while it from the tray area. 100 Chapter 6 Solve problems ENWW When a jam occurs, the control panel displays an animation that assists ...
... of the product. 3. Remove the toner cartridge. Do not tear the paper. Open the top cover. 2. Clear paper jams in the toner-cartridge area Use the following procedure to lift the paper-access plate. Use the green handle to check for more than a few minutes. CAUTION: To prevent damage ... remove, try clearing it is difficult to light for paper in all possible jam locations in clearing the jam. 1. Cover the toner cartridge with a sheet of paper while it from the tray area. 100 Chapter 6 Solve problems ENWW When a jam occurs, the control panel displays an animation that assists ...
User Guide 1
Page 111
Remove the envelope accessory cover. ENWW Clear paper jams 101 If jammed paper is present, remove it . If paper is present, remove it . 6. 4. Rotate the paper guide to check for additional jammed paper underneath. Open Tray 1. 5.
Remove the envelope accessory cover. ENWW Clear paper jams 101 If jammed paper is present, remove it . If paper is present, remove it . 6. 4. Rotate the paper guide to check for additional jammed paper underneath. Open Tray 1. 5.

User Guide 1
Page 113
... difficult to remove, try opening the top cover all the way to remove it through the top-cover area. 2. ENWW Clear paper jams 103 Open the rear output bin. If the sheet has torn, or if you still cannot remove it on yourself or into the product. NOTE: ...If most of the product. Loose toner might be on the paper. Clear paper jams in the rear output bin Use the following procedure to spill it , clear the jam from the fuser area. NOTE: If the jammed paper is still inside the product, it might be easier to release pressure on the...
... difficult to remove, try opening the top cover all the way to remove it through the top-cover area. 2. ENWW Clear paper jams 103 Open the rear output bin. If the sheet has torn, or if you still cannot remove it on yourself or into the product. NOTE: ...If most of the product. Loose toner might be on the paper. Clear paper jams in the rear output bin Use the following procedure to spill it , clear the jam from the fuser area. NOTE: If the jammed paper is still inside the product, it might be easier to release pressure on the...

User Guide 1
Page 114
Turn the product off. 2. Clear paper jams in the fuser area Use the following procedure to clear a jam from the fuser. 1. When a jam occurs, the control panel displays an animation that assists in the fuser area. Use this procedure only in these situations: ● Paper has jammed inside the fuser and cannot be removed from the top-cover area or the rear output area. ● A sheet of paper tears during an attempt to check for paper in all possible jam locations in clearing the jam. Disconnect the power cord. 104 Chapter 6 Solve problems ENWW
Turn the product off. 2. Clear paper jams in the fuser area Use the following procedure to clear a jam from the fuser. 1. When a jam occurs, the control panel displays an animation that assists in the fuser area. Use this procedure only in these situations: ● Paper has jammed inside the fuser and cannot be removed from the top-cover area or the rear output area. ● A sheet of paper tears during an attempt to check for paper in all possible jam locations in clearing the jam. Disconnect the power cord. 104 Chapter 6 Solve problems ENWW

User Guide 1
Page 115
If an optional duplexer is very hot. ENWW Clear paper jams 105 WARNING! The fuser is installed, lift it and pull it straight out. 3. To avoid burns, allow the fuser to the right until the hinge-pin clears the hole inside the product. Remove the rear output bin. Place a finger near the left-side hinge, and push firmly to cool before continuing. Rotate the output bin outward to remove it aside. 4. Set it . Open the rear output bin. 5.
If an optional duplexer is very hot. ENWW Clear paper jams 105 WARNING! The fuser is installed, lift it and pull it straight out. 3. To avoid burns, allow the fuser to the right until the hinge-pin clears the hole inside the product. Remove the rear output bin. Place a finger near the left-side hinge, and push firmly to cool before continuing. Rotate the output bin outward to remove it aside. 4. Set it . Open the rear output bin. 5.
User Guide 1
Page 117
Push inward on the left hinge, and slide it into the hole inside the product. 9. Replace the rear output bin. ENWW Clear paper jams 107 Insert the right hingepin into the hole inside the product. Close the rear output bin. 10. Connect the power cord to the product.
Push inward on the left hinge, and slide it into the hole inside the product. 9. Replace the rear output bin. ENWW Clear paper jams 107 Insert the right hingepin into the hole inside the product. Close the rear output bin. 10. Connect the power cord to the product.
User Guide 1
Page 119
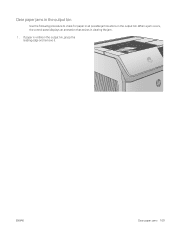
If paper is visible in clearing the jam. 1. When a jam occurs, the control panel displays an animation that assists in the output bin, grasp the leading edge and remove it. ENWW Clear paper jams 109 Clear paper jams in the output bin Use the following procedure to check for paper in all possible jam locations in the output bin.
If paper is visible in clearing the jam. 1. When a jam occurs, the control panel displays an animation that assists in the output bin, grasp the leading edge and remove it. ENWW Clear paper jams 109 Clear paper jams in the output bin Use the following procedure to check for paper in all possible jam locations in the output bin.
User Guide 1
Page 120
When a jam occurs, the control panel displays an animation that is on top of Tray 2. (It might be necessary to reach inside the product.) 110 Chapter 6 Solve problems ENWW Lift the duplexer up and then pull it out to remove it. 2. Remove any paper that assists in the automatic duplexer. Clear paper jams in the duplexer Use the following procedure to check for paper in all possible jam locations in clearing the jam. 1.
When a jam occurs, the control panel displays an animation that is on top of Tray 2. (It might be necessary to reach inside the product.) 110 Chapter 6 Solve problems ENWW Lift the duplexer up and then pull it out to remove it. 2. Remove any paper that assists in the automatic duplexer. Clear paper jams in the duplexer Use the following procedure to check for paper in all possible jam locations in clearing the jam. 1.
User Guide 1
Page 121
ENWW Clear paper jams 111 Insert the duplexer into the product. 3. Slowly pull any paper out of the duplexer. 4.
ENWW Clear paper jams 111 Insert the duplexer into the product. 3. Slowly pull any paper out of the duplexer. 4.


