
HP LE1851w, LE2001w, and LE2001wm LCD Monitors
Page 1
HP LE1851w, LE2001w, and LE2001wm LCD Monitors User Guide
HP LE1851w, LE2001w, and LE2001wm LCD Monitors User Guide

HP LE1851w, LE2001w, and LE2001wm LCD Monitors
Page 3
Text set off in this manner indicates that failure to follow directions could result in damage to follow directions could result in bodily harm or loss of information. CAUTION: Text set off in this manner indicates that failure to equipment or loss of life. WARNING! NOTE: Text set off in this manner provides important supplemental information. About This Guide This guide provides information on setting up the monitor, installing drivers, using the on-screen display menu, troubleshooting and technical specifications. ENWW iii
Text set off in this manner indicates that failure to follow directions could result in damage to follow directions could result in bodily harm or loss of information. CAUTION: Text set off in this manner indicates that failure to equipment or loss of life. WARNING! NOTE: Text set off in this manner provides important supplemental information. About This Guide This guide provides information on setting up the monitor, installing drivers, using the on-screen display menu, troubleshooting and technical specifications. ENWW iii

HP LE1851w, LE2001w, and LE2001wm LCD Monitors
Page 5
...HP LCD Monitors ...1 2 Safety and Maintenance Guidelines Important Safety Information ...2 Maintenance Guidelines ...3 Cleaning the Monitor ...3 Shipping the Monitor ...3 3 Setting Up the Monitor Attaching the Monitor Base ...4 Rear Components ...5 Connecting the Cables ...6 LE1851w and LE2001w Models 6 LE2001wm Model ...7 Adjusting the Monitor ...8 Turning on the Monitor ...8 Mounting the Monitor Panel ...9 Locating the Rating Labels ...11 4 Operating the Monitor...Front Panel Controls ...15 Adjusting the Monitor Settings ...16 Using the On-Screen Display Menu 16 OSD Menu Selections 17...
...HP LCD Monitors ...1 2 Safety and Maintenance Guidelines Important Safety Information ...2 Maintenance Guidelines ...3 Cleaning the Monitor ...3 Shipping the Monitor ...3 3 Setting Up the Monitor Attaching the Monitor Base ...4 Rear Components ...5 Connecting the Cables ...6 LE1851w and LE2001w Models 6 LE2001wm Model ...7 Adjusting the Monitor ...8 Turning on the Monitor ...8 Mounting the Monitor Panel ...9 Locating the Rating Labels ...11 4 Operating the Monitor...Front Panel Controls ...15 Adjusting the Monitor Settings ...16 Using the On-Screen Display Menu 16 OSD Menu Selections 17...

HP LE1851w, LE2001w, and LE2001wm LCD Monitors
Page 6
Identifying Monitor Conditions ...22 Sleep Timer Mode ...23 HP Display LiteSaver ...24 Installing the HP Display LiteSaver Software 24 sRGB Support ...25 Changing the Color Temperature 25 Installing the sRGB ICM File for Microsoft Windows ...Solving Common Problems ...27 Online Technical Support ...28 Preparing to Call Technical Support 28 Appendix B Technical Specifications LE1851w Model ...30 LE2001w Model ...31 LE2001wm Model ...32 Recognizing Preset Display Resolutions 33 LE1851w Model ...33 LE2001w and LE2001wm Models 33 Entering User Modes ...34 Energy Saver Feature ...34 Appendix C ...
Identifying Monitor Conditions ...22 Sleep Timer Mode ...23 HP Display LiteSaver ...24 Installing the HP Display LiteSaver Software 24 sRGB Support ...25 Changing the Color Temperature 25 Installing the sRGB ICM File for Microsoft Windows ...Solving Common Problems ...27 Online Technical Support ...28 Preparing to Call Technical Support 28 Appendix B Technical Specifications LE1851w Model ...30 LE2001w Model ...31 LE2001wm Model ...32 Recognizing Preset Display Resolutions 33 LE1851w Model ...33 LE2001w and LE2001wm Models 33 Entering User Modes ...34 Energy Saver Feature ...34 Appendix C ...

HP LE1851w, LE2001w, and LE2001wm LCD Monitors
Page 7
HP Recycling Program ...39 Chemical Substances ...39 Restriction of Hazardous Substances (RoHS 39 Turkey EEE Regulation ...40 Appendix D LCD Monitor Quality and Pixel Policy ENWW vii
HP Recycling Program ...39 Chemical Substances ...39 Restriction of Hazardous Substances (RoHS 39 Turkey EEE Regulation ...40 Appendix D LCD Monitor Quality and Pixel Policy ENWW vii

HP LE1851w, LE2001w, and LE2001wm LCD Monitors
Page 9
1 Product Features HP LCD Monitors The LCD (liquid crystal display) monitors have an active matrix, thin-film transistor (TFT) panel. The monitor models and features include: ● Wide viewing angle to allow viewing from a sitting or standing position, or moving side-to-side ● Tilt capability ● Removable pedestal base for flexible monitor panel mounting solutions ● Video...
1 Product Features HP LCD Monitors The LCD (liquid crystal display) monitors have an active matrix, thin-film transistor (TFT) panel. The monitor models and features include: ● Wide viewing angle to allow viewing from a sitting or standing position, or moving side-to-side ● Tilt capability ● Removable pedestal base for flexible monitor panel mounting solutions ● Video...

HP LE1851w, LE2001w, and LE2001wm LCD Monitors
Page 10
...: For the protection of surge protection device such as having this monitor. Use the appropriate and correctly sized furniture designed to the LCD monitor so that is included with the monitor, refer to some form of the monitor, as well as the computer, connect all power cords for computer... read the Safety and Comfort Guide. the power strips must be taken to route all power strips provide surge protection; For your HP LCD monitor. When unplugging from the electrical outlet. Not all cords and cables connected to properly support your safety, do not place anything on...
...: For the protection of surge protection device such as having this monitor. Use the appropriate and correctly sized furniture designed to the LCD monitor so that is included with the monitor, refer to some form of the monitor, as well as the computer, connect all power cords for computer... read the Safety and Comfort Guide. the power strips must be taken to route all power strips provide surge protection; For your HP LCD monitor. When unplugging from the electrical outlet. Not all cords and cables connected to properly support your safety, do not place anything on...
HP LE1851w, LE2001w, and LE2001wm LCD Monitors
Page 11
... operating properly or has been dropped or damaged, contact an authorized HP dealer, reseller, or service provider. ● Use only a power source and connection appropriate for this product yourself. These openings must lay the monitor face down on the power label to determine the ampere rating (AMPS...a "burned-in image" are not covered under the HP warranty. ● Slots and openings in the cabinet are covered in a storage area. Adjust only those controls that are provided for each device. ● Install the monitor near an outlet that contain any petroleum based materials such...
... operating properly or has been dropped or damaged, contact an authorized HP dealer, reseller, or service provider. ● Use only a power source and connection appropriate for this product yourself. These openings must lay the monitor face down on the power label to determine the ampere rating (AMPS...a "burned-in image" are not covered under the HP warranty. ● Slots and openings in the cabinet are covered in a storage area. Adjust only those controls that are provided for each device. ● Install the monitor near an outlet that contain any petroleum based materials such...
HP LE1851w, LE2001w, and LE2001wm LCD Monitors
Page 12
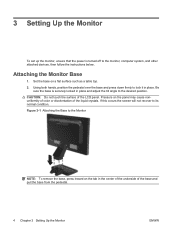
...: To remove the base, press inward on the panel may cause nonuniformity of color or disorientation of the LCD panel. Be sure the base is turned off to the monitor, computer system, and other attached devices, then follow the instructions below. CAUTION: Do not touch the surface of the liquid crystals. ...Set the base on a flat surface such as a table top. 2. 3 Setting Up the Monitor To set up the monitor, ensure that the power is securely locked in place and adjust the tilt angle to the desired position.
...: To remove the base, press inward on the panel may cause nonuniformity of color or disorientation of the LCD panel. Be sure the base is turned off to the monitor, computer system, and other attached devices, then follow the instructions below. CAUTION: Do not touch the surface of the liquid crystals. ...Set the base on a flat surface such as a table top. 2. 3 Setting Up the Monitor To set up the monitor, ensure that the power is securely locked in place and adjust the tilt angle to the desired position.

HP LE1851w, LE2001w, and LE2001wm LCD Monitors
Page 13
... Power Connector Connects the AC power cord to the monitor. 2 Audio Connector Connects the audio cable to the monitor. 3 DVI Connector Connects the DVI-D cable to the monitor. 4 VGA Connector Connects the VGA cable to the monitor. Rear Components Figure 3-2 LE1851w and LE2001w Rear Components Table 3-1 LE1851w and LE2001w Rear Components Component Function 1 AC Power Connector...
... Power Connector Connects the AC power cord to the monitor. 2 Audio Connector Connects the audio cable to the monitor. 3 DVI Connector Connects the DVI-D cable to the monitor. 4 VGA Connector Connects the VGA cable to the monitor. Rear Components Figure 3-2 LE1851w and LE2001w Rear Components Table 3-1 LE1851w and LE2001w Rear Components Component Function 1 AC Power Connector...
HP LE1851w, LE2001w, and LE2001wm LCD Monitors
Page 14
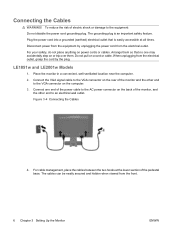
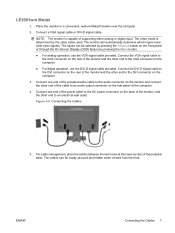
Do not pull on or trip over them so that is an important safety feature. LE1851w and LE2001w Models 1. Connect the VGA signal cable to the VGA connector on the back of the monitor and the other end to an electrical wall outlet. The cables can be neatly secured and ... grounding plug is easily accessible at the lower section of electric shock or damage to the VGA connector on power cords or cables. Place the monitor in a convenient, well-ventilated location near the computer. 2. Connecting the Cables WARNING! When unplugging from the electrical outlet, grasp the cord by ...
Do not pull on or trip over them so that is an important safety feature. LE1851w and LE2001w Models 1. Connect the VGA signal cable to the VGA connector on the back of the monitor and the other end to an electrical wall outlet. The cables can be neatly secured and ... grounding plug is easily accessible at the lower section of electric shock or damage to the VGA connector on power cords or cables. Place the monitor in a convenient, well-ventilated location near the computer. 2. Connecting the Cables WARNING! When unplugging from the electrical outlet, grasp the cord by ...
HP LE1851w, LE2001w, and LE2001wm LCD Monitors
Page 15
...the DVI-D signal cable to the DVI connector on the computer. ● For digital operation, use the VGA signal cable provided. LE2001wm Model 1. NOTE: The monitor is determined by pressing the Menu button. ● For analog operation, use the DVI-D signal cable provided. For cable management, place the cables between the...section of supporting either analog or digital input. Connect one end of the power cable to the AC power connector on the back of the monitor, and the other end of the cable to an audio output connector on the rear panel of the provided audio cable to the audio ...
...the DVI-D signal cable to the DVI connector on the computer. ● For digital operation, use the VGA signal cable provided. LE2001wm Model 1. NOTE: The monitor is determined by pressing the Menu button. ● For analog operation, use the DVI-D signal cable provided. For cable management, place the cables between the...section of supporting either analog or digital input. Connect one end of the power cable to the AC power connector on the back of the monitor, and the other end of the cable to an audio output connector on the rear panel of the provided audio cable to the audio ...

HP LE1851w, LE2001w, and LE2001wm LCD Monitors
Page 16
...button on the computer to turn it on the front of the monitor, then select Management > Bezel Power LED > Off. 8 Chapter 3 Setting Up the Monitor ENWW Press the Menu button on . 2. CAUTION: Burn-in image damage on all LCD screens. NOTE: If pressing the power button has no effect, the...disable the power LED in image" are not covered under the HP warranty. * A prolonged period of time is a condition that display the same static image on screen for 10 seconds. Image retention is 12 consecutive hours of the monitor to a comfortable eye level. To disable this feature, press ...
...button on the computer to turn it on the front of the monitor, then select Management > Bezel Power LED > Off. 8 Chapter 3 Setting Up the Monitor ENWW Press the Menu button on . 2. CAUTION: Burn-in image damage on all LCD screens. NOTE: If pressing the power button has no effect, the...disable the power LED in image" are not covered under the HP warranty. * A prolonged period of time is a condition that display the same static image on screen for 10 seconds. Image retention is 12 consecutive hours of the monitor to a comfortable eye level. To disable this feature, press ...

HP LE1851w, LE2001w, and LE2001wm LCD Monitors
Page 17
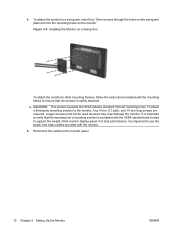
..., a swing arm, or other mounting fixture. Lay the monitor face down on the back of the monitor. 2. Disconnect and remove the signal and power cables from the back of the monitor that connect the monitor panel to the pedestal base (1) and slide the pedestal base...3-7 Removing the Pedestal Base ENWW Mounting the Monitor Panel 9 Mounting the Monitor Panel You can remove the monitor panel from the monitor panel (2). Four threaded mounting holes are both disconnected. 1. CAUTION: Before beginning to disassemble the monitor, be sure the monitor is intended to be supported by UL or ...
..., a swing arm, or other mounting fixture. Lay the monitor face down on the back of the monitor. 2. Disconnect and remove the signal and power cables from the back of the monitor that connect the monitor panel to the pedestal base (1) and slide the pedestal base...3-7 Removing the Pedestal Base ENWW Mounting the Monitor Panel 9 Mounting the Monitor Panel You can remove the monitor panel from the monitor panel (2). Four threaded mounting holes are both disconnected. 1. CAUTION: Before beginning to disassemble the monitor, be sure the monitor is intended to be supported by UL or ...
HP LE1851w, LE2001w, and LE2001wm LCD Monitors
Page 18
...holes on a Swing Arm To attach the monitor to other mounting fixtures, follow the instructions included with the monitor. 5. To attach a third-party mounting solution to the monitor panel. 10 Chapter 3 Setting Up the Monitor ENWW Reconnect the cables to the monitor, four 4 mm, 0.7 pitch, and... 10 mm long screws are required. CAUTION: This monitor supports the VESA industry ...
...holes on a Swing Arm To attach the monitor to other mounting fixtures, follow the instructions included with the monitor. 5. To attach a third-party mounting solution to the monitor panel. 10 Chapter 3 Setting Up the Monitor ENWW Reconnect the cables to the monitor, four 4 mm, 0.7 pitch, and... 10 mm long screws are required. CAUTION: This monitor supports the VESA industry ...
HP LE1851w, LE2001w, and LE2001wm LCD Monitors
Page 19
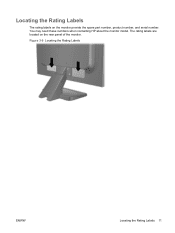
The rating labels are located on the monitor provide the spare part number, product number, and serial number. Locating the Rating Labels The rating labels on the rear panel of the monitor. Figure 3-9 Locating the Rating Labels ENWW Locating the Rating Labels 11 You may need these numbers when contacting HP about the monitor model.
The rating labels are located on the monitor provide the spare part number, product number, and serial number. Locating the Rating Labels The rating labels on the rear panel of the monitor. Figure 3-9 Locating the Rating Labels ENWW Locating the Rating Labels 11 You may need these numbers when contacting HP about the monitor model.
HP LE1851w, LE2001w, and LE2001wm LCD Monitors
Page 20
... feature. NOTE: The ICM color profile is VESA DDC2-compliant and that the monitor connects directly to the graphics card. This monitor is activated from scanner to ensure monitor compatibility with the monitor contains files you can be downloaded from the HP monitors support Web site. The Image Color Matching File The .ICM files are data...
... feature. NOTE: The ICM color profile is VESA DDC2-compliant and that the monitor connects directly to the graphics card. This monitor is activated from scanner to ensure monitor compatibility with the monitor contains files you can be downloaded from the HP monitors support Web site. The Image Color Matching File The .ICM files are data...

HP LE1851w, LE2001w, and LE2001wm LCD Monitors
Page 21
... install the digitally signed monitor .INF and .ICM files manually from the CD in the event of .INF and .ICM files from the CD or download them. Installing from the CD: 1. Follow the on the CD. NOTE: You may need to http://www.hp.com/support and select the country region. 2. Refer... the support page and download page. 3. Download the software by using a VGA (analog) input, this procedure can install the .INF and .ICM files from the HP monitors support Web site: 1. Ensure the system meets the requirements. 4. The CD menu is using the OK/auto button on the...
... install the digitally signed monitor .INF and .ICM files manually from the CD in the event of .INF and .ICM files from the CD or download them. Installing from the CD: 1. Follow the on the CD. NOTE: You may need to http://www.hp.com/support and select the country region. 2. Refer... the support page and download page. 3. Download the software by using a VGA (analog) input, this procedure can install the .INF and .ICM files from the HP monitors support Web site: 1. Ensure the system meets the requirements. 4. The CD menu is using the OK/auto button on the...
HP LE1851w, LE2001w, and LE2001wm LCD Monitors
Page 22
... the CD in this chapter. ● If the result is not satisfactory, continue with the procedure. 3. Press the OK/auto button on the monitor front panel. ● You can also press the Menu button, then select Image Control > Auto-Adjustment from the OSD Main Menu. The setup test... pattern is displayed. 4. Select Open Auto-Adjustment Software. Press the OK/auto button on the monitor front panel to produce a stable, centered image. 6. Refer to Adjusting the Monitor Settings on the keyboard to warm up for 20 minutes before adjusting. 2. The CD menu is displayed. 5. ...
... the CD in this chapter. ● If the result is not satisfactory, continue with the procedure. 3. Press the OK/auto button on the monitor front panel. ● You can also press the Menu button, then select Image Control > Auto-Adjustment from the OSD Main Menu. The setup test... pattern is displayed. 4. Select Open Auto-Adjustment Software. Press the OK/auto button on the monitor front panel to produce a stable, centered image. 6. Refer to Adjusting the Monitor Settings on the keyboard to warm up for 20 minutes before adjusting. 2. The CD menu is displayed. 5. ...

HP LE1851w, LE2001w, and LE2001wm LCD Monitors
Page 23
ENWW Front Panel Controls 15 Amber = Sleep mode. Flashing Amber = Sleep Timer mode. 6 Power Turns the monitor on , press to navigate forward through the OSD menu and decrease adjustment levels. Volume/Minus (LE2001wm model only) If the OSD menu is inactive, ...only) 4 OK/auto If the OSD menu is on , press to navigate backward through the OSD menu and increase adjustment levels. Front Panel Controls Table 4-1 Monitor Front Panel Controls Control 1 Menu Function Opens, selects or exits the OSD menu. 2 Minus If the OSD menu is on , press to select the highlighted...
ENWW Front Panel Controls 15 Amber = Sleep mode. Flashing Amber = Sleep Timer mode. 6 Power Turns the monitor on , press to navigate forward through the OSD menu and decrease adjustment levels. Volume/Minus (LE2001wm model only) If the OSD menu is inactive, ...only) 4 OK/auto If the OSD menu is on , press to navigate backward through the OSD menu and increase adjustment levels. Front Panel Controls Table 4-1 Monitor Front Panel Controls Control 1 Menu Function Opens, selects or exits the OSD menu. 2 Minus If the OSD menu is on , press to select the highlighted...


