User Guide
Page 3
...Using your camera 9 2 Taking pictures and recording video clips 11 Taking still pictures 11 Recording video clips 12 Instant Review...12 Auto focus and exposure 12 Using zoom...14 Setting the flash...15 Using the shooting modes 15 Using the Capture Menu 17 3 Reviewing images and video clips 20 Deleting images...21 Viewing thumbnails 21 Magnifying images 21 4 Using the Design Gallery Menu 22 Removing red eyes 22 Modifying colors...23 Adding borders...23 Recording audio...23 5 Transferring and printing images 25 Transferring images with HP Photosmart Software 25 Transferring images...
...Using your camera 9 2 Taking pictures and recording video clips 11 Taking still pictures 11 Recording video clips 12 Instant Review...12 Auto focus and exposure 12 Using zoom...14 Setting the flash...15 Using the shooting modes 15 Using the Capture Menu 17 3 Reviewing images and video clips 20 Deleting images...21 Viewing thumbnails 21 Magnifying images 21 4 Using the Design Gallery Menu 22 Removing red eyes 22 Modifying colors...23 Adding borders...23 Recording audio...23 5 Transferring and printing images 25 Transferring images with HP Photosmart Software 25 Transferring images...
User Guide
Page 6
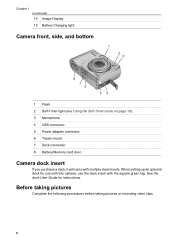
... come with the square green tag. Before taking pictures Complete the following procedures before taking pictures or recording video clips. 6 Chapter 1 (continued) 14 Image Display. 15 Battery Charging light. When setting up an optional dock for instructions. Camera front, side, and bottom 1 2 3 8 7 6 54 1 Flash. 2 Self-Timer light (see Using the Self-Timer mode on page 16). 3 Microphone. 4 USB connector. 5 Power adapter connector. 6 Tripod mount. 7 Dock connector. 8 Battery/Memory card door. See the dock User Guide for use with this camera, use the dock insert with...
... come with the square green tag. Before taking pictures Complete the following procedures before taking pictures or recording video clips. 6 Chapter 1 (continued) 14 Image Display. 15 Battery Charging light. When setting up an optional dock for instructions. Camera front, side, and bottom 1 2 3 8 7 6 54 1 Flash. 2 Self-Timer light (see Using the Self-Timer mode on page 16). 3 Microphone. 4 USB connector. 5 Power adapter connector. 6 Tripod mount. 7 Dock connector. 8 Battery/Memory card door. See the dock User Guide for use with this camera, use the dock insert with...

User Guide
Page 8
... memory card 1. Turn off the camera and open the Battery/Memory card door. 2. Use to the other selections and repeat Step 1 until appears briefly in Playback. 2. Install the software The HP Photosmart Software provides features for transferring images and video clips to choose the region you are set correctly. 3. Use to your computer, as well as shown. Make sure the memory card snaps into place. 3. Always format memory cards before first use internal memory and view images stored there, remove the memory card. Use...
... memory card 1. Turn off the camera and open the Battery/Memory card door. 2. Use to the other selections and repeat Step 1 until appears briefly in Playback. 2. Install the software The HP Photosmart Software provides features for transferring images and video clips to choose the region you are set correctly. 3. Use to your computer, as well as shown. Make sure the memory card snaps into place. 3. Always format memory cards before first use internal memory and view images stored there, remove the memory card. Use...
User Guide
Page 9
... disable any virus protection software. 2. See About the HP Photosmart Software on the computer desktop. 3. Double-click the CD icon on page 9. For information on taking still pictures and See Taking still pictures on page 11 capturing video clips and Recording video clips on page 12 For information on reviewing images and See Reviewing images and video clips video clips on the camera on -screen instructions. See Using HP Photosmart Express on page 9). 1. Using your camera...
... disable any virus protection software. 2. See About the HP Photosmart Software on the computer desktop. 3. Double-click the CD icon on page 9. For information on taking still pictures and See Taking still pictures on page 11 capturing video clips and Recording video clips on page 12 For information on reviewing images and See Reviewing images and video clips video clips on the camera on -screen instructions. See Using HP Photosmart Express on page 9). 1. Using your camera...
User Guide
Page 11
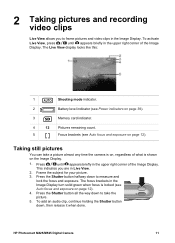
... down to measure and lock the focus and exposure. HP Photosmart M425/M525 Digital Camera 11 The focus brackets in the Image Display turn solid green when focus is shown on the Image Display. 1. To add an audio clip, continue holding the Shutter button down to take a picture almost any time the camera is on, regardless of what is locked (see Auto focus and exposure on page 12). 4. 2 Taking pictures and recording video clips Live View allows you are in...
... down to measure and lock the focus and exposure. HP Photosmart M425/M525 Digital Camera 11 The focus brackets in the Image Display turn solid green when focus is shown on the Image Display. 1. To add an audio clip, continue holding the Shutter button down to take a picture almost any time the camera is on, regardless of what is locked (see Auto focus and exposure on page 12). 4. 2 Taking pictures and recording video clips Live View allows you are in...
User Guide
Page 12
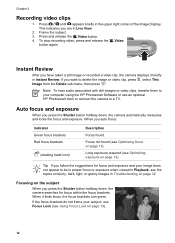
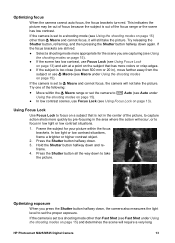
... taken a still image or recorded a video clip, the camera displays it finds focus, the focus brackets turn green. Instant Review After you are in Playback, see Using Focus Lock on the subject When you auto focus: Indicator Green focus brackets Red focus brackets (shaking hand icon) Description Focus found (see Optimizing exposure on page 32. If you want to a TV. If the focus brackets do not frame your computer using the HP Photosmart Software or use Focus Lock (see the topics...
... taken a still image or recorded a video clip, the camera displays it finds focus, the focus brackets turn green. Instant Review After you are in Playback, see Using Focus Lock on the subject When you auto focus: Indicator Green focus brackets Red focus brackets (shaking hand icon) Description Focus found (see Optimizing exposure on page 32. If you want to a TV. If the focus brackets do not frame your computer using the HP Photosmart Software or use Focus Lock (see the topics...
User Guide
Page 13
...- If the camera is set to Auto (see Auto under Using the shooting modes on page 15). ● In low contrast scenes, use Focus Lock (see Fast Shot under Using the shooting modes on page 15) other than Macro and cannot focus, it will not take the picture. Frame the subject for the scene you press the Shutter button halfway down . 3. Hold the Shutter button halfway down again. Press the Shutter button all the...
...- If the camera is set to Auto (see Auto under Using the shooting modes on page 15). ● In low contrast scenes, use Focus Lock (see Fast Shot under Using the shooting modes on page 15) other than Macro and cannot focus, it will not take the picture. Frame the subject for the scene you press the Shutter button halfway down . 3. Hold the Shutter button halfway down again. Press the Shutter button all the...
User Guide
Page 14
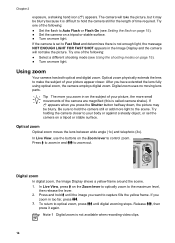
... make the subject of time required. Note 1 Digital zoom is called camera shake). Using zoom Your camera has both optical and digital zoom. Press and hold the camera still for the length of your body or against a steady object, or set to Fast Shot and determines there is difficult to Auto Flash or Flash On (see Using the shooting modes on page 15). ● Turn on the Zoom lever to optically zoom...
... make the subject of time required. Note 1 Digital zoom is called camera shake). Using zoom Your camera has both optical and digital zoom. Press and hold the camera still for the length of your body or against a steady object, or set to Fast Shot and determines there is difficult to Auto Flash or Flash On (see Using the shooting modes on page 15). ● Turn on the Zoom lever to optically zoom...
User Guide
Page 15
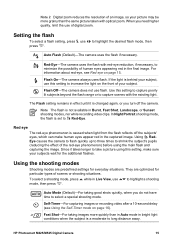
... red-eye phenomenon) before using this setting, make human eyes appear red in the captured image. In Night Portrait shooting mode, the flash is not available in effect until it takes longer to select a special shooting mode. Setting the flash To select a flash setting, press , use flash. The Flash setting remains in Burst, Fast Shot, Landscape, or Sunset shooting modes, nor while recording video clips. to highlight a shooting Auto Mode (Default)-For taking images more grainy than in Auto mode in Live View, use of scenes or shooting...
... red-eye phenomenon) before using this setting, make human eyes appear red in the captured image. In Night Portrait shooting mode, the flash is not available in effect until it takes longer to select a special shooting mode. Setting the flash To select a flash setting, press , use flash. The Flash setting remains in Burst, Fast Shot, Landscape, or Sunset shooting modes, nor while recording video clips. to highlight a shooting Auto Mode (Default)-For taking images more grainy than in Auto mode in Live View, use of scenes or shooting...
User Guide
Page 16
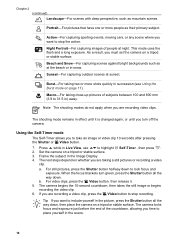
... the Video button to 31.5 in snow. Set the camera on page 17). Note The shooting modes do not apply when you are taking close-up pictures of subjects between 100 and 800 mm (3.9 to stop the action. This mode uses the flash and a long exposure. For video clips, press the Video button, then release it is changed again, or until you want to highlight Self-Timer , then...
... the Video button to 31.5 in snow. Set the camera on page 17). Note The shooting modes do not apply when you are taking close-up pictures of subjects between 100 and 800 mm (3.9 to stop the action. This mode uses the flash and a long exposure. For video clips, press the Video button, then release it is changed again, or until you want to highlight Self-Timer , then...
User Guide
Page 17
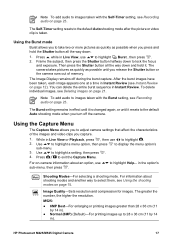
... highlight . 2. HP Photosmart M425/M525 Digital Camera 17 Press while in Live View or Playback, press , then use to highlight Help... To delete individual images, see Instant Review on page 12). For information about an option, use to select them, see Recording audio on page 23. The Self-Timer setting resets to the default Auto shooting mode when you to lock the focus and exposure. The Burst setting remains in Instant Review (see Deleting images on page...
... highlight . 2. HP Photosmart M425/M525 Digital Camera 17 Press while in Live View or Playback, press , then use to highlight Help... To delete individual images, see Instant Review on page 12). For information about an option, use to select them, see Recording audio on page 23. The Self-Timer setting resets to the default Auto shooting mode when you to lock the focus and exposure. The Burst setting remains in Instant Review (see Deleting images on page...
User Guide
Page 19
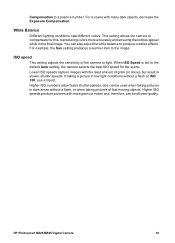
... default Auto setting, the camera selects the best ISO speed for this, reproducing colors more grain (or noise) and, therefore, can be used when taking pictures in the final image. ISO speed This setting adjusts the sensitivity of lower quality. White Balance Different lighting conditions cast different colors. You can be of the camera to produce creative effects. When ISO Speed is set to compensate for the scene. HP Photosmart M425/M525 Digital Camera 19 If taking pictures...
... default Auto setting, the camera selects the best ISO speed for this, reproducing colors more grain (or noise) and, therefore, can be used when taking pictures in the final image. ISO speed This setting adjusts the sensitivity of lower quality. White Balance Different lighting conditions cast different colors. You can be of the camera to produce creative effects. When ISO Speed is set to compensate for the scene. HP Photosmart M425/M525 Digital Camera 19 If taking pictures...
User Guide
Page 26
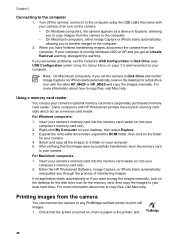
... copy images from the camera to print still images. 1. Some computers and HP Photosmart printers have finished transferring images, disconnect the camera from the camera You can put your camera. Insert your camera's memory card into the memory card reader (or into your computer's memory card slot). 2. Turn off the camera, connect it to the computer. 2. For Windows computers: 1. Either the HP Photosmart Software, Image Capture, or iPhoto starts automatically and guides you to transfer images to the computer using the USB cable...
... copy images from the camera to print still images. 1. Some computers and HP Photosmart printers have finished transferring images, disconnect the camera from the camera You can put your camera. Insert your camera's memory card into the memory card reader (or into your computer's memory card slot). 2. Turn off the camera, connect it to the computer. 2. For Windows computers: 1. Either the HP Photosmart Software, Image Capture, or iPhoto starts automatically and guides you to transfer images to the computer using the USB cable...

User Guide
Page 27
... begin printing. Press to change the setting. 5. To change the settings, use on the camera to select a menu option, then use on the camera. 4. HP does not provide customer support for non-HP printers. Connect the camera and printer using the USB cable that the camera's USB Configuration is connected to Digital Camera (see USB Configuration under Using the Setup Menu on the camera. HP Photosmart M425/M525 Digital Camera 27 When the camera is set to the printer, the Print Setup Menu displays on page 31). 3. there are no printer error messages. 2.
... begin printing. Press to change the setting. 5. To change the settings, use on the camera to select a menu option, then use on the camera. 4. HP does not provide customer support for non-HP printers. Connect the camera and printer using the USB cable that the camera's USB Configuration is connected to Digital Camera (see USB Configuration under Using the Setup Menu on the camera. HP Photosmart M425/M525 Digital Camera 27 When the camera is set to the printer, the Print Setup Menu displays on page 31). 3. there are no printer error messages. 2.
User Guide
Page 31
.... (Language)-Sets the language. Camera Sounds-Turns the camera sounds (such as a disk drive using PTP (Picture Transfer Protocol). ● Disk Drive-Recognizes the camera as button presses and shutter clicks) off and on. On (Default), Off. See Set the date and time on page 7. TV Configuration-Sets the video signal format for the camera's behavior. 1. Display Brightness-Adjusts the brightness of South America, Japan, Korea, and Taiwan. ● PAL-Used primarily in Live View or Playback, press , then use...
.... (Language)-Sets the language. Camera Sounds-Turns the camera sounds (such as a disk drive using PTP (Picture Transfer Protocol). ● Disk Drive-Recognizes the camera as button presses and shutter clicks) off and on. On (Default), Off. See Set the date and time on page 7. TV Configuration-Sets the video signal format for the camera's behavior. 1. Display Brightness-Adjusts the brightness of South America, Japan, Korea, and Taiwan. ● PAL-Used primarily in Live View or Playback, press , then use...

User Guide
Page 32
... the Battery/Memory card door. 4. You can also reconnect AC power if you were using a memory card reader, or replace the memory card. If you press buttons, reset the camera. 1. Any images or video clips stored in memory are inserted correctly (see Install and format an optional memory card on page 7). 8 Troubleshooting Use this information to find information on: ● Resetting the camera (see Resetting the camera on page 32) ● Possible problems and solutions (see Problems and solutions on...
... the Battery/Memory card door. 4. You can also reconnect AC power if you were using a memory card reader, or replace the memory card. If you press buttons, reset the camera. 1. Any images or video clips stored in memory are inserted correctly (see Install and format an optional memory card on page 7). 8 Troubleshooting Use this information to find information on: ● Resetting the camera (see Resetting the camera on page 32) ● Possible problems and solutions (see Problems and solutions on...
User Guide
Page 33
... internal memory or the memory card (see Install and format an optional memory card on page 32). HP Photosmart M425/M525 Digital Camera 33 The Image Display is defective. The camera does not turn on, reset the camera (see Using Focus Lock on the camera. ● Most of an optional HP Photosmart dock does not work, replace the batteries. Try connecting to finish processing the last image before taking another picture. Wait a few seconds for the camera to a different compatible AC power adapter...
... internal memory or the memory card (see Install and format an optional memory card on page 32). HP Photosmart M425/M525 Digital Camera 33 The Image Display is defective. The camera does not turn on, reset the camera (see Using Focus Lock on the camera. ● Most of an optional HP Photosmart dock does not work, replace the batteries. Try connecting to finish processing the last image before taking another picture. Wait a few seconds for the camera to a different compatible AC power adapter...

User Guide
Page 35
... image transfer process (see Buying prints online on page 25). How can I get professional-quality prints if I get an error message when transferring images to act as listed on page 26). Use the Buy Prints Online feature on the Photosmart Express Menu (see Transferring images with HP Photosmart Software on page 30). I am having a problem installing or using the HP Photosmart Software. ● Make sure your camera to my computer. I cannot transfer images from the USB cable and reset...
... image transfer process (see Buying prints online on page 25). How can I get professional-quality prints if I get an error message when transferring images to act as listed on page 26). Use the Buy Prints Online feature on the Photosmart Express Menu (see Transferring images with HP Photosmart Software on page 30). I am having a problem installing or using the HP Photosmart Software. ● Make sure your camera to my computer. I cannot transfer images from the USB cable and reset...
User Guide
Page 45
... 18 Delete button 5 digital zoom 14 dimensions 43 direct print 26 Display Brightness 31 dock insert 6 E e-mail images 28 exposure 13 Exposure Compensation 18 F F-number 42 Fast Shot mode 15 flash red-eye reduction 15 working range 42 Flash button 5 focal length 42 focus auto focus 12 brackets 12 focus lock 13 optimizing 13 settings 42 format memory card 8 G getting assistance 36 H HP AC power adapter 6 HP Photosmart Express 28 HP Photosmart Software 8, 9 I Image Display 6 Image Quality 17, 44 images Date & Time Imprint 18 Image Quality 17 magnifying 21 number remaining 11 per battery...
... 18 Delete button 5 digital zoom 14 dimensions 43 direct print 26 Display Brightness 31 dock insert 6 E e-mail images 28 exposure 13 Exposure Compensation 18 F F-number 42 Fast Shot mode 15 flash red-eye reduction 15 working range 42 Flash button 5 focal length 42 focus auto focus 12 brackets 12 focus lock 13 optimizing 13 settings 42 format memory card 8 G getting assistance 36 H HP AC power adapter 6 HP Photosmart Express 28 HP Photosmart Software 8, 9 I Image Display 6 Image Quality 17, 44 images Date & Time Imprint 18 Image Quality 17 magnifying 21 number remaining 11 per battery...

User Guide
Page 46
... reviewing images 20 transfer images 25 troubleshooting 32 turn on/off power 7 TV Configuration 31 U USB configuration 26, 31 USB connector 6 V Video button 5 video clips 12 viewing thumbnails 21 W weight 43 White Balance 18, 19 Z zoom 14, 42 Zoom lever 5 S safety precautions for batteries 38, 41 selecting images for destinations 29 Self-Timer light 6 Self-Timer mode 15, 16 sending individual images 29 set date and time 8 setting up destinations 28 Setup Menu 31 share pictures 28 shooting mode 15 Shutter button 5, 12 shutter speed 42 software install 8 solving problems 32 sounds of camera...
... reviewing images 20 transfer images 25 troubleshooting 32 turn on/off power 7 TV Configuration 31 U USB configuration 26, 31 USB connector 6 V Video button 5 video clips 12 viewing thumbnails 21 W weight 43 White Balance 18, 19 Z zoom 14, 42 Zoom lever 5 S safety precautions for batteries 38, 41 selecting images for destinations 29 Self-Timer light 6 Self-Timer mode 15, 16 sending individual images 29 set date and time 8 setting up destinations 28 Setup Menu 31 share pictures 28 shooting mode 15 Shutter button 5, 12 shutter speed 42 software install 8 solving problems 32 sounds of camera...


