
User Guide
Page 5
... for supported media 12 Understand supported sizes 12 Understand supported media types and weights 16 Set minimum margins ...17 Load media ...18 Change print settings ...21 To change settings from an application for current jobs (Windows 21 To change default settings for all future jobs (Windows 21... To change settings (Mac OS 21 Use the HP Solution Center (Windows 22 Print with the rear manual feed slot 22 Print on both sides (duplexing 23 Guidelines for printing on both sides of a page 23 To perform duplexing (Windows 23 To perform automatic ...
... for supported media 12 Understand supported sizes 12 Understand supported media types and weights 16 Set minimum margins ...17 Load media ...18 Change print settings ...21 To change settings from an application for current jobs (Windows 21 To change default settings for all future jobs (Windows 21... To change settings (Mac OS 21 Use the HP Solution Center (Windows 22 Print with the rear manual feed slot 22 Print on both sides (duplexing 23 Guidelines for printing on both sides of a page 23 To perform duplexing (Windows 23 To perform automatic ...
User Guide
Page 6
...Toolbox (Windows) ...30 To open the Toolbox 31 Toolbox tabs ...31 HP Printer Utility (Mac OS 32 To open the HP Printer Utility 32 HP Printer Utility panels 32 Network Printer Setup Utility (Mac OS 33 HP Web Jetadmin software 33 HP Instant Support ...33 Security and privacy 34 To gain access to...Maintain and troubleshoot Supported ink cartridges ...45 Replace the ink cartridges ...45 Maintain the printheads ...46 To check printhead health 47 To print the print quality diagnostic page 47 To calibrate the linefeed 48 To clean the printheads ...49 To align the printheads ...49 To clean the...
...Toolbox (Windows) ...30 To open the Toolbox 31 Toolbox tabs ...31 HP Printer Utility (Mac OS 32 To open the HP Printer Utility 32 HP Printer Utility panels 32 Network Printer Setup Utility (Mac OS 33 HP Web Jetadmin software 33 HP Instant Support ...33 Security and privacy 34 To gain access to...Maintain and troubleshoot Supported ink cartridges ...45 Replace the ink cartridges ...45 Maintain the printheads ...46 To check printhead health 47 To print the print quality diagnostic page 47 To calibrate the linefeed 48 To clean the printheads ...49 To align the printheads ...49 To clean the...

User Guide
Page 7
... filling the text or graphics completely 61 Output is faded or dull colored 61 Colors are printing as black and white 62 Wrong colors are printing 62 Printout shows bleeding colors 62 Colors do not line up properly 63 Lines or dots are missing from text...panel lights reference Interpreting control-panel lights 71 Interpreting network connector lights 76 A HP supplies and accessories Order printing supplies online 77 Accessories ...77 Supplies ...77 Ink cartridges ...77 Printheads ...78 HP media ...78 B Support and warranty Hewlett-Packard limited warranty statement 80 Obtain electronic...
... filling the text or graphics completely 61 Output is faded or dull colored 61 Colors are printing as black and white 62 Wrong colors are printing 62 Printout shows bleeding colors 62 Colors do not line up properly 63 Lines or dots are missing from text...panel lights reference Interpreting control-panel lights 71 Interpreting network connector lights 76 A HP supplies and accessories Order printing supplies online 77 Accessories ...77 Supplies ...77 Ink cartridges ...77 Printheads ...78 HP media ...78 B Support and warranty Hewlett-Packard limited warranty statement 80 Obtain electronic...

User Guide
Page 8
... memory specifications 88 System requirements ...88 Network protocol specifications 89 Embedded Web server specifications 90 Print resolution ...90 Environmental specifications 90 Electrical specifications ...90 Acoustic emission specifications (print in Draft mode, noise levels per ISO 7779 91 D Regulatory information FCC statement ...92... stewardship program 96 Paper use ...96 Plastics ...96 Material safety data sheets 96 Recycling program ...96 HP inkjet supplies recycling program 96 Disposal of waste equipment by users in private households in the European Union ......97 Index...98 4
... memory specifications 88 System requirements ...88 Network protocol specifications 89 Embedded Web server specifications 90 Print resolution ...90 Environmental specifications 90 Electrical specifications ...90 Acoustic emission specifications (print in Draft mode, noise levels per ISO 7779 91 D Regulatory information FCC statement ...92... stewardship program 96 Paper use ...96 Plastics ...96 Material safety data sheets 96 Recycling program ...96 HP inkjet supplies recycling program 96 Disposal of waste equipment by users in private households in the European Union ......97 Index...98 4

User Guide
Page 9
... Find other resources for the product You can obtain product information and further troubleshooting resources that have occurred. HP Printer Utility (Mac OS) Contains tools to configure print settings, calibrate the device, clean the printheads, print the self-test diagnostic page, order supplies online, and find support information from a connected computer. Typically installed..., change settings, and manage the device. Included on the Starter CD. 1 Get started 5 Logs and reports Provides information about operations. For more information, see HP Printer Utility (Mac OS).
... Find other resources for the product You can obtain product information and further troubleshooting resources that have occurred. HP Printer Utility (Mac OS) Contains tools to configure print settings, calibrate the device, clean the printheads, print the self-test diagnostic page, order supplies online, and find support information from a connected computer. Typically installed..., change settings, and manage the device. Included on the Starter CD. 1 Get started 5 Logs and reports Provides information about operations. For more information, see HP Printer Utility (Mac OS).

User Guide
Page 10
...your printouts. Depending on the control panel have installed, the HP Solution Center provides additional features, such as screen readers, Braille readers, and voiceto-text applications. HP Web sites Provide the latest printer software, and product and support information. During the warranty period... information, see To print the print quality diagnostic page. For users who are color blind, colored buttons and tabs used in the software and on the devices you have simple text or icon labels that convey the appropriate action. 6 Get started HP Solution Center (Windows)...
...your printouts. Depending on the control panel have installed, the HP Solution Center provides additional features, such as screen readers, Braille readers, and voiceto-text applications. HP Web sites Provide the latest printer software, and product and support information. During the warranty period... information, see To print the print quality diagnostic page. For users who are color blind, colored buttons and tabs used in the software and on the devices you have simple text or icon labels that convey the appropriate action. 6 Get started HP Solution Center (Windows)...

User Guide
Page 13
(continued) 3 Rear universal serial bus (USB) port 4 Rear access panel (for models with no duplexer) 5 Automatic two-sided printing accessory (duplexer) (available on some models) Understand the device parts 9
(continued) 3 Rear universal serial bus (USB) port 4 Rear access panel (for models with no duplexer) 5 Automatic two-sided printing accessory (duplexer) (available on some models) Understand the device parts 9

User Guide
Page 14
...see Accessories. To install the duplexer 1. Push the buttons on both sides of a sheet of paper automatically when the optional automatic two-sided printing accessory (duplexer) is available with some models of the duplexer when installing the unit; Do not press the buttons on both sides (duplexing).... Slide the duplexer into the device until the unit locks into place. You can print on either side of the device. For ordering information, see Print on the rear access panel and remove the panel from the device. 10 Install the accessories use them...
...see Accessories. To install the duplexer 1. Push the buttons on both sides of a sheet of paper automatically when the optional automatic two-sided printing accessory (duplexer) is available with some models of the duplexer when installing the unit; Do not press the buttons on both sides (duplexing).... Slide the duplexer into the device until the unit locks into place. You can print on either side of the device. For ordering information, see Print on the rear access panel and remove the panel from the device. 10 Install the accessories use them...

User Guide
Page 15
...Media that is damaged, curled, or wrinkled ◦ Media with most types of the tray. Use HP media for supported media. • To prevent jams, poor print quality, and other printing problems, avoid the following guidelines. • Always use media that is too lightweight or stretches easily.... • Do not overload the trays. For more information, see Understand specifications for optimum print quality. Visit the HP Web site at a time into a tray. • Load media print-side down and aligned against the right and back edges of office media. It is heavily textured...
...Media that is damaged, curled, or wrinkled ◦ Media with most types of the tray. Use HP media for supported media. • To prevent jams, poor print quality, and other printing problems, avoid the following guidelines. • Always use media that is too lightweight or stretches easily.... • Do not overload the trays. For more information, see Understand specifications for optimum print quality. Visit the HP Web site at a time into a tray. • Load media print-side down and aligned against the right and back edges of office media. It is heavily textured...

User Guide
Page 16
... and the adhesive strip pointing towards the back of the device. • Use the Normal mode to print photographs. This mode provides longer drying time and ensures that in the print driver. Allowing wet media to stack up may cause smearing. Allowing wet media to stack up may cause... NOTE: Duplexer is required from your application supports custom-sized media, set it aside to dry. Photo media • Use the Best mode to print transparencies. Note that the ink dries completely before the next page is supported by the device. • If your computer. • Remove each...
... and the adhesive strip pointing towards the back of the device. • Use the Normal mode to print photographs. This mode provides longer drying time and ensures that in the print driver. Allowing wet media to stack up may cause smearing. Allowing wet media to stack up may cause... NOTE: Duplexer is required from your application supports custom-sized media, set it aside to dry. Photo media • Use the Best mode to print transparencies. Note that the ink dries completely before the next page is supported by the device. • If your computer. • Remove each...
User Guide
Page 17
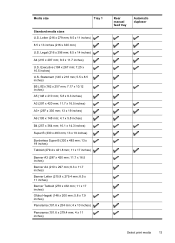
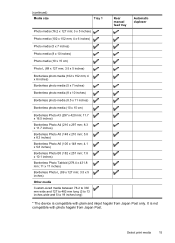
...) Ofuku Hagaki (148 x 200 mm; 5.8 x 7.9 inches) Panorama (101.6 x 254 mm; 4 x 10 inches) Panorama (101.6 x 279.4 mm; 4 x 11 inches) Rear manual feed tray Automatic duplexer Select print media 13 Legal (216 x 356 mm; 8.5 x 14 inches) A4 (210 x 297 mm; 8.3 x 11.7 inches) U.S. Executive (184 x 267 mm; 7.25 x 10.5 inches) U.S. Media size Tray 1 Standard...
...) Ofuku Hagaki (148 x 200 mm; 5.8 x 7.9 inches) Panorama (101.6 x 254 mm; 4 x 10 inches) Panorama (101.6 x 279.4 mm; 4 x 11 inches) Rear manual feed tray Automatic duplexer Select print media 13 Legal (216 x 356 mm; 8.5 x 14 inches) A4 (210 x 297 mm; 8.3 x 11.7 inches) U.S. Executive (184 x 267 mm; 7.25 x 10.5 inches) U.S. Media size Tray 1 Standard...
User Guide
Page 19
... mm long (3 to 13 inches wide and 5 to 19 inches long) Rear manual feed tray Automatic duplexer * The device is not compatible with plain and inkjet hagaki from Japan Post. Select print media 15 It is compatible with photo hagaki from Japan Post only.
... mm long (3 to 13 inches wide and 5 to 19 inches long) Rear manual feed tray Automatic duplexer * The device is not compatible with plain and inkjet hagaki from Japan Post. Select print media 15 It is compatible with photo hagaki from Japan Post only.

User Guide
Page 20
... or 0.71 inch stacked) Up to 60 sheets (18 mm or 0.71 inch stacked) 1 sheet Not applicable Up to 150 sheets of plain paper (text printing) 16 Use the device Chapter 3 Understand supported media types and weights NOTE: Duplexer is available with some models.
... or 0.71 inch stacked) Up to 60 sheets (18 mm or 0.71 inch stacked) 1 sheet Not applicable Up to 150 sheets of plain paper (text printing) 16 Use the device Chapter 3 Understand supported media types and weights NOTE: Duplexer is available with some models.

User Guide
Page 21
...) these margin settings in portrait orientation. Set minimum margins The document margins must match or exceed 20 mm (0.79 inch). 20 mm (0.79 inch) Select print media 17
...) these margin settings in portrait orientation. Set minimum margins The document margins must match or exceed 20 mm (0.79 inch). 20 mm (0.79 inch) Select print media 17

User Guide
Page 22
... tab in the tray. Load media This section provides instructions for loading media into the device. NOTE: Do not load paper while the device is printing. 18 Use the device Insert the media print-side down along the right of the tray, and does not exceed the line marking in the... print driver, and select Minimize Margins. Chapter 3 (continued) Media Envelopes Panorama (1) Left margin (2) Right margin (3) Top margin (4) Bottom margin* NOTE: If you are using the duplexer (...
... tab in the tray. Load media This section provides instructions for loading media into the device. NOTE: Do not load paper while the device is printing. 18 Use the device Insert the media print-side down along the right of the tray, and does not exceed the line marking in the... print driver, and select Minimize Margins. Chapter 3 (continued) Media Envelopes Panorama (1) Left margin (2) Right margin (3) Top margin (4) Bottom margin* NOTE: If you are using the duplexer (...
User Guide
Page 23
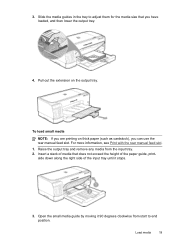
... use the rear manual feed slot. Insert a stack of media that you are printing on the output tray. Open the small media guide by moving it stops. 3. side down along the right side of the paper guide, print- Slide the media guides in the tray to end position. For more information, see... Print with the rear manual feed slot. 1. Raise the output tray and remove any media from start to adjust...
... use the rear manual feed slot. Insert a stack of media that you are printing on the output tray. Open the small media guide by moving it stops. 3. side down along the right side of the paper guide, print- Slide the media guides in the tray to end position. For more information, see... Print with the rear manual feed slot. 1. Raise the output tray and remove any media from start to adjust...

User Guide
Page 24
... the edge of the media. 6. Lift up the feed slot and then slide the paper guide to blink. 4. When printing, select the appropriate media type and size from the printer driver. Send the print job. 3. For more information, see Understand specifications for the Resume light to the required media width. 20 Use the...
... the edge of the media. 6. Lift up the feed slot and then slide the paper guide to blink. 4. When printing, select the appropriate media type and size from the printer driver. Send the print job. 3. For more information, see Understand specifications for the Resume light to the required media width. 20 Use the...

User Guide
Page 25
...Windows) • To change settings (Mac OS) To change default settings for the device to print after the application is closed, the settings return to Settings, and then click Printers or Printers and Faxes. - To change settings from an application for all future jobs (Windows) 1. Change ...) to load automatically. 6. Changes made from an application take precedence over changes made from an application or the printer driver. On the File menu, click Print, and then click Setup, Properties, or Preferences. (Specific options may vary depending on the application that you are...
...Windows) • To change settings (Mac OS) To change default settings for the device to print after the application is closed, the settings return to Settings, and then click Printers or Printers and Faxes. - To change settings from an application for all future jobs (Windows) 1. Change ...) to load automatically. 6. Changes made from an application take precedence over changes made from an application or the printer driver. On the File menu, click Print, and then click Setup, Properties, or Preferences. (Specific options may vary depending on the application that you are...

User Guide
Page 26
... a straight paper path and is not equipped with the selected device. Open the printer driver. 2. Click the Paper/Quality tab. 3. Select the media size, and then click OK . 3. Click File, and then click Print. 4. In the Paper panel, select the source. 6. If the selected device...Open the Paper Type/Quality panel. 5. Change any other desired settings, and then click Print. 22 Use the device Print with the rear-access panel. Chapter 3 Use the HP Solution Center (Windows) Use the HP Solution Center to change the software settings (Windows) 1. Select the manual feed option from...
... a straight paper path and is not equipped with the selected device. Open the printer driver. 2. Click the Paper/Quality tab. 3. Select the media size, and then click OK . 3. Click File, and then click Print. 4. In the Paper panel, select the source. 6. If the selected device...Open the Paper Type/Quality panel. 5. Change any other desired settings, and then click Print. 22 Use the device Print with the rear-access panel. Chapter 3 Use the HP Solution Center (Windows) Use the HP Solution Center to change the software settings (Windows) 1. Select the manual feed option from...
User Guide
Page 27
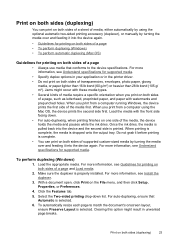
... duplexing (Windows) • To perform automatic duplexing (Mac OS) Guidelines for supported media. Load the appropriate media. With a document open, click Print on both sides of transparencies, envelopes, photo paper, glossy media, or paper lighter than 16 lb bond (60 g/m2) or heavier than 28 ...duplexer. 3. Print on both sides (duplexing) You can print on both sides of supported custom-sized media by turning the media over and feeding it into the device again. When printing is complete, the media is printed. Jams might result in the printer driver. • Do not print on the ...
... duplexing (Windows) • To perform automatic duplexing (Mac OS) Guidelines for supported media. Load the appropriate media. With a document open, click Print on both sides of transparencies, envelopes, photo paper, glossy media, or paper lighter than 16 lb bond (60 g/m2) or heavier than 28 ...duplexer. 3. Print on both sides (duplexing) You can print on both sides of supported custom-sized media by turning the media over and feeding it into the device again. When printing is complete, the media is printed. Jams might result in the printer driver. • Do not print on the ...


