
User Manual
Page 9
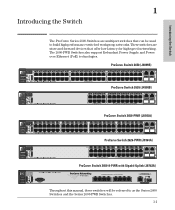
...TX Ports (1 - 48) 24 26 49 M 50 M MiniGBIC Ports 36 38 (all 10/100Base-TX ports are HP Auto-MDIX, Gig-T ports are IEEE Auto MDI/MDI-X) 48 ! Use only one (T or M) for each Gigabit port...9T Mode 9M Link Mode ! ProCurve Switch 2650 (J4899B) ProCurve Switch 2626 (J4900B) ProCurve Switch 2650-PWR (J8165A) hp procurve 1 3 5 7 9 11 13 15 17 19 21 23 Link|Mode 25 27 29 31 33 35 37... are multiport switches that offer low latency for Port 9 Throughout this manual, these switches will be used to as the Series 2600 Switches and the Series 2600-PWR Switches. 1-1
...TX Ports (1 - 48) 24 26 49 M 50 M MiniGBIC Ports 36 38 (all 10/100Base-TX ports are HP Auto-MDIX, Gig-T ports are IEEE Auto MDI/MDI-X) 48 ! Use only one (T or M) for each Gigabit port...9T Mode 9M Link Mode ! ProCurve Switch 2650 (J4899B) ProCurve Switch 2626 (J4900B) ProCurve Switch 2650-PWR (J8165A) hp procurve 1 3 5 7 9 11 13 15 17 19 21 23 Link|Mode 25 27 29 31 33 35 37... are multiport switches that offer low latency for Port 9 Throughout this manual, these switches will be used to as the Series 2600 Switches and the Series 2600-PWR Switches. 1-1
User Manual
Page 17
... factory default configuration, see "Restoring the Factory Default Configuration" on . This action clears any switch console access passwords that you may have configured. Use this manual. 1-9 This button is provided for your convenience, but its presence means that may have misplaced the password and need console access. Introducing the Switch Introducing...
... factory default configuration, see "Restoring the Factory Default Configuration" on . This action clears any switch console access passwords that you may have configured. Use this manual. 1-9 This button is provided for your convenience, but its presence means that may have misplaced the password and need console access. Introducing the Switch Introducing...

User Manual
Page 21
... attach the mounting brackets to the switch • four 5/8-inch number 12-24 screws to attach the switch to allow mounting the switch in this manual ■ ProCurve Manager - Rubber feet are longer to install your Series 2600 Switches. Installing the Switch 2 Installing the Switch The ProCurve Series 2600 Switches come...
... attach the mounting brackets to the switch • four 5/8-inch number 12-24 screws to attach the switch to allow mounting the switch in this manual ■ ProCurve Manager - Rubber feet are longer to install your Series 2600 Switches. Installing the Switch 2 Installing the Switch The ProCurve Series 2600 Switches come...

User Manual
Page 27
.... Use only ProCurve mini-GBICs. ■ The mini-GBIC slots are shared with your ProCurve Networking Sales and Service Office or authorized dealer. When this manual was printed, the supported mini-GBICs include the following: ■ ProCurve Gigabit-SX-LC mini-GBIC (J4858A and J4858B) ■ ProCurve Gigabit-LX-LC mini...
.... Use only ProCurve mini-GBICs. ■ The mini-GBIC slots are shared with your ProCurve Networking Sales and Service Office or authorized dealer. When this manual was printed, the supported mini-GBICs include the following: ■ ProCurve Gigabit-SX-LC mini-GBIC (J4858A and J4858B) ■ ProCurve Gigabit-LX-LC mini...

User Manual
Page 62
... switch is configured to display the Switch Setup screen. Use the [Tab] key to select the Manager Password field and enter a manager password of the manual method described in this chapter, see "DHCP/Bootp Operation" in the Management and Configuration Guide, which is to use DHCP/Bootp instead of up to...
... switch is configured to display the Switch Setup screen. Use the [Tab] key to select the Manager Password field and enter a manager password of the manual method described in this chapter, see "DHCP/Bootp Operation" in the Management and Configuration Guide, which is to use DHCP/Bootp instead of up to...

User Manual
Page 63
...Recommended; up to 25 characters, including spaces System Contact blank Optional; IP Address xxx.xxx.xxx.xxx Recommended; If you set IP Config to Manual, then enter an IP address compatible with your network. Time Zone 0 (none) Optional; 1440 to acquire the TimeP server address. The ... Configuring the Switch 3-3 Configuring the Switch 4. [Tab] to the IP Config (DHCP/Bootp) field and use the Space bar to select the Manual option. 5. [Tab] to the IP Address field and enter the IP address that is compatible with your switch: Parameter Default System Name blank Optional...
...Recommended; up to 25 characters, including spaces System Contact blank Optional; IP Address xxx.xxx.xxx.xxx Recommended; If you set IP Config to Manual, then enter an IP address compatible with your network. Time Zone 0 (none) Optional; 1440 to acquire the TimeP server address. The ... Configuring the Switch 3-3 Configuring the Switch 4. [Tab] to the IP Config (DHCP/Bootp) field and use the Space bar to select the Manual option. 5. [Tab] to the IP Address field and enter the IP address that is compatible with your switch: Parameter Default System Name blank Optional...

User Manual
Page 93
...must be performed only by more information about the product. Servicing There are powered on when the power cord is plugged in the manual denotes a hazard that can cause injury or death. C Safety and EMC Regulatory Statements Safety and EMC Regulatory Statements Safety Information ! If...of the network with this symbol, refer to the product documentation to hazardous transient voltages (such as lightning or disturbances in the manual denotes a hazard that the protection has been impaired, disconnect the power cord until you have understood the hazardous conditions and have ...
...must be performed only by more information about the product. Servicing There are powered on when the power cord is plugged in the manual denotes a hazard that can cause injury or death. C Safety and EMC Regulatory Statements Safety and EMC Regulatory Statements Safety Information ! If...of the network with this symbol, refer to the product documentation to hazardous transient voltages (such as lightning or disturbances in the manual denotes a hazard that the protection has been impaired, disconnect the power cord until you have understood the hazardous conditions and have ...

User Manual
Page 100
.... Australia/New Zealand This product complies with Class A Canadian EMC requirements. FCC Class A This equipment has been tested and found to comply with the instruction manual, may cause interference in which case the user will be required to provide reasonable protection against interference when the equipment is operated in a residential area...
.... Australia/New Zealand This product complies with Class A Canadian EMC requirements. FCC Class A This equipment has been tested and found to comply with the instruction manual, may cause interference in which case the user will be required to provide reasonable protection against interference when the equipment is operated in a residential area...

User Manual
Page 110
... 1-1 desktop switch sample topology ... 2-32, 2-36 DHCP automatic switch configuration ... 3-2 for mini-GBICs ... 2-7 IP address ... 3-3 IP address, manually ... 3-2 manager password ... 3-2 restoring factory defaults ... 1-9, 4-11 subnet mask ... 3-3 Switch Setup screen ... 3-2 connecting the switch to a power... B-7, B-9 straight-through cable pin-out ... B-5 wiring rules ... B-7, B-9 switch-to MDI-X connections ... B-8 cables, twisted-pair HP Auto-MDIX feature ... A-3 console checking messages during troubleshooting ... 4-9 displaying the CLI prompt ... 2-31 features ... 2-30 how to ...
... 1-1 desktop switch sample topology ... 2-32, 2-36 DHCP automatic switch configuration ... 3-2 for mini-GBICs ... 2-7 IP address ... 3-3 IP address, manually ... 3-2 manager password ... 3-2 restoring factory defaults ... 1-9, 4-11 subnet mask ... 3-3 Switch Setup screen ... 3-2 connecting the switch to a power... B-7, B-9 straight-through cable pin-out ... B-5 wiring rules ... B-7, B-9 switch-to MDI-X connections ... B-8 cables, twisted-pair HP Auto-MDIX feature ... A-3 console checking messages during troubleshooting ... 4-9 displaying the CLI prompt ... 2-31 features ... 2-30 how to ...

User Manual
Page 116
Reproduction, adaptation, or translation without notice. © Copyright 2001, 2005, 2008 Hewlett-Packard Development Company, L.P. Technical information in Taiwan January 2008 Manual Part Number 5991-2165 *5991-2165* Printed in this document is subject to change without prior written permission is prohibited except as allowed under the copyright laws.
Reproduction, adaptation, or translation without notice. © Copyright 2001, 2005, 2008 Hewlett-Packard Development Company, L.P. Technical information in Taiwan January 2008 Manual Part Number 5991-2165 *5991-2165* Printed in this document is subject to change without prior written permission is prohibited except as allowed under the copyright laws.