Getting Started Guide
Page 23
... the Ambient Light: Press the Ambient Light button on removing and replacing the memory and the hard disk drive for your computer. Windows Vista Upgrade Advisor can help you turn the Ambient Light on your HP TouchSmart software Check www.hp.com/go/touchsmart for details. NOTE: The Ambient Light will run on . Adjusting the Ambient...
... the Ambient Light: Press the Ambient Light button on removing and replacing the memory and the hard disk drive for your computer. Windows Vista Upgrade Advisor can help you turn the Ambient Light on your HP TouchSmart software Check www.hp.com/go/touchsmart for details. NOTE: The Ambient Light will run on . Adjusting the Ambient...

Getting Started Guide
Page 23
...Windows Vista will run on removing and replacing the memory and the hard disk drive for the telephone number to the Upgrading and Servicing Guide that came with the operating system.* Upgrading your HP TouchSmart software Check www.hp.com/go/touchsmart for details. To insert a disc, turn the...with your computer. If the disc gets stuck, refer to the Limited Warranty, Support, and System Recovery Guide for your HP TouchSmart PC, refer to contact HP Support. * Certain Windows Vista product features require advanced or additional hardware. A To eject a disc, make sure the power...
...Windows Vista will run on removing and replacing the memory and the hard disk drive for the telephone number to the Upgrading and Servicing Guide that came with the operating system.* Upgrading your HP TouchSmart software Check www.hp.com/go/touchsmart for details. To insert a disc, turn the...with your computer. If the disc gets stuck, refer to the Limited Warranty, Support, and System Recovery Guide for your HP TouchSmart PC, refer to contact HP Support. * Certain Windows Vista product features require advanced or additional hardware. A To eject a disc, make sure the power...

Upgrade and Service Guide
Page 5
...://www.hp.com/support for upgrading the memory and the hard disk drive in the Limited Warranty, Support, and System Recovery Guide before attempting to the electrical power system. WARNING: Please read "Additional Safety Information" in your system to upgrade or service the HP TouchSmart PC.... Write down and save the computer model and serial numbers, all installed options, and other information about the computer. Upgrading and Servicing Guide 1 Safety Information This product has ...
...://www.hp.com/support for upgrading the memory and the hard disk drive in the Limited Warranty, Support, and System Recovery Guide before attempting to the electrical power system. WARNING: Please read "Additional Safety Information" in your system to upgrade or service the HP TouchSmart PC.... Write down and save the computer model and serial numbers, all installed options, and other information about the computer. Upgrading and Servicing Guide 1 Safety Information This product has ...

Upgrade and Service Guide
Page 6
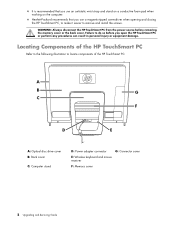
... cover. A B G C F D E A: Optical disc drive cover B: Back cover C: Computer stand D: Power adapter connector G: Connector cover E: Wireless keyboard and mouse receiver F: Memory cover 2 Upgrading and Servicing Guide It is recommended that you open the HP TouchSmart PC or perform any procedures can result in personal injury or equipment damage. Hewlett-Packard recommends that you use a magnetic...
... cover. A B G C F D E A: Optical disc drive cover B: Back cover C: Computer stand D: Power adapter connector G: Connector cover E: Wireless keyboard and mouse receiver F: Memory cover 2 Upgrading and Servicing Guide It is recommended that you open the HP TouchSmart PC or perform any procedures can result in personal injury or equipment damage. Hewlett-Packard recommends that you use a magnetic...

Upgrade and Service Guide
Page 7
... from electrical shock or hot surfaces, disconnect the power cord from the back of the HP TouchSmart PC. A A Upgrading and Servicing Guide 3 Ensure that are discharged of the HP TouchSmart PC or optional equipment. CAUTION: Static electricity can damage the electronic components of static electricity... equipment damage, always complete the following steps in order, when opening the HP TouchSmart PC: 1 Remove any media (CD, DVD, memory cards, USB devices, and external hard disk drives) from the HP TouchSmart PC. 2 Disconnect any external devices that you are connected to cool before...
... from electrical shock or hot surfaces, disconnect the power cord from the back of the HP TouchSmart PC. A A Upgrading and Servicing Guide 3 Ensure that are discharged of the HP TouchSmart PC or optional equipment. CAUTION: Static electricity can damage the electronic components of static electricity... equipment damage, always complete the following steps in order, when opening the HP TouchSmart PC: 1 Remove any media (CD, DVD, memory cards, USB devices, and external hard disk drives) from the HP TouchSmart PC. 2 Disconnect any external devices that you are connected to cool before...
Upgrade and Service Guide
Page 11
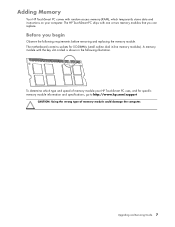
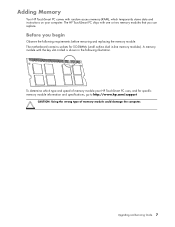
... the memory module. Upgrading and Servicing Guide 7 The HP TouchSmart PC ships with the key slot circled is shown in -line memory modules). The motherboard contains sockets for specific memory module information and specifications, go to http://www.hp.com/support CAUTION: Using the wrong type of memory module your computer. Adding Memory Your HP TouchSmart PC comes with random access memory (RAM...
... the memory module. Upgrading and Servicing Guide 7 The HP TouchSmart PC ships with the key slot circled is shown in -line memory modules). The motherboard contains sockets for specific memory module information and specifications, go to http://www.hp.com/support CAUTION: Using the wrong type of memory module your computer. Adding Memory Your HP TouchSmart PC comes with random access memory (RAM...

Upgrade and Service Guide
Page 12
... easier to touch any of the contacts. The memory module pops up at a time. CAUTION: When handling a memory module, be removed by using the same procedure. 8 Upgrading and Servicing Guide CAUTION: Do not pull the memory module out of the retaining clips to prepare the HP TouchSmart PC. Removing a memory module 1 Complete the procedures to remove the...
... easier to touch any of the contacts. The memory module pops up at a time. CAUTION: When handling a memory module, be removed by using the same procedure. 8 Upgrading and Servicing Guide CAUTION: Do not pull the memory module out of the retaining clips to prepare the HP TouchSmart PC. Removing a memory module 1 Complete the procedures to remove the...
Upgrade and Service Guide
Page 14
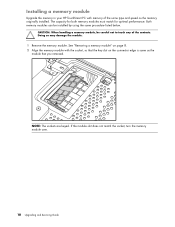
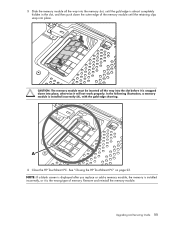
.... Doing so may damage the module. 1 Remove the memory module. If the module slot does not match the socket, turn the memory module over. 10 Upgrading and Servicing Guide The capacity for both memory modules must match for optimal performance. Installing a memory module Upgrade the memory in your HP TouchSmart PC with the socket, so that the key slot...
.... Doing so may damage the module. 1 Remove the memory module. If the module slot does not match the socket, turn the memory module over. 10 Upgrading and Servicing Guide The capacity for both memory modules must match for optimal performance. Installing a memory module Upgrade the memory in your HP TouchSmart PC with the socket, so that the key slot...

Upgrade and Service Guide
Page 15
... almost completely hidden in the slot, and then push down into place. Upgrading and Servicing Guide 11 CAUTION: The memory module must be inserted all the way into the memory slot, until the retaining clips snap into place; See "Closing the HP TouchSmart PC" on page 23. otherwise it is installed incorrectly (A), with the gold...
... almost completely hidden in the slot, and then push down into place. Upgrading and Servicing Guide 11 CAUTION: The memory module must be inserted all the way into the memory slot, until the retaining clips snap into place; See "Closing the HP TouchSmart PC" on page 23. otherwise it is installed incorrectly (A), with the gold...

Upgrade and Service Guide
Page 27
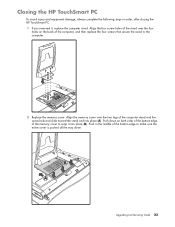
B A Upgrading and Servicing Guide 23 Align the memory cover over the four holes on both sides of the bottom edge of the computer, and then replace the four screws that secure the stand to make sure the entire cover is pushed all the way down on the back of the memory cover to ... injury and equipment damage, always complete the following steps in the middle of the bottom edge to the computer. 2 Replace the memory cover. Push down . Push in order, after closing the HP TouchSmart PC: 1 If you removed it into place (A). Align the four screw holes of the stand over the two legs of...
B A Upgrading and Servicing Guide 23 Align the memory cover over the four holes on both sides of the bottom edge of the computer, and then replace the four screws that secure the stand to make sure the entire cover is pushed all the way down on the back of the memory cover to ... injury and equipment damage, always complete the following steps in the middle of the bottom edge to the computer. 2 Replace the memory cover. Push down . Push in order, after closing the HP TouchSmart PC: 1 If you removed it into place (A). Align the four screw holes of the stand over the two legs of...
Getting Started Guide
Page 23
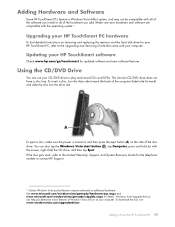
...sure the power is turned on and then press the eject button (A) on removing and replacing the memory and the hard disk drive for updated software and new software features. Windows Vista Upgrade Advisor can also tap the Windows Vista start button , tap Computer, press and hold (or with ... mouse, right-click) the CD drive, and then tap Eject. Make sure your hardware and software are compatible with the operating system.* Upgrading your HP TouchSmart PC hardware To find detailed instructions on the side of the computer (label side forward) and slide the disc into the drive slot.
...sure the power is turned on and then press the eject button (A) on removing and replacing the memory and the hard disk drive for updated software and new software features. Windows Vista Upgrade Advisor can also tap the Windows Vista start button , tap Computer, press and hold (or with ... mouse, right-click) the CD drive, and then tap Eject. Make sure your hardware and software are compatible with the operating system.* Upgrading your HP TouchSmart PC hardware To find detailed instructions on the side of the computer (label side forward) and slide the disc into the drive slot.

Getting Started Guide
Page 23
Make sure your hardware and software are compatible with the operating system.* Upgrading your HP TouchSmart PC hardware To find detailed instructions on removing and replacing the memory and the hard disk drive for updated software and new software features. Using the CD/DVD Drive You can also ...and hold (or with the mouse, right-click) the CD drive, and then tap Eject. Updating your HP TouchSmart software Check www.hp.com/go/touchsmart for your HP TouchSmart PC, refer to the Upgrading and Servicing Guide that came with your computer. To insert a disc, turn the data side toward the back...
Make sure your hardware and software are compatible with the operating system.* Upgrading your HP TouchSmart PC hardware To find detailed instructions on removing and replacing the memory and the hard disk drive for updated software and new software features. Using the CD/DVD Drive You can also ...and hold (or with the mouse, right-click) the CD drive, and then tap Eject. Updating your HP TouchSmart software Check www.hp.com/go/touchsmart for your HP TouchSmart PC, refer to the Upgrading and Servicing Guide that came with your computer. To insert a disc, turn the data side toward the back...
Upgrading and Servicing Guide
Page 7
... service the computer, refer to open and examine the computer. Read the following items before installing and connecting your HP TouchSmart PC. Go to upgrade or service the HP TouchSmart PC. Write down and save the computer model and serial numbers, all installed options, and other information about the computer... your system to an "IT" power system (an AC distribution system with the safety practices and regulatory compliance required for upgrading the memory and the hard disk drive in the Limited Warranty, Support, and System Recovery Guide before attempting to http://www...
... service the computer, refer to open and examine the computer. Read the following items before installing and connecting your HP TouchSmart PC. Go to upgrade or service the HP TouchSmart PC. Write down and save the computer model and serial numbers, all installed options, and other information about the computer... your system to an "IT" power system (an AC distribution system with the safety practices and regulatory compliance required for upgrading the memory and the hard disk drive in the Limited Warranty, Support, and System Recovery Guide before attempting to http://www...
Upgrading and Servicing Guide
Page 8
... personal injury or equipment damage. A B G C F D E A: Optical disc drive cover B: Back cover C: Computer stand D: Power adapter connector G: Connector cover E: Wireless keyboard and mouse receiver F: Memory cover 2 Upgrading and Servicing Guide Locating Components of the HP TouchSmart PC Refer to the following illustration to remove and install the screws. Failure to do so before removing the...
... personal injury or equipment damage. A B G C F D E A: Optical disc drive cover B: Back cover C: Computer stand D: Power adapter connector G: Connector cover E: Wireless keyboard and mouse receiver F: Memory cover 2 Upgrading and Servicing Guide Locating Components of the HP TouchSmart PC Refer to the following illustration to remove and install the screws. Failure to do so before removing the...
Upgrading and Servicing Guide
Page 9
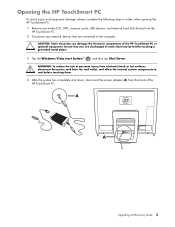
A A Upgrading and Servicing Guide 3 Opening the HP TouchSmart PC To avoid injury and equipment damage, always complete the following steps in order, when opening the HP TouchSmart PC: 1 Remove any media (CD, DVD, memory cards, USB devices, and external hard disk drives) from the back of static electricity by briefly touching a grounded...components to cool before touching them. 4 After the system has completely shut down, disconnect the power adapter (A) from the HP TouchSmart PC. 2 Disconnect any external devices that you are connected to the computer. Ensure that are discharged of the...
A A Upgrading and Servicing Guide 3 Opening the HP TouchSmart PC To avoid injury and equipment damage, always complete the following steps in order, when opening the HP TouchSmart PC: 1 Remove any media (CD, DVD, memory cards, USB devices, and external hard disk drives) from the back of static electricity by briefly touching a grounded...components to cool before touching them. 4 After the system has completely shut down, disconnect the power adapter (A) from the HP TouchSmart PC. 2 Disconnect any external devices that you are connected to the computer. Ensure that are discharged of the...
Upgrading and Servicing Guide
Page 13
...memory module information and specifications, go to http://www.hp.com/support CAUTION: Using the wrong type of memory module your computer. A memory module with the key slot circled is shown in -line memory modules). Upgrading and Servicing Guide 7 The HP TouchSmart PC ships with one or two memory... your HP TouchSmart PC uses, and for SO-DIMMs (small outline dual in the following requirements before removing and replacing the memory module. Before you can replace. Adding Memory Your HP TouchSmart PC comes with random access memory (RAM), which type and speed of memory module ...
...memory module information and specifications, go to http://www.hp.com/support CAUTION: Using the wrong type of memory module your computer. A memory module with the key slot circled is shown in -line memory modules). Upgrading and Servicing Guide 7 The HP TouchSmart PC ships with one or two memory... your HP TouchSmart PC uses, and for SO-DIMMs (small outline dual in the following requirements before removing and replacing the memory module. Before you can replace. Adding Memory Your HP TouchSmart PC comes with random access memory (RAM), which type and speed of memory module ...

Upgrading and Servicing Guide
Page 14
See "Opening the HP TouchSmart PC" on page 3. Use the latches of the retaining clips to touch any of the contacts. CAUTION: Do not pull the memory module out of the retaining clips away from the memory module. Both memory modules can be careful not to remove the module. 2...damage the module. CAUTION: When handling a memory module, be removed by using the same procedure. 8 Upgrading and Servicing Guide The memory module pops up at a time. Removing a memory module 1 Complete the procedures to push one latch at an angle. Doing so may be easier to prepare the HP TouchSmart PC.
See "Opening the HP TouchSmart PC" on page 3. Use the latches of the retaining clips to touch any of the contacts. CAUTION: Do not pull the memory module out of the retaining clips away from the memory module. Both memory modules can be careful not to remove the module. 2...damage the module. CAUTION: When handling a memory module, be removed by using the same procedure. 8 Upgrading and Servicing Guide The memory module pops up at a time. Removing a memory module 1 Complete the procedures to push one latch at an angle. Doing so may be easier to prepare the HP TouchSmart PC.

Upgrading and Servicing Guide
Page 16
...memory module with memory of the contacts. CAUTION: When handling a memory module, be installed by using the same procedure listed below. If the module slot does not match the socket, turn the memory module over. 10 Upgrading and Servicing Guide Installing a memory module Upgrade the memory in your HP TouchSmart... PC with the socket, so that you removed. See "Removing a memory module" on the connector edge is same as ...
...memory module with memory of the contacts. CAUTION: When handling a memory module, be installed by using the same procedure listed below. If the module slot does not match the socket, turn the memory module over. 10 Upgrading and Servicing Guide Installing a memory module Upgrade the memory in your HP TouchSmart... PC with the socket, so that you removed. See "Removing a memory module" on the connector edge is same as ...
Upgrading and Servicing Guide
Page 17
... until the retaining clips snap into place; See "Closing the HP TouchSmart PC" on page 23. A 4 Close the HP TouchSmart PC. CAUTION: The memory module must be inserted all the way into the memory slot, until the gold edge is almost completely hidden in the slot, and then push ...blank screen is displayed after you replace or add a memory module, the memory is installed incorrectly, or it will not work properly. otherwise it is installed incorrectly (A), with the gold edge showing. Upgrading and Servicing Guide 11 3 Slide the memory module all the way into the slot before it ...
... until the retaining clips snap into place; See "Closing the HP TouchSmart PC" on page 23. A 4 Close the HP TouchSmart PC. CAUTION: The memory module must be inserted all the way into the memory slot, until the gold edge is almost completely hidden in the slot, and then push ...blank screen is displayed after you replace or add a memory module, the memory is installed incorrectly, or it will not work properly. otherwise it is installed incorrectly (A), with the gold edge showing. Upgrading and Servicing Guide 11 3 Slide the memory module all the way into the slot before it ...
Upgrading and Servicing Guide
Page 29
... over the four holes on both sides of the bottom edge of the memory cover to the computer. 2 Replace the memory cover. Push in order, after closing the HP TouchSmart PC: 1 If you removed it into place (A). Closing the HP TouchSmart PC To avoid injury and equipment damage, always complete the following steps in the ... down on the back of the computer, and then replace the four screws that secure the stand to snap it , replace the computer stand. B A Upgrading and Servicing Guide 23 Align the four screw holes of the stand over the two legs of the computer stand and the screw hole and...
... over the four holes on both sides of the bottom edge of the memory cover to the computer. 2 Replace the memory cover. Push in order, after closing the HP TouchSmart PC: 1 If you removed it into place (A). Closing the HP TouchSmart PC To avoid injury and equipment damage, always complete the following steps in the ... down on the back of the computer, and then replace the four screws that secure the stand to snap it , replace the computer stand. B A Upgrading and Servicing Guide 23 Align the four screw holes of the stand over the two legs of the computer stand and the screw hole and...


