
Security - Window Vista and Windows 7
Page 5
... computer 2 Using passwords Setting passwords in Windows ...3 Setting passwords in Setup Utility ...3 Administrator password ...3 Managing an administrator password 4 Entering an administrator password 4 Power-on password ...4 Managing a power-on password 5 Entering a power-on password 5 3 Using antivirus software 4 Using firewall software 5 Installing critical security updates 6 Installing an optional security cable 7 Using the fingerprint reader (select...
... computer 2 Using passwords Setting passwords in Windows ...3 Setting passwords in Setup Utility ...3 Administrator password ...3 Managing an administrator password 4 Entering an administrator password 4 Power-on password ...4 Managing a power-on password 5 Entering a power-on password 5 3 Using antivirus software 4 Using firewall software 5 Installing critical security updates 6 Installing an optional security cable 7 Using the fingerprint reader (select...
Security - Window Vista and Windows 7
Page 7
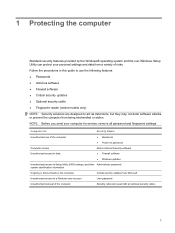
... the computer Security cable slot (used with an optional security cable) 1 Follow the procedures in this guide to use of the computer ● QuickLock ● Power-on password Computer viruses Unauthorized access to data Norton Internet Security software ● Firewall software ● Windows updates Unauthorized access to Setup Utility, BIOS settings...
... the computer Security cable slot (used with an optional security cable) 1 Follow the procedures in this guide to use of the computer ● QuickLock ● Power-on password Computer viruses Unauthorized access to data Norton Internet Security software ● Firewall software ● Windows updates Unauthorized access to Setup Utility, BIOS settings...

Security - Window Vista and Windows 7
Page 9
... Setting passwords in Windows, nor is it displayed as it is set, it must be entered each time you record your power-on password* CAUTION: If you forget your Windows user or administrator password. Initiate QuickLock by entering your administrator password, you ...enter it must be entered in Setup Utility. Setting passwords in a safe place. Be sure that you access Setup Utility. Power-on password, you access Setup Utility. Administrator password Your administrator password protects the configuration settings and system identification information in the ...
... Setting passwords in Windows, nor is it displayed as it is set, it must be entered each time you record your power-on password* CAUTION: If you forget your Windows user or administrator password. Initiate QuickLock by entering your administrator password, you ...enter it must be entered in Setup Utility. Setting passwords in a safe place. Be sure that you access Setup Utility. Power-on password, you access Setup Utility. Administrator password Your administrator password protects the configuration settings and system identification information in the ...

Security - Window Vista and Windows 7
Page 10
... Exit > Exit Saving Changes. To save your current password in the Enter Password field, and then press enter 4 times. 3. Power-on password Your power-on or restart the computer, or exit Hibernation. A power-on password is not displayed as it must be entered each time you turn on password prevents unauthorized use the...
... Exit > Exit Saving Changes. To save your current password in the Enter Password field, and then press enter 4 times. 3. Power-on password Your power-on or restart the computer, or exit Hibernation. A power-on password is not displayed as it must be entered each time you turn on password prevents unauthorized use the...

Security - Window Vista and Windows 7
Page 11
...Open the Setup Utility by turning on or restarting the computer. Use the arrow keys to select Security > Set Power-On Password, and then press enter. ● To set , change a power-on password, type your current password in the Enter Current Password field, type a new password in the Enter ... of the screen, press f10. - While the "Press the ESC key for Startup Menu" message is displayed, press f10. 2. Managing a power-on password To set a power-on password, type your password in the Enter New Password and Confirm New Password fields, and then press enter. ● To change , or...
...Open the Setup Utility by turning on or restarting the computer. Use the arrow keys to select Security > Set Power-On Password, and then press enter. ● To set , change a power-on password, type your current password in the Enter Current Password field, type a new password in the Enter ... of the screen, press f10. - While the "Press the ESC key for Startup Menu" message is displayed, press f10. 2. Managing a power-on password To set a power-on password, type your password in the Enter New Password and Confirm New Password fields, and then press enter. ● To change , or...
Security - Window Vista and Windows 7
Page 20
... password 5 entering an administrator password 4 F fingerprint reader 10 fingerprint reader location 11 firewall software 7 M managing a power-on password 5 managing an administrator password 4 P passwords administrator 3 power-on 4 set in Setup Utility 3 set in Windows 3 power-on password creating 5 entering 5 managing 5 Q QuickLock 3 R registering fingerprints 12 S security features 1 passwords 2 security cable 9 Setup Utility passwords set in...
... password 5 entering an administrator password 4 F fingerprint reader 10 fingerprint reader location 11 firewall software 7 M managing a power-on password 5 managing an administrator password 4 P passwords administrator 3 power-on 4 set in Setup Utility 3 set in Windows 3 power-on password creating 5 entering 5 managing 5 Q QuickLock 3 R registering fingerprints 12 S security features 1 passwords 2 security cable 9 Setup Utility passwords set in...
Setup Utility - Windows Vista and Windows 7
Page 9
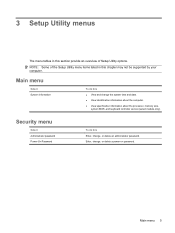
Security menu Select Administrator password Power-On Password To do this section provide an overview of the Setup Utility menu items listed in this ● View and change the system time ... the processor, memory size, system BIOS, and keyboard controller version (select models only). Main menu 5 NOTE: Some of Setup Utility options. Enter, change, or delete a power-on password. 3 Setup Utility menus The menu tables in this Enter, change, or delete an administrator password. Main menu Select System information To do this...
Security menu Select Administrator password Power-On Password To do this section provide an overview of the Setup Utility menu items listed in this ● View and change the system time ... the processor, memory size, system BIOS, and keyboard controller version (select models only). Main menu 5 NOTE: Some of Setup Utility options. Enter, change, or delete a power-on password. 3 Setup Utility menus The menu tables in this Enter, change, or delete an administrator password. Main menu Select System information To do this...

Setup Utility - Windows Vista and Windows 7
Page 10
... is in intervals of the Setup Utility in DC mode. Enable/disable the processor C6 sleep state. Enable/disable Card Reader/1394 Power Saving. Run a comprehensive self-test on . Run a diagnostic test on the system memory. 6 Chapter 3 Setup Utility menus ...Enabled/disable Fan Always On. Enable/disable LAN Power Saving. Enable/disable the processor Virtualization Technology. System Configuration menu Select Language Support Button Sound (select models only) Virtualization Technology (select ...
... is in intervals of the Setup Utility in DC mode. Enable/disable the processor C6 sleep state. Enable/disable Card Reader/1394 Power Saving. Run a comprehensive self-test on . Run a diagnostic test on the system memory. 6 Chapter 3 Setup Utility menus ...Enabled/disable Fan Always On. Enable/disable LAN Power Saving. Enable/disable the processor Virtualization Technology. System Configuration menu Select Language Support Button Sound (select models only) Virtualization Technology (select ...
Setup Utility - Windows Vista and Windows 7
Page 11
... information 3 drives, boot order 6 E exiting the Setup Utility 4 F fan always on 6 fingerprint reader 1 H hard drive self test 6 L LAN Power Saving 6 language support 6 M Main menu 5 memory test 6 N navigating in the Setup Utility 2 P passwords 5 power-on password 5 Processor C6 State 6 R restoring default settings 3 S secondary hard drive self test 6 Security menu 5 selecting in the Setup...
... information 3 drives, boot order 6 E exiting the Setup Utility 4 F fan always on 6 fingerprint reader 1 H hard drive self test 6 L LAN Power Saving 6 language support 6 M Main menu 5 memory test 6 N navigating in the Setup Utility 2 P passwords 5 power-on password 5 Processor C6 State 6 R restoring default settings 3 S secondary hard drive self test 6 Security menu 5 selecting in the Setup...
Wireless (Select Models Only) - Windows 7
Page 8
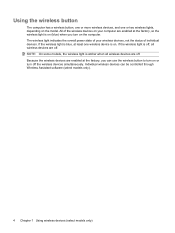
... more wireless devices, and one wireless device is amber when all wireless devices are off the wireless devices simultaneously. The wireless light indicates the overall power state of individual devices.
... more wireless devices, and one wireless device is amber when all wireless devices are off the wireless devices simultaneously. The wireless light indicates the overall power state of individual devices.
Wireless (Select Models Only) - Windows 7
Page 14
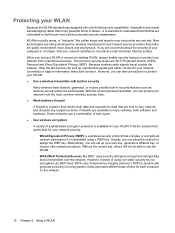
... wireless manufacturers and hotspot service providers that encodes or encrypts all network data before it is a wireless security protocol that make the public environment more powerful forms of using a WEP key. When you can protect your network from unauthorized access. Find the solution that works best for your network security: ◦...
... wireless manufacturers and hotspot service providers that encodes or encrypts all network data before it is a wireless security protocol that make the public environment more powerful forms of using a WEP key. When you can protect your network from unauthorized access. Find the solution that works best for your network security: ◦...
Wireless (Select Models Only) - Windows 7
Page 18
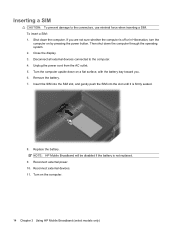
... from the AC outlet. 5. Replace the battery. Then shut down the computer. NOTE: HP Mobile Broadband will be disabled if the battery is firmly seated. 8. Turn on by pressing the power button. Turn the computer upside down on a flat surface, with the battery bay toward you are not ...sure whether the computer is off or in Hibernation, turn the computer on the computer. 14 Chapter 3 Using HP Mobile Broadband (select models only) Inserting a...
... from the AC outlet. 5. Replace the battery. Then shut down the computer. NOTE: HP Mobile Broadband will be disabled if the battery is firmly seated. 8. Turn on by pressing the power button. Turn the computer upside down on a flat surface, with the battery bay toward you are not ...sure whether the computer is off or in Hibernation, turn the computer on the computer. 14 Chapter 3 Using HP Mobile Broadband (select models only) Inserting a...
Wireless (Select Models Only) - Windows 7
Page 19
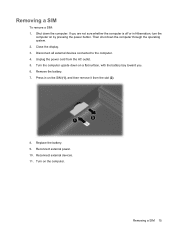
... the SIM (1), and then remove it from the AC outlet. 5. Reconnect external power. 10. Reconnect external devices. 11. Removing a SIM To remove a SIM: 1. If you . 6. Unplug the power cord from the slot (2). 8. Replace the battery. 9. Turn on by pressing the power button. Removing a SIM 15 Remove the battery. 7. Close the display. 3. Press in...
... the SIM (1), and then remove it from the AC outlet. 5. Reconnect external power. 10. Reconnect external devices. 11. Removing a SIM To remove a SIM: 1. If you . 6. Unplug the power cord from the slot (2). 8. Replace the battery. 9. Turn on by pressing the power button. Removing a SIM 15 Remove the battery. 7. Close the display. 3. Press in...

Wireless (Select Models Only) - Windows 7
Page 28
If the computer still cannot make a connection to 15 seconds. Cannot connect to the wireless router If you are trying to connect to the wireless router and are unsuccessful, reset the wireless router by removing power from the router for 10 to a WLAN, restart the wireless router. For details, refer to the router manufacturer's instructions. 24 Chapter 5 Troubleshooting wireless connection problems
If the computer still cannot make a connection to 15 seconds. Cannot connect to the wireless router If you are trying to connect to the wireless router and are unsuccessful, reset the wireless router by removing power from the router for 10 to a WLAN, restart the wireless router. For details, refer to the router manufacturer's instructions. 24 Chapter 5 Troubleshooting wireless connection problems

Memory Modules - Windows Vista and Windows 7
Page 7
... computer. 7. Turn the computer upside down the computer through the operating system. 3. The memory capacity of static electricity by pressing the power button. NOTE: To use a dual-channel configuration when adding a second memory module, be upgraded by adding a memory module to the... down on the bottom of electric shock and damage to the computer. 4. Disconnect all external devices connected to the equipment, unplug the power cord and remove all batteries before installing a memory module. Adding or replacing a memory module The computer has one memory module compartment, which...
... computer. 7. Turn the computer upside down the computer through the operating system. 3. The memory capacity of static electricity by pressing the power button. NOTE: To use a dual-channel configuration when adding a second memory module, be upgraded by adding a memory module to the... down on the bottom of electric shock and damage to the computer. 4. Disconnect all external devices connected to the equipment, unplug the power cord and remove all batteries before installing a memory module. Adding or replacing a memory module The computer has one memory module compartment, which...

Memory Modules - Windows Vista and Windows 7
Page 10
15. Turn on the computer. 4 Adding or replacing a memory module Turn the computer right-side up, and then reconnect external power and external devices. 16.
15. Turn on the computer. 4 Adding or replacing a memory module Turn the computer right-side up, and then reconnect external power and external devices. 16.
Pointing Devices and Keyboard - Windows 7
Page 9
... connected to the hard drive. After you can press fn+f3 to initiate Sleep. While the computer is conserved. To exit Sleep, briefly press the power button. The function of Sleep. Using hotkeys 5 When Sleep is initiated, your information is stored in system memory, the screen is cleared, and... power is in Windows Control Panel. Until you have set the fn+f5 hotkey to the fn+f5 hotkey. Opening a Web browser (fn+f3) Press fn+...
... connected to the hard drive. After you can press fn+f3 to initiate Sleep. While the computer is conserved. To exit Sleep, briefly press the power button. The function of Sleep. Using hotkeys 5 When Sleep is initiated, your information is stored in system memory, the screen is cleared, and... power is in Windows Control Panel. Until you have set the fn+f5 hotkey to the fn+f5 hotkey. Opening a Web browser (fn+f3) Press fn+...

Multimedia - Windows 7
Page 6
... captures still photographs. Records sound. Connects an optional computer headset microphone, stereo array microphone, or monaural microphone. WARNING! For additional safety information, refer to optional powered stereo speakers, headphones, earbuds, a headset, or television audio. Produces sound when connected to the Regulatory, Safety and Environmental Notices. NOTE: Your computer may look slightly...
... captures still photographs. Records sound. Connects an optional computer headset microphone, stereo array microphone, or monaural microphone. WARNING! For additional safety information, refer to optional powered stereo speakers, headphones, earbuds, a headset, or television audio. Produces sound when connected to the Regulatory, Safety and Environmental Notices. NOTE: Your computer may look slightly...
Multimedia - Windows 7
Page 31
...8 H HDMI connecting 9 HDMI port 9 headphone (audio-out) jack 2 headphones 2 high-definition devices, connecting 9 hotkeys muting/restoring speaker volume 3 HP DVD Play 5 I internal digital dual array microphone, identifying 2 issues, resolving 21 J jacks audio-in (microphone) 2 audio-out (headphone) 2...movie, watching 15 multimedia components, identifying 2 multimedia software 5 multimedia software, installing 5 O optical disc Blu-ray 14 inserting 14 removing, with power 18 using 12 optical drive 11, 12 P ports external monitor 8 HDMI 9 projector, connecting 8 R region codes, DVD 16 S software ...
...8 H HDMI connecting 9 HDMI port 9 headphone (audio-out) jack 2 headphones 2 high-definition devices, connecting 9 hotkeys muting/restoring speaker volume 3 HP DVD Play 5 I internal digital dual array microphone, identifying 2 issues, resolving 21 J jacks audio-in (microphone) 2 audio-out (headphone) 2...movie, watching 15 multimedia components, identifying 2 multimedia software 5 multimedia software, installing 5 O optical disc Blu-ray 14 inserting 14 removing, with power 18 using 12 optical drive 11, 12 P ports external monitor 8 HDMI 9 projector, connecting 8 R region codes, DVD 16 S software ...
Power Management - Windows 7
Page 3
... Hibernation 2 Using the battery meter ...3 Using power plans ...4 Viewing the current power plan 4 Selecting a different power plan 4 Customizing power plans ...4 Setting password protection on wakeup 4 2 Using external AC power Connecting the AC adapter ...6 Testing an AC adapter ...7 3 Using battery power Finding battery information in Help and Support 9 ... low battery levels 13 Resolving a low battery level 13 Resolving a low battery level when external power is available 13 Resolving a low battery level when a charged battery is available 13 Resolving a low battery level when no...
... Hibernation 2 Using the battery meter ...3 Using power plans ...4 Viewing the current power plan 4 Selecting a different power plan 4 Customizing power plans ...4 Setting password protection on wakeup 4 2 Using external AC power Connecting the AC adapter ...6 Testing an AC adapter ...7 3 Using battery power Finding battery information in Help and Support 9 ... low battery levels 13 Resolving a low battery level 13 Resolving a low battery level when external power is available 13 Resolving a low battery level when a charged battery is available 13 Resolving a low battery level when no...


