
Security - Window Vista and Windows 7
Page 8
... types of passwords can be set, depending on how you set , changed, or deleted, it in a secure place. Passwords can be set in the non-Windows Setup Utility preinstalled on the computer. ● Do not use the same password for a Setup Utility feature and for more than one Setup Utility feature. Because most passwords are not displayed as screen-saver passwords, select Start > Help and Support. 2 Chapter 2 Using passwords A password set in Windows or in Windows must be entered...
... types of passwords can be set, depending on how you set , changed, or deleted, it in a secure place. Passwords can be set in the non-Windows Setup Utility preinstalled on the computer. ● Do not use the same password for a Setup Utility feature and for more than one Setup Utility feature. Because most passwords are not displayed as screen-saver passwords, select Start > Help and Support. 2 Chapter 2 Using passwords A password set in Windows or in Windows must be entered...

Setup Utility - Windows Vista and Windows 7
Page 10
... test on the hard drive. Enable/disable the capacitive button tapping sound. When enabled, saves power when the computer is called the Primary Hard Disk Self Test. Enable/disable the processor C6 sleep state. Enable/disable LAN Power Saving. System Configuration menu Select Language Support Button Sound (select models only) Virtualization Technology (select models only) Processor C6 State (select models only) LAN Power Saving (select models only) Card Reader/1394 Power Saving (select models only) Fan Always On Boot Options To do this Change the Setup Utility language.
... test on the hard drive. Enable/disable the capacitive button tapping sound. When enabled, saves power when the computer is called the Primary Hard Disk Self Test. Enable/disable the processor C6 sleep state. Enable/disable LAN Power Saving. System Configuration menu Select Language Support Button Sound (select models only) Virtualization Technology (select models only) Processor C6 State (select models only) LAN Power Saving (select models only) Card Reader/1394 Power Saving (select models only) Fan Always On Boot Options To do this Change the Setup Utility language.
Software Update - Windows Vista and Windows 7
Page 5
... http://www.hp.com. 3. Prepare for a system BIOS update by identifying the BIOS version currently installed on the system ROM. NOTE: Windows® includes the User Account Control feature to improve the security of your computer model, product category, and series or family. NOTE: The computer system BIOS is connected to Windows Help for more information. 2. Updating software Updated versions of the software provided with the hardware devices, and provides...
... http://www.hp.com. 3. Prepare for a system BIOS update by identifying the BIOS version currently installed on the system ROM. NOTE: Windows® includes the User Account Control feature to improve the security of your computer model, product category, and series or family. NOTE: The computer system BIOS is connected to Windows Help for more information. 2. Updating software Updated versions of the software provided with the hardware devices, and provides...

Software Update - Windows Vista and Windows 7
Page 6
... the hard drive. 2 Updating software Do not download or install a BIOS update while the computer is connected to reliable external power using the AC adapter. Follow the instructions on battery power, docked in Windows) or by turning on the screen to identify your computer: Select Start > Help and Support, and then click the link for your computer and access the BIOS update you currently have and then download and install the new BIOS. To use the Setup Utility for Startup Menu" message is displayed. 3. Downloading a BIOS update...
... the hard drive. 2 Updating software Do not download or install a BIOS update while the computer is connected to reliable external power using the AC adapter. Follow the instructions on battery power, docked in Windows) or by turning on the screen to identify your computer: Select Start > Help and Support, and then click the link for your computer and access the BIOS update you currently have and then download and install the new BIOS. To use the Setup Utility for Startup Menu" message is displayed. 3. Downloading a BIOS update...
Software Update - Windows Vista and Windows 7
Page 8
... the device. 4 Updating software When prompted, click Save and then select a storage location on your operating system. 5. Open your Internet browser, go to http://www.hp.com/support, and select your specific product from the models listed. 4. Click Install now to install. 7. Click your country or region. 2. After the file is displayed, click an updated driver to download the driver and install it later. If you may be able to open a window...
... the device. 4 Updating software When prompted, click Save and then select a storage location on your operating system. 5. Open your Internet browser, go to http://www.hp.com/support, and select your specific product from the models listed. 4. Click Install now to install. 7. Click your country or region. 2. After the file is displayed, click an updated driver to download the driver and install it later. If you may be able to open a window...
Wireless (Select Models Only) - Windows 7
Page 23
... or password for tasks such as installing software, running utilities, or changing Windows settings. Refer to expand the list and show all adapters. 4. Click the arrow next to Network adapters to Help and Support for more information on your computer: NOTE: Windows includes the User Account Control feature to a WLAN 19 In the System area, click Device Manager. 3. Select Start > Control Panel > System and Security. 2. You may include the term wireless, wireless LAN...
... or password for tasks such as installing software, running utilities, or changing Windows settings. Refer to expand the list and show all adapters. 4. Click the arrow next to Network adapters to Help and Support for more information on your computer: NOTE: Windows includes the User Account Control feature to a WLAN 19 In the System area, click Device Manager. 3. Select Start > Control Panel > System and Security. 2. You may include the term wireless, wireless LAN...
Drives - Windows 7
Page 15
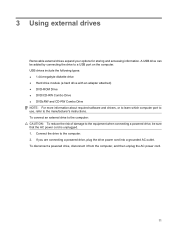
... diskette drive ● Hard drive module (a hard drive with an adapter attached) ● DVD-ROM Drive ● DVD/CD-RW Combo Drive ● DVD±RW and CD-RW Combo Drive NOTE: For more information about required software and drivers, or to learn which computer port to use, refer to a USB port on the computer. To disconnect a powered drive, disconnect it from the computer, and then unplug the AC power cord. 11 Connect the drive...
... diskette drive ● Hard drive module (a hard drive with an adapter attached) ● DVD-ROM Drive ● DVD/CD-RW Combo Drive ● DVD±RW and CD-RW Combo Drive NOTE: For more information about required software and drivers, or to learn which computer port to use, refer to a USB port on the computer. To disconnect a powered drive, disconnect it from the computer, and then unplug the AC power cord. 11 Connect the drive...
Drives - Windows 7
Page 16
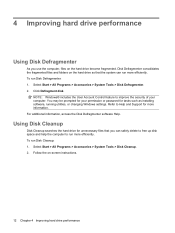
... prompted for tasks such as installing software, running utilities, or changing Windows settings. Follow the on the hard drive become fragmented. Click Defragment disk. NOTE: Windows® includes the User Account Control feature to run more efficiently. Using Disk Cleanup Disk Cleanup searches the hard drive for more information. Refer to Help and Support for unnecessary files that the system can safely delete to free up disk space and help the...
... prompted for tasks such as installing software, running utilities, or changing Windows settings. Follow the on the hard drive become fragmented. Click Defragment disk. NOTE: Windows® includes the User Account Control feature to run more efficiently. Using Disk Cleanup Disk Cleanup searches the hard drive for more information. Refer to Help and Support for unnecessary files that the system can safely delete to free up disk space and help the...
Drives - Windows 7
Page 17
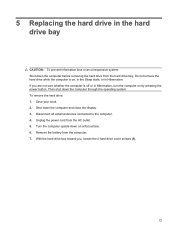
... is on, in the Sleep state, or in Hibernation, turn the computer on a flat surface. 6. Disconnect all external devices connected to the computer. 4. Remove the battery from the AC outlet. 5. Then shut down the computer and close the display. 3. Unplug the power cord from the computer. 7. Shut down the computer through the operating system. If you , loosen the 4 hard drive cover screws (1). 13
... is on, in the Sleep state, or in Hibernation, turn the computer on a flat surface. 6. Disconnect all external devices connected to the computer. 4. Remove the battery from the AC outlet. 5. Then shut down the computer and close the display. 3. Unplug the power cord from the computer. 7. Shut down the computer through the operating system. If you , loosen the 4 hard drive cover screws (1). 13
Drives - Windows 7
Page 24
... file is displayed, click an updated driver to download the driver and install it later. This feature can be set up Windows Update, you will be able to open a window containing additional information. 6. Click Start > All Programs > Windows Update. NOTE: If you have not previously set to your computer model number in the Search box, press enter, and follow the instructions provided. or - Proceed to obtain HP device drivers: 1. To use the HP Web...
... file is displayed, click an updated driver to download the driver and install it later. This feature can be set up Windows Update, you will be able to open a window containing additional information. 6. Click Start > All Programs > Windows Update. NOTE: If you have not previously set to your computer model number in the Search box, press enter, and follow the instructions provided. or - Proceed to obtain HP device drivers: 1. To use the HP Web...
Drives - Windows 7
Page 25
... hard drive; Index A airport security devices 1 AutoPlay 7 B BD copying 8 playing 6 removing 10 Blu-ray ROM with LightScribe 3 E external drive 11 H hard disk drive external 11 installing 14 removing 13 replacing 13 hard drive external 11 installing 14 removing 13 replacing 13 M maintenance Disk Cleanup 12 Disk Defragmenter 12 O optical disc playing 6 removing 10 optical drive 2, 11 R region codes, DVD 7 S software Disk Cleanup 12 Disk Defragmenter 12 T troubleshooting burning discs 19 device driver 19 disc play 18 HP device drivers 20 optical disc tray 16 optical drive detection 17 Windows...
... hard drive; Index A airport security devices 1 AutoPlay 7 B BD copying 8 playing 6 removing 10 Blu-ray ROM with LightScribe 3 E external drive 11 H hard disk drive external 11 installing 14 removing 13 replacing 13 hard drive external 11 installing 14 removing 13 replacing 13 M maintenance Disk Cleanup 12 Disk Defragmenter 12 O optical disc playing 6 removing 10 optical drive 2, 11 R region codes, DVD 7 S software Disk Cleanup 12 Disk Defragmenter 12 T troubleshooting burning discs 19 device driver 19 disc play 18 HP device drivers 20 optical disc tray 16 optical drive detection 17 Windows...
Notebook Tour - Windows 7
Page 8
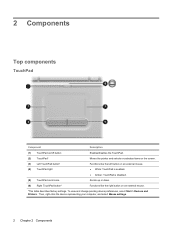
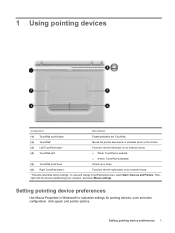
... and selects or activates items on the screen. (3) Left TouchPad button* (4) TouchPad light Functions like the left button on an external mouse. ● White: TouchPad is enabled. ● Amber: TouchPad is disabled. (5) TouchPad scroll zone Scrolls up or down. (6) Right TouchPad button* Functions like the right button on an external mouse. *This table describes factory settings. Then, right-click the device representing your computer, and select Mouse settings. 2 Chapter 2 Components To view and change pointing device preferences, select Start > Devices and Printers.
... and selects or activates items on the screen. (3) Left TouchPad button* (4) TouchPad light Functions like the left button on an external mouse. ● White: TouchPad is enabled. ● Amber: TouchPad is disabled. (5) TouchPad scroll zone Scrolls up or down. (6) Right TouchPad button* Functions like the right button on an external mouse. *This table describes factory settings. Then, right-click the device representing your computer, and select Mouse settings. 2 Chapter 2 Components To view and change pointing device preferences, select Start > Devices and Printers.
Notebook Tour - Windows 7
Page 15
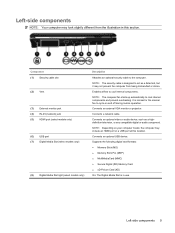
... location. Connects an external VGA monitor or projector. Connects an optional video or audio device, such as a deterrent, but it may not prevent the computer from the illustration in use. NOTE: Depending on and off during routine operation. Supports the following digital card formats: ● Memory Stick (MS) ● Memory Stick Pro (MSP) ● MultiMediaCard (MMC) ● Secure Digital (SD) Memory Card ● xD-Picture Card (XD) On: The Digital Media Slot...
... location. Connects an external VGA monitor or projector. Connects an optional video or audio device, such as a deterrent, but it may not prevent the computer from the illustration in use. NOTE: Depending on and off during routine operation. Supports the following digital card formats: ● Memory Stick (MS) ● Memory Stick Pro (MSP) ● MultiMediaCard (MMC) ● Secure Digital (SD) Memory Card ● xD-Picture Card (XD) On: The Digital Media Slot...
Notebook Tour - Windows 7
Page 20
... Key. The part number helps a service technician to update or troubleshoot the operating system. The service tag label is the product name affixed to the bottom of the computer. ● Microsoft® Certificate of your notebook. ◦ Serial number (s/n) (2). This number provides specific information about optional wireless devices and the approval markings of some of the warranty period for this information available when you contact technical support...
... Key. The part number helps a service technician to update or troubleshoot the operating system. The service tag label is the product name affixed to the bottom of the computer. ● Microsoft® Certificate of your notebook. ◦ Serial number (s/n) (2). This number provides specific information about optional wireless devices and the approval markings of some of the warranty period for this information available when you contact technical support...
Pointing Devices and Keyboard - Windows 7
Page 5
... view and change TouchPad preferences, select Start > Devices and Printers. Functions like the right button on an external mouse. ● White: TouchPad is enabled. ● Amber: TouchPad is disabled. 1 Using pointing devices Component Description (1) TouchPad on the screen. Moves the pointer and selects or activates items on /off button (2) TouchPad* (3) Left TouchPad button* (4) TouchPad light (5) TouchPad scroll zone Enables/disables the TouchPad. Setting pointing device preferences 1 Scrolls up or down. (6) Right TouchPad button* Functions like the left button on...
... view and change TouchPad preferences, select Start > Devices and Printers. Functions like the right button on an external mouse. ● White: TouchPad is enabled. ● Amber: TouchPad is disabled. 1 Using pointing devices Component Description (1) TouchPad on the screen. Moves the pointer and selects or activates items on /off button (2) TouchPad* (3) Left TouchPad button* (4) TouchPad light (5) TouchPad scroll zone Enables/disables the TouchPad. Setting pointing device preferences 1 Scrolls up or down. (6) Right TouchPad button* Functions like the left button on...
Pointing Devices and Keyboard - Windows 7
Page 6
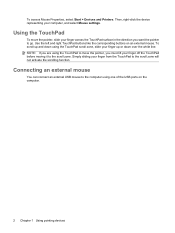
... right TouchPad buttons like the corresponding buttons on the computer. 2 Chapter 1 Using pointing devices Simply sliding your finger off the TouchPad before moving it to go. Connecting an external mouse You can connect an external USB mouse to the scroll zone will not activate the scrolling function. Then, right-click the device representing your finger up and down using one of the USB ports on an external mouse. NOTE: If you are using the TouchPad...
... right TouchPad buttons like the corresponding buttons on the computer. 2 Chapter 1 Using pointing devices Simply sliding your finger off the TouchPad before moving it to go. Connecting an external mouse You can connect an external USB mouse to the scroll zone will not activate the scrolling function. Then, right-click the device representing your finger up and down using one of the USB ports on an external mouse. NOTE: If you are using the TouchPad...
Multimedia - Windows 7
Page 29
... displayed, click an updated driver to uninstall and then reinstall (for software and driver downloads, type your hard drive. After the file is complete, and then verify the operation of driver you want a specific SoftPaq, enter the SoftPaq number in the System area, click Device Manager. 3. Remove any other drivers you want to delete the device, but do this, click Download only to save all open a window containing additional information. 6. In the Device Manager window...
... displayed, click an updated driver to uninstall and then reinstall (for software and driver downloads, type your hard drive. After the file is complete, and then verify the operation of driver you want a specific SoftPaq, enter the SoftPaq number in the System area, click Device Manager. 3. Remove any other drivers you want to delete the device, but do this, click Download only to save all open a window containing additional information. 6. In the Device Manager window...
Power Management - Windows 7
Page 16
... installed. Do not charge the computer battery while you use before turning on the features you are charging a new battery, charge it . Charging a battery WARNING! The battery light displays charge status: ● On: The battery is charging. ● Blinking: The battery has reached a low battery level or critical battery level and is not charging. ● Off: The battery is plugged into external power through normal use while on the display. ● Check the Power saver setting in Power Options. ● Remove the battery...
... installed. Do not charge the computer battery while you use before turning on the features you are charging a new battery, charge it . Charging a battery WARNING! The battery light displays charge status: ● On: The battery is charging. ● Blinking: The battery has reached a low battery level or critical battery level and is not charging. ● Off: The battery is plugged into external power through normal use while on the display. ● Check the Power saver setting in Power Options. ● Remove the battery...
Power Management - Windows 7
Page 19
... power options. - Click Save changes. Record the Turn off . Calibrating a battery Calibrate a battery under Hibernate after so that you can reset it should not need to Never. 5. It is fully charged. Step 1: Fully charge the battery WARNING! Do not charge the computer battery while you are onboard aircraft. Connect the computer to calibrate a new battery. The battery light on . 3. Step 2: Disable Hibernation and Sleep 1. Change the Turn off . Click Change advanced power settings. 6. Change the On battery setting...
... power options. - Click Save changes. Record the Turn off . Calibrating a battery Calibrate a battery under Hibernate after so that you can reset it should not need to Never. 5. It is fully charged. Step 1: Fully charge the battery WARNING! Do not charge the computer battery while you are onboard aircraft. Connect the computer to calibrate a new battery. The battery light on . 3. Step 2: Disable Hibernation and Sleep 1. Change the Turn off . Click Change advanced power settings. 6. Change the On battery setting...

HP Notebook Hard Drives & Solid State Drives Identifying, Preventing, Diagnosing and Recovering from Drive Failures Care and Mai
Page 6
... Controller (AHCI) Interface. Intel Matrix Storage Manager Driver provides support for notebook PC models that are released to SATA AHCI mode Using Sysprep with Serial ATA hard disk drives. The Intel Matrix Storage Technology solution technology provides improved performance and reliability, as well as support for adding SATA drivers to RIS (Remote Installation Service) installation points include: Adding SATA drivers to installation CDs, building an image, and switching...
... Controller (AHCI) Interface. Intel Matrix Storage Manager Driver provides support for notebook PC models that are released to SATA AHCI mode Using Sysprep with Serial ATA hard disk drives. The Intel Matrix Storage Technology solution technology provides improved performance and reliability, as well as support for adding SATA drivers to RIS (Remote Installation Service) installation points include: Adding SATA drivers to installation CDs, building an image, and switching...


