
Setup Utility - Windows Vista and Windows 7
Page 10
... computer fan will always be on a secondary hard drive. NOTE: On models with two hard drives, this Change the Setup Utility language. Run a diagnostic test on Key ◦ USB Hard drive ◦ Network adapter Diagnostics menu Select Hard Disk Self Test Secondary Hard Disk Self Test (select models only) Memory ... Adapter. ● Boot Order―Set the boot order for: ◦ USB Floppy ◦ Internal CD/DVD ROM drive ◦ USB CD/DVD ROM drive ◦ Hard drive ◦ USB Diskette on the system memory. 6 Chapter 3 Setup Utility menus Enable/disable the processor C6 sleep state....
... computer fan will always be on a secondary hard drive. NOTE: On models with two hard drives, this Change the Setup Utility language. Run a diagnostic test on Key ◦ USB Hard drive ◦ Network adapter Diagnostics menu Select Hard Disk Self Test Secondary Hard Disk Self Test (select models only) Memory ... Adapter. ● Boot Order―Set the boot order for: ◦ USB Floppy ◦ Internal CD/DVD ROM drive ◦ USB CD/DVD ROM drive ◦ Hard drive ◦ USB Diskette on the system memory. 6 Chapter 3 Setup Utility menus Enable/disable the processor C6 sleep state....
Setup Utility - Windows Vista and Windows 7
Page 11
... Reader Power Saving 6 changing the Setup Utility language 2 D Diagnostics menu 6 displaying system information 3 drives, boot order 6 E exiting the Setup Utility 4 F fan always on 6 fingerprint reader 1 H hard drive self test 6 L LAN Power Saving 6 language support 6 M Main menu 5 memory test 6 ...N navigating in the Setup Utility 2 P passwords 5 power-on password 5 Processor C6 State 6 R restoring default settings 3 S secondary hard drive self test 6 Security menu 5 selecting in the Setup Utility 2 starting the Setup Utility 1 System Configuration menu 6 system information 5 U using ...
... Reader Power Saving 6 changing the Setup Utility language 2 D Diagnostics menu 6 displaying system information 3 drives, boot order 6 E exiting the Setup Utility 4 F fan always on 6 fingerprint reader 1 H hard drive self test 6 L LAN Power Saving 6 language support 6 M Main menu 5 memory test 6 ...N navigating in the Setup Utility 2 P passwords 5 power-on password 5 Processor C6 State 6 R restoring default settings 3 S secondary hard drive self test 6 Security menu 5 selecting in the Setup Utility 2 starting the Setup Utility 1 System Configuration menu 6 system information 5 U using ...
Backup and Recovery - Windows Vista
Page 5
...you create. To check for the presence of recovery discs (Recovery Manager software feature). HP recommends that do not have a partition. If the partition is present, an HP Recovery drive is as complete as your computer and restore the operating system and software programs to factory... computer to help you to reverse undesirable changes to your information and restoring it in the Hard Disk Drives section of system failure or instability. ● Backing up your system on the hard drive or from a dedicated recovery partition (select models only) on a regular basis to protect...
...you create. To check for the presence of recovery discs (Recovery Manager software feature). HP recommends that do not have a partition. If the partition is present, an HP Recovery drive is as complete as your computer and restore the operating system and software programs to factory... computer to help you to reverse undesirable changes to your information and restoring it in the Hard Disk Drives section of system failure or instability. ● Backing up your system on the hard drive or from a dedicated recovery partition (select models only) on a regular basis to protect...
Backup and Recovery - Windows Vista
Page 10
... system files and settings. Restore to a previous date and time To revert to create a restore point. 5. The System Restore window opens. 5. NOTE: Recovering to your hard drive at a previous date and time), when the computer was functioning optimally, follow these steps: 1. Select Start > Control Panel > System and Maintenance > System. 2. You can reverse...
... system files and settings. Restore to a previous date and time To revert to create a restore point. 5. The System Restore window opens. 5. NOTE: Recovering to your hard drive at a previous date and time), when the computer was functioning optimally, follow these steps: 1. Select Start > Control Panel > System and Maintenance > System. 2. You can reverse...
Backup and Recovery - Windows Vista
Page 11
...restore the system from the recovery discs 7 Back up your computer includes a solid-state drive (SSD), you experience system failure or instability. HP recommends that is the case, recovery discs have previously backed up. NOTE: Recovery Manager ...screen instructions. Use these features, try them before using Recovery Manager. Insert the first recovery disc into the optical drive and restart the computer. 3. Recovery Manager works from recovery discs or from the disc provided by the manufacturer....with your operating system and software. Follow the on the hard drive.
...restore the system from the recovery discs 7 Back up your computer includes a solid-state drive (SSD), you experience system failure or instability. HP recommends that is the case, recovery discs have previously backed up. NOTE: Recovery Manager ...screen instructions. Use these features, try them before using Recovery Manager. Insert the first recovery disc into the optical drive and restart the computer. 3. Recovery Manager works from recovery discs or from the disc provided by the manufacturer....with your operating system and software. Follow the on the hard drive.
Backup and Recovery - Windows Vista
Page 12
On some models, you can perform a recovery from the partition on the hard drive from the partition, follow these discs to recover your computer includes an SSD, you may not have a recovery partition. Recovery Manager opens. 2. Follow the on ...
On some models, you can perform a recovery from the partition on the hard drive from the partition, follow these discs to recover your computer includes an SSD, you may not have a recovery partition. Recovery Manager opens. 2. Follow the on ...

Software Update, Backup and Recovery - Windows Vista
Page 6
... by pressing fn+esc (if you currently have and then download and install the new BIOS. Identify the BIOS update that provides software for your hard drive. BIOS version information (also known as ROM date and System BIOS) can be displayed by unplugging the power cord from the AC outlet. To .... Make a note of the screen, press f10. 2. When the Main menu is running on battery power, docked in Windows) or by turning on the HP Web site that is displayed. 3. Access the page on or restarting the computer. To exit the Setup Utility, use the arrow keys to reliable external...
... by pressing fn+esc (if you currently have and then download and install the new BIOS. Identify the BIOS update that provides software for your hard drive. BIOS version information (also known as ROM date and System BIOS) can be displayed by unplugging the power cord from the AC outlet. To .... Make a note of the screen, press f10. 2. When the Main menu is running on battery power, docked in Windows) or by turning on the HP Web site that is displayed. 3. Access the page on or restarting the computer. To exit the Setup Utility, use the arrow keys to reliable external...
Software Update, Backup and Recovery - Windows Vista
Page 7
...screen after the download is typically Local Disk (C:). 3. Follow any software updates, especially system BIOS updates. The hard drive designation is complete. Using the hard drive path you are displayed, follow these steps: 1. Complete the installation by selecting Start > Computer. 2. You will... the instructions on your computer to a network, consult the network administrator before installing any instructions that are displayed on your hard drive where the BIOS update will need to install the update. The BIOS installation begins. 5. BIOS installation procedures vary. NOTE:...
...screen after the download is typically Local Disk (C:). 3. Follow any software updates, especially system BIOS updates. The hard drive designation is complete. Using the hard drive path you are displayed, follow these steps: 1. Complete the installation by selecting Start > Computer. 2. You will... the instructions on your computer to a network, consult the network administrator before installing any instructions that are displayed on your hard drive where the BIOS update will need to install the update. The BIOS installation begins. 5. BIOS installation procedures vary. NOTE:...

Software Update, Backup and Recovery - Windows Vista
Page 8
... to your computer model number in the Search box, press enter, and follow these steps: To use the HP Web site: 1. If you may be able to http://www.hp.com/support, and select your hard drive. When prompted, click Save and then select a storage location on your country or region. 2. Open your Internet...
... to your computer model number in the Search box, press enter, and follow these steps: To use the HP Web site: 1. If you may be able to http://www.hp.com/support, and select your hard drive. When prompted, click Save and then select a storage location on your country or region. 2. Open your Internet...
Drives - Windows Vista
Page 3
... or DVD ...7 Creating or "burning" a CD or DVD ...7 Removing an optical disc (CD or DVD 8 3 Improving hard drive performance Using Disk Defragmenter ...9 Using Disk Cleanup ...9 4 Replacing the hard drive 5 Troubleshooting The optical disc tray does not open for removal of a CD or DVD 13 The computer does not detect the... optical drive 14 A disc does not play ...15 A disc does not play automatically ...16 The process of burning a disc does not begin, or it stops before completion 16 A device driver must be reinstalled ...17 Obtaining the latest HP device drivers 17 Obtaining ...
... or DVD ...7 Creating or "burning" a CD or DVD ...7 Removing an optical disc (CD or DVD 8 3 Improving hard drive performance Using Disk Defragmenter ...9 Using Disk Cleanup ...9 4 Replacing the hard drive 5 Troubleshooting The optical disc tray does not open for removal of a CD or DVD 13 The computer does not detect the... optical drive 14 A disc does not play ...15 A disc does not play automatically ...16 The process of burning a disc does not begin, or it stops before completion 16 A device driver must be reinstalled ...17 Obtaining the latest HP device drivers 17 Obtaining ...
Drives - Windows Vista
Page 8
...include the following : ● Developing and maintaining large documents and project files ● Transporting work files ● Making weekly backups of hard drive files ● Updating photos, video, audio, and data continuously DVD±R discs Use blank DVD±R discs to permanently store large amounts... CDs ● Keeping permanent archives of disc is recorded, it cannot be erased or written over. NOTE: The optical drive on your hard drive to store digital data, are convenient for movies, software, and data backup purposes. DVDs are read-compatible with virtually anyone...
...include the following : ● Developing and maintaining large documents and project files ● Transporting work files ● Making weekly backups of hard drive files ● Updating photos, video, audio, and data continuously DVD±R discs Use blank DVD±R discs to permanently store large amounts... CDs ● Keeping permanent archives of disc is recorded, it cannot be erased or written over. NOTE: The optical drive on your hard drive to store digital data, are convenient for movies, software, and data backup purposes. DVDs are read-compatible with virtually anyone...
Drives - Windows Vista
Page 11
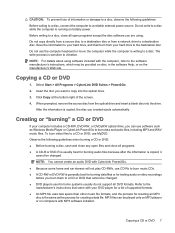
... CD or DVD If your computer includes a CD-RW, DVD-RW, or DVD±RW optical drive, you burn them to a reliable external power source. NOTE: You cannot create an audio DVD with your hard drive to a disc while the computer is copied, it cannot be provided on disc, in home systems ... creating a data file. Refer to the manufacturer's instructions that cannot be changed . Do not write to the destination disc. Save the information to your hard drive, and then burn from your DVD player for a list of supported formats. ● An MP3 file uses less space than other music file formats, ...
... CD or DVD If your computer includes a CD-RW, DVD-RW, or DVD±RW optical drive, you burn them to a reliable external power source. NOTE: You cannot create an audio DVD with your hard drive to a disc while the computer is copied, it cannot be provided on disc, in home systems ... creating a data file. Refer to the manufacturer's instructions that cannot be changed . Do not write to the destination disc. Save the information to your hard drive, and then burn from your DVD player for a list of supported formats. ● An MP3 file uses less space than other music file formats, ...
Drives - Windows Vista
Page 12
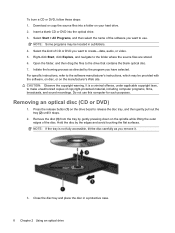
...CD or DVD, follow these steps: 1. NOTE: Some programs may be located in a protective case. 8 Chapter 2 Using an optical drive Press the release button (1) on your hard drive. 2. Open the folder, and then drag the files to the folder where the source files are stored. 6. Removing an optical disc ...not use . Select Start > All Programs, and then select the name of the disc. Right-click Start, click Explore, and navigate to the drive that contains the blank optical disc. 7. For specific instructions, refer to release the disc tray, and then gently pull out the tray (2) until ...
...CD or DVD, follow these steps: 1. NOTE: Some programs may be located in a protective case. 8 Chapter 2 Using an optical drive Press the release button (1) on your hard drive. 2. Open the folder, and then drag the files to the folder where the source files are stored. 6. Removing an optical disc ...not use . Select Start > All Programs, and then select the name of the disc. Right-click Start, click Explore, and navigate to the drive that contains the blank optical disc. 7. For specific instructions, refer to release the disc tray, and then gently pull out the tray (2) until ...
Drives - Windows Vista
Page 13
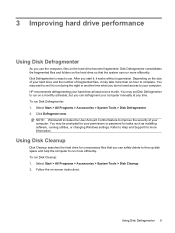
... it to your computer manually at least once a month. Using Disk Cleanup Disk Cleanup searches the hard drive for tasks such as installing software, running utilities, or changing Windows settings. HP recommends defragmenting your computer. Select Start > All Programs > Accessories > System Tools > Disk Cleanup.... 2. You may take more than an hour to run more information. Follow the on the hard drive so that you do not need...
... it to your computer manually at least once a month. Using Disk Cleanup Disk Cleanup searches the hard drive for tasks such as installing software, running utilities, or changing Windows settings. HP recommends defragmenting your computer. Select Start > All Programs > Accessories > System Tools > Disk Cleanup.... 2. You may take more than an hour to run more information. Follow the on the hard drive so that you do not need...
Drives - Windows Vista
Page 14
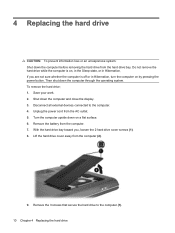
... that secure the hard drive to the computer. 4. Unplug the power cord from the computer. 7. Lift the hard drive cover away from the hard drive bay. Then shut down the computer and close the display. 3. To remove the hard drive: 1. With the hard drive bay toward you are... Disconnect all external devices connected to the computer (1). 10 Chapter 4 Replacing the hard drive Turn the computer upside down the computer before removing the hard drive from the computer (2). 9. 4 Replacing the hard drive CAUTION: To prevent information loss or an unresponsive system: Shut down on a ...
... that secure the hard drive to the computer. 4. Unplug the power cord from the computer. 7. Lift the hard drive cover away from the hard drive bay. Then shut down the computer and close the display. 3. To remove the hard drive: 1. With the hard drive bay toward you are... Disconnect all external devices connected to the computer (1). 10 Chapter 4 Replacing the hard drive Turn the computer upside down the computer before removing the hard drive from the computer (2). 9. 4 Replacing the hard drive CAUTION: To prevent information loss or an unresponsive system: Shut down on a ...
Drives - Windows Vista
Page 15
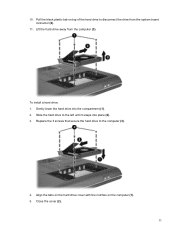
Align the tabs on the hard drive cover with the notches on top of the hard drive to disconnect the drive from the computer (3). Slide the hard drive to the computer (3). 4. Replace the 3 screws that secure the hard drive to the left until it snaps into the compartment (1). 2. Gently lower the hard drive into place (2). 3. Lift the hard drive away from the system board connector (2). 11. To install a hard drive: 1. 10. Close the cover (2). 11 Pull the black plastic tab on the computer (1). 5.
Align the tabs on the hard drive cover with the notches on top of the hard drive to disconnect the drive from the computer (3). Slide the hard drive to the computer (3). 4. Replace the 3 screws that secure the hard drive to the left until it snaps into the compartment (1). 2. Gently lower the hard drive into place (2). 3. Lift the hard drive away from the system board connector (2). 11. To install a hard drive: 1. 10. Close the cover (2). 11 Pull the black plastic tab on the computer (1). 5.

Drives - Windows Vista
Page 16
6. Tighten the 2 hard drive cover screws (3). 12 Chapter 4 Replacing the hard drive
6. Tighten the 2 hard drive cover screws (3). 12 Chapter 4 Replacing the hard drive
Drives - Windows Vista
Page 20
...start automatically when it stops before trying to burn the contents to a new disc, and then burn from your hard drive. ● Reinstall the disc-burning device driver located in the DVD/CD-ROM drives category in the Start Search box. A disc does not play automatically 1. The process of burning a disc ...user guides for all media and devices, and then click Save. As you are copying a disc, save the information on the source disc to your hard drive before completion ● Be sure that all other programs are closed. ● Turn off Sleep mode and Hibernation. ● Be sure that you ...
...start automatically when it stops before trying to burn the contents to a new disc, and then burn from your hard drive. ● Reinstall the disc-burning device driver located in the DVD/CD-ROM drives category in the Start Search box. A disc does not play automatically 1. The process of burning a disc ...user guides for all media and devices, and then click Save. As you are copying a disc, save the information on the source disc to your hard drive before completion ● Be sure that all other programs are closed. ● Turn off Sleep mode and Hibernation. ● Be sure that you ...
Drives - Windows Vista
Page 22
... and go to do so, restart your computer. 18 Chapter 5 Troubleshooting When prompted, click Save and then select a storage location on -screen instructions to your hard drive. Click Security & Updates. 3. Click Change settings and select a time for Microsoft Update to check for and install Microsoft device drivers when new devices are connected...
... and go to do so, restart your computer. 18 Chapter 5 Troubleshooting When prompted, click Save and then select a storage location on -screen instructions to your hard drive. Click Security & Updates. 3. Click Change settings and select a time for Microsoft Update to check for and install Microsoft device drivers when new devices are connected...
Drives - Windows Vista
Page 23
... copying 7 playing 5 removing 8 CD drive 3 CD, drive 2 copyright warning 6 D device drivers HP drivers 17 Windows drivers 18 Disk Cleanup software 9 Disk Defragmenter software 9 disk performance 9 drives caring for 1 hard 10, 11 optical 2 drives, optical drive 3 DVD burning 7, 16 changing region setting 6 copying 7 drive 2 playing 5 removing 8 DVD drive 3 H hard disk drive installing 11 removing 10 replacing 10 hard drive installing 11 removing 10 replacing...
... copying 7 playing 5 removing 8 CD drive 3 CD, drive 2 copyright warning 6 D device drivers HP drivers 17 Windows drivers 18 Disk Cleanup software 9 Disk Defragmenter software 9 disk performance 9 drives caring for 1 hard 10, 11 optical 2 drives, optical drive 3 DVD burning 7, 16 changing region setting 6 copying 7 drive 2 playing 5 removing 8 DVD drive 3 H hard disk drive installing 11 removing 10 replacing 10 hard drive installing 11 removing 10 replacing...

