
Setup Utility - Windows Vista and Windows 7
Page 10
... Language Support Button Sound (select models only) Virtualization Technology (select models only) Processor C6 State (select models only) LAN Power Saving (select models only) Card Reader/1394 Power Saving (select models only) Fan Always On Boot Options To do this Run a comprehensive self-test on the system memory....drive ◦ USB CD/DVD ROM drive ◦ Hard drive ◦ USB Diskette on Key ◦ USB Hard drive ◦ Network adapter Diagnostics menu Select Hard Disk Self Test Secondary Hard Disk Self Test (select models only) Memory Test To do this menu option is in intervals...
... Language Support Button Sound (select models only) Virtualization Technology (select models only) Processor C6 State (select models only) LAN Power Saving (select models only) Card Reader/1394 Power Saving (select models only) Fan Always On Boot Options To do this Run a comprehensive self-test on the system memory....drive ◦ USB CD/DVD ROM drive ◦ Hard drive ◦ USB Diskette on Key ◦ USB Hard drive ◦ Network adapter Diagnostics menu Select Hard Disk Self Test Secondary Hard Disk Self Test (select models only) Memory Test To do this menu option is in intervals...

Software Update, Backup and Recovery - Windows Vista
Page 6
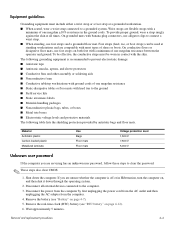
... download and installation, follow these instructions: Do not disconnect power from the AC outlet. Access the page on or restarting the computer. At the download area, follow these steps: a. Open the Setup Utility by turning on the HP Web site that is selected, BIOS and other identifier. Do..., first determine what BIOS version you need this information to locate the update later, after it has been downloaded to reliable external power using the AC adapter. To exit the Setup Utility, use the arrow keys to select Exit > Exit Discarding Changes, and then press enter. Follow ...
... download and installation, follow these instructions: Do not disconnect power from the AC outlet. Access the page on or restarting the computer. At the download area, follow these steps: a. Open the Setup Utility by turning on the HP Web site that is selected, BIOS and other identifier. Do..., first determine what BIOS version you need this information to locate the update later, after it has been downloaded to reliable external power using the AC adapter. To exit the Setup Utility, use the arrow keys to select Exit > Exit Discarding Changes, and then press enter. Follow ...
Notebook Tour - Windows Vista
Page 14
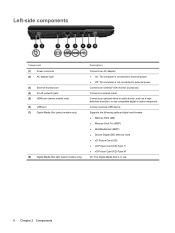
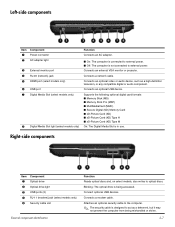
... Card (XD) Type H ● xD-Picture Card (XD) Type M On: The Digital Media Slot is not connected to external power. Connects an external VGA monitor or projector. Left-side components Component (1) Power connector (2) AC adapter light (3) External monitor port (4) RJ-45 (network) jack (5) HDMI port (select models only) (6) USB port (7) Digital Media Slot...
... Card (XD) Type H ● xD-Picture Card (XD) Type M On: The Digital Media Slot is not connected to external power. Connects an external VGA monitor or projector. Left-side components Component (1) Power connector (2) AC adapter light (3) External monitor port (4) RJ-45 (network) jack (5) HDMI port (select models only) (6) USB port (7) Digital Media Slot...
Notebook Tour - Windows Vista
Page 20
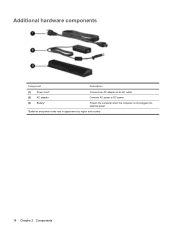
Additional hardware components Component Description (1) Power cord* Connects an AC adapter to an AC outlet. (2) AC adapter Converts AC power to DC power. (3) Battery* Powers the computer when the computer is not plugged into external power. *Batteries and power cords vary in appearance by region and country. 14 Chapter 2 Components
Additional hardware components Component Description (1) Power cord* Connects an AC adapter to an AC outlet. (2) AC adapter Converts AC power to DC power. (3) Battery* Powers the computer when the computer is not plugged into external power. *Batteries and power cords vary in appearance by region and country. 14 Chapter 2 Components
Notebook Tour - Windows Vista
Page 22
...adapter, identifying 14 antennae 13 applications key, Windows 3 audio-in (microphone) jack, identifying 5 audio-out (headphone) jack, identifying 5 B battery bay 15 battery bay, identifying 9 battery light, identifying 5, 11 battery release latch, identifying 9 battery, identifying 14 bays battery 9, 15 hard drive 9 Bluetooth label 15 buttons power...identifying 3 keys esc 3 fn 3 function 3 keypad 3 Windows applications 3 Windows logo 3 L labels Bluetooth 15 HP Broadband 15 Microsoft Certificate of Authenticity 15 modem approval 15 regulatory 15 service tag 15 SIM 15 wireless certification 15 ...
...adapter, identifying 14 antennae 13 applications key, Windows 3 audio-in (microphone) jack, identifying 5 audio-out (headphone) jack, identifying 5 B battery bay 15 battery bay, identifying 9 battery light, identifying 5, 11 battery release latch, identifying 9 battery, identifying 14 bays battery 9, 15 hard drive 9 Bluetooth label 15 buttons power...identifying 3 keys esc 3 fn 3 function 3 keypad 3 Windows applications 3 Windows logo 3 L labels Bluetooth 15 HP Broadband 15 Microsoft Certificate of Authenticity 15 modem approval 15 regulatory 15 service tag 15 SIM 15 wireless certification 15 ...
Power Management - Windows Vista
Page 3
...Sleep 1 Initiating and exiting Hibernation 2 Using the battery meter ...3 Using power plans ...4 Viewing the current power plan 4 Selecting a different power plan 4 Customizing power plans ...4 Setting password protection on wakeup 5 2 Using battery power Finding battery information in Help and Support 7 Displaying the remaining battery ...Fully recharge the battery 16 Step 5: Reenable Hibernation and Sleep 16 Conserving battery power ...17 Storing a battery ...17 Disposing of a used battery ...17 3 Using external AC power Connecting the AC adapter ...19 4 Shutting down the computer iii
...Sleep 1 Initiating and exiting Hibernation 2 Using the battery meter ...3 Using power plans ...4 Viewing the current power plan 4 Selecting a different power plan 4 Customizing power plans ...4 Setting password protection on wakeup 5 2 Using battery power Finding battery information in Help and Support 7 Displaying the remaining battery ...Fully recharge the battery 16 Step 5: Reenable Hibernation and Sleep 16 Conserving battery power ...17 Storing a battery ...17 Disposing of a used battery ...17 3 Using external AC power Connecting the AC adapter ...19 4 Shutting down the computer iii

Power Management - Windows Vista
Page 10
... the computer whenever the computer is plugged into external power, the computer runs on how you disconnect AC power. To increase display brightness, use only the battery provided with the computer, a replacement battery provided by HP, or a compatible battery purchased from the computer. ... off and unplugged from external power. Computer battery life varies, depending on power management settings, programs running on external AC power supplied through the AC adapter, the computer switches to battery power if the AC adapter is plugged into external AC power, the computer runs on the...
... the computer whenever the computer is plugged into external power, the computer runs on how you disconnect AC power. To increase display brightness, use only the battery provided with the computer, a replacement battery provided by HP, or a compatible battery purchased from the computer. ... off and unplugged from external power. Computer battery life varies, depending on power management settings, programs running on external AC power supplied through the AC adapter, the computer switches to battery power if the AC adapter is plugged into external AC power, the computer runs on the...
Power Management - Windows Vista
Page 15
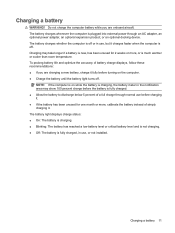
... use , but it . ● If the battery has been unused for 2 weeks or more , calibrate the battery instead of a full charge through an AC adapter, an optional power adapter, an optional expansion product, or an optional docking device. Charging a battery WARNING! The battery light displays charge status: ● On: The battery is charging...
... use , but it . ● If the battery has been unused for 2 weeks or more , calibrate the battery instead of a full charge through an AC adapter, an optional power adapter, an optional expansion product, or an optional docking device. Charging a battery WARNING! The battery light displays charge status: ● On: The battery is charging...
Power Management - Windows Vista
Page 17
...when the computer cannot exit Hibernation When the computer lacks sufficient power to exit Hibernation, follow these steps: 1. Exit Hibernation by briefly pressing power button. Resolving a low battery level when external power is available ▲ Connect one of losing information when the... when no power source is available 1. Turn on the computer. Insert a charged battery or plug the computer into external power. 2. Turn off . or - Resolving a low battery level CAUTION: To reduce the risk of the following devices: ● AC adapter ● Optional power adapter Resolving a ...
...when the computer cannot exit Hibernation When the computer lacks sufficient power to exit Hibernation, follow these steps: 1. Exit Hibernation by briefly pressing power button. Resolving a low battery level when external power is available ▲ Connect one of losing information when the... when no power source is available 1. Turn on the computer. Insert a charged battery or plug the computer into external power. 2. Turn off . or - Resolving a low battery level CAUTION: To reduce the risk of the following devices: ● AC adapter ● Optional power adapter Resolving a ...

Power Management - Windows Vista
Page 18
...notification area, and then click More power options. - Click the plus sign next to Sleep, and then click the plus sign next to Hibernate after the calibration. 8. It is also not necessary to an AC adapter, optional power adapter, optional expansion product, or optional ...docking device, and then plug the adapter or device into external power. Insert the battery into external power until the battery is fully charged. Select Start > Control Panel...
...notification area, and then click More power options. - Click the plus sign next to Sleep, and then click the plus sign next to Hibernate after the calibration. 8. It is also not necessary to an AC adapter, optional power adapter, optional expansion product, or optional ...docking device, and then plug the adapter or device into external power. Insert the battery into external power until the battery is fully charged. Select Start > Control Panel...

Power Management - Windows Vista
Page 22
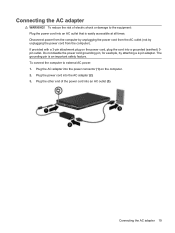
... The computer switches to external AC power, the following conditions: WARNING! WARNING! To reduce potential safety issues, use only the AC adapter provided with the computer, a replacement AC adapter provided by HP, or a compatible AC adapter purchased from HP. To increase display brightness, press ...the fn+f8 hotkey or reconnect the AC adapter. 18 Chapter 3 Using external AC power 3 Using external AC power External AC power is...
... The computer switches to external AC power, the following conditions: WARNING! WARNING! To reduce potential safety issues, use only the AC adapter provided with the computer, a replacement AC adapter provided by HP, or a compatible AC adapter purchased from HP. To increase display brightness, press ...the fn+f8 hotkey or reconnect the AC adapter. 18 Chapter 3 Using external AC power 3 Using external AC power External AC power is...
Power Management - Windows Vista
Page 23
...at all times. Plug the AC adapter into the power connector (1) on the power cord, plug the cord into an AC outlet that is an important safety feature. Plug the other end of electric shock or damage to external AC power: 1. Do not disable the power cord grounding pin, for example, by... unplugging the power cord from the AC outlet (not by attaching a 2-pin adapter. If provided with a 3-pin attachment plug on the computer. 2. To connect ...
...at all times. Plug the AC adapter into the power connector (1) on the power cord, plug the cord into an AC outlet that is an important safety feature. Plug the other end of electric shock or damage to external AC power: 1. Do not disable the power cord grounding pin, for example, by... unplugging the power cord from the AC outlet (not by attaching a 2-pin adapter. If provided with a 3-pin attachment plug on the computer. 2. To connect ...
Power Management - Windows Vista
Page 25
...adapter, connecting 19 B battery calibrating 14 charging 11, 14 conserving power 17 disposing 17 inserting 9 low battery levels 12 recharging 16 removing 9 storing 17 battery light 11, 12 battery power 6 battery release latch 9 battery temperature 17 C calibrating battery 14 charging batteries 11, 14 connection, external power 19 conservation, power... exiting 2 initiated during critical battery level 12 initiating 2 L low battery level 12 O operating system 20 P power connecting 19 conserving 17 R readable media 1 S shutdown 20 shutting down 20 Sleep exiting 1 initiating 1 storing battery...
...adapter, connecting 19 B battery calibrating 14 charging 11, 14 conserving power 17 disposing 17 inserting 9 low battery levels 12 recharging 16 removing 9 storing 17 battery light 11, 12 battery power 6 battery release latch 9 battery temperature 17 C calibrating battery 14 charging batteries 11, 14 connection, external power 19 conservation, power... exiting 2 initiated during critical battery level 12 initiating 2 L low battery level 12 O operating system 20 P power connecting 19 conserving 17 R readable media 1 S shutdown 20 shutting down 20 Sleep exiting 1 initiating 1 storing battery...
Service Guide
Page 12
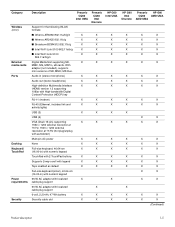
... HP G60 Intel UMA X X X X X X X X X X X X X X X X X X X X X X X X X X X X X X X X X X X X X X X X X X X X HP G60 Intel Discrete X X X X X X X X X X X X X X X X X X X X X X Presario HP G60 CQ60 AMD UMA AMD UMA X X X X X X X X X X X X X X X X X X X X X X X X X X X X X X X X X X X X X X X X X X X X X X (Continued) Product description 1-5 With adapter (not included), supports mini versions of SD, MMC, MS Duo. Category Wireless (cont.) External media cards Ports Docking Keyboard/ TouchPad Power...
... HP G60 Intel UMA X X X X X X X X X X X X X X X X X X X X X X X X X X X X X X X X X X X X X X X X X X X X HP G60 Intel Discrete X X X X X X X X X X X X X X X X X X X X X X Presario HP G60 CQ60 AMD UMA AMD UMA X X X X X X X X X X X X X X X X X X X X X X X X X X X X X X X X X X X X X X X X X X X X X X (Continued) Product description 1-5 With adapter (not included), supports mini versions of SD, MMC, MS Duo. Category Wireless (cont.) External media cards Ports Docking Keyboard/ TouchPad Power...
Service Guide
Page 20
... an optional video or audio device, such as a deterrent, but it may not prevent the computer from being accessed. Left-side components Item Component 1 Power connector 2 AC adapter light 3 External monitor port 4 RJ-45 (network) jack 5 HDMI port (select models only) 6 USB port 7 Digital Media Slot (select models only) 8 Digital Media Slot...
... an optional video or audio device, such as a deterrent, but it may not prevent the computer from being accessed. Left-side components Item Component 1 Power connector 2 AC adapter light 3 External monitor port 4 RJ-45 (network) jack 5 HDMI port (select models only) 6 USB port 7 Digital Media Slot (select models only) 8 Digital Media Slot...
Service Guide
Page 34
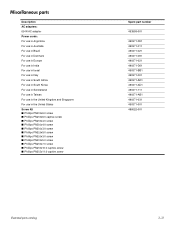
Miscellaneous parts Description AC adapters: 65-W AC adapter Power cords: For use in Argentina For use in Australia For use in Brazil For use in Denmark For use in Europe For use in India ...
Miscellaneous parts Description AC adapters: 65-W AC adapter Power cords: For use in Argentina For use in Australia For use in Brazil For use in Denmark For use in Europe For use in India ...
Service Guide
Page 45
...operator and ground. On conductive floors or dissipative floor mats, use foot straps and a grounded floor mat. Shut down through the operating system. 2. Disconnect the power from the computer by antistatic bags and floor mats. Remove the real-time clock (RTC) battery (see "Battery" on page 4-12). 6. Foot straps (...boxes ■ Metal tote boxes ■ Electrostatic voltage levels and protective materials The following table lists the shielding protection provided by first unplugging the power cord from the AC outlet and then unplugging the AC adapter from the computer. 4.
...operator and ground. On conductive floors or dissipative floor mats, use foot straps and a grounded floor mat. Shut down through the operating system. 2. Disconnect the power from the computer by antistatic bags and floor mats. Remove the real-time clock (RTC) battery (see "Battery" on page 4-12). 6. Foot straps (...boxes ■ Metal tote boxes ■ Electrostatic voltage levels and protective materials The following table lists the shielding protection provided by first unplugging the power cord from the AC outlet and then unplugging the AC adapter from the computer. 4.
Service Guide
Page 48
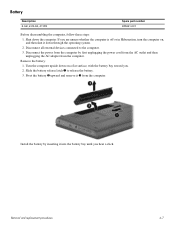
... into the battery bay until you hear a click. Disconnect the power from the computer by inserting it 3 from the computer. Removal and replacement procedures 4-7 Install the battery by first unplugging the power cord from the AC outlet and then unplugging the AC adapter from the computer. If you . 2. Shut down through the operating...
... into the battery bay until you hear a click. Disconnect the power from the computer by inserting it 3 from the computer. Removal and replacement procedures 4-7 Install the battery by first unplugging the power cord from the AC outlet and then unplugging the AC adapter from the computer. If you . 2. Shut down through the operating...
Service Guide
Page 49
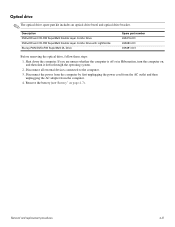
... system. 2. Remove the battery (see"Battery" on , and then shut it down the computer. Disconnect the power from the computer by first unplugging the power cord from the AC outlet and then unplugging the AC adapter from the computer. 4. Optical drive ✎ The optical drive spare part kit includes an optical drive bezel...
... system. 2. Remove the battery (see"Battery" on , and then shut it down the computer. Disconnect the power from the computer by first unplugging the power cord from the AC outlet and then unplugging the AC adapter from the computer. 4. Optical drive ✎ The optical drive spare part kit includes an optical drive bezel...
Service Guide
Page 51
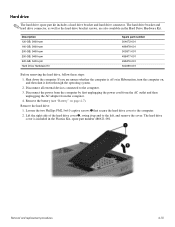
... battery (see "Battery" on , and then shut it up and to the left, and remove the cover. Removal and replacement procedures 4-10 Disconnect the power from the computer by first unplugging the power cord from the AC outlet and then unplugging the AC adapter from the computer. 4. Shut down through the operating system. 2.
... battery (see "Battery" on , and then shut it up and to the left, and remove the cover. Removal and replacement procedures 4-10 Disconnect the power from the computer by first unplugging the power cord from the AC outlet and then unplugging the AC adapter from the computer. 4. Shut down through the operating system. 2.


