Security - Window Vista and Windows 7
Page 17
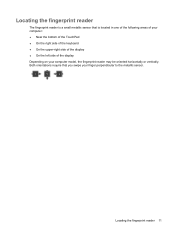
Locating the fingerprint reader 11 Both orientations require that is a small metallic sensor that you swipe your computer model, the fingerprint reader may be oriented horizontally or vertically. Locating the fingerprint reader The fingerprint reader is located in one of the following areas of your computer: ● Near the bottom of the TouchPad ● On the right side of the keyboard ● On the upper-right side of the display ● On the left side of the display Depending on your finger perpendicular to the metallic sensor.
Locating the fingerprint reader 11 Both orientations require that is a small metallic sensor that you swipe your computer model, the fingerprint reader may be oriented horizontally or vertically. Locating the fingerprint reader The fingerprint reader is located in one of the following areas of your computer: ● Near the bottom of the TouchPad ● On the right side of the keyboard ● On the upper-right side of the display ● On the left side of the display Depending on your finger perpendicular to the metallic sensor.
Setup Utility - Windows Vista and Windows 7
Page 9
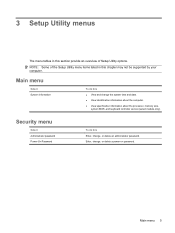
... change the system time and date. ● View identification information about the computer. ● View specification information about the processor, memory size, system BIOS, and keyboard controller version (select models only). Security menu Select Administrator password Power-On Password To do this Enter, change , or delete a power-on password. Enter, change...
... change the system time and date. ● View identification information about the computer. ● View specification information about the processor, memory size, system BIOS, and keyboard controller version (select models only). Security menu Select Administrator password Power-On Password To do this Enter, change , or delete a power-on password. Enter, change...
Drives - Windows Vista
Page 5
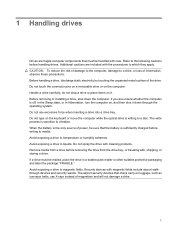
... or installing a drive, shut down through the operating system. Avoid exposing a drive to magnetic fields. Avoid exposing a drive to liquids. Do not type on the keyboard or move the computer while the optical drive is sensitive to temperature or humidity extremes. Do not spray the drive with magnetic fields include airport...
... or installing a drive, shut down through the operating system. Avoid exposing a drive to magnetic fields. Avoid exposing a drive to liquids. Do not type on the keyboard or move the computer while the optical drive is sensitive to temperature or humidity extremes. Do not spray the drive with magnetic fields include airport...
Drives - Windows Vista
Page 11
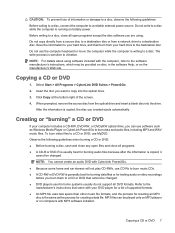
... to vibration. Do not use MyDVD. Select Start > All Programs > CyberLink DVD Suites > Power2Go. 2. To burn video files to a CD or DVD, use the computer keyboard or move the computer while the computer is sensitive to a destination disc. NOTE: For details about using .
... to vibration. Do not use MyDVD. Select Start > All Programs > CyberLink DVD Suites > Power2Go. 2. To burn video files to a CD or DVD, use the computer keyboard or move the computer while the computer is sensitive to a destination disc. NOTE: For details about using .

External Devices - Windows Vista
Page 7
To add more information about device-specific software, refer to the computer. For more USB ports, connect an optional hub. 1 Using a USB device A USB port connects an optional external device, such as a USB keyboard, mouse, drive, printer, scanner, or hub, to the manufacturer's instructions. Some USB devices may require additional support software, which support USB 1.0, USB 1.1, and USB 2.0 devices. The computer has 3 USB ports which is usually included with the device.
To add more information about device-specific software, refer to the computer. For more USB ports, connect an optional hub. 1 Using a USB device A USB port connects an optional external device, such as a USB keyboard, mouse, drive, printer, scanner, or hub, to the manufacturer's instructions. Some USB devices may require additional support software, which support USB 1.0, USB 1.1, and USB 2.0 devices. The computer has 3 USB ports which is usually included with the device.

Pointing Devices and Keyboard - Windows Vista
Page 1
Pointing Devices and Keyboard User Guide
Pointing Devices and Keyboard User Guide
Pointing Devices and Keyboard - Windows Vista
Page 3
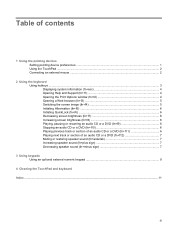
Table of contents 1 Using the pointing devices Setting pointing device preferences ...1 Using the TouchPad ...2 Connecting an external mouse ...2 2 Using the keyboard Using hotkeys ...3 Displaying system information (fn+esc 4 Opening Help and Support (fn+f1 4 Opening the Print Options window (fn+f2 4 Opening a Web browser (fn+f3 5 ...+asterisk 7 Increasing speaker sound (fn+plus sign 7 Decreasing speaker sound (fn+minus sign 7 3 Using keypads Using an optional external numeric keypad 9 4 Cleaning the TouchPad and keyboard Index ...11 iii
Table of contents 1 Using the pointing devices Setting pointing device preferences ...1 Using the TouchPad ...2 Connecting an external mouse ...2 2 Using the keyboard Using hotkeys ...3 Displaying system information (fn+esc 4 Opening Help and Support (fn+f1 4 Opening the Print Options window (fn+f2 4 Opening a Web browser (fn+f3 5 ...+asterisk 7 Increasing speaker sound (fn+plus sign 7 Decreasing speaker sound (fn+minus sign 7 3 Using keypads Using an optional external numeric keypad 9 4 Cleaning the TouchPad and keyboard Index ...11 iii

Pointing Devices and Keyboard - Windows Vista
Page 7
Increase screen brightness. Open a Web browser. Decrease screen brightness. 2 Using the keyboard Using hotkeys Hotkeys are discussed in the "Using the keyboard" sections. Function Display system information. Open Help and Support. Initiate Hibernation. Hotkey fn+esc fn+f1 fn+f2 fn+f3 fn+f4 fn+f5 fn+...
Increase screen brightness. Open a Web browser. Decrease screen brightness. 2 Using the keyboard Using hotkeys Hotkeys are discussed in the "Using the keyboard" sections. Function Display system information. Open Help and Support. Initiate Hibernation. Hotkey fn+esc fn+f1 fn+f2 fn+f3 fn+f4 fn+f5 fn+...

Pointing Devices and Keyboard - Windows Vista
Page 8
...fn+f1 to use a hotkey command on your computer ● Checkups for the Windows operating system, drivers, and the software provided on the computer keyboard, follow either of these steps: ● Briefly press the fn key, and then briefly press the second key of the active Windows program. ...4 Chapter 2 Using the keyboard fn++ Decrease system volume. Displaying system information (fn+esc) Press fn+esc to display information about using your computer, such as the BIOS date...
...fn+f1 to use a hotkey command on your computer ● Checkups for the Windows operating system, drivers, and the software provided on the computer keyboard, follow either of these steps: ● Briefly press the fn key, and then briefly press the second key of the active Windows program. ...4 Chapter 2 Using the keyboard fn++ Decrease system volume. Displaying system information (fn+esc) Press fn+esc to display information about using your computer, such as the BIOS date...
Pointing Devices and Keyboard - Windows Vista
Page 10
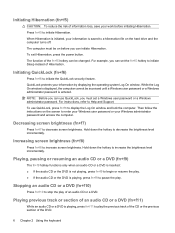
... power button. QuickLock protects your Windows administrator password and access the computer. For instructions, refer to pause the play of the DVD. 6 Chapter 2 Using the keyboard Then follow the instructions on the screen to enter your Windows user password or your information by displaying the operating system Log On window. While...
... power button. QuickLock protects your Windows administrator password and access the computer. For instructions, refer to pause the play of the DVD. 6 Chapter 2 Using the keyboard Then follow the instructions on the screen to enter your Windows user password or your information by displaying the operating system Log On window. While...
Pointing Devices and Keyboard - Windows Vista
Page 12
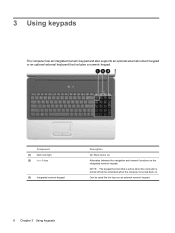
... that includes a numeric keypad. 3 Using keypads The computer has an integrated numeric keypad and also supports an optional external numeric keypad or an optional external keyboard that is active when the computer is turned off will be used like the keys on an external numeric keypad. 8 Chapter 3 Using keypads Component (1) Num...
... that includes a numeric keypad. 3 Using keypads The computer has an integrated numeric keypad and also supports an optional external numeric keypad or an optional external keyboard that is active when the computer is turned off will be used like the keys on an external numeric keypad. 8 Chapter 3 Using keypads Component (1) Num...
Pointing Devices and Keyboard - Windows Vista
Page 14
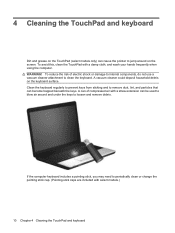
...this, clean the TouchPad with a damp cloth, and wash your hands frequently when using the computer. Clean the keyboard regularly to prevent keys from sticking and to clean the keyboard. To reduce the risk of compressed air with a straw extension can cause the pointer to jump around and ... to periodically clean or change the pointing stick cap. (Pointing stick caps are included with select models.) 10 Chapter 4 Cleaning the TouchPad and keyboard A can of electric shock or damage to internal components, do not use a vacuum cleaner attachment to remove dust, lint, and particles that ...
...this, clean the TouchPad with a damp cloth, and wash your hands frequently when using the computer. Clean the keyboard regularly to prevent keys from sticking and to clean the keyboard. To reduce the risk of compressed air with a straw extension can cause the pointer to jump around and ... to periodically clean or change the pointing stick cap. (Pointing stick caps are included with select models.) 10 Chapter 4 Cleaning the TouchPad and keyboard A can of electric shock or damage to internal components, do not use a vacuum cleaner attachment to remove dust, lint, and particles that ...
Pointing Devices and Keyboard - Windows Vista
Page 15
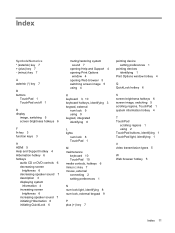
... system sound 7 opening Help and Support 4 opening Print Options window 4 opening Web browser 5 switching screen image 5 using 4 K keyboard 3, 10 keyboard hotkeys, identifying 3 keypad, external num lock 9 using 9 keypad, integrated identifying 8 L lights num lock 8 TouchPad 1 M maintenance keyboard 10 TouchPad 10 media controls, hotkeys 6 minus (-) key 7 mouse, external connecting 2 setting preferences 1 N num lock light, identifying...
... system sound 7 opening Help and Support 4 opening Print Options window 4 opening Web browser 5 switching screen image 5 using 4 K keyboard 3, 10 keyboard hotkeys, identifying 3 keypad, external num lock 9 using 9 keypad, integrated identifying 8 L lights num lock 8 TouchPad 1 M maintenance keyboard 10 TouchPad 10 media controls, hotkeys 6 minus (-) key 7 mouse, external connecting 2 setting preferences 1 N num lock light, identifying...
Multimedia - Windows Vista
Page 13
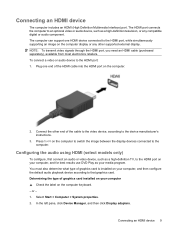
... Start > Computer > System properties. 2. Determining the type of graphics card is installed on the computer. 2. Connecting an HDMI device 9 Press fn+f4 on the computer keyboard. - NOTE: To transmit video signals through the HDMI port, you need an HDMI cable (purchased separately), available from most electronics retailers. Connect the other supported...
... Start > Computer > System properties. 2. Determining the type of graphics card is installed on the computer. 2. Connecting an HDMI device 9 Press fn+f4 on the computer keyboard. - NOTE: To transmit video signals through the HDMI port, you need an HDMI cable (purchased separately), available from most electronics retailers. Connect the other supported...
Power Management - Windows Vista
Page 5
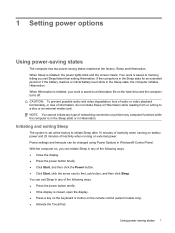
... if the battery reaches a critical battery level while in any computer functions while the computer is closed, open the display. ● Press a key on the keyboard or button on the hard drive and the computer turns off. Initiating and exiting Sleep The system is saved to initiate Sleep after 10 minutes...
... if the battery reaches a critical battery level while in any computer functions while the computer is closed, open the display. ● Press a key on the keyboard or button on the hard drive and the computer turns off. Initiating and exiting Sleep The system is saved to initiate Sleep after 10 minutes...
Service Guide
Page 4
... 4-2 Unknown user password 4-4 Component replacement procedures 4-5 Serial number 4-5 Computer feet 4-6 Battery 4-7 Optical drive 4-8 Hard drive 4-10 RTC battery 4-12 Memory module 4-13 WLAN module 4-15 Keyboard 4-17 Keyboard cover 4-20 Contents iv
... 4-2 Unknown user password 4-4 Component replacement procedures 4-5 Serial number 4-5 Computer feet 4-6 Battery 4-7 Optical drive 4-8 Hard drive 4-10 RTC battery 4-12 Memory module 4-13 WLAN module 4-15 Keyboard 4-17 Keyboard cover 4-20 Contents iv
Service Guide
Page 12
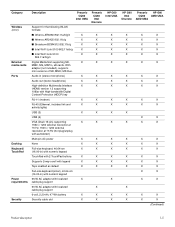
...slot X Presario CQ60 Intel Discrete HP G60 Intel UMA X X X X X X X X X X X X X X X X X X X X X X X X X X X X X X X X X X X X X X X X X X X X HP G60 Intel Discrete X X X X X X X X X X X X X X X X X X X X X X Presario HP G60 CQ60 AMD UMA AMD UMA X X X X X X X X X X X X X X X X X X X X X X X X X X X X X X X X X X X X X X X X X X X X X X (Continued) Product description 1-5 Category Wireless (cont.) External media cards Ports Docking Keyboard/ TouchPad Power requirements Security Description Presario...
...slot X Presario CQ60 Intel Discrete HP G60 Intel UMA X X X X X X X X X X X X X X X X X X X X X X X X X X X X X X X X X X X X X X X X X X X X HP G60 Intel Discrete X X X X X X X X X X X X X X X X X X X X X X Presario HP G60 CQ60 AMD UMA AMD UMA X X X X X X X X X X X X X X X X X X X X X X X X X X X X X X X X X X X X X X X X X X X X X X (Continued) Product description 1-5 Category Wireless (cont.) External media cards Ports Docking Keyboard/ TouchPad Power requirements Security Description Presario...
Service Guide
Page 24
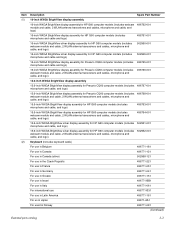
..., 2 WLAN antenna transceivers and cables, microphone and cable, and logo) 502950-001 16-inch WXGA BrightView silver display assembly for HP G60 computer models (includes 502949-001 microphone and cable and logo) 16-inch WXGA BrightView display assembly for Presario CQ60 computer models (includes...cable, and logo) 15.6-inch WXGA BrightView silver display assembly for HP G60 computer models (includes 502952-001 webcam module and cable, 2 WLAN antenna transceivers and cables, microphone and cable, and logo) Keyboard (includes keyboard cable) For use in Belgium 496771-181 For use in Canada ...
..., 2 WLAN antenna transceivers and cables, microphone and cable, and logo) 502950-001 16-inch WXGA BrightView silver display assembly for HP G60 computer models (includes 502949-001 microphone and cable and logo) 16-inch WXGA BrightView display assembly for Presario CQ60 computer models (includes...cable, and logo) 15.6-inch WXGA BrightView silver display assembly for HP G60 computer models (includes 502952-001 webcam module and cable, 2 WLAN antenna transceivers and cables, microphone and cable, and logo) Keyboard (includes keyboard cable) For use in Belgium 496771-181 For use in Canada ...

Service Guide
Page 25
... For use in the United Kingdom 496771-031 For use in the United States 496771-001 For use in the United States (silver) 502958-001 (3) Keyboard cover 506848-001 (4) Power button board (includes power button board cable) 496830-001 (5) Top cover (includes TouchPad board) 506849-001 (6) TouchPad on/off button board...
... For use in the United Kingdom 496771-031 For use in the United States 496771-001 For use in the United States (silver) 502958-001 (3) Keyboard cover 506848-001 (4) Power button board (includes power button board cable) 496830-001 (5) Top cover (includes TouchPad board) 506849-001 (6) TouchPad on/off button board...
Service Guide
Page 38
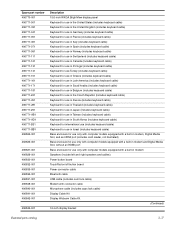
... (includes keyboard cable) Keyboard for use in France (includes keyboard cable) Keyboard for use in Italy (includes keyboard cable) Keyboard for use in Spain (includes keyboard cable) Keyboard for use in Norway (includes keyboard cable) Keyboard for use in Switzerland (includes keyboard cable) Keyboard for use in Canada (includes keyboard cable) Keyboard for use in Portugal (includes keyboard cable) Keyboard for use Turkey (includes keyboard cable) Keyboard for...
... (includes keyboard cable) Keyboard for use in France (includes keyboard cable) Keyboard for use in Italy (includes keyboard cable) Keyboard for use in Spain (includes keyboard cable) Keyboard for use in Norway (includes keyboard cable) Keyboard for use in Switzerland (includes keyboard cable) Keyboard for use in Canada (includes keyboard cable) Keyboard for use in Portugal (includes keyboard cable) Keyboard for use Turkey (includes keyboard cable) Keyboard for...


