

Getting Started - Windows 7
Page 6
Pinching/Zooming 24 Rotating 24 5 Maintenance Inserting or removing the battery ...25 Replacing or upgrading the hard drive 27 Removing the hard drive ...27 Installing the hard drive ...28 Adding or replacing memory modules 30 Updating programs and drivers ...33 Routine care ...33 Cleaning the display ...33 Cleaning the TouchPad and keyboard 33...
Pinching/Zooming 24 Rotating 24 5 Maintenance Inserting or removing the battery ...25 Replacing or upgrading the hard drive 27 Removing the hard drive ...27 Installing the hard drive ...28 Adding or replacing memory modules 30 Updating programs and drivers ...33 Routine care ...33 Cleaning the display ...33 Cleaning the TouchPad and keyboard 33...
Getting Started - Windows 7
Page 31
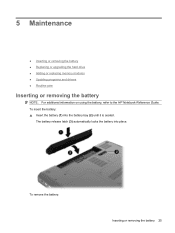
The battery release latch (3) automatically locks the battery into the battery bay (2) until it is seated. 5 Maintenance ● Inserting or removing the battery ● Replacing or upgrading the hard drive ● Adding or replacing memory modules ● Updating programs and drivers ● Routine care Inserting or removing the battery NOTE: For additional information on using the battery, refer to the HP Notebook Reference Guide. To remove the battery: Inserting or removing the battery 25 To insert the battery: ▲ Insert the battery (1) into place.
The battery release latch (3) automatically locks the battery into the battery bay (2) until it is seated. 5 Maintenance ● Inserting or removing the battery ● Replacing or upgrading the hard drive ● Adding or replacing memory modules ● Updating programs and drivers ● Routine care Inserting or removing the battery NOTE: For additional information on using the battery, refer to the HP Notebook Reference Guide. To remove the battery: Inserting or removing the battery 25 To insert the battery: ▲ Insert the battery (1) into place.
Getting Started - Windows 7
Page 36
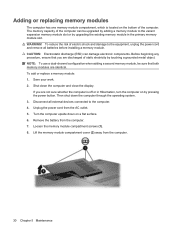
... down the computer through the operating system. 3. Lift the memory module compartment cover (2) away from the computer. 30 Chapter 5 Maintenance The memory capacity of static electricity by upgrading the existing memory module in Hibernation, turn the computer on the bottom of electric... shock and damage to the vacant expansion memory module slot or by touching a grounded metal object. ...
... down the computer through the operating system. 3. Lift the memory module compartment cover (2) away from the computer. 30 Chapter 5 Maintenance The memory capacity of static electricity by upgrading the existing memory module in Hibernation, turn the computer on the bottom of electric... shock and damage to the vacant expansion memory module slot or by touching a grounded metal object. ...

HP Notebook User Guide - SuSE Linux
Page 7
7 Drives Handling drives ...38 Replacing or upgrading the hard drive 39 Removing the hard drive ...39 Installing the hard drive ...40 Using optical drives (select models only 42 Identifying the installed optical ... ...42 8 External devices Using a USB device ...44 Connecting a USB device 44 Removing a USB device ...46 Using optional external devices ...46 Using optional external drives 46 9 Memory modules 10 Security Protecting the computer ...51 Using passwords ...51 Setting passwords in the operating system 52 11 Backup and Recovery Performing a system recovery ...54...
7 Drives Handling drives ...38 Replacing or upgrading the hard drive 39 Removing the hard drive ...39 Installing the hard drive ...40 Using optical drives (select models only 42 Identifying the installed optical ... ...42 8 External devices Using a USB device ...44 Connecting a USB device 44 Removing a USB device ...46 Using optional external devices ...46 Using optional external drives 46 9 Memory modules 10 Security Protecting the computer ...51 Using passwords ...51 Setting passwords in the operating system 52 11 Backup and Recovery Performing a system recovery ...54...

HP Notebook User Guide - SuSE Linux
Page 55
... Remove the battery from the AC outlet. 5. WARNING! 9 Memory modules The computer has one memory module compartment, which is off or in Hibernation, turn the computer on by upgrading the existing memory module in the primary memory module slot. CAUTION: Electrostatic discharge (ESD) can be sure ... located on a flat surface. 6. NOTE: To use a dual-channel configuration when adding a second memory module, be upgraded by adding a memory module to the vacant expansion memory module slot or by pressing the power button. If you are discharged of the computer. Disconnect all ...
... Remove the battery from the AC outlet. 5. WARNING! 9 Memory modules The computer has one memory module compartment, which is off or in Hibernation, turn the computer on by upgrading the existing memory module in the primary memory module slot. CAUTION: Electrostatic discharge (ESD) can be sure ... located on a flat surface. 6. NOTE: To use a dual-channel configuration when adding a second memory module, be upgraded by adding a memory module to the vacant expansion memory module slot or by pressing the power button. If you are discharged of the computer. Disconnect all ...
Compaq Presario CQ56 Notebook PC and HP G56 Notebook PC - Maintenance and Service Guide
Page 10
...in) HD CCFL BrightView (1366×768) 16:9 wide aspect ratio 2 customer-accessible/upgradable SODIMM slots Supports dual-channel memory DDR3, 1066 MHz Supports dual-channel memory DDR2, 800 MHz Supports up to 8 GB of system memory Supports the following configurations: ● 4096 MB (2048 MB × 2) ●...; 3072 MB (1024 MB × 1 + 2048 MB × 1) ● 2048 MB (2048 MB × 1) ● 2048 MB (1024 MB × 2) ● 1024 MB (1024 MB × 1) HP G56 AMD √ √ ...
...in) HD CCFL BrightView (1366×768) 16:9 wide aspect ratio 2 customer-accessible/upgradable SODIMM slots Supports dual-channel memory DDR3, 1066 MHz Supports dual-channel memory DDR2, 800 MHz Supports up to 8 GB of system memory Supports the following configurations: ● 4096 MB (2048 MB × 2) ●...; 3072 MB (1024 MB × 1 + 2048 MB × 1) ● 2048 MB (2048 MB × 1) ● 2048 MB (1024 MB × 2) ● 1024 MB (1024 MB × 1) HP G56 AMD √ √ ...

