
Setup Utility - Windows Vista and Windows 7
Page 10
...; Boot Order―Set the boot order for: ◦ USB Floppy ◦ Internal CD/DVD ROM drive ◦ USB CD/DVD ROM drive ◦ Hard drive ◦ USB Diskette on Key ◦ USB Hard drive ◦ Network adapter Diagnostics menu Select Hard Disk Self Test Secondary Hard Disk Self Test (select models only) Memory Test To do this menu option is in intervals of the Setup Utility in DC mode. Enable/disable LAN Power Saving. Enabled/disable Fan Always On. When enabled, the computer fan will always be on. NOTE: On models with two hard drives, this Change...
...; Boot Order―Set the boot order for: ◦ USB Floppy ◦ Internal CD/DVD ROM drive ◦ USB CD/DVD ROM drive ◦ Hard drive ◦ USB Diskette on Key ◦ USB Hard drive ◦ Network adapter Diagnostics menu Select Hard Disk Self Test Secondary Hard Disk Self Test (select models only) Memory Test To do this menu option is in intervals of the Setup Utility in DC mode. Enable/disable LAN Power Saving. Enabled/disable Fan Always On. When enabled, the computer fan will always be on. NOTE: On models with two hard drives, this Change...
Software Update, Backup and Recovery - Windows Vista
Page 5
Updating software Updated versions of this guide: 1. Most software and BIOS updates on the HP Web site are explained in compressed files called SoftPaqs. Install the updates. 1 Identify your permission or password for tasks such as installing applications, running utilities, or changing Windows settings. NOTE: The computer system BIOS is connected to a network, consult the network administrator before installing any software updates, especially system BIOS updates. Prepare for data transfer among hardware devices, including the time and date...
Updating software Updated versions of this guide: 1. Most software and BIOS updates on the HP Web site are explained in compressed files called SoftPaqs. Install the updates. 1 Identify your permission or password for tasks such as installing applications, running utilities, or changing Windows settings. NOTE: The computer system BIOS is connected to a network, consult the network administrator before installing any software updates, especially system BIOS updates. Prepare for data transfer among hardware devices, including the time and date...

Software Update, Backup and Recovery - Windows Vista
Page 6
... displaying BIOS information: 1. Downloading a BIOS update CAUTION: To prevent damage to the computer or an unsuccessful installation, download and install a BIOS update only when the computer is running on the screen to identify your selection to an optional power source. Follow the instructions on battery power, docked in an optional docking device, or connected to the hard drive. 2 Updating software You may need to select Exit > Exit Discarding Changes, and then press enter. b. To use the Setup Utility for Startup Menu...
... displaying BIOS information: 1. Downloading a BIOS update CAUTION: To prevent damage to the computer or an unsuccessful installation, download and install a BIOS update only when the computer is running on the screen to identify your selection to an optional power source. Follow the instructions on battery power, docked in an optional docking device, or connected to the hard drive. 2 Updating software You may need to select Exit > Exit Discarding Changes, and then press enter. b. To use the Setup Utility for Startup Menu...

Software Update, Backup and Recovery - Windows Vista
Page 8
... list of the device. 4 Updating software To do so, restart your specific product from the models listed. 4. Updating programs and drivers To download and install software other than a BIOS update, follow the instructions provided. Click Install now to step 6. 3. If you may be able to install. 7. NOTE: In some locations you want a specific SoftPaq, enter the SoftPaq number in the Search box, and then press enter. - Click the option for software and driver downloads, type your computer model number...
... list of the device. 4 Updating software To do so, restart your specific product from the models listed. 4. Updating programs and drivers To download and install software other than a BIOS update, follow the instructions provided. Click Install now to step 6. 3. If you may be able to install. 7. NOTE: In some locations you want a specific SoftPaq, enter the SoftPaq number in the Search box, and then press enter. - Click the option for software and driver downloads, type your computer model number...
Wireless (Select Models Only) - Windows Vista
Page 24
... listing for tasks such as installing software, running utilities, or changing Windows settings. Select Start > Computer > System properties. 2. Cannot connect to a WLAN If you have an integrated WLAN device, or the driver for the WLAN device is properly installed on troubleshooting WLANs, refer to improve the security of your computer. Refer to Help and Support for more information on your computer: NOTE: Windows includes the User Account Control...
... listing for tasks such as installing software, running utilities, or changing Windows settings. Select Start > Computer > System properties. 2. Cannot connect to a WLAN If you have an integrated WLAN device, or the driver for the WLAN device is properly installed on troubleshooting WLANs, refer to improve the security of your computer. Refer to Help and Support for more information on your computer: NOTE: Windows includes the User Account Control...
Drives - Windows Vista
Page 13
... not need access to use the computer, files on the hard drive become fragmented. After you start it, it to run more information. You may be prompted for tasks such as installing software, running utilities, or changing Windows settings. Using Disk Defragmenter 9 You may set it works without supervision. Disk Defragmenter consolidates the fragmented files and folders on a monthly schedule, but you can safely delete to free up disk space...
... not need access to use the computer, files on the hard drive become fragmented. After you start it, it to run more information. You may be prompted for tasks such as installing software, running utilities, or changing Windows settings. Using Disk Defragmenter 9 You may set it works without supervision. Disk Defragmenter consolidates the fragmented files and folders on a monthly schedule, but you can safely delete to free up disk space...
Drives - Windows Vista
Page 21
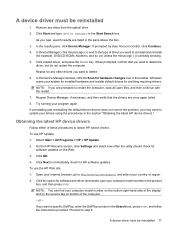
... the Device Manager window, click the Scan for example, DVD/CD-ROMs, Modems, and so on bottom of the display and on the service tag on ) unless the minus sign (-) is already showing. 5. To use HP Update: 1. or - Proceed to obtain HP device drivers. Click the option for software and driver downloads, type your country or region. 2. Click a listed driver, and press the Delete key. If prompted by User Account Control, click Continue...
... the Device Manager window, click the Scan for example, DVD/CD-ROMs, Modems, and so on bottom of the display and on the service tag on ) unless the minus sign (-) is already showing. 5. To use HP Update: 1. or - Proceed to obtain HP device drivers. Click the option for software and driver downloads, type your country or region. 2. Click a listed driver, and press the Delete key. If prompted by User Account Control, click Continue...
Drives - Windows Vista
Page 22
... Update. Click Security & Updates. 3. If prompted by User Account Control, click Continue. 5. Click Change settings and select a time for Microsoft Update to check for and install Microsoft device drivers when new devices are connected to get the latest updates for your specific product from the models listed. 4. Click Microsoft Update to your computer. Click Download only to save the file to install the updated driver without downloading the file. - When the list of the device...
... Update. Click Security & Updates. 3. If prompted by User Account Control, click Continue. 5. Click Change settings and select a time for Microsoft Update to check for and install Microsoft device drivers when new devices are connected to get the latest updates for your specific product from the models listed. 4. Click Microsoft Update to your computer. Click Download only to save the file to install the updated driver without downloading the file. - When the list of the device...
Drives - Windows Vista
Page 23
... 6 D device drivers HP drivers 17 Windows drivers 18 Disk Cleanup software 9 Disk Defragmenter software 9 disk performance 9 drives caring for 1 hard 10, 11 optical 2 drives, optical drive 3 DVD burning 7, 16 changing region setting 6 copying 7 drive 2 playing 5 removing 8 DVD drive 3 H hard disk drive installing 11 removing 10 replacing 10 hard drive installing 11 removing 10 replacing 10 M maintenance Disk Cleanup 9 Disk Defragmenter 9 O optical disc Blu-ray 5 removing 8 using 3, 4 optical drive identifying 2 P playing a CD or DVD 5 R region codes, DVD 6 S software Disk Cleanup 9 Disk...
... 6 D device drivers HP drivers 17 Windows drivers 18 Disk Cleanup software 9 Disk Defragmenter software 9 disk performance 9 drives caring for 1 hard 10, 11 optical 2 drives, optical drive 3 DVD burning 7, 16 changing region setting 6 copying 7 drive 2 playing 5 removing 8 DVD drive 3 H hard disk drive installing 11 removing 10 replacing 10 hard drive installing 11 removing 10 replacing 10 M maintenance Disk Cleanup 9 Disk Defragmenter 9 O optical disc Blu-ray 5 removing 8 using 3, 4 optical drive identifying 2 P playing a CD or DVD 5 R region codes, DVD 6 S software Disk Cleanup 9 Disk...
Multimedia - Windows Vista
Page 13
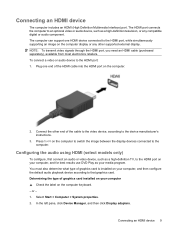
... media program. Connecting an HDMI device 9 NOTE: To transmit video signals through the HDMI port, you need an HDMI cable (purchased separately), available from most electronics retailers. Plug one HDMI device connected to the device manufacturer's instructions. 3. Press fn+f4 on your computer, and for best results use DVD Play as your computer, and then configure the default audio playback device according to the HDMI port: 1. Configuring the audio using HDMI (select models only) To configure, first connect an audio or video device...
... media program. Connecting an HDMI device 9 NOTE: To transmit video signals through the HDMI port, you need an HDMI cable (purchased separately), available from most electronics retailers. Plug one HDMI device connected to the device manufacturer's instructions. 3. Press fn+f4 on your computer, and for best results use DVD Play as your computer, and then configure the default audio playback device according to the HDMI port: 1. Configuring the audio using HDMI (select models only) To configure, first connect an audio or video device...
Multimedia - Windows Vista
Page 30
... driver downloads, type your hard drive. Proceed to install the updated driver without downloading the file. - Click Install now to step 6. 3. After the file is complete, and then verify the operation of the device. This Windows feature can obtain the latest Windows device drivers by User Account Control, click Continue. 26 Chapter 7 Troubleshooting To use the HP Web site: 1. or - Click your country or region. 2. If you want a specific SoftPaq, enter the SoftPaq number...
... driver downloads, type your hard drive. Proceed to install the updated driver without downloading the file. - Click Install now to step 6. 3. After the file is complete, and then verify the operation of the device. This Windows feature can obtain the latest Windows device drivers by User Account Control, click Continue. 26 Chapter 7 Troubleshooting To use the HP Web site: 1. or - Click your country or region. 2. If you want a specific SoftPaq, enter the SoftPaq number...
Power Management - Windows Vista
Page 5
... computer turns off. When Hibernation is initiated, your work is closed, open the display. ● Press a key on the keyboard or button on external power. You can be changed using Power Options in any computer functions while the computer is saved to a hibernation file on battery power and 25 minutes of the following ways: ● Press the power button briefly. ● If the display is saved to a disc or an external media card.
... computer turns off. When Hibernation is initiated, your work is closed, open the display. ● Press a key on the keyboard or button on external power. You can be changed using Power Options in any computer functions while the computer is saved to a hibernation file on battery power and 25 minutes of the following ways: ● Press the power button briefly. ● If the display is saved to a disc or an external media card.

Power Management - Windows Vista
Page 20
... battery level. 1. Select Start > Control Panel > System and Maintenance > Power Options. 2. Step 5: Reenable Hibernation and Sleep CAUTION: Failure to reenable Hibernation after calibration may result in the notification area, and then click More power options. - Under the current power plan, click Change plan settings. 3. Plug the computer into external power and maintain external power until the battery is fully charged and the battery light has turned off , turn it on -screen instructions. 16 Chapter 2 Using battery power Click Restore default settings...
... battery level. 1. Select Start > Control Panel > System and Maintenance > Power Options. 2. Step 5: Reenable Hibernation and Sleep CAUTION: Failure to reenable Hibernation after calibration may result in the notification area, and then click More power options. - Under the current power plan, click Change plan settings. 3. Plug the computer into external power and maintain external power until the battery is fully charged and the battery light has turned off , turn it on -screen instructions. 16 Chapter 2 Using battery power Click Restore default settings...

Power Management - Windows Vista
Page 24
... procedures in Hibernation, you are unable to the Lock button. 3. Click Start, and then click the arrow next to use the preceding shutdown procedures, try the following conditions: ● When you need to replace the battery or access components inside the computer ● When you are connecting an external hardware device that does not connect to a USB port ● When the computer will be unused...
... procedures in Hibernation, you are unable to the Lock button. 3. Click Start, and then click the arrow next to use the preceding shutdown procedures, try the following conditions: ● When you need to replace the battery or access components inside the computer ● When you are connecting an external hardware device that does not connect to a USB port ● When the computer will be unused...

Pointing Devices and Keyboard - Windows Vista
Page 11
... display to monitor display to open your information by the fn+f4 hotkey: ● LCD (computer display) ● External VGA (most external monitors) ● HDMI (televisions, camcorders, DVD players, VCRs, and video capture cards with HDMI ports) Initiating Hibernation (fn+f5) CAUTION: To reduce the risk of the active Windows program. Press fn+f5 to open the Print Options window of information loss, save your Internet or network services, the fn+f3 hotkey opens the Windows Internet Connection Wizard. Using hotkeys...
... display to monitor display to open your information by the fn+f4 hotkey: ● LCD (computer display) ● External VGA (most external monitors) ● HDMI (televisions, camcorders, DVD players, VCRs, and video capture cards with HDMI ports) Initiating Hibernation (fn+f5) CAUTION: To reduce the risk of the active Windows program. Press fn+f5 to open the Print Options window of information loss, save your Internet or network services, the fn+f3 hotkey opens the Windows Internet Connection Wizard. Using hotkeys...

Pointing Devices and Keyboard - Windows Vista
Page 14
... performs the function indicated by using the fn key or the fn+shift key combination. ● To change the function of a keypad key to whether num lock is on or off. (Num lock is turned off at the factory.) For example: ● When num lock is turned on . NOTE: The embedded numeric keypad will not function while an external keyboard or numeric keypad is turned on . Enabling and disabling the...
... performs the function indicated by using the fn key or the fn+shift key combination. ● To change the function of a keypad key to whether num lock is on or off. (Num lock is turned off at the factory.) For example: ● When num lock is turned on . NOTE: The embedded numeric keypad will not function while an external keyboard or numeric keypad is turned on . Enabling and disabling the...
HP G50 Notebook PC and Compaq Presario CQ50 Notebook PC - Maintenance and Service Guide
Page 95
... enter. 3. While the "Press the ESC key for Startup Menu" message is already running , begin at step 1. If the Setup Utility is displayed in the lower-left corner of the screen, press f10. - or - When the Setup Confirmation is displayed, press f10. 2. NOTE: Your password, security, and language settings are not changed when you restore the factory default settings. Open the Setup Utility by turning on or restarting the computer. Open the Setup Utility...
... enter. 3. While the "Press the ESC key for Startup Menu" message is already running , begin at step 1. If the Setup Utility is displayed in the lower-left corner of the screen, press f10. - or - When the Setup Confirmation is displayed, press f10. 2. NOTE: Your password, security, and language settings are not changed when you restore the factory default settings. Open the Setup Utility by turning on or restarting the computer. Open the Setup Utility...
HP G50 Notebook PC and Compaq Presario CQ50 Notebook PC - Maintenance and Service Guide
Page 145
... Bluetooth module cable, spare part number 18, 27, 29, 71 boot options 91 boot order 91 bottom components 13 button components 7 button sound 91 buttons power 7 TouchPad 9 C cables, service considerations 33 Card Reader Power Saving 91 changing the Setup Utility language 85 chipset, product description 2 CMOS clearing 37 components bottom 13 buttons 7 display 6 front 10 keys 8 left-side 12 rear 11 right-side 11 top 6 TouchPad 9 computer feet locations 39 spare part number 39 computer specifications 93 connectors power 12 service considerations 33 D Diagnostics menu 92...
... Bluetooth module cable, spare part number 18, 27, 29, 71 boot options 91 boot order 91 bottom components 13 button components 7 button sound 91 buttons power 7 TouchPad 9 C cables, service considerations 33 Card Reader Power Saving 91 changing the Setup Utility language 85 chipset, product description 2 CMOS clearing 37 components bottom 13 buttons 7 display 6 front 10 keys 8 left-side 12 rear 11 right-side 11 top 6 TouchPad 9 computer feet locations 39 spare part number 39 computer specifications 93 connectors power 12 service considerations 33 D Diagnostics menu 92...
HP G50 Notebook PC and Compaq Presario CQ50 Notebook PC - Maintenance and Service Guide
Page 147
... 2 diskette drive 3 display panel 2 docking support 4 Ethernet 3 external media cards 4 graphics 2 hard drives 3 keyboard 4 memory module 2 microphone 3 modem module 3 operating system 4 optical drives 3 pointing devices 4 ports 4 power requirements 4 processors 1 product name 1 security 4 serviceability 5 webcam 3 wireless 3 product name 1 R rear component 11 recovering a program or driver 119 recovering from the dedicated recovery partition 123 recovering from the recovery discs 123 recovery discs 119 Recovery Manager 119, 123 recovery partition 119 recovery, system 123 removal/replacement...
... 2 diskette drive 3 display panel 2 docking support 4 Ethernet 3 external media cards 4 graphics 2 hard drives 3 keyboard 4 memory module 2 microphone 3 modem module 3 operating system 4 optical drives 3 pointing devices 4 ports 4 power requirements 4 processors 1 product name 1 security 4 serviceability 5 webcam 3 wireless 3 product name 1 R rear component 11 recovering a program or driver 119 recovering from the dedicated recovery partition 123 recovering from the recovery discs 123 recovery discs 119 Recovery Manager 119, 123 recovery partition 119 recovery, system 123 removal/replacement...
HP G50 Notebook PC and Compaq Presario CQ50 Notebook PC - Maintenance and Service Guide
Page 148
... listing 103 secondary hard drive self test 92 security cable slot 11 Security menu 90 security, product description 4 selecting in the Setup Utility 86 serial number 14, 38 service considerations 32 serviceability, product description 5 Setup Utility overview 85 solid-state drive (SSD) 119, 123 speakers removal 72 spare part number 17, 29, 72 specifications Blu-ray BD-ROM with SuperMulti DVD±RW and CDRW Double-Layer Combo Drive 97 computer 93 display...
... listing 103 secondary hard drive self test 92 security cable slot 11 Security menu 90 security, product description 4 selecting in the Setup Utility 86 serial number 14, 38 service considerations 32 serviceability, product description 5 Setup Utility overview 85 solid-state drive (SSD) 119, 123 speakers removal 72 spare part number 17, 29, 72 specifications Blu-ray BD-ROM with SuperMulti DVD±RW and CDRW Double-Layer Combo Drive 97 computer 93 display...


